Difference between revisions of "Visualizing Images: Displaying images using the default view"
(→Displaying images using the default view) |
(→Displaying images using the default view) |
||
| (4 intermediate revisions by the same user not shown) | |||
| Line 1: | Line 1: | ||
| − | == Displaying images using the default view | + | =Index= |
| + | *[[Visualizing Images:Displaying images using the default view: Magnifying and minifying images|"Magnifying and minifying images"]] | ||
| + | *[[Visualizing Images: Displaying images using the default view: Viewing two images together|"Viewing two images together"]] | ||
| + | *[[Visualizing Images: Displaying images using the default view:Changing image brightness and contrast using LUTs|"Changing image brightness and contrast using LUTs"]] | ||
| − | + | ||
| + | |||
| + | |||
| + | |||
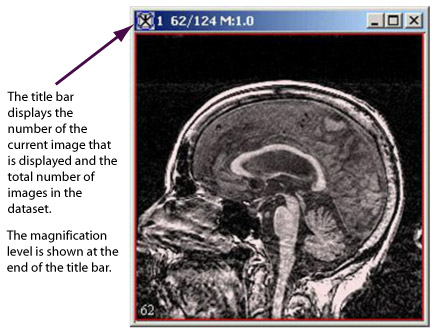
| + | When you initially open or load an image dataset, it appears in the image window showing the default view (Figure 2).<br /> | ||
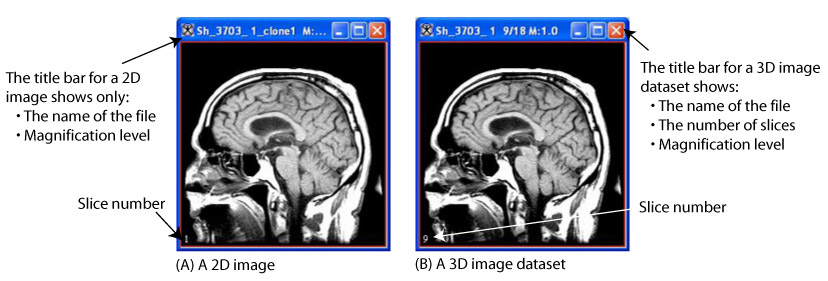
If you display a 2D image dataset, the title bar only displays the name of the file and the magnification level only. If you open an image dataset that has more than two dimensions, the title bar displays the name of the file, the position of the image in the dataset, the total number of images in the dataset, and the magnification level. | If you display a 2D image dataset, the title bar only displays the name of the file and the magnification level only. If you open an image dataset that has more than two dimensions, the title bar displays the name of the file, the position of the image in the dataset, the total number of images in the dataset, and the magnification level. | ||
{| border="1" cellpadding="5" | {| border="1" cellpadding="5" | ||
| − | |+ | + | |+ '''Figure 2. Image window showing the default view for a 2D image''' |
|- | |- | ||
| | | | ||
| Line 13: | Line 20: | ||
Datasets with more than two dimensions typically contain many image slices. To manually advance through datasets that contain more than one image, you can use the image slice slider or [[Image:iconDecrementsImageSlice.jpg]] , the Decrements image slice icon, or [[Image:iconIncrementsImageSlice.jpg]] , the Increments image slice icons in the MIPAV window (Figure 4). You can also use the lightbox view to find and display a particular slice in the image dataset in the default view (refer to "Using the lightbox view to update the image slice displayed in the default view"). | Datasets with more than two dimensions typically contain many image slices. To manually advance through datasets that contain more than one image, you can use the image slice slider or [[Image:iconDecrementsImageSlice.jpg]] , the Decrements image slice icon, or [[Image:iconIncrementsImageSlice.jpg]] , the Increments image slice icons in the MIPAV window (Figure 4). You can also use the lightbox view to find and display a particular slice in the image dataset in the default view (refer to "Using the lightbox view to update the image slice displayed in the default view"). | ||
| − | |||
| − | |||
{| border="1" cellpadding="5" | {| border="1" cellpadding="5" | ||
| − | |+ | + | |+ '''Figure 3. Image window showing (A) a 2D image, or slice, and (B) an image dataset that has more than two dimensions. ''' |
|- | |- | ||
| | | | ||
Latest revision as of 19:29, 17 February 2012
Index
- "Magnifying and minifying images"
- "Viewing two images together"
- "Changing image brightness and contrast using LUTs"
When you initially open or load an image dataset, it appears in the image window showing the default view (Figure 2).
If you display a 2D image dataset, the title bar only displays the name of the file and the magnification level only. If you open an image dataset that has more than two dimensions, the title bar displays the name of the file, the position of the image in the dataset, the total number of images in the dataset, and the magnification level.
Datasets with more than two dimensions typically contain many image slices. To manually advance through datasets that contain more than one image, you can use the image slice slider or ![]() , the Decrements image slice icon, or
, the Decrements image slice icon, or ![]() , the Increments image slice icons in the MIPAV window (Figure 4). You can also use the lightbox view to find and display a particular slice in the image dataset in the default view (refer to "Using the lightbox view to update the image slice displayed in the default view").
, the Increments image slice icons in the MIPAV window (Figure 4). You can also use the lightbox view to find and display a particular slice in the image dataset in the default view (refer to "Using the lightbox view to update the image slice displayed in the default view").
Visualizing Images:Displaying images using the default view: Magnifying and minifying images

