Swap slices and swap volumes
Contents
Background
Both Swap Slices and Swap Volumes allow the user to select slices and volumes and to insert selected slices\volumes into different locations in the image.
Why swap slices and volumes?
In DTI scanning B0 volume (the volume made without a b pulse) is used for creating a whole-brain mask, which is used to determine which voxels to include into analysis. For most of MRI scanners B0 is either the fist or the last recorded volume, but some scanners put B0 is some different places. The easiest way to move B0 volume to the beginning or to the end of the image is by using the Swap Volumes tool.
The Swap Slices tool is helpful when the user needs to remove\replace a bunch of slices from the beginning or from the end of image (or both). For example in brain MRI, researches are interested mostly in analyzing internal slices. The same applies to microscopy where first and last slices are usually out of focus.
Swap Slices
The Swap Slices tool is available via Utilities > 3D Slice Tools > Swap Slices. The tool could be run for both 3D and 4D images. In case of a 4D image it interchanges (swaps) slices around all volumes in the image.
Running Swap Slices for 3D images
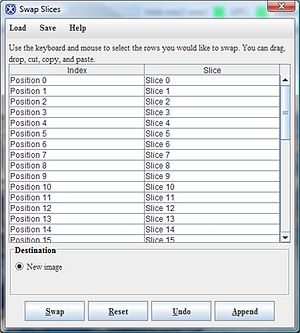
To run the Swap Slices tool, open an image of interest and call the tool via the Utilities > 3D Slice Tools > Swap Slices menu. That Swap Slices dialog box appears.
In the dialog box one can see 2 columns - the right column contains slice numbers and the left column contains position numbers.
Slice number is the number of the slice as it encoded in the image header.
Position number is the position of the slice in the image. It shows where exactly in the image the slice is located. For the image that did not undergone any slice swapping the position number and the slice number are the same.
To copy and paste a slice to another position:
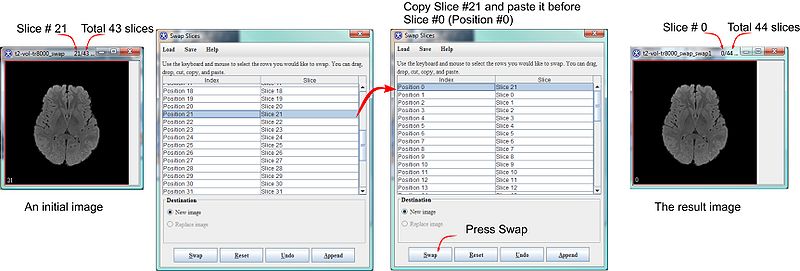
For example, we have a 3D image with 43 slices and we would like to copy slice #21 to position #0. In order to do that:
- In the Swap Slices dialog box, select slice 21 and press Crt+C (for PC) or Control+C (for Mac);
- Navigate to the position #0, and press Ctrl+V (for PC) or Control+V (for Mac);
- In the dialog box, you will see that Position #0 now corresponds to the slice #21;
- To save your changes, press Swap. The new image that has 44 slices appears on your desktop.
Note that the correlation between slice number and position number would be restored in the new image after you press Swap and the new image appears on your desktop. That means that the slice #21 on the position #0 in the original image would be slice #0 on the position #0 in the new image.
Please see the figure below that shows the whole process.
What if you need to swap several slices?
In order to copy and paste a bunch of slices, select slices using the Ctrl+left mouse button combination of keys first, and then follow the same procedure described in the section above.
To move a slice to another position:
To move a slice (or slices), you need to use a combination of cut and paste.
- First select the slice(s) and cut it using Crt+X (for PC) or Control+X (for Mac) combination of keys.
- Then navigate to the position where you want to place the slice(s) and press Ctrl+V (for PC) or Control+V (for Mac). Note that the slice appears before the position you selected.
- Press Swap. The new image that has a bunch of slices moved to another position(s) appears on your desktop.
Note that the correlation between the slice number and its position number would be restored in the new image that appears on your desktop. E.g. slice #1 - position #1, slice #2 - position #2, ... slice #n - position #n.
Swap Volumes
The Swap Volumes tool is available via Utilities > 4D Slice Tools > Swap Volumes. The tool could be run for 4D images.
Running Swap Volumes
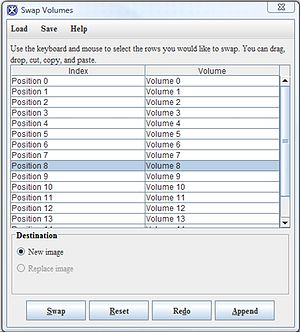
To run the Swap Volumes tool, open an image of interest and call the tool via the Utilities > 4D Slice Tools > Swap Volumes menu. The Swap Volumes dialog box appears.
In the dialog box one can see 2 columns - the right column contains volume numbers and the left column contains position numbers.
Volume number is the number of the slice as it encoded in the image header.
Position number is the position of the volume in the image. It shows where exactly in the volume is located. For the image that did not undergone any volume swapping the position number and the volume number are the same.
To copy and paste a slice to another position:
For example, we have a 4D image with 16 slices and we would like to copy volume #16 to Position #0. In order to do that:
- In the Swap Volumes dialog box, select volume #16 and press Crt+C (for PC) or Control+C (for Mac);
- Navigate to the position #0, and press Ctrl+V (for PC) or Control+V (for Mac);
- In the dialog box, you will see that position #0 now corresponds to volume #16;
- To save your changes, press Swap. The new image that has 17 volumes appears on your desktop.
Note that the correlation between the volume number and position number would be restored in the new image after you press Swap and the new image appears on your desktop. That means that the volume #16 on the position #0 in the original image would be volume #0 on the position #0 in the new image.
New image name
The new image (the one that was saved after swapping) has the same name as the original image plus _swap_ addition to its name. For example, if the initial image name was t2-vol-tr800, the new image after undergoing a single swap operation will have a name t2-vol-tr800_swap. If you apply another swap operation to the t2-vol-tr800_swap image, the new image will have the name t2-vol-tr800_swap_swap (with 2 swaps).
Comment
Help needs to be created so that user can
understand the interface, the scripting parameters, and the result images.

