From MIPAV
Masking (filling) images
Masks allow you to remove portions of images and display only those portions as separate image files. For example, you may only be interested in a section of an image and only want to display and work with that section.
To create a mask, you first, need to create one or more VOIs on the image. Depending on the type of mask you want to create, the VOIs should do either of the following:
Enclose the image areas you want to preserve
Enclose the image areas you do not want to preserve
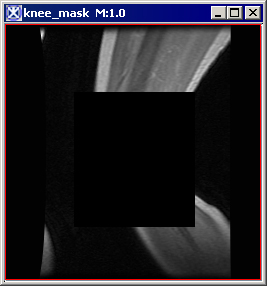
If the VOIs indicate the areas of the image that should be deleted from the image, you need to create an interior mask and specify the number of pixels the program should use to hide the image inside the VOIs, or interior ([MIPAV_Utilities.html#1200171 Figure 239]-B).
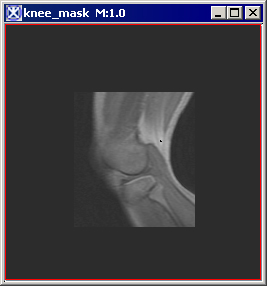
To preserve the image inside the VOIs, however, you need to create an exterior mask. An exterior mask fills the image outside of the VOIs with the number of pixels you specify. This filling hides the portions of the image outside the VOIs, or exterior ([MIPAV_Utilities.html#1200171 Figure 239]-C).
|
{| align="center"
|
|
A
|
{| align="center"
|
|}
B
|
{| align="center"
|
|}
|-
| rowspan="1" colspan="3" |
Â
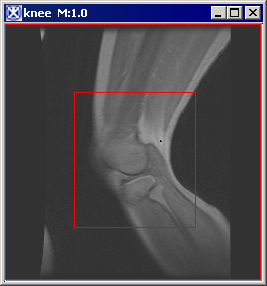
Figure 239. An original image (A), interior mask (B) and exterior mask (C)
|}
To create an interior mask
1 Open an image.
2 Create one or more VOIs that enclose the portions of the image that interest you.
3 Select Utilities > Fill. The Fill dialog box ([MIPAV_Utilities.html#1173369 Figure 240]) opens.
4 Type the number of pixels to fill the interior of the VOIs.
5 Select Interior fill.
6 Select either New Image or Replace Image depending on which you prefer.
7 Click OK. The program either displays a new image or replaces the current image with an image that hides the portions of the image that are inside the VOIs ([MIPAV_Utilities.html#1200178 Figure ]-B).
To create an exterior mask
1 Open an image.
2 Create one or more VOIs that enclose the portions of the image that interest you.
3 Select Utilities > Fill. The Mask dialog box ([MIPAV_Utilities.html#1173369 Figure 240]) opens.
4 Type the number of pixels to fill the interior of the VOIs.
5 Select Exterior fill.
6 Select either New Image or Replace Image depending on which you prefer.
7 Click OK. The program either displays a new image or replaces the current image with an image that hides the exterior of the image outside the VOIs ([MIPAV_Utilities.html#1200178 Figure ]-C).
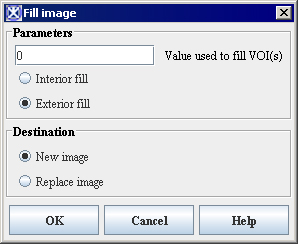
Figure 240. The Fill Image dialog box
|
Parameters
|
Specifies the value in pixels to fill the VOI.
|
{| align="center"
|
|
|-
|
Interior fill
|
Applies the value to the interior of the VOI.
|-
|
Exterior fill
|
Applies the value to the exterior of the VOI.
|-
|
New image
|
Shows the cropped image in a new image window.
|-
|
Replace image
|
Replaces the current active image with the cropped image.
|-
|
OK
| rowspan="1" colspan="2" |
Applies the parameters that you specified to mask the image.
|-
|
Cancel
| rowspan="1" colspan="2" |
Disregards any changes you made in this dialog box, closes the dialog box, and does not mask the image.
|-
|
Help
| rowspan="1" colspan="2" |
Displays online help for this dialog box.
|}


