From MIPAV
Inserting slices into image datasets
When you change an image dataset, you are inserting or removing slices in the dataset or changing their order.
You can use the Insert Slice command on the Utilities menu to insert a slice into an image dataset. Although you cannot insert a slice from another file, you can insert either a blank slice or a new slice that is an average of two adjacent slices in the dataset.
To insert slices into image datasets
1 Select Utilities Slice Tools> Insert Slice. The Insert Slice dialog box appears.
2 Enter the number of the new slice position in the Insert before slice (1-124) or enter 125 for new last slice box.
3 Select either the Average or Blank radio button. If you select Average, MIPAV analyzes the slices immediately before and after the new slice in the dataset. The software then generates an intermediary composite by morphing the two slices. This composite becomes the new slice. If you select Blank, MIPAV inserts a blank slice in the dataset.
4 Click OK. MIPAV inserts the new slice into the dataset and opens the new dataset in a new image window.
Figure 280. The Insert Slice dialog box optionsÂ
|
Insert before slice (1-124) or enter 125 for new last slice
|
Specifies the position of the new slice.
|
|
|
Average
|
Inserts a slice that is the average the adjacent slices.
|
|
Copy previous adjacent
|
Insert a slice that is a copy of the preceding slice.
|
|
Copy next adjacent
|
Inserts a slice that is a copy of the following slice.
|
|
Blank
|
Inserts a blank slice.
|
|
Original
|
Inserts an image from the original dataset.
|
|
OK
|
Applies the parameters that you specified to insert the slice in the image dataset.
|
|
Cancel
|
Disregards any changes you made in this dialog box, closes the dialog box, and does not insert the slice into the image dataset.
|
|
Help
|
Displays online help for this dialog box.
|
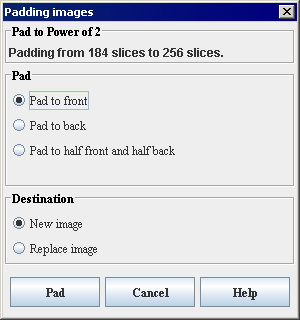
Pad slices to power of 2
The utility pads an image with blank slices to an even power of 2 (e.g. 22k). Depending on the selected option (Pad to Front, Pad to Back, or Pad to Half Front and Back), all slices can be inserted in front, in back, or half the slices in front and half the slices in back.
Image types
The algorithm works with 3D and 4D, grayscale, black and white, and color images. It preserves the image type when inserts slices.
Applying the pad to power of 2 utility
To pad the image dataset to power of 2
1 Select Utilities > Slice tools>Pad to Power of 2. The Padding Images dialog box opens.
2 The dialog box window appears indicating how many slices should be added to the image.
3 Choose the method for slice insertion: Pad to Front, Pad to Back, or Pad to Half Front and Half Back.
4 Select the destination. Choose New Image if you want the image with inserted slices appear in a new image frame; choose Replace Image to replace the original image.
5 Click Pad to proceed.
|
Pad to Front
|
Inserts slices before the first slice of the image.
|
{| align="center"
|
|
|-
|
Pad to Back
|
Inserts slices after the last slice of the image.
|-
|
Copy previous adjacent
|
Insert a slice that is a copy of the preceding slice.
|-
| rowspan="1" colspan="2" |
Destination
|-
|
Pad to half front and half back
|
Inserts half of the slices before the first slice of the image and half after the last slice.
|-
|
New Image
| rowspan="1" colspan="2" |
Opens the modified image in a new image frame.
|-
|
Replace image
| rowspan="1" colspan="2" |
Replaces the existing image.
|-
|
Pad
| rowspan="1" colspan="2" |
Applies the parameters that you specified to insert the slices in the image dataset.
|-
|
Cancel
| rowspan="1" colspan="2" |
Disregards any changes you made in this dialog box, closes the dialog box, and does not insert the slice into the image dataset.
|-
|
Help
| rowspan="1" colspan="2" |
Displays online help for this dialog box.
|-
| rowspan="1" colspan="3" |
Figure 281. The Padding Images dialog box optionsÂ
|}
Randomizing image (slice) order
To randomize the order of slices in the image dataset, do the following:
1 Open an image that contains slices.
2 Write the slice numbers on a piece of paper.
3 Select Utilities > Slice Tools>Randomize Slice Order.
4 The MIPAV window refreshes and, depending on your selection, the new dataset appears in the same image window as the original dataset.
The new randomized slice ordering appears as a table in the Output window.
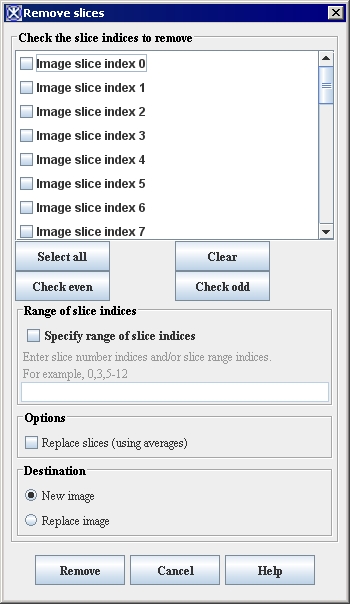
Removing images (slices) from datasets
MIPAV allows you to remove one, several, or all slices from an image dataset. In addition, you can specify one or more ranges of slices to remove, or slice removal can include only the even-numbered or only the odd-numbered slices.
To remove slices from datasets
1 Select Utilities > Remove slices. The Remove Slices dialog box opens.
2 Use the image slider in the MIPAV window to locate slices that you want to remove.
3 Decide whether to remove:
One or more slices
Most of the slices
One or more ranges of slices
All even-numbered slices
All odd-numbered slices
Tip: Use the image slider on the MIPAV window to look at specific slices to decide which slices to remove.
4 Select one of the following:
New image-If the new image dataset should appear in its own image window
Replace image-If the dataset should overwrite the original dataset and appear in the original image window
5 Select Remove. A status message appears. Then the MIPAV window refreshes and, depending on your selection, the new dataset appears in either a new image window or in the same image window as the original dataset.
Figure 282. Remove Slices dialog boxÂ
|
Slices
|
Indicates the slices that you want to remove from the dataset. You can scroll through the list to select one or more slices.
|
Â
{| align="center"
|
|
|-
|
Select all
|
Selects all of the slices in the dataset.
|-
|
Clear
|
Clears all of the slices that are currently selected.
|-
|
Check even
|
Selects all of the even-numbered slices.
|-
|
Check odd
|
Selects all of the odd-numbered slices.
|-
|
Specify range of slices
|
Indicates that you want to remove one or more slices or a range of slices from the dataset.
If you select this check box, you must specify the slices or ranges of slices you want to remove. in the Slice number or range of slices box below.
|-
|
Replace slices
| rowspan="1" colspan="2" |
If you select that option, the removed slices would be replaced using the average method.
|-
|
New image
| rowspan="1" colspan="2" |
Shows the results of the slice removal in a new image window.
|-
|
Replace image
| rowspan="1" colspan="2" |
Replaces the current active dataset with the dataset resulting from the slice removal in the same image window.
|-
|
Remove
| rowspan="1" colspan="2" |
Removes the slices that you indicated in this dialog box.
|-
|
Cancel
| rowspan="1" colspan="2" |
Disregards any changes that you made in this dialog box and closes the dialog box.
|-
|
Help
| rowspan="1" colspan="2" |
Displays online help for this dialog box.
|}
The algorithm replaces blank slices with slices that carry average pixel values calculated from the neighbor slices. The algorithm, first, counts the number of consecutive blank slices, and then does the following:
To run the algorithm, call Utilities >Slice Tools> Replace Blanks with Averages.


