Difference between revisions of "Correcting image spacing"
(Created page with '== Correcting image spacing == <div style="font-style: normal; font-weight: normal; margin-bottom: 6pt; margin-left: 0pt; margin-right: 0pt; margin-top: 0pt; text-align: left; t...') |
(→Understanding contiguous planes' effect on image scanning) |
||
| Line 5: | Line 5: | ||
==== Understanding contiguous planes' effect on image scanning ==== | ==== Understanding contiguous planes' effect on image scanning ==== | ||
| − | <div style="font-style: normal; font-weight: normal; margin-bottom: 6pt; margin-left: 0pt; margin-right: 0pt; margin-top: 0pt; text-align: left; text-decoration: none; text-indent: 0pt; text-transform: none; vertical-align: baseline"><font color="#000000"> Image scanning is usually done in contiguous planes. For example, if the first slice is centered at position 5.0 and the slices are 2 mm thick, the second slice is centered at 7.0. In such a case, the slice thickness, 2, and the slice spacing, 2, are equal. There are, however, two scenarios when the slice spacing does not equal the slice thickness:<br /></font></div><div style="font-style: normal; font-weight: normal; margin-bottom: 0pt; margin-left: 24pt; margin-right: 0pt; margin-top: 5pt; text-align: left; text-decoration: none; text-indent: -24pt; text-transform: none; vertical-align: baseline"><font color="#000000"> <span style="font-style: normal; text-decoration: none; text-transform: none; vertical-align: baseline">'''<font color="#000000">Slice spacing is less than the slice thickness</font>'''</span>-In this case, although the images are, for example, | + | <div style="font-style: normal; font-weight: normal; margin-bottom: 6pt; margin-left: 0pt; margin-right: 0pt; margin-top: 0pt; text-align: left; text-decoration: none; text-indent: 0pt; text-transform: none; vertical-align: baseline"><font color="#000000"> Image scanning is usually done in contiguous planes. For example, if the first slice is centered at position 5.0 and the slices are 2 mm thick, the second slice is centered at 7.0. In such a case, the slice thickness, 2, and the slice spacing, 2, are equal. There are, however, two scenarios when the slice spacing does not equal the slice thickness:<br /></font></div><div style="font-style: normal; font-weight: normal; margin-bottom: 0pt; margin-left: 24pt; margin-right: 0pt; margin-top: 5pt; text-align: left; text-decoration: none; text-indent: -24pt; text-transform: none; vertical-align: baseline"><font color="#000000"> <span style="font-style: normal; text-decoration: none; text-transform: none; vertical-align: baseline">'''<font color="#000000">Slice spacing is less than the slice thickness</font>'''</span>-In this case, although the images are, for example, 2 mm thick, they are spaced only 1Â mm apart (Figure 13). This scenario arises when the ZIP x 2 feature is used during MRI scanning, which enables the acquisition of slices only 1 mm apart but uses signals from a 2-mm slab to increase the signal-to-noise ratio.<br /></font></div><div style="font-style: normal; font-weight: normal; margin-bottom: 0pt; margin-left: 24pt; margin-right: 0pt; margin-top: 5pt; text-align: left; text-decoration: none; text-indent: -24pt; text-transform: none; vertical-align: baseline"><font color="#000000"> <span style="font-style: normal; text-decoration: none; text-transform: none; vertical-align: baseline">'''<font color="#000000">Slice spacing is greater than the slice thickness</font>'''</span>-This scenario (Figure 13), which is more common than the first, occurs when the operator chooses to acquire images at intervals greater than the slice thickness (i.e., there is a gap between successive image slices) in order to cover a deeper field of view.<br /></font></div> |
MIPAV assumes that successive images are contiguous. So, for example, if users chose the triplanar view to display an image that had slice spacing larger than slice thickness, the image would appear shortened in the out-of-plane direction. The Correct Image Spacing utility corrects both situations in which the slice thickness and spacing are not equal. Once the correction is applied, the slice thickness and slice spacing for the given image dataset are the same. | MIPAV assumes that successive images are contiguous. So, for example, if users chose the triplanar view to display an image that had slice spacing larger than slice thickness, the image would appear shortened in the out-of-plane direction. The Correct Image Spacing utility corrects both situations in which the slice thickness and spacing are not equal. Once the correction is applied, the slice thickness and slice spacing for the given image dataset are the same. | ||
Revision as of 17:24, 15 February 2012
Correcting image spacing
Understanding contiguous planes' effect on image scanning
MIPAV assumes that successive images are contiguous. So, for example, if users chose the triplanar view to display an image that had slice spacing larger than slice thickness, the image would appear shortened in the out-of-plane direction. The Correct Image Spacing utility corrects both situations in which the slice thickness and spacing are not equal. Once the correction is applied, the slice thickness and slice spacing for the given image dataset are the same.
Understanding how MIPAV solves the image spacing problem
Since all slices within an image volume must have the same slice thickness, in many cases more than one slice must be inserted and the original images must be repeated so that a new value can be found for the slice thickness that fits evenly into the original slice spacing. Since there are an infinite number of combinations of slice spacing and thickness, not all could be handled. [MIPAV_Utilities.html#1169607 Table 3] displays the most common combinations and the algorithms MIPAV uses for handling them.
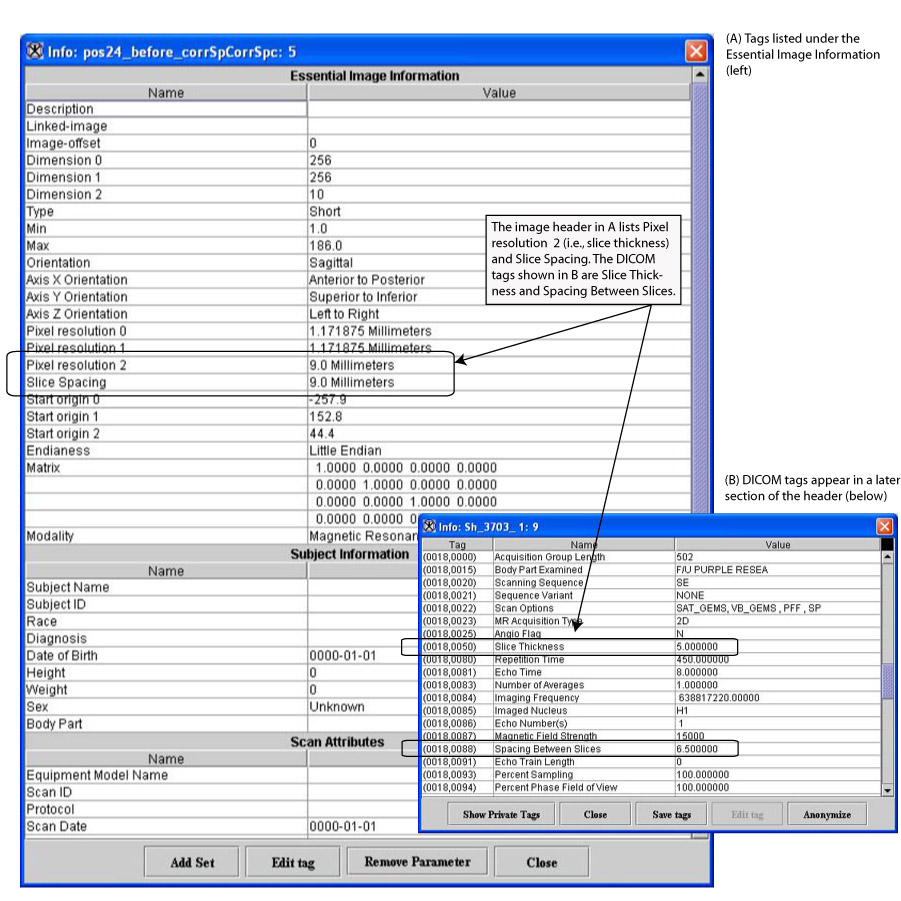
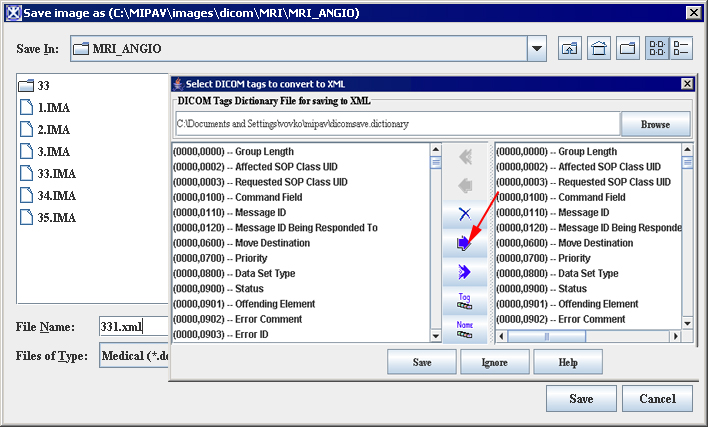
To use the Correct Image Spacing utility, DICOM images must first be saved in XML format. The following DICOM tags ([MIPAV_Utilities.html#1169929 Figure 233 on page 427]) are used:
You can also find this information listed in the Essential Image Information section of the image header ([MIPAV_Utilities.html#1169929 Figure 233 on page 427]) as Pixel resolution 2 (i.e., slice thickness) and Slice Spacing.
|
Case
|
New slice thickness (N)
|
Number of images in new set for each original image
|
Number of blanks inserted for each original image
|
Total images in set now
|
New image set origin File:MIPAV Utilities24.gif
|
|
2
|
|||||
|
else
|
don't handle, give message
|
Â
|
Â
| ||
|
Legend: T = Original slice thickness S = Original space between slices
|
 G = Gap = S - T M = Number of original images
|
 O = Original image set origin N = New slice thickness
| |||
|
{| align="center" |
|}
|}
|
General Options
| |||
|
Save image slices to separate files
|
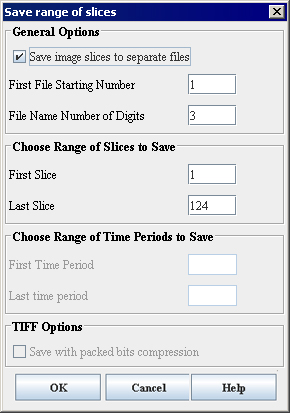
If checked, allows to save the image slices as separate files. The slices will be saved as files with the file name contains the name of the original image followed by the slice number specified by a user, e.g. patientX001. Here patientX is the name of the original image and 001 is the number of the slice. Refer to [MIPAV_Utilities.html#1169544 "Understanding contiguous planes' effect on image scanning" on page 423].
|
{| align="center" |
|
|- |
|
|- | rowspan="1" colspan="3" |
|- |
| rowspan="1" colspan="2" |
|- |
| rowspan="1" colspan="2" |
|- | rowspan="1" colspan="3" |
|- |
| rowspan="1" colspan="2" |
|- |
| rowspan="1" colspan="2" |
|- | rowspan="1" colspan="3" |
|- |
| rowspan="1" colspan="2" |
|- |
| rowspan="1" colspan="2" |
|- |
| rowspan="1" colspan="2" |
|- |
| rowspan="1" colspan="2" |
|- | rowspan="1" colspan="3" |
|}


