Converting image datasets to different data types

From MIPAV
Revision as of 15:48, 15 February 2012 by Angelfish100 (Talk)

(diff) <previousrevision> | Latest revision (diff) | <nextrevision> (diff)
Jump to: navigation, search

Converting image datasets to different data types

In MIPAV you can convert image datasets to different data types. For example, you might want to convert a Boolean type dataset to an integer type dataset. MIPAV also allows you to simultaneously alter the input and output values. This utility is particularly helpful if you want to apply an algorithm to a dataset but cannot do so because the original images are the wrong image type.
data type-A set of values from which a variable, constant, function, or expression may takes its value. MIPAV automates the following data types: Boolean, signed byte, unsigned byte, signed short, unsigned short, integer, long, float, double, and color 24.

Convert Type

To convert a dataset to a different image type
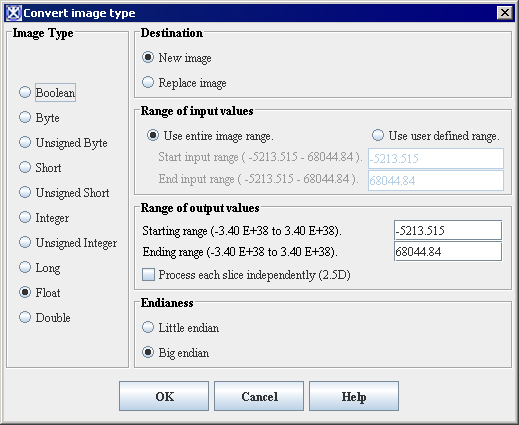
1 Select Utilities >Conversion Tools > Convert type. The Convert Image Type dialog box ([MIPAV_Utilities.html#1165741 Figure 228]) opens.
2 Select the desired image type in the Image Type group.
3 Indicate the start and end input ranges in the Range of input values group.
4 Indicate the start and end output ranges in the Range of output values group.
5 Specify either Little endian or Big endian in the Endianess group.
6 Click OK. The dataset is converted to the new image type.

Figure 228. Convert Image Type dialog boxÂ


{| align="center"

ConvertImageType.jpg


|- | rowspan="4" colspan="1" |

Image Type

| rowspan="1" colspan="2" |

Specifies the data type. Select one of the following:

|- |

Boolean

|

Indicates whether a condition if true or false.

|- |

Byte

|

Primitive 8-bit data type. Valid values range from -127 to 128.

|- |

Unsigned byte

|

Primitive 8-bit data type. Unsigned byte is a variation of the integer data type. The unsigned byte data type signifies that valid values must fall within a specified range of positive whole number values. Valid values range from 0 to 255. Negative values are not valid, hence the term unsigned byte.

|- | rowspan="7" colspan="1" |

Â

|

Short

|

Primitive 16-bit data type. Short is a variation of the integer data type. Short accommodates values that are whole numbers. Valid values range from 0 to 32,768.

|- |

Unsigned short

|

Primitive 16-bit data type. Unsigned short is a variation of the integer data type. The unsigned short data type signifies that valid values must fall within a specified range of positive whole number values. Valid values range from 0 to 65,535. Note that negative values are not valid, hence the term unsigned byte.

|- |

Integer

|

Primitive 32-bit data type. Integer is sometimes abbreviated as int. Integer accommodates values that are whole numbers. Valid values range from
-2,147,483,648 to 2,147,483,648.

|- |

Unsigned integer

|

Primitive 32-bit data type.

|- |

Long

|

Primitive 64-bit data type. Long is a variation of the integer data type. Long accommodates values that are whole numbers. Valid values range from
-9,223,372,036,854,775,808 to 9,223,372,036,854,775,808.

|- |

Float

|

Primitive 32-bit data type. Float is a floating point data type that accommodates decimal values, up to 6 or 7 significant digits of accuracy. Valid values can range from -3.4 x 1038 to 3.4 x 1038.

|- |

Double

|

Primitive 64-bit data type. Double is a floating point data type that accommodates decimal values, up to 14 or 15 significant digits of accuracy. Valid values can range from -1.7 x 10308 to 1.7 x 10308.

|- |

Destination

|

New image

|

Shows the converted dataset in a new image window.

|- |

Â

|

Replace image

|

Replaces the current active dataset with the converted dataset.

|- | rowspan="4" colspan="1" |

Range of input values

|

Use entire image range

|

Converts all intensity values to the result image range when converting the image to a different type.

|- |

Use user-defined range

|

Converts only the intensity values in the user-defined range when converting the image to a different type.

|- |

Start input range

|

Specifies the intensity value at the beginning of the input range. The default value is the image minimum.

|- |

End input range

|

Specifies the intensity value at the end of the input range.

|- | rowspan="2" colspan="1" |

Range of output values

|

Starting range

|

Specifies the intensity value at the beginning of the output range. The default value is the image minimum.

|- |

Ending range

|

Specifies the intensity value at the end of the output range.

|- |

Process each slice independently (2.5D)

| rowspan="1" colspan="2" |

Converts each image slice independently as if it was a separate image. This options works for 2.5D images.

|- | rowspan="3" colspan="1" |

Endianess

| rowspan="1" colspan="2" |

Data organization strategy. Refers to the way computer processors store data in memory.

|- |

Little endian

|

Stores the least significant byte (LSB) first.

|- |

Big endian

|

Stores the most significant byte (MSB) first.

|- |

OK

| rowspan="1" colspan="2" |

Applies the parameters that you specified to convert the dataset.

|- |

Cancel

| rowspan="1" colspan="2" |

Disregards any changes you made in this dialog box, closes the dialog box, and does not convert the dataset.

|- |

Help

| rowspan="1" colspan="2" |

Displays online help for this dialog box.

|}


Converting grayscale images to RGB images

You can convert grayscale image datasets to RGB. RGB images have three channels (red, green, and blue) that contain image data.If you open two datasets in one image window, you can create a composite image that contains a mixture of the red, green, and blue channels.
To convert grayscale images to RGB images
1 Open an image.
2 Select Utilities >Conversion Tools> Grays -> RGB. The Concatenate -> RGB dialog box opens.
3 Select the image to which you want to apply the red channel in the Image (red) list. If you loaded two images into the image window, two file names should appear.
4 Do the same for the Image (green) list and the Image (blue) list.
5 Indicate whether you want to remap to current intensity values to the full standard 0-255 RGB values.
Note: Generally, each color is defined as one of the 256 intensities. If you remap the grayscale intensities and select Remap data, the system defines the intensities as one of the 256 values. If one or all of the input images have values that exceed 255 and you do not select Remap data, then data truncates to 255 since a color channel can only represent values 0-255.
6 Click OK. A status message appears. When filtering is complete, the new RGB image appears in a separate image window.


Figure 229. Concatenate -> RGB dialog boxÂ

Image (red)
Identifies the image to be added to the red channel of the resulting image.

{| align="center"

GraysToRGB.jpg


Â

|- |

Image (green)

|

Identifies the image to be added to the green channel of the resulting image.

|- |

Image (blue)

|

Identifies the image to be added to the blue channel of the resulting image.

|- |

Remap data (0-255)

|

Indicates, when selected, that you want image intensities to be remapped to values 0-255, which is the standard for RGB images.

|- | rowspan="1" colspan="3" |

Destination

|- |

New image

| rowspan="1" colspan="2" |

Sends the output to a new image frame.

|- |

Replace image

| rowspan="1" colspan="2" |

Replaces the existing image.

|- |

OK

| rowspan="1" colspan="2" |

Applies the parameters that you specified to create an RGB image.

|- |

Cancel

| rowspan="1" colspan="2" |

Disregards any changes you made in this dialog box, closes the dialog box, and does not create an RGB image.

|- |

Help

| rowspan="1" colspan="2" |

Displays online help for this dialog box.

|}


Converting RGB datasets to grayscale datasets

On the Utilities > Conversion Tools menu in the MIPAV window, the RGB conversion utility offers both a manual and an automatic method of converting RGB datasets to grayscale RGB images.
Manual conversion-In the manual method of conversion, you select Utilities >Conversion Tools > RGB -> Gray to display the RGB -> Gray dialog box ([MIPAV_Utilities.html#1167473 Figure 230]). The dialog box provides three weighting methods: Equal weights-This method assigns equal weights to each of the three color channels. When you select this option, you can also select the Only average RGB values greater than check box and specify a threshold value. For example, if you specify a threshold value of 50, the program ignores any pixel in that channel that contains a value over 50.
Computer graphics weights-This method assigns the weights to each channel that are typically used to display computer graphics.
User-specified weights-In this method, you enter the specific weights for each color channel.
Automatic conversion-If, instead, you select Utilities > >Conversion Tools > RGB -> Grays, the program automatically converts the RGB image to three grayscale images: one each for the red, blue, and green channels.
Note: You can only specify a threshold when you choose to use the equal weights method of conversion.

RGB datasets have four channels: red, green, blue, and alpha. When you convert RGB datasets to grayscale. RGB images, the intensities are combined to form a single grayscale value.

For example:

File:MIPAV Utilities68.gif


Where,

N = New grayscale pixel
R = Red channel
G = Green channel
B = Blue channel
RW = Weight assigned to the red channel
GW = Weight assigned to the green channel
BW = Weight assigned to the blue channel


Figure 230. RGB -> Gray dialog boxÂ

Equal weights
Assigns the same weight (0.3333) to each channel in the image. When you select this option, the Only average RGB values great than becomes available.
Â

{| align="center"

RGB To Gray.jpg


|- |

Computer graphics

|

Assigns the weighting factors typically used in computer graphics to each channel in the image:
Red, 0.299
Green, 0.587
Blue, 0.114

|- |

User specified

| rowspan="1" colspan="2" |

Specifies a weight that you determine for each channel. When you select this check box, you must type a specific weight for each channel in the Red, Green, and Blue boxes.

|- |

Red

| rowspan="1" colspan="2" |

Specifies the weight assigned to the red channel in the image. You can only specify a weight in this box if you selected the User specified option.

|- |

Green

| rowspan="1" colspan="2" |

Specifies the weight assigned to the green channel in the image. You can only specify a weight in this box if you selected the User specified option.

|- |

Blue

| rowspan="1" colspan="2" |

Specifies the weight assigned to the blue channel in the image. You can only specify a weight in this box if you selected the User specified option.

|- |

Only average RGB values greater than

| rowspan="1" colspan="2" |

Excludes any voxel in the image over the threshold value that you specify in this box. This check box is only available when you select the Equal Weights option.

|- |

New Image

| rowspan="1" colspan="2" |

Sends the output to a new image frame.

|- |

Replace Image

| rowspan="1" colspan="2" |

Replaces the existing image.

|- |

OK

| rowspan="1" colspan="2" |

Applies the parameters that you specified to create a grayscale image.

|- |

Cancel

| rowspan="1" colspan="2" |

Disregards any changes you made in this dialog box, closes the dialog box, and does not create a grayscale image.

|- |

Help

| rowspan="1" colspan="2" |

Displays online help for this dialog box.

|}