Changing Image Contrast
From MIPAV
Using the right mouse button
The right mouse button provides you with a very simple way of changing image contrast. To do so, open an image and then hold down the right mouse button and drag it around the screen. The cursor changes from a red cross to one that is shown in [MIPAV_QuickStart.html#2644979 Figure 23]. To restore an image to its original appearance, refer to [MIPAV_QuickStart.html#1011509 "Restoring images to their original appearance" on page 35].
|
{| align="left"
|
|
|
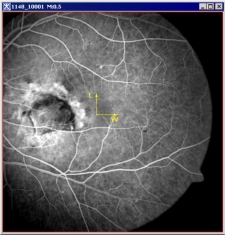
Figure 23. Changing image contrast using the right mouse button
When you drag the cursor up and down or across the image, the image may become darker and gradually disappear or become lighter in appearance.
At some points you may be able to create a negative of the image.
|}
Adjust Window and Level
 The Adjust Window and Level icon on the Image toolbar provides another way to change the contrast of images.
|
{| align="center"
|
|
|
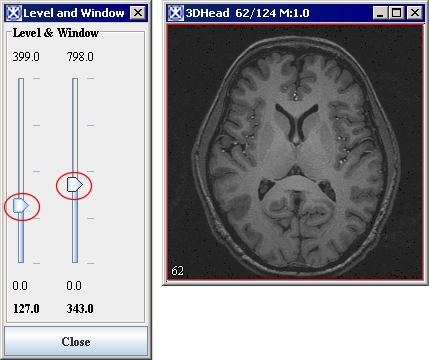
Figure 24. The Level and Window dialog box
Move each slider up or down to change the contrast of the image. The changes are immediately effective in the image.
|}
To adjust image contrast
1 Open an image file. The image appears in an image window.
2 Click Adjust Window and Level. The Level & Window dialog box appears.
3 In the dialog box, move each slider up or down to change the contrast of the image. The changes are immediately effective in the image. Click Close when done.
Restoring images to their original appearance
 To return to the original appearance of the image, click Reset LUT.
 In addition, you can click the Gray icon to restore the image to grayscale if you have changed it or added colors.
Improving contrast by generating and modifying histograms
 To generate a histogram of an image, you can use the Lookup Table icon or call LUT > Histogram LUT. To obtain a histogram summary, which is in the tabular form, use the Algorithms > Histogram Tools > Histogram Summary command.
To generate a histogram for an image
1 Open an image. The image appears in an image window.
2 Do either of the following: click Lookup Table icon or select LUT > Histogram-LUT. For images that do not contain VOIs, the Lookup Table window opens.
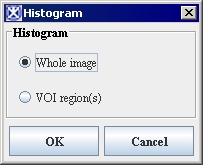
3 For images that contain VOIs, the Histogram dialog box appears. In the dialog box, select either Whole image or VOI region(s).
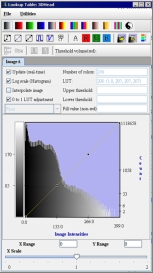
4 Click OK. A progress message appears. After a few moments, the Lookup Table window ([MIPAV_QuickStart.html#2661116 Figure 26]) opens.
Figure 25. The Lookup Table window (A) and Histogram dialog box (B)
|
{| align="center"
|
|
A
|
{| align="center"
|
|}
B
Â
Â
Â
|}
Definition: Lookup table (LUT) indicates the intensity of each voxel in the image and, in MIPAV, allows you to remap the original intensities to other intensities.
transfer function reflects the relationship between the original image intensity values and how they are mapped into the LUT. The line in the LUT represents the transfer function.
To change back to the original grayscale intensities, click Gray LUT in the MIPAV window.
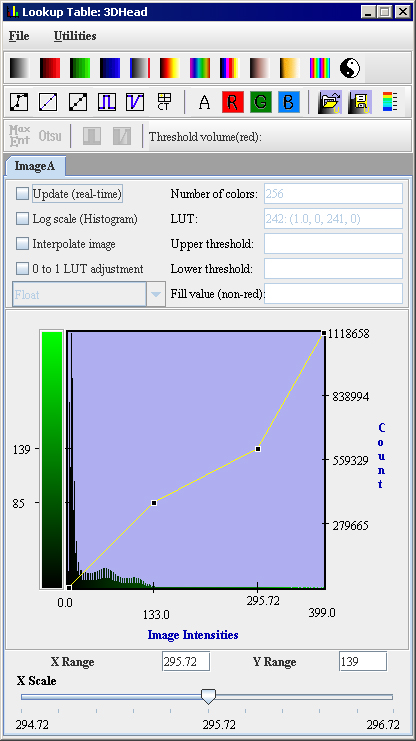
Figure 26. Lookup Table dialog boxÂ
|
Â
|
|
File
|
Open LUT-Opens a previously saved LUT file. LUT files have an. LUT extension. Save LUT-Saves the LUT displayed in this window in a LUT file. Open user defined LUT- opens a file with the user defined LUT. Save user defined LUT- saves a user defined LUT. Open Transfer Functions-Opens a previously saved transfer function. Transfer function files have a .FUN extension. Save Transfer Functions-Saves the transfer function displayed in this window to a file. Close LUT-Closes the LUT window.
|
{| align="center"
|
|
|-
|
Utilities
|
Change number of colors-Allows you to change the number of colors displayed in the image. Valid values are 2 to 256.
CT function-Allows you to select a preset LUT that is appropriate for the image content. Values are abdomen, head, lung, mediastinum, spine, and vertebrae.
|-
|
Â
| rowspan="1" colspan="2" |
Invert LUT-Creates a negative of the image.
Reset transfer function-resets the chosen LUT back to Gray LUT.
Reset histogram and LUT A-Returns image A to its original values.
Reset histogram and LUT B-Returns image B to its original values. This command is only available if two images are open.
|-
|
LUT toolbar
| rowspan="1" colspan="2" |

- Gray LUT;

- Red LUT;

- Green LUT;

- Blue LUT;

- Cool-Hot LUT;

- Gray/Blue/Red LUT;

- Hot Metal LUT;

- Spectrum LUT;

- Skin LUT;

- Bone LUT;

- Stripped LUT;

- Invert LUT.
|-
|
Functions toolbar
| rowspan="1" colspan="2" |

- Transfer function;

- Reset Transfer function;

- Even Distributed Transfer function;

- Dual Trashed function;

- Dual Inverse Trashed function;

- CT preset function;

- Edit Alpha function;

- Edit Red LUT;

- Edit Green function;

- Edit Blue function;

- Open user Defined LUT;

- Save User Defined LUT;

- Generate LUT.
|-
|
Update (real-time)
| rowspan="1" colspan="2" |
Changes the image as you make changes to the LUT, which allows you to see the effect of your changes immediately on the image.
|-
|
Log scale (histogram)
| rowspan="1" colspan="2" |
Displays the image's histogram count in log scale along the Y axis.
|-
|
Interpolate image
| rowspan="1" colspan="2" |
Displays image using interpolation, which reduces pixilated image to appear more smooth.
Caution: Depending on the memory resources of your workstation, interpolation can be very lengthy.
|-
|
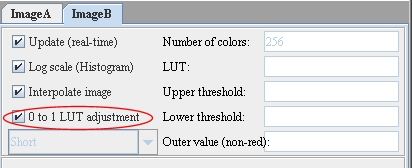
0 to 1 LUT adjustment
|
Appears only for in the ImageB tab when two images are loaded in the same image frame.It processes the image for contrast as follows: for contrast <0, it uses a linear function to calculate the entire contrast look-up-table; for contrast 0, the contrast look-up-table is an identity table, and for contrast greater than 0, a linear function is used to calculate the linear region and for regions near min and max, the nonlinear function y=xn is used. .
|
{| align="center"
|
|}
|-
|
Number of colors
| rowspan="1" colspan="2" |
Allows you to change the number of colors displayed in the image.
|-
|
LUT
| rowspan="1" colspan="2" |
Displays the image intensities.
|-
| rowspan="2" colspan="1" |
Upper threshold
Lower threshold
Fill value
| rowspan="2" colspan="2" |
The threshold options is a tool for setting thresholds for a gray level of the image in order to segment the image into an object and a background. This tool does applys a pceudo color (spesified in the Fill Value parameter) to the image, to show the pixels selected by the threshold setting, that is, those pixels with values equal to and between the thresholds.
|-
|}
Based on the 256-step color values scale, MIPAV assigns the inverse value to each pixel of the image (refer to [MIPAV_QuickStart.html#1993908 Figure 27]).


