Building and compiling plug-in programs
From MIPAV
To build a new plug-in program for MIPAV, you must first install a build environment, alter the path environment variable, and compile the plug-in files.
Contents
Installing a build environment
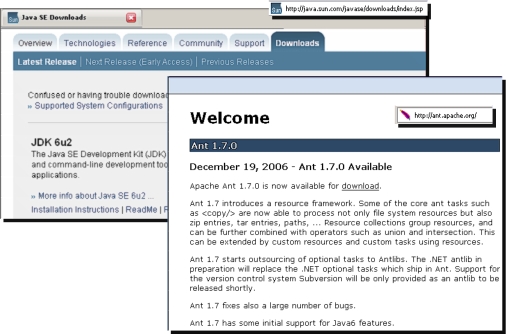
1 Download and install Java SE Development Kit (JDK), version 1.6 (JDK 6u2) <http://java.sun.com/javase/downloads/index.jsp>.
Configuring the environment
To configure your environment, you need to add two new variables-JAVA_HOME and ANT_HOME-and update the path variable in your system.
On Windows workstations
1 Click Start > Control Panel. The Control Panel window opens.
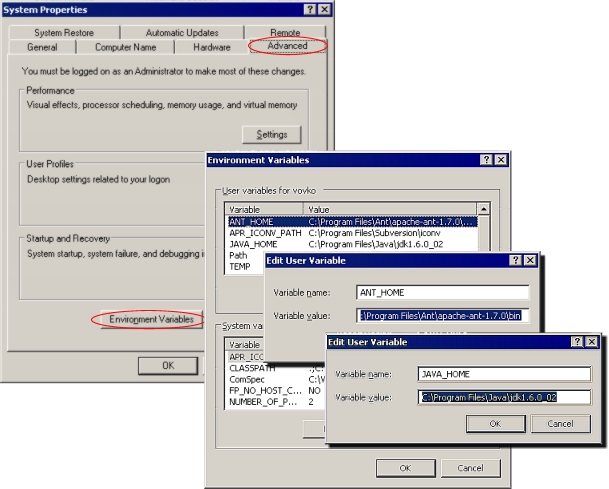
2 Double-click the System icon. The System Properties dialog box opens.
3 Click Advanced. The Advanced page of the System Properties dialog box appears.
4 Click Environment Variables. The Environment Variables dialog box opens.
5 Decide whether to add and edit variables in the User variables box or the System variables box based on which users should have access to the Java SDK and Ant.
6 Add the JAVA_HOME variable to your environment:
a Click New. The New User Variable dialog box or the New System Variable dialog box opens.
b Type JAVA_HOME in Variable name.
c Type the path for the Java SDK on your computer (e.g., C:\Program Files\Java\jdk1.6.0_02) in Variable value.
d Click OK. The JAVA_HOME variable appears in either the User variables box or System variables box as appropriate.
7 Add the ANT_HOME variable to your environment by doing the following:
a Click New under either the User variables box or the System variables box. The New User Variable dialog box or the New System Variables dialog box opens as appropriate.
b Type ANT_HOME in Variable name.
c Type the path for the Ant on your computer (e.g., C:\Program Files\Ant\apache-ant-1.7.0) in Variable value.
d Click OK. The ANT_HOME variable appears in either the User variables box or System variables box as appropriate.
8 Update either the PATH variable in the User variables box or the Path variable in the System variables box by doing the following:
a Select the PATH variable in the User variables box, or select the Path variable in the System variables box.
b Click Edit under the User variables box, or click Edit under the System variables box. Either the Edit User Variable dialog box or the Edit System Variable dialog box opens.
c Type ;%JAVA_HOME%\bin;%ANT_HOME%\bin to the end of the PATH variable or to the end of the Path variable.
d Click OK. The edited variable appears either in the User variables box or the System variables box. See also Figure 14.
9 Open a new terminal for the change to take effect by doing the following:
a Click Start > Run. The Run dialog box opens.
b Type cmd in Open, and click OK. A terminal window opens.
10 Retrieve the sample Ant build file (build.xml) from the MIPAV web site and place it in the same directory as the plug-in.java files you want to compile.
11 Alter the dir.mipav and dir.jdk properties within the build.xml to point to the directory where MIPAV and the SDK are installed, respectively.
Note: Add and edit the variables in the User variables box if you want to limit the build environment to just yourself and no other users. Add and edit the variables in the Systems variables box to make the environment accessible to anyone who uses the workstation.
Recommendation: Although it is possible to update the path variable in either the User variables box or System variables box, you should add the statement to the same box in which you added the JAVA_HOME and ANT_HOME variables.
See also:
"Installing Ant" on <http://ant.apache.org/manual/index.html>.
"JavaTM SE 6 Release Notes-Microsoft Windows Installation (32-bit)" on <http://java.sun.com/javase/6/webnotes/install/jdk/install-windows.html>.
On Linux or UNIX workstations
Bash users should do the following:
1 Edit the file $HOME/.bash_profile and add lines similar to following:
ANT_HOME=/path/to/apache-ant-1.6.3
JAVA_HOME=/path/to/j2sdk1.4.2_08
PATH=$PATH:$JAVA_HOME/bin:$ANT_HOME/bin
export ANT_HOME
export JAVA_HOME
export PATH
where ANT_HOME and JAVA_HOME are the paths where each application was installed.
2 Retrieve the sample Ant build file from the MIPAV web site, and place it in the same directory where the plug-in .java files you want to compile are located.
3 Alter the dir.mipav and dir.jdk properties within build.xml to point to the directory where MIPAV and the SDK are installed, respectively.
Build.xml
Figure 15 below displays the content of the build.xml file. build.xml is also available on the MIPAV web site <http://mipav.cit.nih.gov/documentation/presentations/plugins/build.xml>.
|
build.xml 1 <!-- build file for MIPAV plugin class --> 2 - 3 <project basedir="." default="compile" name="mipav_plugin"> 4 <property name="dir.mipav" value="c:\\Program Files\\mipav\\"/> 5 <property name="dir.jdk" value="c:\\Program Files\\Java\\jdk1.6.0_02"/> 6 - 7 <target name="init"> 8 <tstamp/> 9 - 10 <path id="build.classpath"> 11 <pathelement path="${dir.mipav}"/> 12 <pathelement location="${dir.mipav}/InsightToolkit/lib/InsightToolkit/InsightToolkit.jar"/> 13 - 14 <fileset dir="${dir.mipav}"> 15 <filename name="*.jar"/> 16 </fileset> 17 </path> 18 <property name="build.cp" refid="build.classpath"/> 19 </target> 20 - 21 <target name="compile" depends="init"> 22 <echo>classpath: ${build.cp}</echo> 23 - 24 <javac debug="true" deprecation="true" description="Builds MIPAV" verbose="no" listfiles="yes" nowarn="no" fork="true" memoryInitialSize="220M" memoryMaximumSize="1000M" id="mipav build" source="1.4" target="1.4" destdir="." srcdir="." compiler="modern"> 25 <classpath refid="build.classpath"/> 26 </javac> 27 </target> 28 - 29 <target name="clean" depends="init"> 30 - 31 <delete> 32 - 33 <fileset dir="."> 34 <include name="**/*.class"/> 35 </fileset> 36 </delete> 37 </target> 38 </project>
|
Compiling the plug-in files
Note: You should keep back-up copies of the source and compiled files in case you need to update or change the plug-in.
1 Type ant compile on your workstation (e.g., cmd ant compile on Windows or xterm ant compile on UNIX platforms). The BUILD SUCCESSFUL message should appear at the end of the Ant output.
2 Copy the .class files that Ant produced into MIPAV's plug-in directory.
On Windows platforms:
C:\Documents and Settings\username\mipav\plugins
On UNIX platforms:
/home/username/mipav/plugins
where username is the name of your account on the system.
3 Install the plug-in file. Select PlugIns > Install Plugin in the main MIPAV window. In the Install PlugIn dialog box, use the Browse buton to navigate to the \plugins directory . Select the plug-in and Press OK.


