Writing MIPAV plugins without access to MIPAV source code
There exists a way within eclipse to develop plugins for MIPAV without access to the MIPAV source code.
Contents
Requirements
- Java SE Development Kit. Version 1.5 or higher is needed. Download here
- Eclipse IDE for Java Developers. The current version is required. Download here
- A release of MIPAV. Available here
Installation
Installation should be completed in the following order.
Installing Java
Java installation simply requires following the prompts.
Installing Eclipse
Open the downloaded zip file. Unzip the entire contents to a convenient folder, such as C:\Program Files\
Installing MIPAV
Mipav installation is also quickly completed by following the prompts. Note where you installed MIPAV, by default this is in the folder C:\Program Files\mipav
Building the Eclipse project
Start Eclipse. A dialog will ask you where the default workspace is located. Note the location it specifies and then click OK. With Eclipse started, click File -> New -> Java Project. ![]()
Name your project mipav-plugin. Ensure that the button next to "Create seperate folders for source and class files" is checked. Click the Next button.
On the Source tab, change the Default output folder tab to "mipav-plugin/classes" 
On the libraries tab, click "Add External Class Folder" where you'll want to navigate to where you installed MIPAV. Select the corresponding folder. 
Also on the libraries tab, click "Add External JARs" and then add all the files from the following locations: 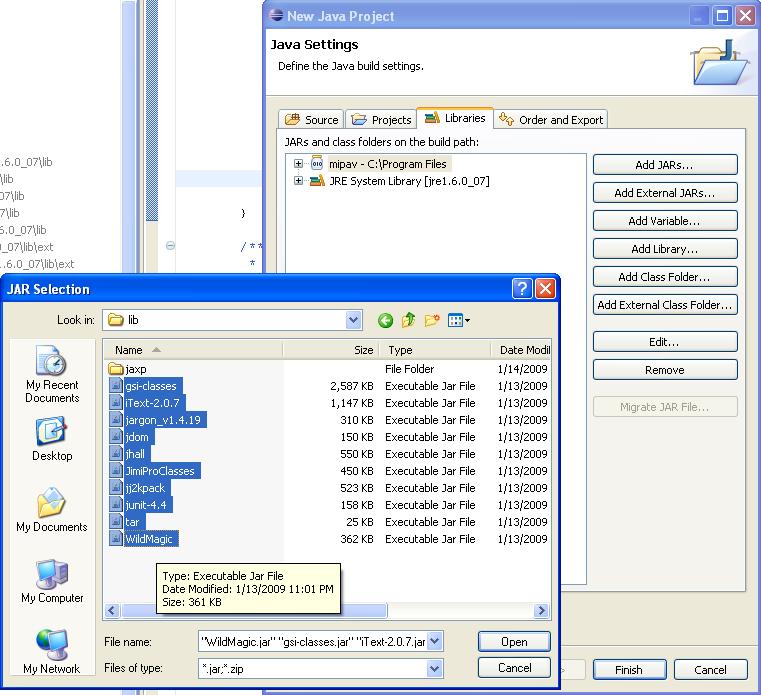

- mipav/lib/*
- mipav/lib/jaxp/*
- mipav/help/mipav_help.jar
- mipav/InsightToolkit/lib/InsightToolkit/InsightToolkit.jar

Click Finish when complete. A new project called mipav-plugin should appear. You're now ready to run MIPAV.
Running MIPAV with a sample plugin within Eclipse
To make sure you've set everything up correctly, we'll try to run MIPAV inside of Eclipse. Navigate to Run->Run Configurations... on the control panel. On the dialog box that opens, highlight Java Application, and then click the New Launch Configuration on the left. Fill out the Name and Project fields with the phrase "mipav-plugin" To fill in the Main Class, click the Search... button. Search for the name "MipavMain" If found, great! Otherwise go to troubleshooting. 
Click on the arguments tab. In the VM arguments box, put the following phrase "-Xms800M -Xmx800" This specifies how many megabytes Java has available to run MIPAV. If your computer has more or less, feel free to adjust the numbers accordingly. 
When finished, click Run. If MIPAV starts, you're ready to start developing plugins. If not, go to troubleshooting. 
Importing the plugin
For now download these three files to a convenient location:
- PlugInDialogNewGeneric2.java
- PlugInAlgorithmNewGeneric2.java
- PlugInNewGeneric2.java
Import these files into Eclipse using the dialog from File->Import. 

Installing the plugin
Start MIPAV using the method shown in Running MIPAV within Eclipse. If that's already set up, press the green play button as shown. Once MIPAV starts, navigate to Plugins->Install Plugin. Once you press the Browse button, find the folder where the mipav-plugin project resides. This should be inside of the default workspace folder you noted earlier. Once found, go to click on the mipav-plugin/classes folder. You should see the following classes: 
- PlugInDialogNewGeneric2.class
- PlugInAlgorithmNewGeneric2.class
- PlugInNewGeneric2.class
Select PlugInNewGeneric2.class and then press Open, and then OK. Now open an image using MIPAV. You can now click on Plugs->Algorithms->PlugInNewGeneric2. 
This plugin opens a blank dialog box with working OK and Cancel buttons. 
Modifying the plugin
You'll see the the OK and Cancel buttons print those words to the Console window in Eclipse. These words can be modified on lines X and Y of PlugInDialogNewGeneric2. Note that because we loaded the plugin from the classes folder, the plugin is automatically updated when you make changes to the code. When you want to test a new version of your plugin, simply restart MIPAV and then run your plugin.
Writing a plugin
Writing a plugin, including accessing the MIPAV API, the structure of plugins, and accessing MIPAV help is covered extensively in the following powerpoint presentation.
Attaching the MIPAV Source
If you have an older copy of the MIPAV source code, this can be integrated into your plugin development. Right click on the mipav folder in the referenced libraries as shown, and then click on Properties. Under Java Source Attachment, you can select the external file or folder that contains the MIPAV source.