|
|
| (4 intermediate revisions by the same user not shown) |
| Line 1: |
Line 1: |
| − | == Displaying images using the triplanar-dual view ==
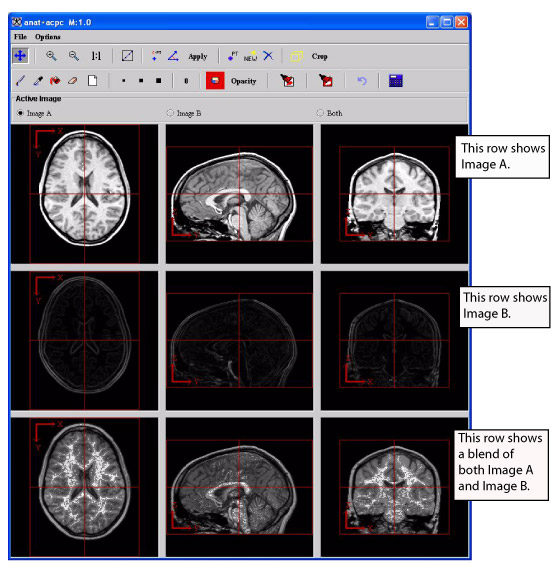
| + | The ''triplanar-dual view'' displays two image datasets (referred to as Image A and Image B) and a blended version of both Image A and Image B from three orthogonal planes.<br /> |
| | | | |
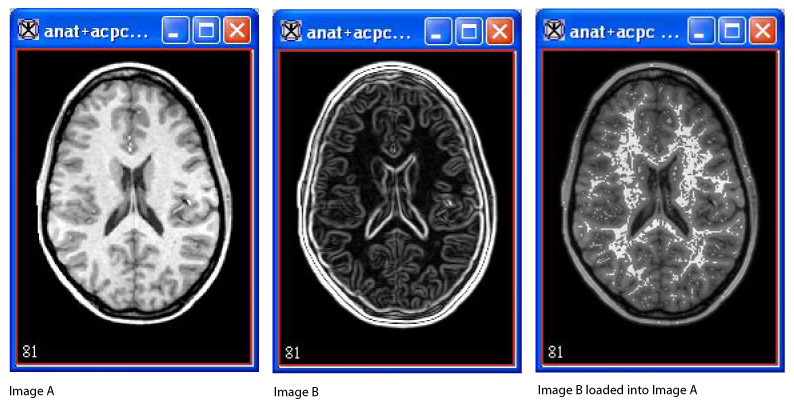
| − | <div style="font-style: normal; font-weight: normal; margin-bottom: 6pt; margin-left: 0pt; margin-right: 0pt; margin-top: 0pt; text-align: left; text-decoration: none; text-indent: 0pt; text-transform: none; vertical-align: baseline"><font color="#000000"> The <span style="font-weight: normal; text-decoration: none; text-transform: none; vertical-align: baseline">''<font color="#000000">triplanar-dual view</font>''</span> displays two image datasets (referred to as Image A and Image B) and a blended version of both Image A and Image B from three orthogonal planes.<br /></font></div><div style="font-style: normal; margin-bottom: 6pt; margin-left: 0pt; margin-right: 0pt; margin-top: 14pt; text-align: left; text-decoration: none; text-indent: 0pt; text-transform: none; vertical-align: baseline">'''<font color="#000000"> To view image datasets using this view<br /></font>'''</div><div style="font-style: normal; font-weight: normal; margin-bottom: 0pt; margin-left: 18pt; margin-right: 0pt; margin-top: 6pt; text-align: left; text-decoration: none; text-indent: -18pt; text-transform: none; vertical-align: baseline"><font color="#000000"> 1 Open two 3D or 4D images, which become known as Image A and Image B.<br /></font></div><div style="font-style: normal; font-weight: normal; margin-bottom: 0pt; margin-left: 18pt; margin-right: 0pt; margin-top: 6pt; text-align: left; text-decoration: none; text-indent: -18pt; text-transform: none; vertical-align: baseline"><font color="#000000"> 2 Load Image B into Image A.<br /></font></div><div style="font-style: normal; font-weight: normal; margin-bottom: 0pt; margin-left: 18pt; margin-right: 0pt; margin-top: 6pt; text-align: left; text-decoration: none; text-indent: -18pt; text-transform: none; vertical-align: baseline"><font color="#000000"> 3 Select Image > Views > Triplanar-Dual. The triplanar-dual view appears in an image window.<br /></font></div>
| + | '''To view image datasets using this view'''<br /> |
| − | | + | 1 Open two 3D or 4D images, which become known as Image A and Image B.<br /> |
| − | <div style="font-style: normal; font-weight: normal; margin-bottom: 0pt; margin-left: 0pt; margin-right: 0pt; margin-top: 0pt; text-align: left; text-decoration: none; text-indent: 0pt; text-transform: none; vertical-align: baseline"><font color="#000000">
| + | 2 Load Image B into Image A.<br /> |
| | + | 3 Select Image > Views > Triplanar-Dual. The triplanar-dual view appears in an image window.<br /> |
| | | | |
| | {| border="1" cellpadding="5" | | {| border="1" cellpadding="5" |
| − | |+ <div style="font-style: normal; margin-bottom: 3pt; margin-left: 0pt; margin-right: 0pt; margin-top: 9pt; text-align: left; text-decoration: none; text-indent: 0pt; text-transform: none; vertical-align: baseline">'''<font color="#000000"> Figure 1. Image A, Image B, and Image B loaded into Image A<br /></font>'''</div> | + | |+ '''Figure 1. Image A, Image B, and Image B loaded into Image A''' |
| | |- | | |- |
| | | | | | |
| Line 12: |
Line 13: |
| | |} | | |} |
| | | | |
| − | <br /></font></div>
| |
| | | | |
| | The image window for the triplanar-dual view is quite similar to the image window for the triplanar view. The File and Options menus contain the same commands except for one command-the Options menu for the triplanar view contains the command Link to Another TriImage. Since the triplanar-dual view shows two datasets in the image window and allows you to manipulate them together, linking to another image is not necessary. Most of the icons and buttons on the toolbars for both views are the same with one primary difference: The triplanar-dual view allows you to create VOIs on the images; the triplanar view does not. | | The image window for the triplanar-dual view is quite similar to the image window for the triplanar view. The File and Options menus contain the same commands except for one command-the Options menu for the triplanar view contains the command Link to Another TriImage. Since the triplanar-dual view shows two datasets in the image window and allows you to manipulate them together, linking to another image is not necessary. Most of the icons and buttons on the toolbars for both views are the same with one primary difference: The triplanar-dual view allows you to create VOIs on the images; the triplanar view does not. |
| Line 19: |
Line 19: |
| | | | |
| | === Showing and hiding axes, cross hairs, and Talairach grid === | | === Showing and hiding axes, cross hairs, and Talairach grid === |
| | + | By default, the triplanar-dual view automatically shows the axes and cross hairs on Image A, Image B, and the blended dataset. <br /> |
| | | | |
| − | <div style="font-style: normal; font-weight: normal; margin-bottom: 6pt; margin-left: 0pt; margin-right: 0pt; margin-top: 0pt; text-align: left; text-decoration: none; text-indent: 0pt; text-transform: none; vertical-align: baseline"><font color="#000000"> By default, the triplanar-dual view automatically shows the axes and cross hairs on Image A, Image B, and the blended dataset. <br /></font></div><div style="font-style: normal; margin-bottom: 6pt; margin-left: 0pt; margin-right: 0pt; margin-top: 14pt; text-align: left; text-decoration: none; text-indent: 0pt; text-transform: none; vertical-align: baseline">'''<font color="#000000"> <span style="font-style: normal; text-decoration: none; text-transform: none; vertical-align: baseline">'''<font color="#000000">To show or hide axes on images</font>'''</span><br /></font>'''</div><div style="font-style: normal; font-weight: normal; margin-bottom: 6pt; margin-left: 0pt; margin-right: 0pt; margin-top: 0pt; text-align: left; text-decoration: none; text-indent: 0pt; text-transform: none; vertical-align: baseline"><font color="#000000"> To hide the axes, select Options > Show Axes (Figure 2). The check mark disappears from the check box in front of the command on the menu, and the axes disappear from all of the images.<br /></font></div><div style="font-style: normal; font-weight: normal; margin-bottom: 0pt; margin-left: 0pt; margin-right: 0pt; margin-top: 0pt; text-align: left; text-decoration: none; text-indent: 0pt; text-transform: none; vertical-align: baseline"><font color="#000000">
| + | '''To show or hide axes on images'''<br />To hide the axes, select Options > Show Axes (Figure 2). The check mark disappears from the check box in front of the command on the menu, and the axes disappear from all of the images.<br /> |
| | | | |
| | {| border="1" cellpadding="5" | | {| border="1" cellpadding="5" |
| − | |+ <div style="font-style: normal; margin-bottom: 3pt; margin-left: 0pt; margin-right: 0pt; margin-top: 9pt; text-align: left; text-decoration: none; text-indent: 0pt; text-transform: none; vertical-align: baseline">'''<font color="#000000"> Figure 2. Show Axes command on the Options menu in the Triplanar-Dual window<br /></font>'''</div> | + | |+ '''Figure 2. Show Axes command on the Options menu in the Triplanar-Dual window''' |
| | |- | | |- |
| | | | | | |
| | [[Image:menuOptionsShowAxes.jpg]] | | [[Image:menuOptionsShowAxes.jpg]] |
| | |} | | |} |
| − |
| |
| − | <br /></font></div>
| |
| | | | |
| | To display the axes on the images again, simply select Options > Show Axes. The check mark reappears in the check box in front of the command. | | To display the axes on the images again, simply select Options > Show Axes. The check mark reappears in the check box in front of the command. |
| | | | |
| − | <div style="font-style: normal; margin-bottom: 6pt; margin-left: 0pt; margin-right: 0pt; margin-top: 14pt; text-align: left; text-decoration: none; text-indent: 0pt; text-transform: none; vertical-align: baseline">'''<font color="#000000"> <span style="font-style: normal; text-decoration: none; text-transform: none; vertical-align: baseline">'''<font color="#000000">To show or hide cross hairs</font>'''</span><br /></font>'''</div><div style="font-style: normal; font-weight: normal; margin-bottom: 6pt; margin-left: 0pt; margin-right: 0pt; margin-top: 0pt; text-align: left; text-decoration: none; text-indent: 0pt; text-transform: none; vertical-align: baseline"><font color="#000000"> Showing or hiding cross hairs works just as showing or hiding axes. To hide the cross hairs, select Options > Show Cross Hairs. To show them, select Options > Show Cross Hairs again. <br /></font></div><div style="font-style: normal; margin-bottom: 6pt; margin-left: 0pt; margin-right: 0pt; margin-top: 14pt; text-align: left; text-decoration: none; text-indent: 0pt; text-transform: none; vertical-align: baseline">'''<font color="#000000"> <span style="font-style: normal; text-decoration: none; text-transform: none; vertical-align: baseline">'''<font color="#000000">To show or hide the Talairach grid</font>'''</span><br /></font>'''</div><div style="font-style: normal; font-weight: normal; margin-bottom: 6pt; margin-left: 0pt; margin-right: 0pt; margin-top: 0pt; text-align: left; text-decoration: none; text-indent: 0pt; text-transform: none; vertical-align: baseline"><font color="#000000"> By default, the Talairach grid does not automatically display on the images unless you specifically select it to do so. To show the grid, select Options > Show Talairach Grid. The grid appears on all of the images shown in the triplanar-dual view. When you want to hide the grid, select Options > Show Talairach Grid again.<br /></font></div>
| + | '''To show or hide cross hairs'''<br /> |
| | + | Showing or hiding cross hairs works just as showing or hiding axes. To hide the cross hairs, select Options > Show Cross Hairs. To show them, select Options > Show Cross Hairs again. <br /> |
| | + | '''To show or hide the Talairach grid'''<br /> |
| | + | By default, the Talairach grid does not automatically display on the images unless you specifically select it to do so. To show the grid, select Options > Show Talairach Grid. The grid appears on all of the images shown in the triplanar-dual view. When you want to hide the grid, select Options > Show Talairach Grid again.<br /> |
| | | | |
| | === Creating VOIs on images === | | === Creating VOIs on images === |
| | | | |
| − | <div style="font-style: normal; font-weight: normal; margin-bottom: 6pt; margin-left: 0pt; margin-right: 0pt; margin-top: 0pt; text-align: left; text-decoration: none; text-indent: 0pt; text-transform: none; vertical-align: baseline"><font color="#000000"> You can create point or line VOIs on the images.<br /></font></div><div style="font-style: normal; margin-bottom: 6pt; margin-left: 0pt; margin-right: 0pt; margin-top: 14pt; text-align: left; text-decoration: none; text-indent: 0pt; text-transform: none; vertical-align: baseline">'''<font color="#000000"> <span style="font-style: normal; text-decoration: none; text-transform: none; vertical-align: baseline">'''<font color="#000000">To create point VOIs</font>'''</span><br /></font>'''</div><div style="font-style: normal; font-weight: normal; margin-bottom: 0pt; margin-left: 18pt; margin-right: 0pt; margin-top: 6pt; text-align: left; text-decoration: none; text-indent: -18pt; text-transform: none; vertical-align: baseline"><font color="#000000"> 1 Click [[Image:iconPoint.jpg]] .<br /></font></div><div style="font-style: normal; font-weight: normal; margin-bottom: 0pt; margin-left: 18pt; margin-right: 0pt; margin-top: 6pt; text-align: left; text-decoration: none; text-indent: -18pt; text-transform: none; vertical-align: baseline"><font color="#000000"> 2 Click in the image where you want to create a point.<br /></font></div><div style="font-style: normal; font-weight: normal; margin-bottom: 0pt; margin-left: 18pt; margin-right: 0pt; margin-top: 6pt; text-align: left; text-decoration: none; text-indent: -18pt; text-transform: none; vertical-align: baseline"><font color="#000000"> 3 Repeat steps 1 and 2 for all other desired points.<br /></font></div><div style="font-style: normal; margin-bottom: 6pt; margin-left: 0pt; margin-right: 0pt; margin-top: 14pt; text-align: left; text-decoration: none; text-indent: 0pt; text-transform: none; vertical-align: baseline">'''<font color="#000000"> <span style="font-style: normal; text-decoration: none; text-transform: none; vertical-align: baseline">'''<font color="#000000">To draw line VOIs</font>'''</span><br /></font>'''</div><div style="font-style: normal; font-weight: normal; margin-bottom: 0pt; margin-left: 18pt; margin-right: 0pt; margin-top: 6pt; text-align: left; text-decoration: none; text-indent: -18pt; text-transform: none; vertical-align: baseline"><font color="#000000"> 1 Click <span style="font-style: normal; text-decoration: none; text-transform: none; vertical-align: baseline">'''<font color="#000000">[[Image:iconDrawLineVOI.jpg]] .</font>'''</span><br /></font></div><div style="font-style: normal; font-weight: normal; margin-bottom: 0pt; margin-left: 18pt; margin-right: 0pt; margin-top: 6pt; text-align: left; text-decoration: none; text-indent: -18pt; text-transform: none; vertical-align: baseline"><font color="#000000"> 2 Click in the image where the line should begin and drag the line to where it should end.<br /></font></div><div style="font-style: normal; font-weight: normal; margin-bottom: 0pt; margin-left: 18pt; margin-right: 0pt; margin-top: 6pt; text-align: left; text-decoration: none; text-indent: 0pt; text-transform: none; vertical-align: baseline"><font color="#000000"> The numbers beneath the line indicate the length of the line in millimeters.<br /></font></div><div style="font-style: normal; font-weight: normal; margin-bottom: 0pt; margin-left: 18pt; margin-right: 0pt; margin-top: 6pt; text-align: left; text-decoration: none; text-indent: 0pt; text-transform: none; vertical-align: baseline"><font color="#000000"> To change the line VOI, simply click on the VOI and then drag it to another position in the image.<br /></font></div><div style="font-style: normal; font-weight: normal; margin-bottom: 5pt; margin-left: 0pt; margin-right: 0pt; margin-top: 5pt; text-align: left; text-decoration: none; text-indent: 0pt; text-transform: none; vertical-align: baseline"><font color="#000000"> <br clear="all" />
| + | You can create point or line VOIs on the images.<br /> |
| | + | '''To create point VOIs'''<br /> |
| | + | 1 Click [[Image:iconPoint.jpg]] .<br /> |
| | + | 2 Click in the image where you want to create a point.<br /> |
| | + | 3 Repeat steps 1 and 2 for all other desired points.<br /> |
| | + | |
| | + | '''To draw line VOIs'''<br /> |
| | + | 1 Click <span style="font-style: normal; text-decoration: none; text-transform: none; vertical-align: baseline">'''<font color="#000000">[[Image:iconDrawLineVOI.jpg]] .</font>'''</span><br /> |
| | + | 2 Click in the image where the line should begin and drag the line to where it should end.<br /> |
| | + | The numbers beneath the line indicate the length of the line in millimeters.<br /> |
| | + | To change the line VOI, simply click on the VOI and then drag it to another position in the image.<br /> |
| | | | |
| | {| | | {| |
| Line 44: |
Line 56: |
| | |} | | |} |
| | | | |
| − | <br clear="all" /><span style="font-style: normal; text-decoration: none; text-transform: none; vertical-align: baseline">'''<font color="#000000">Note:</font>'''</span> You can only create one line VOI per orthogonal plane, although you can create a line VOI in each one of the three orthogonal planes.<br /></font></div><div style="font-style: normal; margin-bottom: 6pt; margin-left: 0pt; margin-right: 0pt; margin-top: 14pt; text-align: left; text-decoration: none; text-indent: 0pt; text-transform: none; vertical-align: baseline">'''<font color="#000000"> <span style="font-style: normal; text-decoration: none; text-transform: none; vertical-align: baseline">'''<font color="#000000">To delete line VOIs</font>'''</span><br /></font>'''</div><div style="font-style: normal; font-weight: normal; margin-bottom: 6pt; margin-left: 0pt; margin-right: 0pt; margin-top: 0pt; text-align: left; text-decoration: none; text-indent: 0pt; text-transform: none; vertical-align: baseline"><font color="#000000"> You cannot delete a line VOI. However, you can remove the display of the line VOI on the image. To do so, click [[Image:iconTraverseImage.jpg]] . The line VOI disappears.<br /></font></div><div style="font-style: normal; font-weight: normal; margin-bottom: 0pt; margin-left: 0pt; margin-right: 0pt; margin-top: 0pt; text-align: left; text-decoration: none; text-indent: 0pt; text-transform: none; vertical-align: baseline"><font color="#000000"> <br /></font></div><div style="font-style: normal; font-weight: normal; margin-bottom: 0pt; margin-left: 0pt; margin-right: 0pt; margin-top: 0pt; text-align: left; text-decoration: none; text-indent: 0pt; text-transform: none; vertical-align: baseline"><font color="#000000">
| + | You can only create one line VOI per orthogonal plane, although you can create a line VOI in each one of the three orthogonal planes.<br /> |
| | + | |
| | + | '''To delete line VOIs'''<br /> |
| | + | You cannot delete a line VOI. However, you can remove the display of the line VOI on the image. To do so, click [[Image:iconTraverseImage.jpg]] . The line VOI disappears.<br /> |
| | | | |
| | {| border="1" cellpadding="5" | | {| border="1" cellpadding="5" |
| − | |+ <div style="font-style: normal; margin-bottom: 3pt; margin-left: 0pt; margin-right: 0pt; margin-top: 9pt; text-align: left; text-decoration: none; text-indent: 0pt; text-transform: none; vertical-align: baseline">'''<font color="#000000"> Figure 3. Triplanar-Dual window <br /></font>'''</div> | + | |+ '''Figure 3. Triplanar-Dual window''' |
| | |- | | |- |
| | | rowspan="1" colspan="3" | | | | rowspan="1" colspan="3" | |
| Line 232: |
Line 247: |
| | |} | | |} |
| | | | |
| − | <br />
| |
| − | <div style="font-style: normal; margin-bottom: 6pt; margin-left: 0pt; margin-right: 0pt; margin-top: 14pt; text-align: left; text-decoration: none; text-indent: 0pt; text-transform: none; vertical-align: baseline">'''<font color="#000000"> <span style="font-style: normal; text-decoration: none; text-transform: none; vertical-align: baseline">'''<font color="#000000">To delete point VOIs</font>'''</span><br /></font>'''</div><div style="font-style: normal; font-weight: normal; margin-bottom: 0pt; margin-left: 18pt; margin-right: 0pt; margin-top: 6pt; text-align: left; text-decoration: none; text-indent: -18pt; text-transform: none; vertical-align: baseline"><font color="#000000"> 1 Click the first point on the image aligning the middle of the cursor with the center of the point.<br /></font></div><div style="font-style: normal; font-weight: normal; margin-bottom: 0pt; margin-left: 18pt; margin-right: 0pt; margin-top: 6pt; text-align: left; text-decoration: none; text-indent: -18pt; text-transform: none; vertical-align: baseline"><font color="#000000"> 2 Click [[Image:iconDelete.jpg]] . The point disappears.<br /></font></div><div style="font-style: normal; font-weight: normal; margin-bottom: 0pt; margin-left: 18pt; margin-right: 0pt; margin-top: 6pt; text-align: left; text-decoration: none; text-indent: -18pt; text-transform: none; vertical-align: baseline"><font color="#000000"> 3 Repeat the first two steps for every point you want to delete.<br /></font></div>
| |
| | | | |
| − | === Aligning the datasets ===
| + | '''To delete point VOIs'''<br /> |
| | + | 1 Click the first point on the image aligning the middle of the cursor with the center of the point.<br /> |
| | + | 2 Click [[Image:iconDelete.jpg]] . The point disappears.<br /> |
| | + | 3 Repeat the first two steps for every point you want to delete.<br /> |
| | | | |
| − | <div style="font-style: normal; font-weight: normal; margin-bottom: 6pt; margin-left: 0pt; margin-right: 0pt; margin-top: 0pt; text-align: left; text-decoration: none; text-indent: 0pt; text-transform: none; vertical-align: baseline"><font color="#000000"> The Alignment Tool icon, [[Image:iconAlignmentTool.jpg]] , allows you to create a new transformation matrix for the dataset.<br /></font></div><div style="font-style: normal; font-weight: normal; margin-bottom: 0pt; margin-left: 18pt; margin-right: 0pt; margin-top: 6pt; text-align: left; text-decoration: none; text-indent: -18pt; text-transform: none; vertical-align: baseline"><font color="#000000"> 1 Click [[Image:iconAlignmentTool.jpg]] . <br /></font></div><div style="font-style: normal; font-weight: normal; margin-bottom: 0pt; margin-left: 18pt; margin-right: 0pt; margin-top: 6pt; text-align: left; text-decoration: none; text-indent: 0pt; text-transform: none; vertical-align: baseline"><font color="#000000"> A closed angle appears on each of the images in the triplanar-dual view. On Image A, the angle is red; on Image B, it's yellow; on the blended image, the angle is green.<br /></font></div><div style="font-style: normal; font-weight: normal; margin-bottom: 0pt; margin-left: 18pt; margin-right: 0pt; margin-top: 6pt; text-align: left; text-decoration: none; text-indent: -18pt; text-transform: none; vertical-align: baseline"><font color="#000000"> 2 Move the cursor to the arrow on the thin line to the right, and align the cursor with the end of the arrow. At this time, the cursor should be a red cross.<br /></font></div><div style="font-style: normal; font-weight: normal; margin-bottom: 0pt; margin-left: 0pt; margin-right: 0pt; margin-top: 0pt; text-align: left; text-decoration: none; text-indent: 0pt; text-transform: none; vertical-align: baseline"><font color="#000000">
| + | === Aligning the datasets === |
| | + | The Alignment Tool icon, [[Image:iconAlignmentTool.jpg]] , allows you to create a new transformation matrix for the dataset.<br />< |
| | + | 1 Click [[Image:iconAlignmentTool.jpg]] . <br /> |
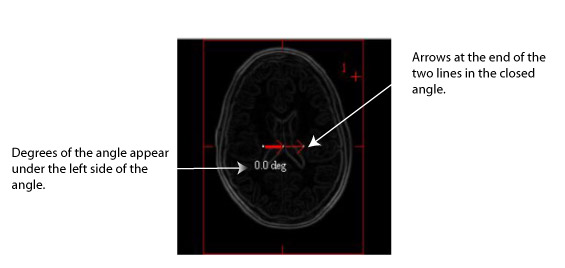
| | + | A closed angle appears on each of the images in the triplanar-dual view. On Image A, the angle is red; on Image B, it's yellow; on the blended image, the angle is green.<br /> |
| | + | 2 Move the cursor to the arrow on the thin line to the right, and align the cursor with the end of the arrow. At this time, the cursor should be a red cross.<br /> |
| | | | |
| | {| border="1" cellpadding="5" | | {| border="1" cellpadding="5" |
| − | |+ <div style="font-style: normal; margin-bottom: 3pt; margin-left: 0pt; margin-right: 0pt; margin-top: 9pt; text-align: left; text-decoration: none; text-indent: 0pt; text-transform: none; vertical-align: baseline">'''<font color="#000000"> Figure 4. Closed angle that appears on each of the images<br /></font>'''</div> | + | |+ '''Figure 4. Closed angle that appears on each of the images''' |
| | |- | | |- |
| | | | | | |
| | [[Image:exampleAngle2.jpg]] | | [[Image:exampleAngle2.jpg]] |
| | |} | | |} |
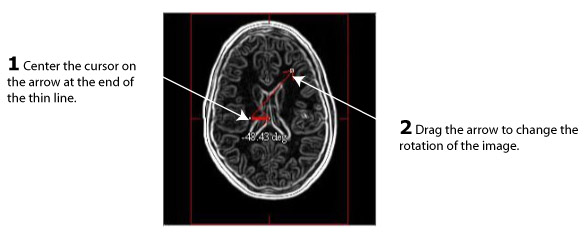
| − | | + | 3 Change the size of the angle by dragging the arrow on the thin line up or down depending on the type of angle you want to create. The exact number of degrees appear on the left below the angle.<br /> |
| − | <br /></font></div><div style="font-style: normal; font-weight: normal; margin-bottom: 0pt; margin-left: 18pt; margin-right: 0pt; margin-top: 6pt; text-align: left; text-decoration: none; text-indent: -18pt; text-transform: none; vertical-align: baseline"><font color="#000000"> 3 Change the size of the angle by dragging the arrow on the thin line up or down depending on the type of angle you want to create. The exact number of degrees appear on the left below the angle.<br /></font></div><div style="font-style: normal; font-weight: normal; margin-bottom: 0pt; margin-left: 18pt; margin-right: 0pt; margin-top: 6pt; text-align: left; text-decoration: none; text-indent: -18pt; text-transform: none; vertical-align: baseline"><font color="#000000"> 4 Release the mouse button when you reach the desired number of degrees.<br /></font></div>
| + | 4 Release the mouse button when you reach the desired number of degrees.<br /> |
| − | | + | |
| − | <div style="font-style: normal; font-weight: normal; margin-bottom: 0pt; margin-left: 0pt; margin-right: 0pt; margin-top: 0pt; text-align: left; text-decoration: none; text-indent: 0pt; text-transform: none; vertical-align: baseline"><font color="#000000">
| + | |
| | | | |
| | {| border="1" cellpadding="5" | | {| border="1" cellpadding="5" |
| − | |+ <div style="font-style: normal; margin-bottom: 3pt; margin-left: 0pt; margin-right: 0pt; margin-top: 9pt; text-align: left; text-decoration: none; text-indent: 0pt; text-transform: none; vertical-align: baseline">'''<font color="#000000"> Figure 5. Changing the angle by dragging the arrow on the thin line<br /></font>'''</div> | + | |+ '''Figure 5. Changing the angle by dragging the arrow on the thin line''' |
| | |- | | |- |
| | | | | | |
| Line 257: |
Line 275: |
| | |} | | |} |
| | | | |
| − | <br /></font></div><div style="font-style: normal; font-weight: normal; margin-bottom: 0pt; margin-left: 18pt; margin-right: 0pt; margin-top: 6pt; text-align: left; text-decoration: none; text-indent: -18pt; text-transform: none; vertical-align: baseline"><font color="#000000"> 5 Click on the image or on any other area of the triplanar-dual view. The arrows disappear from the angle.<br /></font></div><div style="font-style: normal; font-weight: normal; margin-bottom: 0pt; margin-left: 18pt; margin-right: 0pt; margin-top: 6pt; text-align: left; text-decoration: none; text-indent: -18pt; text-transform: none; vertical-align: baseline"><font color="#000000"> 6 Click on the angle again to be able to change the angle again. The arrows reappear and you can repeat the previous steps.<br />
| + | 5 Click on the image or on any other area of the triplanar-dual view. The arrows disappear from the angle.<br /> |
| | + | 6 Click on the angle again to be able to change the angle again. The arrows reappear and you can repeat the previous steps.<br /> |
| | | | |
| | === Finding the center of image datasets === | | === Finding the center of image datasets === |
| − | | + | To find the center of the dataset, click [[Image:iconCenterVolume.jpg]] . The center of each image dataset, shown as [[Image:crosshairBlackWhite.jpg]] , appears in each image in the triplanar-dual view.<br /> |
| − | <div style="font-style: normal; font-weight: normal; margin-bottom: 6pt; margin-left: 0pt; margin-right: 0pt; margin-top: 0pt; text-align: left; text-decoration: none; text-indent: 0pt; text-transform: none; vertical-align: baseline"><font color="#000000"> To find the center of the dataset, click [[Image:iconCenterVolume.jpg]] . The center of each image dataset, shown as [[Image:crosshairBlackWhite.jpg]] , appears in each image in the triplanar-dual view.<br /></font></div>
| + | |
| | | | |
| | === Erasing part or all of drawings === | | === Erasing part or all of drawings === |
| | + | If you used the paint brush to draw on the image, you may at times find a need to erase a part of the drawing or the entire drawing.<br /> |
| | + | [[Image:MIPAV_VisualizationTools189.gif]] <br /> |
| | + | |
| | + | Make sure that you want to erase a part of the drawing or the entire drawing. There is no undo.<br /> |
| | + | '''To erase a part of the drawing'''<br /> |
| | + | 1 Select the image that contains the drawing you want to erase. In other words, select Image A, Image B, or Both.<br /> |
| | + | 2 Click [[Image:iconErase.jpg]] .<br /> |
| | + | 3 Click on the part of the drawing that you want to erase.<br /> |
| | + | 4 Repeat step 3 for as long as needed.<br /> |
| | | | |
| − | <div style="font-style: normal; font-weight: normal; margin-bottom: 6pt; margin-left: 0pt; margin-right: 0pt; margin-top: 0pt; text-align: left; text-decoration: none; text-indent: 0pt; text-transform: none; vertical-align: baseline"><font color="#000000"> If you used the paint brush to draw on the image, you may at times find a need to erase a part of the drawing or the entire drawing.<br /></font></div><div style="font-style: normal; font-weight: normal; margin-bottom: 5pt; margin-left: 0pt; margin-right: 36pt; margin-top: 5pt; text-align: left; text-decoration: none; text-indent: 0pt; text-transform: none; vertical-align: baseline"><font color="#000000"> <span style="font-style: normal; text-decoration: none; text-transform: none; vertical-align: baseline">'''<font color="#000000"><br clear="all" /> [[Image:MIPAV_VisualizationTools189.gif]] <br clear="all" />Caution</font>'''</span><nowiki>: Make sure that you want to erase a part of the drawing or the entire drawing. There is no undo.</nowiki><br /></font></div><div style="font-style: normal; margin-bottom: 6pt; margin-left: 0pt; margin-right: 0pt; margin-top: 14pt; text-align: left; text-decoration: none; text-indent: 0pt; text-transform: none; vertical-align: baseline">'''<font color="#000000"> <span style="font-style: normal; text-decoration: none; text-transform: none; vertical-align: baseline">'''<font color="#000000">To erase a part of the drawing</font>'''</span><br /></font>'''</div><div style="font-style: normal; font-weight: normal; margin-bottom: 0pt; margin-left: 18pt; margin-right: 0pt; margin-top: 6pt; text-align: left; text-decoration: none; text-indent: -18pt; text-transform: none; vertical-align: baseline"><font color="#000000"> 1 Select the image that contains the drawing you want to erase. In other words, select Image A, Image B, or Both.<br /></font></div><div style="font-style: normal; font-weight: normal; margin-bottom: 0pt; margin-left: 18pt; margin-right: 0pt; margin-top: 6pt; text-align: left; text-decoration: none; text-indent: -18pt; text-transform: none; vertical-align: baseline"><font color="#000000"> 2 Click [[Image:iconErase.jpg]] .<br /></font></div><div style="font-style: normal; font-weight: normal; margin-bottom: 0pt; margin-left: 18pt; margin-right: 0pt; margin-top: 6pt; text-align: left; text-decoration: none; text-indent: -18pt; text-transform: none; vertical-align: baseline"><font color="#000000"> 3 Click on the part of the drawing that you want to erase.<br /></font></div><div style="font-style: normal; font-weight: normal; margin-bottom: 0pt; margin-left: 18pt; margin-right: 0pt; margin-top: 6pt; text-align: left; text-decoration: none; text-indent: -18pt; text-transform: none; vertical-align: baseline"><font color="#000000"> 4 Repeat step 3 for as long as needed.<br /></font></div><div style="font-style: normal; margin-bottom: 6pt; margin-left: 0pt; margin-right: 0pt; margin-top: 14pt; text-align: left; text-decoration: none; text-indent: 0pt; text-transform: none; vertical-align: baseline">'''<font color="#000000"> <span style="font-style: normal; text-decoration: none; text-transform: none; vertical-align: baseline">'''<font color="#000000">To erase all of the drawing</font>'''</span><br /></font>'''</div><div style="font-style: normal; font-weight: normal; margin-bottom: 0pt; margin-left: 18pt; margin-right: 0pt; margin-top: 6pt; text-align: left; text-decoration: none; text-indent: -18pt; text-transform: none; vertical-align: baseline"><font color="#000000"> 1 Select the image that contains the drawing you want to erase. Specifically, select Image A, Image B, or Both.<br /></font></div><div style="font-style: normal; font-weight: normal; margin-bottom: 0pt; margin-left: 18pt; margin-right: 0pt; margin-top: 6pt; text-align: left; text-decoration: none; text-indent: -18pt; text-transform: none; vertical-align: baseline"><font color="#000000"> 2 Click [[Image:iconEraseAll.jpg]] . MIPAV removes all of the paint from the image.<br /></font></div>
| + | '''To erase all of the drawing'''<br /> |
| | + | 1 Select the image that contains the drawing you want to erase. Specifically, select Image A, Image B, or Both.<br />< |
| | + | 2 Click [[Image:iconEraseAll.jpg]] . MIPAV removes all of the paint from the image.<br /></font></div> |
| | | | |
| | === Cropping images === | | === Cropping images === |
| | + | MIPAV allows you to extract the crop volume as a separate image, which is helpful if you need to work with or use only that portion of the image. The first step in cropping images is to identify what portion of the image is in the crop volume. Then you need to use the bounding cube for cropping the image.<br /> |
| | | | |
| − | <div style="font-style: normal; font-weight: normal; margin-bottom: 6pt; margin-left: 0pt; margin-right: 0pt; margin-top: 0pt; text-align: left; text-decoration: none; text-indent: 0pt; text-transform: none; vertical-align: baseline"><font color="#000000"> MIPAV allows you to extract the crop volume as a separate image, which is helpful if you need to work with or use only that portion of the image. The first step in cropping images is to identify what portion of the image is in the crop volume. Then you need to use the bounding cube for cropping the image.<br /></font></div><div style="font-style: normal; margin-bottom: 6pt; margin-left: 0pt; margin-right: 0pt; margin-top: 14pt; text-align: left; text-decoration: none; text-indent: 0pt; text-transform: none; vertical-align: baseline">'''<font color="#000000"> <span style="font-style: normal; text-decoration: none; text-transform: none; vertical-align: baseline">'''<font color="#000000">To select the crop volume</font>'''</span><br /></font>'''</div><div style="font-style: normal; font-weight: normal; margin-bottom: 0pt; margin-left: 18pt; margin-right: 0pt; margin-top: 6pt; text-align: left; text-decoration: none; text-indent: -18pt; text-transform: none; vertical-align: baseline"><font color="#000000"> 1 Click [[Image:iconCropVolume.jpg]] . A red box appears on each image in the triplanar-dual view. <br /></font></div><div style="font-style: normal; font-weight: normal; margin-bottom: 0pt; margin-left: 18pt; margin-right: 0pt; margin-top: 6pt; text-align: left; text-decoration: none; text-indent: -18pt; text-transform: none; vertical-align: baseline"><font color="#000000"> 2 Align the cursor with one of the corner points of the box, and enlarge or reduce the size of the box.<br /></font></div><div style="font-style: normal; font-weight: normal; margin-bottom: 0pt; margin-left: 18pt; margin-right: 0pt; margin-top: 6pt; text-align: left; text-decoration: none; text-indent: -18pt; text-transform: none; vertical-align: baseline"><font color="#000000"> 3 Repeat the previous step on each corner point as required to enclose the portion of the image you want to be included in the cropped image. <br /></font></div><div style="font-style: normal; font-weight: normal; margin-bottom: 0pt; margin-left: 18pt; margin-right: 0pt; margin-top: 6pt; text-align: left; text-decoration: none; text-indent: 0pt; text-transform: none; vertical-align: baseline"><font color="#000000"> The numbers on the sides of the box indicate the length and width of the box in millimeters.<br /></font></div><div style="font-style: normal; font-weight: normal; margin-bottom: 5pt; margin-left: 0pt; margin-right: 0pt; margin-top: 5pt; text-align: left; text-decoration: none; text-indent: 0pt; text-transform: none; vertical-align: baseline"><font color="#000000"> <br clear="all" />
| + | '''To select the crop volume'''<br /> |
| | + | 1 Click [[Image:iconCropVolume.jpg]] . A red box appears on each image in the triplanar-dual view. <br /> |
| | + | 2 Align the cursor with one of the corner points of the box, and enlarge or reduce the size of the box.<br /> |
| | + | 3 Repeat the previous step on each corner point as required to enclose the portion of the image you want to be included in the cropped image. <br />The numbers on the sides of the box indicate the length and width of the box in millimeters.<br /> |
| | | | |
| | {| align="left" | | {| align="left" |
| Line 276: |
Line 309: |
| | |} | | |} |
| | | | |
| − | <br clear="all" /><span style="font-style: normal; text-decoration: none; text-transform: none; vertical-align: baseline">'''<font color="#000000">Note:</font>'''</span> The size of the box changes proportionally on all of the images shown in the triplanar-dual view.<br /></font></div><div style="font-style: normal; font-weight: normal; margin-bottom: 0pt; margin-left: 18pt; margin-right: 0pt; margin-top: 6pt; text-align: left; text-decoration: none; text-indent: -18pt; text-transform: none; vertical-align: baseline"><font color="#000000"> 4 Release the mouse button when you are finished making changes to the box.<br /></font></div><div style="font-style: normal; margin-bottom: 6pt; margin-left: 0pt; margin-right: 0pt; margin-top: 14pt; text-align: left; text-decoration: none; text-indent: 0pt; text-transform: none; vertical-align: baseline">'''<font color="#000000"> <span style="font-style: normal; text-decoration: none; text-transform: none; vertical-align: baseline">'''<font color="#000000">To crop images</font>'''</span><br /></font>'''</div><div style="font-style: normal; font-weight: normal; margin-bottom: 0pt; margin-left: 18pt; margin-right: 0pt; margin-top: 6pt; text-align: left; text-decoration: none; text-indent: -18pt; text-transform: none; vertical-align: baseline"><font color="#000000"> 1 Select one of the following:<br /></font></div><div style="font-style: normal; font-weight: normal; margin-bottom: 0pt; margin-left: 36pt; margin-right: 0pt; margin-top: 6pt; text-align: left; text-decoration: none; text-indent: -12pt; text-transform: none; vertical-align: baseline"><font color="#000000"> Image A if you want only the cropped area in Image A<br /></font></div><div style="font-style: normal; font-weight: normal; margin-bottom: 0pt; margin-left: 36pt; margin-right: 0pt; margin-top: 6pt; text-align: left; text-decoration: none; text-indent: -12pt; text-transform: none; vertical-align: baseline"><font color="#000000"> Image B if you want only the cropped area in Image B<br /></font></div><div style="font-style: normal; font-weight: normal; margin-bottom: 0pt; margin-left: 36pt; margin-right: 0pt; margin-top: 6pt; text-align: left; text-decoration: none; text-indent: -12pt; text-transform: none; vertical-align: baseline"><font color="#000000"> Both if you want both the cropped area in Image A and the cropped area in Image B<br /></font></div><div style="font-style: normal; font-weight: normal; margin-bottom: 0pt; margin-left: 18pt; margin-right: 0pt; margin-top: 6pt; text-align: left; text-decoration: none; text-indent: -18pt; text-transform: none; vertical-align: baseline"><font color="#000000"> 2 Click [[Image:iconCropbutton.jpg]] . The Crop Image dialog box appears.<br /></font></div><div style="font-style: normal; font-weight: normal; margin-bottom: 0pt; margin-left: 0pt; margin-right: 0pt; margin-top: 0pt; text-align: left; text-decoration: none; text-indent: 0pt; text-transform: none; vertical-align: baseline"><font color="#000000"> <br /></font></div><div style="font-style: normal; font-weight: normal; margin-bottom: 0pt; margin-left: 0pt; margin-right: 0pt; margin-top: 0pt; text-align: left; text-decoration: none; text-indent: 0pt; text-transform: none; vertical-align: baseline"><font color="#000000"> <br /></font></div><div style="font-style: normal; font-weight: normal; margin-bottom: 0pt; margin-left: 0pt; margin-right: 0pt; margin-top: 0pt; text-align: left; text-decoration: none; text-indent: 0pt; text-transform: none; vertical-align: baseline"><font color="#000000">
| + | '''Note:''' The size of the box changes proportionally on all of the images shown in the triplanar-dual view.<br /> |
| | + | 4 Release the mouse button when you are finished making changes to the box.<br /> |
| | + | |
| | + | '''To crop images'''<br /> |
| | + | 1 Select one of the following:<br /> |
| | + | Image A if you want only the cropped area in Image A<br /> |
| | + | Image B if you want only the cropped area in Image B<br /> |
| | + | Both if you want both the cropped area in Image A and the cropped area in Image B<br /> |
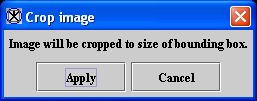
| | + | 2 Click [[Image:iconCropbutton.jpg]] . The Crop Image dialog box appears.<br /> |
| | | | |
| | {| border="1" cellpadding="5" | | {| border="1" cellpadding="5" |
| − | |+ <div style="font-style: normal; margin-bottom: 3pt; margin-left: 0pt; margin-right: 0pt; margin-top: 9pt; text-align: left; text-decoration: none; text-indent: 0pt; text-transform: none; vertical-align: baseline">'''<font color="#000000"> Figure 6. Crop Image dialog box<br /></font>'''</div> | + | |+ '''Figure 6. Crop Image dialog box''' |
| | |- | | |- |
| | | | | | |
| Line 299: |
Line 340: |
| | |} | | |} |
| | | | |
| − | <br /></font></div><div style="font-style: normal; font-weight: normal; margin-bottom: 0pt; margin-left: 18pt; margin-right: 0pt; margin-top: 6pt; text-align: left; text-decoration: none; text-indent: -18pt; text-transform: none; vertical-align: baseline"><font color="#000000"> 3 Click Apply.<br /></font></div><div style="font-style: normal; font-weight: normal; margin-bottom: 0pt; margin-left: 18pt; margin-right: 0pt; margin-top: 6pt; text-align: left; text-decoration: none; text-indent: 0pt; text-transform: none; vertical-align: baseline"><font color="#000000"> The cropped area in the image you selected appears in a separate image window. So, if you selected Image A only or Image B only, one image appears. If you selected Both, two image windows appear: one for Image A and one for Image B.<br /></font></div><div style="font-style: normal; font-weight: normal; margin-bottom: 0pt; margin-left: 0pt; margin-right: 0pt; margin-top: 0pt; text-align: left; text-decoration: none; text-indent: 0pt; text-transform: none; vertical-align: baseline"><font color="#000000">
| + | |
| | + | 3 Click Apply.<br /> |
| | + | The cropped area in the image you selected appears in a separate image window. So, if you selected Image A only or Image B only, one image appears. If you selected Both, two image windows appear: one for Image A and one for Image B.<br /> |
| | | | |
| | {| border="1" cellpadding="5" | | {| border="1" cellpadding="5" |
| Line 325: |
Line 368: |
| | |} | | |} |
| | | | |
| − | <br /></font></div>
| |
| | | | |
| | After you generate the cropped images, you can run algorithms on the images, apply a quick LUT on the images, or use any other image processing that's available in the MIPAV window on them. | | After you generate the cropped images, you can run algorithms on the images, apply a quick LUT on the images, or use any other image processing that's available in the MIPAV window on them. |
| | | | |
| | === Magnifying or minifying images === | | === Magnifying or minifying images === |
| − | | + | Like the image toolbar on the MIPAV window, the Triplanar-Dual window includes the following magnification icons:<br /> |
| − | <div style="font-style: normal; font-weight: normal; margin-bottom: 6pt; margin-left: 0pt; margin-right: 0pt; margin-top: 0pt; text-align: left; text-decoration: none; text-indent: 0pt; text-transform: none; vertical-align: baseline"><font color="#000000"> Like the image toolbar on the MIPAV window, the Triplanar-Dual window includes the following magnification icons:<br /></font></div><div style="font-style: normal; font-weight: normal; margin-bottom: 0pt; margin-left: 24pt; margin-right: 0pt; margin-top: 5pt; text-align: left; text-decoration: none; text-indent: -24pt; text-transform: none; vertical-align: baseline"><font color="#000000"> [[Image:iconMagnify.jpg]] <span style="font-style: normal; text-decoration: none; text-transform: none; vertical-align: baseline">'''<font color="#000000">, the Magnify image 2.0x icon</font>'''</span>-To magnify images to twice their current size<br /></font></div><div style="font-style: normal; font-weight: normal; margin-bottom: 0pt; margin-left: 24pt; margin-right: 0pt; margin-top: 5pt; text-align: left; text-decoration: none; text-indent: -24pt; text-transform: none; vertical-align: baseline"><font color="#000000"> <span style="font-style: normal; text-decoration: none; text-transform: none; vertical-align: baseline">'''<font color="#000000">[[Image:iconMagnifyImage0.5x.jpg]] , the Magnify image 0.5x icon</font>'''</span>-To reduce images to half their current size<br /></font></div><div style="font-style: normal; font-weight: normal; margin-bottom: 0pt; margin-left: 24pt; margin-right: 0pt; margin-top: 5pt; text-align: left; text-decoration: none; text-indent: -24pt; text-transform: none; vertical-align: baseline"><font color="#000000"> <span style="font-style: normal; text-decoration: none; text-transform: none; vertical-align: baseline">'''<font color="#000000">[[Image:iconOriginalMagnification.jpg]] , the Magnify image 1.0x</font>'''</span> -To restore their original size <br /></font></div>
| + | [[Image:iconMagnify.jpg]]<br /> '''the Magnify image 2.0x icon''' -To magnify images to twice their current size<br /> |
| − | | + | [[Image:iconMagnifyImage0.5x.jpg]]<br /> '''the Magnify image 0.5x icon<''' -To reduce images to half their current size<br /> |
| | + | [[Image:iconOriginalMagnification.jpg]]<br /> '''the Magnify image 1.0x''' -To restore their original size <br /> |
| | For information on how to use these icons, refer to "magnify or reduce a region of the image. You can magnify images to 32 times their original size, reduce them to one-fourth their original size, or restore them to their original size.". | | For information on how to use these icons, refer to "magnify or reduce a region of the image. You can magnify images to 32 times their original size, reduce them to one-fourth their original size, or restore them to their original size.". |
| | | | |
| | === Drawing on images === | | === Drawing on images === |
| − | | + | You draw on images in the triplanar-dual view in the same way as you do in the MIPAV window. However, any of the changes you make on the triplanar-dual view are also made on the original images.<br /> |
| − | <div style="font-style: normal; font-weight: normal; margin-bottom: 6pt; margin-left: 0pt; margin-right: 0pt; margin-top: 0pt; text-align: left; text-decoration: none; text-indent: 0pt; text-transform: none; vertical-align: baseline"><font color="#000000"> You draw on images in the triplanar-dual view in the same way as you do in the MIPAV window. However, any of the changes you make on the triplanar-dual view are also made on the original images.<br /></font></div>
| + | |
| | | | |
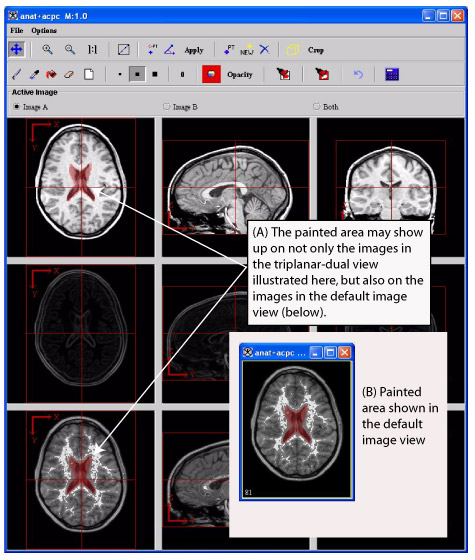
| | For example, if you highlight a particular area in the image in the triplanar-dual view, the same change is made on all of the images in the triplanar-dual view, but also on the images in the default view. | | For example, if you highlight a particular area in the image in the triplanar-dual view, the same change is made on all of the images in the triplanar-dual view, but also on the images in the default view. |
| | | | |
| − | <div style="font-style: normal; margin-bottom: 6pt; margin-left: 0pt; margin-right: 0pt; margin-top: 14pt; text-align: left; text-decoration: none; text-indent: 0pt; text-transform: none; vertical-align: baseline">'''<font color="#000000"> <span style="font-style: normal; text-decoration: none; text-transform: none; vertical-align: baseline">'''<font color="#000000">To change the paint color</font>'''</span><br /></font>'''</div><div style="font-style: normal; font-weight: normal; margin-bottom: 6pt; margin-left: 0pt; margin-right: 0pt; margin-top: 0pt; text-align: left; text-decoration: none; text-indent: 0pt; text-transform: none; vertical-align: baseline"><font color="#000000"> Click [[Image:iconChangePaintColor.jpg]] , the Change Paint Color icon. The Pick Paint Color dialog box opens. For instructions on how to use this dialog box to change the paint color, refer to "To change background and border colors".<br /></font></div><div style="font-style: normal; font-weight: normal; margin-bottom: 0pt; margin-left: 0pt; margin-right: 0pt; margin-top: 0pt; text-align: left; text-decoration: none; text-indent: 0pt; text-transform: none; vertical-align: baseline"><font color="#000000"> <br /></font></div><div style="font-style: normal; font-weight: normal; margin-bottom: 0pt; margin-left: 0pt; margin-right: 0pt; margin-top: 0pt; text-align: left; text-decoration: none; text-indent: 0pt; text-transform: none; vertical-align: baseline"><font color="#000000">
| + | '''To change the paint color'''<br /> |
| | + | Click [[Image:iconChangePaintColor.jpg]] , the Change Paint Color icon. The Pick Paint Color dialog box opens. For instructions on how to use this dialog box to change the paint color, refer to "To change background and border colors".<br /> |
| | | | |
| | {| border="1" cellpadding="5" | | {| border="1" cellpadding="5" |
| − | |+ <div style="font-style: normal; margin-bottom: 3pt; margin-left: 0pt; margin-right: 0pt; margin-top: 9pt; text-align: left; text-decoration: none; text-indent: 0pt; text-transform: none; vertical-align: baseline">'''<font color="#000000"> Figure 162. Painting an area on images in the triplanar-dual view <br /></font>'''</div> | + | |+ '''Figure 7. Painting an area on images in the triplanar-dual view ''' |
| | |- | | |- |
| − | | | + | |rowspan="1" colspan="2"| |
| − | <div style="font-style: normal; font-weight: normal; margin-bottom: 0pt; margin-left: 0pt; margin-right: 0pt; margin-top: 0pt; text-align: left; text-decoration: none; text-indent: 0pt; text-transform: none; vertical-align: baseline"><font color="#000000"> <br clear="all" />{| align="center"
| + | |
| − | | | + | |
| | [[Image:exampleTriplanarDualPaintedArea.jpg]] | | [[Image:exampleTriplanarDualPaintedArea.jpg]] |
| − | |}<br clear="all" /><br /></font></div>
| |
| | |- | | |- |
| | | | | | |
| − | <div class="CellBody">Painting an area on images in the triplanar-dual view affects images in the default image view</div> | + | <div class="CellBody">Painting an area on images in the triplanar-dual view affects images in the default image view</div> |
| | |} | | |} |
| | | | |
| − | <br /></font></div><div style="font-style: normal; margin-bottom: 6pt; margin-left: 0pt; margin-right: 0pt; margin-top: 14pt; text-align: left; text-decoration: none; text-indent: 0pt; text-transform: none; vertical-align: baseline">'''<font color="#000000"> <span style="font-style: normal; text-decoration: none; text-transform: none; vertical-align: baseline">'''<font color="#000000">To change paint opacity</font>'''</span><br /></font>'''</div><div style="font-style: normal; font-weight: normal; margin-bottom: 0pt; margin-left: 18pt; margin-right: 0pt; margin-top: 6pt; text-align: left; text-decoration: none; text-indent: -18pt; text-transform: none; vertical-align: baseline"><font color="#000000"> 1 Click [[Image:iconOpacity.jpg]] . The Paint Opacity dialog box opens.<br /></font></div><div style="font-style: normal; font-weight: normal; margin-bottom: 0pt; margin-left: 18pt; margin-right: 0pt; margin-top: 6pt; text-align: left; text-decoration: none; text-indent: -18pt; text-transform: none; vertical-align: baseline"><font color="#000000"> 2 Move the Opacity slider to the level of opaqueness you want. For example, to make the paint color more opaque, or solid, move the slider to the right. To make the paint color more transparent, move the slider to the left. <br /></font></div><div style="font-style: normal; font-weight: normal; margin-bottom: 0pt; margin-left: 18pt; margin-right: 0pt; margin-top: 6pt; text-align: left; text-decoration: none; text-indent: -18pt; text-transform: none; vertical-align: baseline"><font color="#000000"> 3 Click Close when you have finished. The Paint Opacity dialog box (Figure 60) closes.<br /></font></div><div style="font-style: normal; font-weight: normal; margin-bottom: 0pt; margin-left: 0pt; margin-right: 0pt; margin-top: 0pt; text-align: left; text-decoration: none; text-indent: 0pt; text-transform: none; vertical-align: baseline"><font color="#000000">
| + | '''To change paint opacity'''<br /> |
| | + | 1 Click [[Image:iconOpacity.jpg]] . The Paint Opacity dialog box opens.<br /> |
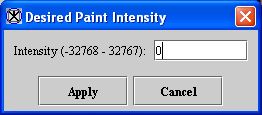
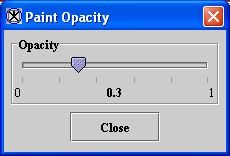
| | + | 2 Move the Opacity slider to the level of opaqueness you want. For example, to make the paint color more opaque, or solid, move the slider to the right. To make the paint color more transparent, move the slider to the left. <br />3 Click Close when you have finished. The Paint Opacity dialog box (Figure 8) closes.<br /> |
| | | | |
| | {| border="1" cellpadding="5" | | {| border="1" cellpadding="5" |
| − | |+ <div style="font-style: normal; margin-bottom: 3pt; margin-left: 0pt; margin-right: 0pt; margin-top: 9pt; text-align: left; text-decoration: none; text-indent: 0pt; text-transform: none; vertical-align: baseline">'''<font color="#000000"> Figure 163. Paint Opacity dialog box <br /></font>'''</div> | + | |+ '''Figure 8. Paint Opacity dialog box ''' |
| | |- | | |- |
| | | | | | |
| Line 366: |
Line 408: |
| | <div class="CellBody">Indicates the opacity of the paint. The further right you move the slider, the more opaque the paint color. The further left you move the slider, the more transparent the paint color.</div> | | <div class="CellBody">Indicates the opacity of the paint. The further right you move the slider, the more opaque the paint color. The further left you move the slider, the more transparent the paint color.</div> |
| | | rowspan="2" colspan="1" | | | | rowspan="2" colspan="1" | |
| − | <div style="font-style: normal; font-weight: normal; margin-bottom: 0pt; margin-left: 0pt; margin-right: 0pt; margin-top: 0pt; text-align: left; text-decoration: none; text-indent: 0pt; text-transform: none; vertical-align: baseline"><font color="#000000"> <br clear="all" />{| align="center"
| |
| − | |
| |
| | [[Image:dialogboxPaintOpacity.jpg]] | | [[Image:dialogboxPaintOpacity.jpg]] |
| − | |}<br clear="all" /><br /></font></div>
| |
| | |- | | |- |
| | | | | | |
| Line 377: |
Line 416: |
| | |} | | |} |
| | | | |
| − | <br /></font></div><div style="font-style: normal; margin-bottom: 6pt; margin-left: 0pt; margin-right: 0pt; margin-top: 14pt; text-align: left; text-decoration: none; text-indent: 0pt; text-transform: none; vertical-align: baseline">'''<font color="#000000"> <span style="font-style: normal; text-decoration: none; text-transform: none; vertical-align: baseline">'''<font color="#000000">To calculate the volume of paint</font>'''</span><br /></font>'''</div><div style="font-style: normal; font-weight: normal; margin-bottom: 6pt; margin-left: 0pt; margin-right: 0pt; margin-top: 0pt; text-align: left; text-decoration: none; text-indent: 0pt; text-transform: none; vertical-align: baseline"><font color="#000000"> The software can calculate the volume of a painted area in the number of pixels. To do so, do the following:<br /></font></div><div style="font-style: normal; font-weight: normal; margin-bottom: 0pt; margin-left: 18pt; margin-right: 0pt; margin-top: 6pt; text-align: left; text-decoration: none; text-indent: -18pt; text-transform: none; vertical-align: baseline"><font color="#000000"> 1 Paint the area of the image in which you are interested.<br /></font></div><div style="font-style: normal; font-weight: normal; margin-bottom: 0pt; margin-left: 18pt; margin-right: 0pt; margin-top: 6pt; text-align: left; text-decoration: none; text-indent: -18pt; text-transform: none; vertical-align: baseline"><font color="#000000"> 2 Click <span style="font-style: normal; text-decoration: none; text-transform: none; vertical-align: baseline">'''<font color="#000000">[[Image:iconCalculateVolume.jpg]] </font>'''</span> to discover the volume of paint. The software lists the number of pixels in each image and the volume in millimeters on the Data page of the Output window.<br /></font></div><div style="font-style: normal; font-weight: normal; margin-bottom: 0pt; margin-left: 18pt; margin-right: 0pt; margin-top: 6pt; text-align: left; text-decoration: none; text-indent: -18pt; text-transform: none; vertical-align: baseline"><font color="#000000"> 3 Amend and save, as an option, the information on the Data page.<br /></font></div><div style="font-style: normal; font-weight: normal; margin-bottom: 0pt; margin-left: 0pt; margin-right: 0pt; margin-top: 0pt; text-align: left; text-decoration: none; text-indent: 0pt; text-transform: none; vertical-align: baseline"><font color="#000000">
| + | '''To calculate the volume of paint'''<br /> |
| | + | The software can calculate the volume of a painted area in the number of pixels. To do so, do the following:<br /> |
| | + | 1 Paint the area of the image in which you are interested.<br /> |
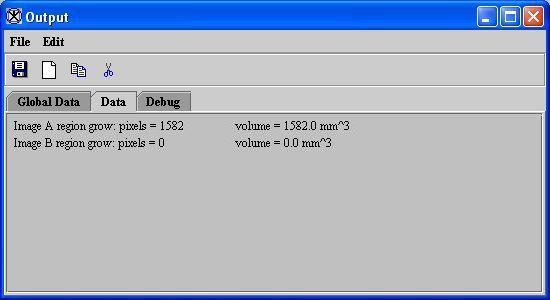
| | + | 2 Click [[Image:iconCalculateVolume.jpg]] to discover the volume of paint. The software lists the number of pixels in each image and the volume in millimeters on the Data page of the Output window.<br /> |
| | + | 3 Amend and save, as an option, the information on the Data page.<br /> |
| | | | |
| | {| border="1" cellpadding="5" | | {| border="1" cellpadding="5" |
| − | |+ <div style="font-style: normal; margin-bottom: 3pt; margin-left: 0pt; margin-right: 0pt; margin-top: 9pt; text-align: left; text-decoration: none; text-indent: 0pt; text-transform: none; vertical-align: baseline">'''<font color="#000000"> Figure 164. Output window after calculating the volume of paint<br /></font>'''</div> | + | |+ '''Figure 9. Output window after calculating the volume of paint''' |
| | |- | | |- |
| | | | | | |
| Line 386: |
Line 429: |
| | |} | | |} |
| | | | |
| − | <br /></font></div><div style="font-style: normal; margin-bottom: 6pt; margin-left: 0pt; margin-right: 0pt; margin-top: 14pt; text-align: left; text-decoration: none; text-indent: 0pt; text-transform: none; vertical-align: baseline">'''<font color="#000000"> <span style="font-style: normal; text-decoration: none; text-transform: none; vertical-align: baseline">'''<font color="#000000">To fill an area with color</font>'''</span><br /></font>'''</div><div style="font-style: normal; font-weight: normal; margin-bottom: 0pt; margin-left: 18pt; margin-right: 0pt; margin-top: 6pt; text-align: left; text-decoration: none; text-indent: -18pt; text-transform: none; vertical-align: baseline"><font color="#000000"> 1 Click [[Image:iconFills.jpg]] . The Paint Grow dialog box opens.<br /></font></div><div style="font-style: normal; font-weight: normal; margin-bottom: 0pt; margin-left: 18pt; margin-right: 0pt; margin-top: 6pt; text-align: left; text-decoration: none; text-indent: -18pt; text-transform: none; vertical-align: baseline"><font color="#000000"> 2 Complete the dialog box.<br /></font></div><div style="font-style: normal; font-weight: normal; margin-bottom: 0pt; margin-left: 18pt; margin-right: 0pt; margin-top: 6pt; text-align: left; text-decoration: none; text-indent: -18pt; text-transform: none; vertical-align: baseline"><font color="#000000"> 3 Click Close.<br /></font></div><div style="font-style: normal; font-weight: normal; margin-bottom: 0pt; margin-left: 0pt; margin-right: 0pt; margin-top: 0pt; text-align: left; text-decoration: none; text-indent: 0pt; text-transform: none; vertical-align: baseline"><font color="#000000"> <br /></font></div><div style="font-style: normal; font-weight: normal; margin-bottom: 0pt; margin-left: 0pt; margin-right: 0pt; margin-top: 0pt; text-align: left; text-decoration: none; text-indent: 0pt; text-transform: none; vertical-align: baseline"><font color="#000000">
| + | '''To fill an area with color'''<br /> |
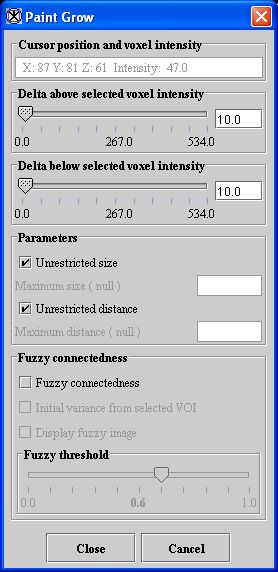
| | + | 1 Click [[Image:iconFills.jpg]] . The Paint Grow dialog box opens.<br /> |
| | + | 2 Complete the dialog box.<br /> |
| | + | 3 Click Close.<br /> |
| | | | |
| | {| border="1" cellpadding="5" | | {| border="1" cellpadding="5" |
| − | |+ <div style="font-style: normal; margin-bottom: 3pt; margin-left: 0pt; margin-right: 0pt; margin-top: 9pt; text-align: left; text-decoration: none; text-indent: 0pt; text-transform: none; vertical-align: baseline">'''<font color="#000000"> Figure 165. Paint Grow dialog box  <br /></font>'''</div> | + | |+ '''Figure 10. Paint Grow dialog box ''' |
| | |- | | |- |
| | | | | | |
| Line 396: |
Line 442: |
| | <div class="CellBody">Indicates the location of the cursor and the intensity value at that point</div> | | <div class="CellBody">Indicates the location of the cursor and the intensity value at that point</div> |
| | | rowspan="13" colspan="1" | | | | rowspan="13" colspan="1" | |
| − | <div style="font-style: normal; font-weight: normal; margin-bottom: 0pt; margin-left: 0pt; margin-right: 0pt; margin-top: 0pt; text-align: left; text-decoration: none; text-indent: 0pt; text-transform: none; vertical-align: baseline"><font color="#000000"> <br clear="all" />{| align="center"
| |
| − | |
| |
| | [[Image:dialogboxPaintGrow.jpg]] | | [[Image:dialogboxPaintGrow.jpg]] |
| − | |}<br clear="all" /><br /></font></div>
| |
| | |- | | |- |
| | | | | | |
| Line 467: |
Line 510: |
| | |} | | |} |
| | | | |
| − | <br /></font></div><div style="font-style: normal; margin-bottom: 6pt; margin-left: 0pt; margin-right: 0pt; margin-top: 14pt; text-align: left; text-decoration: none; text-indent: 0pt; text-transform: none; vertical-align: baseline">'''<font color="#000000"> <span style="font-style: normal; text-decoration: none; text-transform: none; vertical-align: baseline">'''<font color="#000000">To erase an area of paint from images</font>'''</span><br /></font>'''</div><div style="font-style: normal; font-weight: normal; margin-bottom: 0pt; margin-left: 18pt; margin-right: 0pt; margin-top: 6pt; text-align: left; text-decoration: none; text-indent: -18pt; text-transform: none; vertical-align: baseline"><font color="#000000"> 1 Click [[Image:iconErase.jpg]] .<br /></font></div><div style="font-style: normal; font-weight: normal; margin-bottom: 0pt; margin-left: 18pt; margin-right: 0pt; margin-top: 6pt; text-align: left; text-decoration: none; text-indent: -18pt; text-transform: none; vertical-align: baseline"><font color="#000000"> 2 Click the area of the paint that you want to remove.<br /></font></div><div style="font-style: normal; font-weight: normal; margin-bottom: 0pt; margin-left: 18pt; margin-right: 0pt; margin-top: 6pt; text-align: left; text-decoration: none; text-indent: -18pt; text-transform: none; vertical-align: baseline"><font color="#000000"> 3 Repeat the previous step for each area of paint to be removed.<br /></font></div><div style="font-style: normal; font-weight: normal; margin-bottom: 0pt; margin-left: 18pt; margin-right: 0pt; margin-top: 6pt; text-align: left; text-decoration: none; text-indent: -18pt; text-transform: none; vertical-align: baseline"><font color="#000000"> 4 Click [[Image:iconTraverseImage.jpg]] when done to return the cursor to the default state.<br /></font></div><div style="font-style: normal; margin-bottom: 6pt; margin-left: 0pt; margin-right: 0pt; margin-top: 14pt; text-align: left; text-decoration: none; text-indent: 0pt; text-transform: none; vertical-align: baseline">'''<font color="#000000"> <span style="font-style: normal; text-decoration: none; text-transform: none; vertical-align: baseline">'''<font color="#000000">To erase all painting from images</font>'''</span><br /></font>'''</div><div style="font-style: normal; font-weight: normal; margin-bottom: 6pt; margin-left: 0pt; margin-right: 0pt; margin-top: 0pt; text-align: left; text-decoration: none; text-indent: 0pt; text-transform: none; vertical-align: baseline"><font color="#000000"> Click [[Image:iconEraseAll.jpg]] . MIPAV removes all of the paint from all of the images.<br /></font></div><div style="font-style: normal; font-weight: normal; margin-bottom: 0pt; margin-left: 0pt; margin-right: 0pt; margin-top: 8pt; text-align: left; text-decoration: none; text-indent: 0pt; text-transform: none; vertical-align: baseline"><font color="#000000"> <br /></font></div>
| + | '''To erase an area of paint from images'''<br /> |
| | + | 1 Click [[Image:iconErase.jpg]] .<br /> |
| | + | 2 Click the area of the paint that you want to remove.<br /> |
| | + | 3 Repeat the previous step for each area of paint to be removed.<br /> |
| | + | 4 Click [[Image:iconTraverseImage.jpg]] when done to return the cursor to the default state.<br /> |
| | | | |
| | + | '''To erase all painting from images'''<br /> |
| | + | Click [[Image:iconEraseAll.jpg]] . MIPAV removes all of the paint from all of the images.<br /> |
| | [[Visualizing Images: Displaying images using the surface plotter view]] | | [[Visualizing Images: Displaying images using the surface plotter view]] |
Like the triplanar view, you can use the icons and buttons on the toolbar to change magnification, draw, change colors, change opacity, and apply a new intensity to selected voxels in the images.
By default, the triplanar-dual view automatically shows the axes and cross hairs on Image A, Image B, and the blended dataset.
To display the axes on the images again, simply select Options > Show Axes. The check mark reappears in the check box in front of the command.
You can create point or line VOIs on the images.
To create point VOIs
1 Click  .
.
2 Click in the image where you want to create a point.
3 Repeat steps 1 and 2 for all other desired points.
You can only create one line VOI per orthogonal plane, although you can create a line VOI in each one of the three orthogonal planes.
3 Change the size of the angle by dragging the arrow on the thin line up or down depending on the type of angle you want to create. The exact number of degrees appear on the left below the angle.
4 Release the mouse button when you reach the desired number of degrees.
5 Click on the image or on any other area of the triplanar-dual view. The arrows disappear from the angle.
6 Click on the angle again to be able to change the angle again. The arrows reappear and you can repeat the previous steps.
If you used the paint brush to draw on the image, you may at times find a need to erase a part of the drawing or the entire drawing.
File:MIPAV VisualizationTools189.gif
Make sure that you want to erase a part of the drawing or the entire drawing. There is no undo.
To erase a part of the drawing
1 Select the image that contains the drawing you want to erase. In other words, select Image A, Image B, or Both.
2 Click  .
.
3 Click on the part of the drawing that you want to erase.
4 Repeat step 3 for as long as needed.
. MIPAV removes all of the paint from the image.
![]() .
.![]() .
.![]() . The line VOI disappears.
. The line VOI disappears.![]() . The point disappears.
. The point disappears.![]() , allows you to create a new transformation matrix for the dataset.
, allows you to create a new transformation matrix for the dataset.![]() .
. ![]() . The center of each image dataset, shown as
. The center of each image dataset, shown as ![]() , appears in each image in the triplanar-dual view.
, appears in each image in the triplanar-dual view.![]() .
.![]() . A red box appears on each image in the triplanar-dual view.
. A red box appears on each image in the triplanar-dual view. ![]() . The Crop Image dialog box appears.
. The Crop Image dialog box appears.![]()
![]()
![]()
![]() , the Change Paint Color icon. The Pick Paint Color dialog box opens. For instructions on how to use this dialog box to change the paint color, refer to "To change background and border colors".
, the Change Paint Color icon. The Pick Paint Color dialog box opens. For instructions on how to use this dialog box to change the paint color, refer to "To change background and border colors".![]() . The Paint Opacity dialog box opens.
. The Paint Opacity dialog box opens.![]() to discover the volume of paint. The software lists the number of pixels in each image and the volume in millimeters on the Data page of the Output window.
to discover the volume of paint. The software lists the number of pixels in each image and the volume in millimeters on the Data page of the Output window.![]() . The Paint Grow dialog box opens.
. The Paint Grow dialog box opens.![]() .
.![]() when done to return the cursor to the default state.
when done to return the cursor to the default state.![]() . MIPAV removes all of the paint from all of the images.
. MIPAV removes all of the paint from all of the images.