Visualizing Images: Displaying images using the default view: Viewing two images together
From MIPAV
Viewing two images together
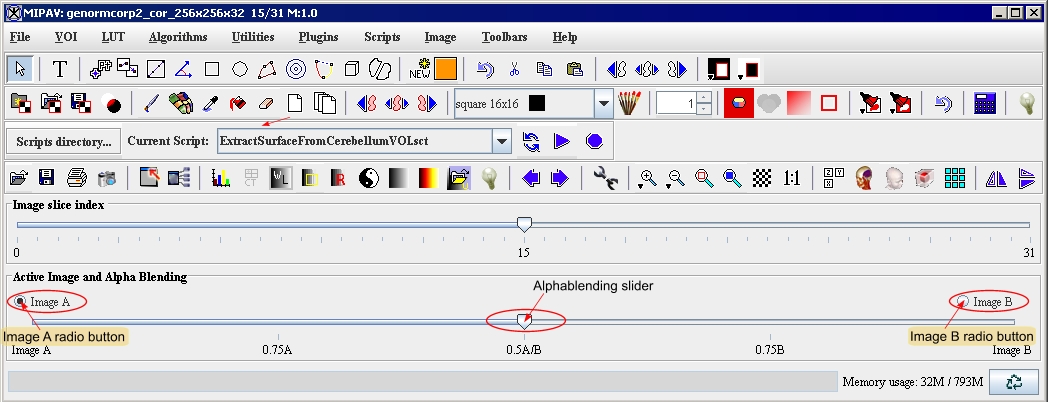
When two separate image files are loaded into the same window (for directions on how to load an image, refer to Chapter 3, "Getting Started Quickly with MIPAV"), the window displays a blending of both images. MIPAV refers to the first image file as "Image A" and to the second image file as "Image B." By default, Image A is active and Image B is inactive. To change which image is active, simply select, as appropriate, the Image A or Image B radio button.
By default, Image A is active and Image B is inactive. Thus, even if two image files are loaded into the same image window, only Image A-which is the designation MIPAV assigns to the first image that was opened in the window-is displayed.
You can view the inactive image using one of the following methods:
Adjust the alphablending value so that you can see the inactive and active images simultaneously
View the part of Image B that is directly under that portion of Image A by using  , the Window region of Image B icon.
View portions of the image using the checkerboard tool
Figure 114. MIPAV window showing the Alphablending slider
|
{| align="center"
|
|
|}
Comparing images using alphablending
Alphablending is a technique that adds transparency information to translucent objects. It is used to blend what is currently rendered on the display (i.e., Image A) with the contents of the frame buffer (i.e., Image B). Each colored voxel is assigned an alpha value, which represents transparency. The alpha value is used to blend the intensities, voxel by voxel. When two images share a window, you can adjust the alphablending settings so that you can see a blend of both images and can compare overlapping regions in two datasets. See [MIPAV_VisualizationTools.html#2104883 Figure 114].
To use the alphablending tool and Window Region tool
1 Open two images.
2 Load the second image into the image window of the first image. The Active Image and Alphablending slider appears at the bottom of the MIPAV window (Figure 11).
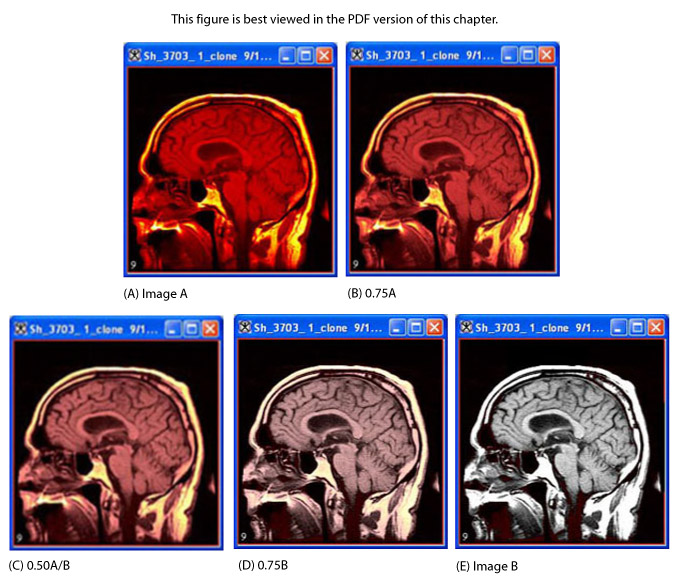
The level of translucency for one image is inversely proportional to the other. Thus, if Image A is 75 percent transparent and 25 percent opaque; Image B is 75 percent opaque and 25 percent transparent ("Alphablending: An Example" on page 20).
Note: In the MIPAV window, notice that an additional magnifying glass is now available:  , the Window Region of Image B icon, which you use to view the portion of Image B that is directly under that portion of Image A.
3 Move the Active Image and Alphablending slider between the Image A and Image B radio buttons.
|
Alphablending: An Example
|
For a very clear example of how alphablending works, open two images and then apply  , the Hot Metal LUT icon, to one of the images before you load them together. After the images are loaded, move the Active Image and Alphablending slider from the left to the right. The following images show what you see at five points of the slider: (A) The image on the far left shows 100 percent of Image A. It does not display a blending of the images. However, for any of the images below, you can use the  , , Window Region of Image B icon, to inspect the portion of Image B that lies underneath that same portion of Image A. |
(B) The next image displays a blending of 75 percent Image A and 25 percent of Image B. Again, use  to see the portion of Image B beneath Image A. (C) The middle image displays 50 percent blending of both Image A and Image B. You can use  to inspect Image B. (D) The fourth image displays 75 percent of Image B and only 25 percent of Image A. You can use  still to inspect Image B. (E) The final image on the right displays 100 percent of Image B. Since all of Image B is shown, you no longer have a need to use  .
|
|
{| align="center"
|
|
|}
Depending on the direction in which you are moving the slider (that is, toward Image A or toward Image B), one image becomes more visible. To examine each image in more detail, you can use the magnifying glasses.
As you move the slider, the images in the image window are updated instantly. If not, release the mouse button to update the image.
Move the slider all the way to the right or to the left depending on which image you want to see. For example, to see Image B, move the slider to the far right. To see Image A, move the slider (Figure 10) to the far left. The closer the slider is to the middle, the more blended are the images.
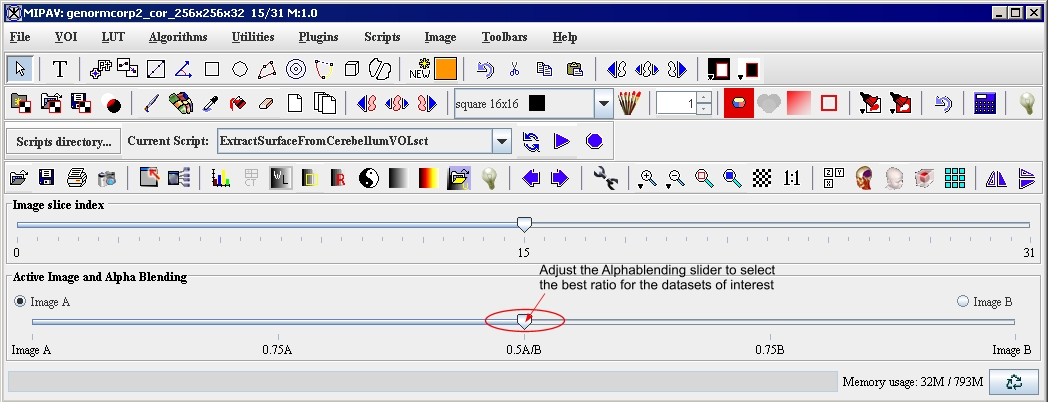
Figure 115. MIPAV window
|
{| align="center"
|
|
|}
To make images active or inactive
1 Open two images.
2 Load the second image into the first image window. The MIPAV window expands to include the Active Image and Alphablending slider ([MIPAV_VisualizationTools.html#1170987 Figure 115]).
3 Notice that Image A is currently the active image.
4 Select Image B in the Active Image and Alphablending slider to make Image B the active image.
5 Move the slider to the far right. As you are moving the slider, more of Image B appears in the image window. When the slider reaches the far right, all of Image B appears in the image window.
6 Click  , the Default Mode icon.
If you want to take an action on one of the images-for example, adjusting the contrast or running an algorithm-make sure that it is the active image. If the inactive image is Image B, you also have the option of using the Image B region tool to view portions of the Image B. If the active image is currently Image A and you want to view Image B, simply select the Image B radio button. To make Image A the active image, select the Image A radio button.
Viewing portions of images using the checkerboard
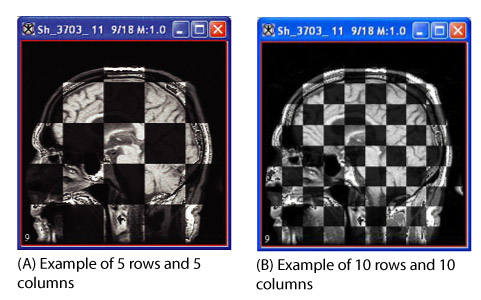
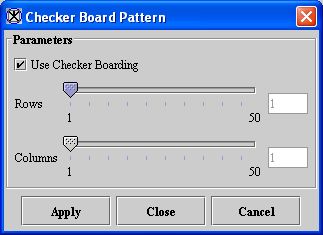
The checkerboard tool displays both portions of both images in an alternating fashion, much like the squares on a checkerboard. A traditional checkerboard has a grid of alternating dark-colored and light-colored squares. Portions of Image A appear where the light-colored squares would appear on the checkerboard; portions of Image B appear in place of the dark-colored squares. You can adjust the number of rows and columns displayed.
To use the checkerboard tool
1 Open two images.
2 Load the second image into the first image window. The MIPAV window expands to include the Active Image and Alphablending slider.Click  . The Checkerboard Pattern dialog box (Figure 12) appears.
Figure 116. Checkerboard Pattern dialog box
|
Use checkerboarding
|
Specifies to use checkerboarding.
|
{| align="center"
|
|
|-
|
Rows
|
Indicates the number of rows you want to display in the checkerboard. You can display from 1 to 50 rows.
|-
|
Columns
|
Indicates the number of columns you want to display in the checkerboard. You can display from 1 to 50 columns.
|-
|
Apply
|
Applies the parameters that you specified to the images.
|-
|
Close
|
Closes this dialog box.
|-
|
Cancel
| rowspan="1" colspan="2" |
Disregards any changes you made in this dialog box, closes the dialog box, and does not apply checker boarding.
|-
|
Help
| rowspan="1" colspan="2" |
Displays online help for this dialog box.
|}


