After hiding the splash screen, you may later decide to display it.
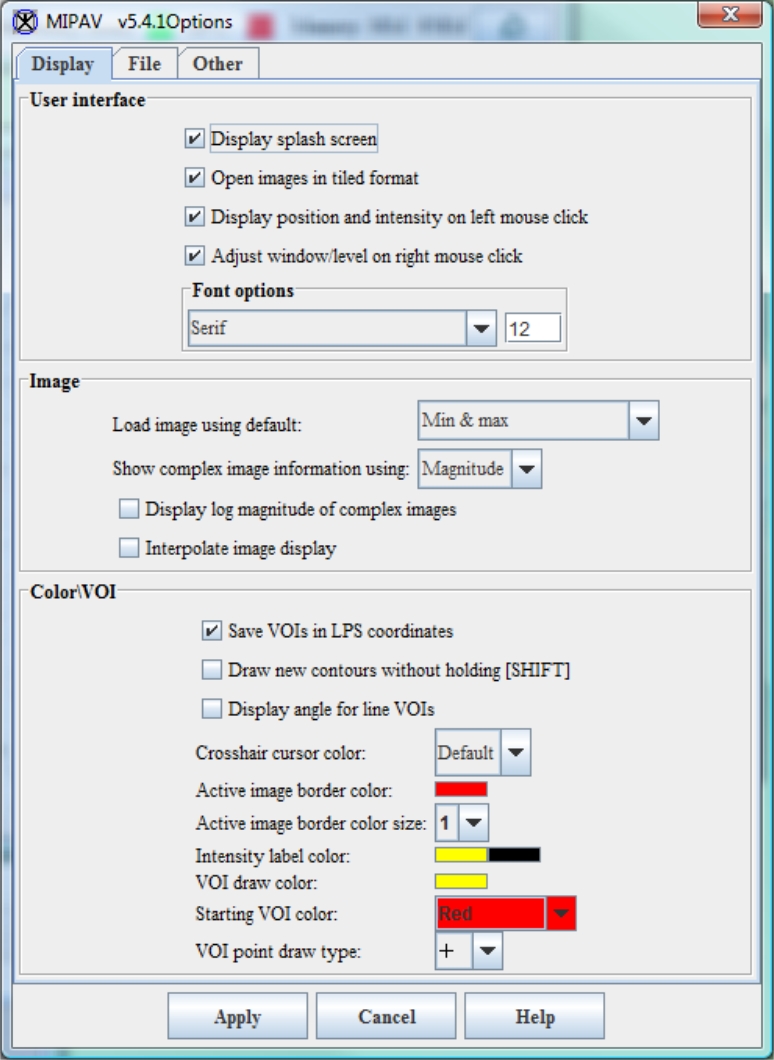
1 Select Help > Program Options. The MIPAV Options dialog box (Figure 47) opens.
2 Mark Display splash screen. A check mark appears in the check box.
3 Click Apply, and then click Close.
After you quit MIPAV and then start it again, the splash screen appears.
Figure 46. The Display page in the MIPAV Options dialog
| Display Splash screen>
|
Displays the MIPAV opening splash screen, or title screen, when MIPAV is started. By default, this check box is clear.
|
|
| Use platform-style File dialog boxes
|
Uses the style of Open and Save dialog boxes that are provided with the operating system of your computer, rather than the MIPAV style. For more information, refer to "Using platform-specific Open and Save dialog boxes". By default, this check box is clear.
|
| Show Scripting toolbar
|
Shows the Scripting toolbar, which you can use to create and run scripts, in the MIPAV window. By default, this check box is clear.
|
| Show Paint toolbar
|
Shows the Paint toolbar, which allows you to paint directly on images. By default, this check box is clear.
|
| Show Paint border
|
Shows a border around the painted area. By default, this check box is clear.
|
| Snap paint cursor to pixels
|
Causes the paint cursor to snap to the nearest pixel.
|
| Recently used image list
|
Specifies the number of recently displayed images that appear near the bottom of the File menu on the MIPAV window. To open a recently displayed image, simply select the image on the File menu.
The number of images that can be displayed can be from 2 to 9. By default, the number of images displayed on the File menu is 4.
|
| Crosshair cursor color
|
Specifies the color of the crosshair cursor. You can choose from several colors and styles. By default, the color is set to "Default."
|
| Active image border color
|
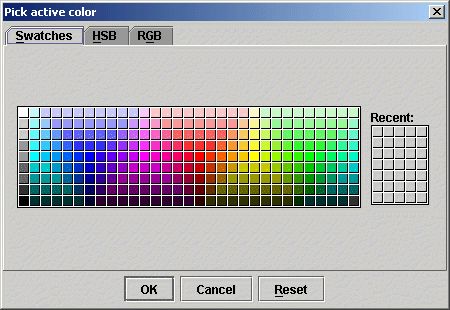
Specifies the color of the border around images. When you click on this box, the Pick Active Color dialog box, which allows you to select a different color, opens. By default, the color is red.
|
|
| VOI draw color'
|
Allows you to choose the color that is used to draw VOIs. After you finish drawing VOIs, the completed VOIs appear in the Starting VOI color.
|
| Starting VOI color
|
Allows you to select the initial color for completed VOIs. That is, when you draw VOIs, they appear in the color chosen for VOI draw color; the completely drawn VOIs appear in the color you selected for this field.
|
| Apply
|
Saves and immediately applies all of the selected parameters in this dialog box.
|
| Cancel
|
Disregards any changes you made in this dialog box, closes the dialog box, and does not save the specified options.
|
| Help
|
Displays online help for this dialog box
|
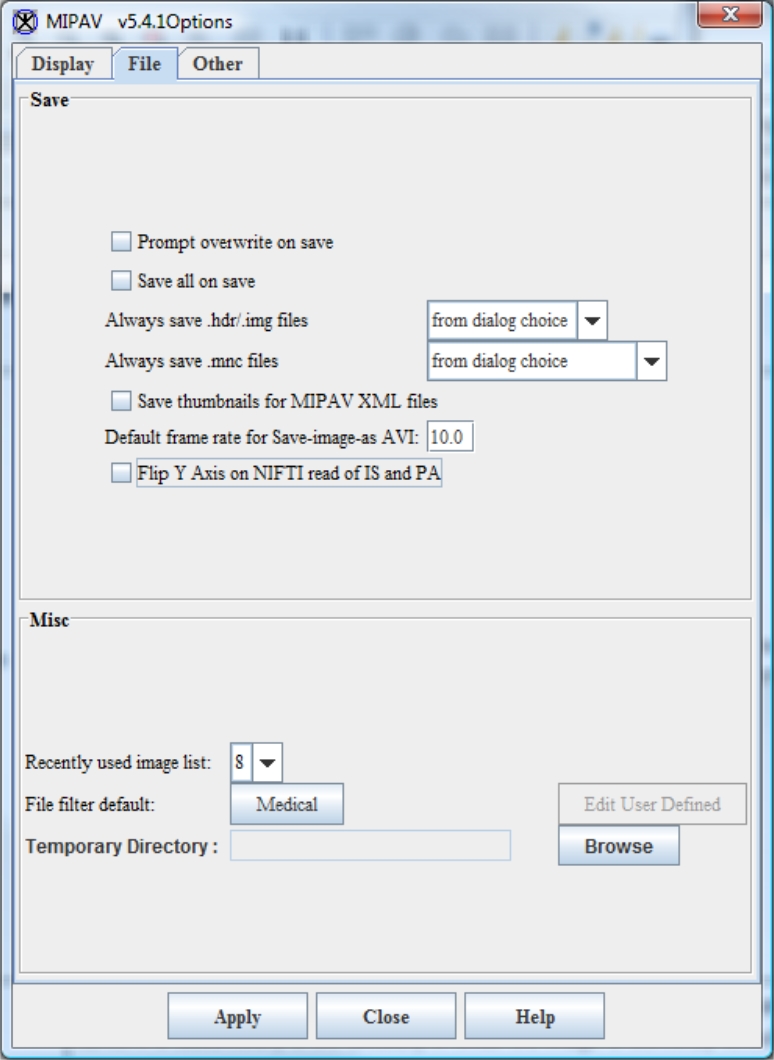
Figure 47. The File page in the MIPAV Options dialog box
| Prompt overwrite on save
|
Displays a prompt, or message, when you save a file under the same name as an already existing file. The message indicates that saving the file under the same name as an existing file overwrites the file.
|
|
| Save all on save
|
Saves the active image and all VOIs presently displayed on the image so that the next time you open the image MIPAV opens the image and VOIs. The VOIs are saved in a subdirectory of the directory in which the image is stored.By default, this check box is clear.
|
| Save dialog settings
|
Saves the settings you specified on algorithm dialog boxes so that the next time you use the algorithms, your specific settings override the default settings.By default, this check box is clear.
|
| Save XML header with Analyze images
|
Saves an XML header for an Analyze image when the image is saved. If you choose this option, the image has two headers: the normal header and an XML header. Both point to the image file. By default, this check box is clear.</div>
|
| Save thumbnails for XML files
|
Saves a thumbnail image in the XML header, allowing you to view the thumbnails in the image browser.
|
| Compress image in zip format when saved as XML
|
Compresses images in a zip format when they are saved in XML format. When an image is saved in XML format, MIPAV produces a RAW file that describes the image and an XML file that includes image attributes. When you select this check box, MIPAV compresses only the RAW file, which compensates for the size of the RAW file. By default, this check box is clear.
|
| Default frame rate for Save-image-as AVI
|
Specifies the default frame rate in frames per second for images that are saved as AVI. By default, this check box is clear. If you select this option, the default frame rate is 10.0.
|
| File filter default
|
Specifies the types of files that should be shown in the Files of type box in the Open Image and Save Image as dialog boxes. Refer to "Choosing the default file types to display or save" for more information.
|
| Apply
|
Saves and immediately applies all of the selected parameters in this dialog box.
|
| Cancel
|
Disregards any changes you made in this dialog box, closes the dialog box, and does not save the specified options.
|
| Help
|
Displays online help for this dialog box.
|
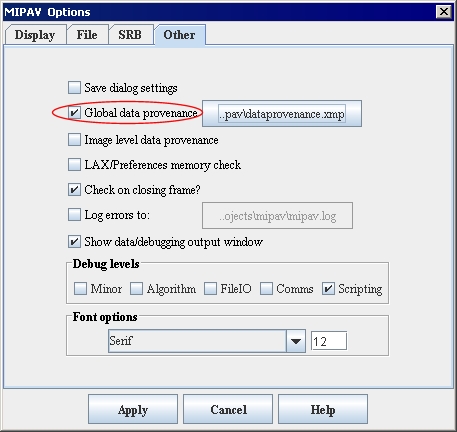
Figure 48. The Other page in the MIPAV Options dialog box
| Save dialog settings
|
Saves the active dialog box settings in a log file.
|
|
| Global data provenance
|
Keeps a global record of all of the actions-algorithms and utilities-performed on images. The history may be viewed in the MIPAV system data provenance dialog box.By default, this check box is clear.
|
| Image level data provenance
|
Keeps a record of all of the actions-algorithms and utilities-performed on images. The history may be viewed in the Image data provenance dialog box while the actions are performed, or in the XML file when an image is saved to an XML file. By default, this check box is clear.
|
| LAX/Preferences memory check
|
Enables MIPAV developers to debug the program. If you experience problems with the program, you may be asked to select this check box.
Recommendation:
Do not select this check box unless otherwise instructed by MIPAV development. By default, this check box is clear.
|
| Check on closing frame?
|
Adds messages to confirm deletions of images. By default, this check box is clear.
|
| Log errors to:
|
Allows you to select the file in which MIPAV records any errors that occur. By default MIPAV logs errors to C:\Program Files\mipav\mipav.log unless the name and path of the log file was changed during installation.
|
| Debug levels: Minor
|
Records only minor error messages in mipav.log.
|
| Debug levels: Algorithm
|
Records only error messages with algorithms in mipav.log.
|
| Debug levels: FileIO
|
Records only FileIO (file input and output) error messages in mipav.log.
|
| Debug levels: Comms
|
Records only error messages involving communications in mipav.log.
|
| Debug levels: Scripts
|
Records all error messages in mipav.log.
|
| Apply
|
>Saves and immediately applies all of the selected parameters in this dialog box.
|
| Cancel
|
Disregards any changes you made in this dialog box, closes the dialog box, and does not save the specified options.
|
| Help
|
Displays online help for this dialog box.
|
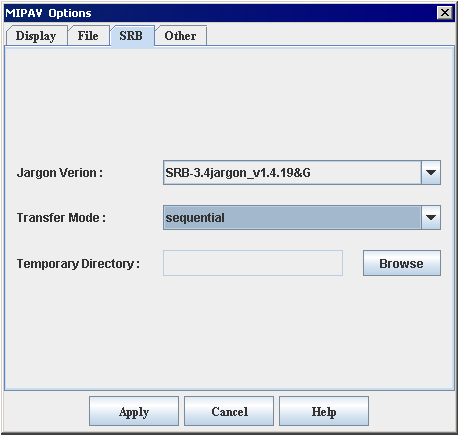
Figure 49. The SRB tab
| Jargon version:
|
A version of Jargon API library, which should be used to communicate to the SRB server. Select one from the list;
|
|
Transfer Mode
|
Parallel or sequential specifies the file transfer protocol. There are SRB parallel transfer protocol and SRB sequential transfer protocol available;
|
Temporary Directory
|
Is your local directory, where you keep your files which need to be transferred FROM or TO the SRB server.See also "Connecting to SRB BIRN".
|
Apply
|
Saves and immediately applies all of the selected parameters in this dialog box.
|
Cancel
|
Disregards any changes you made in this dialog box, closes the dialog box, and does not save the specified options.
|
Help
|
Displays online help for this dialog box.
|
Using platform-specific Open and Save dialog boxes
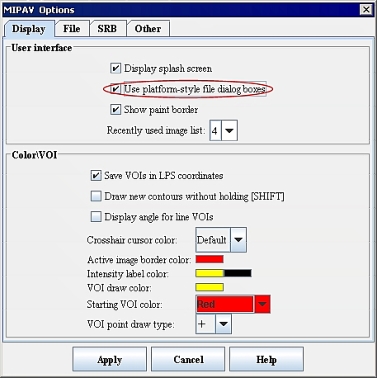
By default, MIPAV uses its own version of Open and Save dialog boxes, which provide you with the ability to assign aliases, or shortcuts, to frequently used images. Aliases make it easy to locate images, a feature that may be attractive if you work with the same images for a period of time. However, you may prefer instead to use the style of Open and Save dialog boxes that are provided with the operating system of your computer. To do so, you need to select the Use platform-style File dialog boxes check box in the MIPAV Options dialog box. See Figure 50.
If this check box is selected and your computer is running Microsoft Windows, MIPAV displays the Windows style of Open and Save dialog boxes. If you use a Sun terminal, when this check box is selected, MIPAV displays the standard Unix-style Open and Save dialog boxes. On Apple MacIntosh computers, MIPAV displays dialog boxes that are standard with that operating system.
To use platform-specific dialog boxes
1 Select Help > Program Options. The MIPAV Options dialog box opens. See Figure 50.
2 Mark Use Platform-Style File Dialog Boxes. A check mark appears in the check box.
3 Click Apply, then click Close. The dialog box closes.
Figure 50. MIPAV Options dialog box showing Use platform-style File dialog boxes check box
|
|
Debugging MIPAV
You can track debugging information and error messages generated by MIPAV during a session by placing it in debug mode. If errors occur during the session, the program displays any error messages in the Output window on the Debug page. By default, the debug mode is off when you start the program.
Recommendation: The debugging information is primarily intended for MIPAV developers and not for users. The best course for a user is to leave the debug mode Off unless a MIPAV developer asks for he/she to turn it on.
For more information about MIPAV debug mode, please refer to "Troubleshooting", "Placing MIPAV in debug mode".
Saving a history of actions on images (TBD)
MIPAV allows you to keep a history of all of the actions-the algorithms and utilities-that you perform on images. The history includes the specific parameters that were set for the action. In addition, if you save the images as XML, the history of actions and their parameters appears in the dataset attributes section near the beginning of the MIPAV header file (the XML file). Each action appears between the <HISTORY> and </HISTORY> tags.
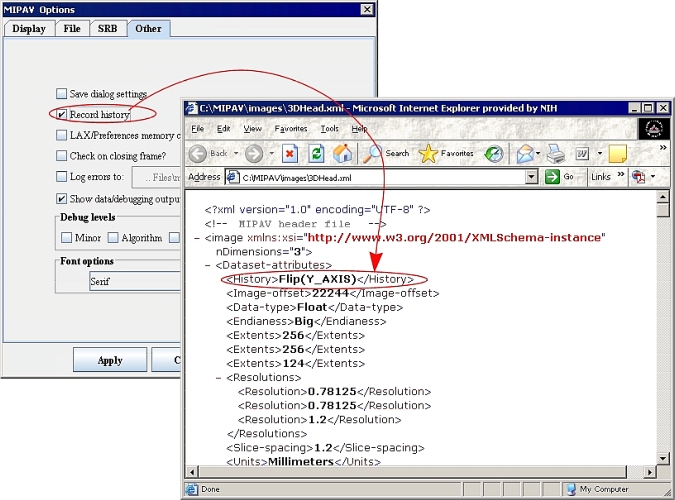
By default, MIPAV does not record a history of actions unless you specifically select the Record history check box in the MIPAV Options > Other dialog box. TBD.
To record a history of actions taken on images TBD
1 Select Help > Program Options in the MIPAV window. The MIPAV Options dialog box appears.
2 Mark Record history. A check mark appears in the check box.
3 Click Apply. From this point on, MIPAV records the actions performed on all images until you clear the Record history check box.
Refer to Figure 51 and "To view the history of actions recorded in the XML file TBD".
To view the history of actions as they are performed
The History page in the Image Attributes dialog box allows you to view the list of actions immediately after they are performed.
The following example illustrates how to do this:
1 Make sure that the Record History check box was selected in the MIPAV Options dialog box.
2 Open a sample image.
3 Select Image > Attributes > Edit attributes. The Image Attributes dialog box opens.
4 Select History. The History page appears.
5 Click the image to make it the active window.
6 Select Utilities > Flip > Horizontal. The image is flipped horizontally, and the words "Flip(Y_AXIS)" appear on the History page in the Image Attributes dialog box.
7 Perform other actions on the image, such as algorithms or other utilities. Note that these actions appear on the History page.
You can type directly onto the History page of the Image Attributes dialog box, letting you add comments to the history, which you can save and print.
|
Under What Circumstances Do Actions Fail to Appear on the History Page?
If MIPAV is fully operational, actions performed on an image always appear on the History page of the Image Attributes dialog box and in the XML file for that image. However, it's important to know whether the actions were performed on the original image or on the replacement image.
|

Several algorithms and utilities offer a choice of either generating a new image (New image check box) or replacing the original image (Replace image check box). If you choose New image and want to see the actions performed on that image, you must select Image > Attributes > Edit Attributes to open an Image Attributes dialog box for the new image. If, however, you select Replace image, the History page on the Image Attributes dialog box for the original image displays the actions. To illustrate this point, open a sample image; select Image > Attributes > Edit Attributes to display the Image Attributes dialog box; and select History to display the History page. Perform an action such as Utilities > Image Margins, mark New image in the dialog box, and then click OK. Notice that the action does not appear on the History page. Click on the new image; select Image > Attributes > Edit Attributes; and select History. The History page shows the AddImageMargins action for the new image.
|
To view the history of actions recorded in the XML file TBD
1 Save the sample image as an XML file by selecting File > Save Image as. The Save Image as dialog box opens.
2 Select the directory where you want to save the file in the Save in box.
3 Type the name of the file-use "SampleImage" as the file name-and type an ".xml" file extension in the File Name box so that the complete file name is "SampleImage.xml."
4 Click Save.
5 Open Windows Explorer by right-clicking on Start and then selecting Explore. The Windows Explorer window opens.
6 Navigate to the directory where you stored the XML file. This directory should have two files named "SampleImage": "SampleImage.raw" and "SampleImage.xml."
7 Double-click "SampleImage.xml." An internet browser page, such as Internet Explorer or Mozilla, appears displaying an XML page.
Notice that, immediately after the <Dataset-attributes> tag, the following line appears:
</font></div>
<History>Flip(Y_AXIS)</History>
Each action that you perform on the image appears between its own <History> and </History> tags. See also Figure 51.
Figure 51. The Record History check box is located in the MIPAV Options dialog box > Other tab. Actions recorded are shown in the header of open XML file. TBD
|
|
Choosing the default file types to display or save


