Difference between revisions of "Task 3, Segmenting the original image"
From MIPAV
(Created page with ' <div style="font-style: normal; font-weight: normal; margin-bottom: 6pt; margin-left: 0pt; margin-right: 0pt; margin-top: 0pt; text-align: left; text-decoration: none; text-inde...') |
(→To use the FANTASM plug-in program) |
||
| Line 7: | Line 7: | ||
{| border="1" cellpadding="5" | {| border="1" cellpadding="5" | ||
| − | |+ | + | |+ '''Figure 1. FANTASM dialog box''' |
|- | |- | ||
| − | + | | [[Image:dialogboxFANTASM.gif]] | |
| − | + | ||
|} | |} | ||
| Line 16: | Line 15: | ||
{| border="1" cellpadding="5" | {| border="1" cellpadding="5" | ||
| − | |+ | + | |+ '''Figure 2. Initial Centroids dialog box''' |
|- | |- | ||
| − | |||
| − | |||
| | | | ||
[[Image:TechGuide_MappingBrainsTalairach28.gif]] | [[Image:TechGuide_MappingBrainsTalairach28.gif]] | ||
| − | |||
|} | |} | ||
| − | <br /></font></div><div style="font-style: normal; font-weight: normal; margin-bottom: 0pt; margin-left: 18pt; margin-right: 0pt; margin-top: 6pt; text-align: left; text-decoration: none; text-indent: -18pt; text-transform: none; vertical-align: baseline"><font color="#000000"> 5 Click OK.<br /></font></div><div style="font-style: normal; font-weight: normal; margin-bottom: 0pt; margin-left: 18pt; margin-right: 0pt; margin-top: 6pt; text-align: left; text-decoration: none; text-indent: 0pt; text-transform: none; vertical-align: baseline"><font color="#000000"> A series of progress messages appear, and data appears on the Data page in the Output window ( | + | <br /></font></div><div style="font-style: normal; font-weight: normal; margin-bottom: 0pt; margin-left: 18pt; margin-right: 0pt; margin-top: 6pt; text-align: left; text-decoration: none; text-indent: -18pt; text-transform: none; vertical-align: baseline"><font color="#000000"> 5 Click OK.<br /></font></div><div style="font-style: normal; font-weight: normal; margin-bottom: 0pt; margin-left: 18pt; margin-right: 0pt; margin-top: 6pt; text-align: left; text-decoration: none; text-indent: 0pt; text-transform: none; vertical-align: baseline"><font color="#000000"> A series of progress messages appear, and data appears on the Data page in the Output window (Figure 3).<br /></font></div><div style="font-style: normal; font-weight: normal; margin-bottom: 0pt; margin-left: 0pt; margin-right: 0pt; margin-top: 0pt; text-align: left; text-decoration: none; text-indent: 0pt; text-transform: none; vertical-align: baseline"><font color="#000000"> |
{| border="1" cellpadding="5" | {| border="1" cellpadding="5" | ||
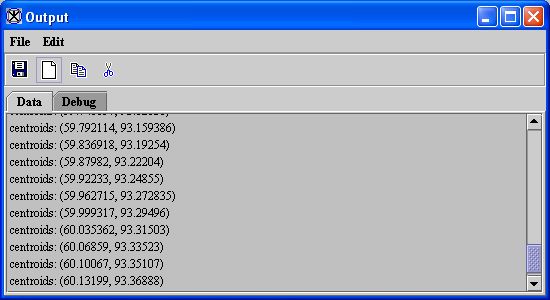
| − | |+ | + | |+ '''Figure 46. Data on the Data page in the Output window''' |
|- | |- | ||
| − | |||
| − | |||
| | | | ||
[[Image:dialogboxOutputFANTASMdata.jpg]] | [[Image:dialogboxOutputFANTASMdata.jpg]] | ||
| − | |||
|} | |} | ||
| − | <br /></font></div><div style="font-style: normal; font-weight: normal; margin-bottom: 0pt; margin-left: 18pt; margin-right: 0pt; margin-top: 6pt; text-align: left; text-decoration: none; text-indent: 0pt; text-transform: none; vertical-align: baseline"><font color="#000000"> In a few moments, processing completes, and an image appears ( | + | <br /></font></div><div style="font-style: normal; font-weight: normal; margin-bottom: 0pt; margin-left: 18pt; margin-right: 0pt; margin-top: 6pt; text-align: left; text-decoration: none; text-indent: 0pt; text-transform: none; vertical-align: baseline"><font color="#000000"> In a few moments, processing completes, and an image appears (Figure 4A).<br /></font></div><div style="font-style: normal; font-weight: normal; margin-bottom: 0pt; margin-left: 0pt; margin-right: 0pt; margin-top: 0pt; text-align: left; text-decoration: none; text-indent: 0pt; text-transform: none; vertical-align: baseline"><font color="#000000"> |
{| border="1" cellpadding="5" | {| border="1" cellpadding="5" | ||
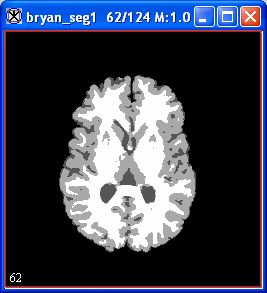
| − | |+ | + | |+ '''Figure 4. FANTASM image''' |
|- | |- | ||
| − | |||
| − | |||
| | | | ||
[[Image:exampleCompositeImageFANTASM.jpg]] | [[Image:exampleCompositeImageFANTASM.jpg]] | ||
| − | |||
|} | |} | ||
| − | <br /></font></div><div style="font-style: normal; margin-bottom: 6pt; margin-left: 0pt; margin-right: 0pt; margin-top: 14pt; text-align: left; text-decoration: none; text-indent: 0pt; text-transform: none; vertical-align: baseline">'''<font color="#000000"> To use the Fuzzy C-Means algorithm <br /></font>'''</div><div style="font-style: normal; font-weight: normal; margin-bottom: 0pt; margin-left: 18pt; margin-right: 0pt; margin-top: 6pt; text-align: left; text-decoration: none; text-indent: -18pt; text-transform: none; vertical-align: baseline"><font color="#000000"> 1 Select the original image.<br /></font></div><div style="font-style: normal; font-weight: normal; margin-bottom: 0pt; margin-left: 18pt; margin-right: 0pt; margin-top: 6pt; text-align: left; text-decoration: none; text-indent: -18pt; text-transform: none; vertical-align: baseline"><font color="#000000"> 2 Select Algorithms > Segmentation> Fuzzy C-Means > Single Channel in the MIPAV window.<br /></font></div><div style="font-style: normal; font-weight: normal; margin-bottom: 0pt; margin-left: 0pt; margin-right: 0pt; margin-top: 0pt; text-align: left; text-decoration: none; text-indent: 0pt; text-transform: none; vertical-align: baseline"><font color="#000000"> <br /></font></div><div style="font-style: normal; font-weight: normal; margin-bottom: 0pt; margin-left: 0pt; margin-right: 0pt; margin-top: 0pt; text-align: left; text-decoration: none; text-indent: 0pt; text-transform: none; vertical-align: baseline"><font color="#000000"> <br /></font></div><div style="font-style: normal; font-weight: normal; margin-bottom: 0pt; margin-left: 0pt; margin-right: 0pt; margin-top: 0pt; text-align: left; text-decoration: none; text-indent: 0pt; text-transform: none; vertical-align: baseline"><font color="#000000"> <br /></font></div><div style="font-style: normal; font-weight: normal; margin-bottom: 0pt; margin-left: 18pt; margin-right: 0pt; margin-top: 6pt; text-align: left; text-decoration: none; text-indent: 0pt; text-transform: none; vertical-align: baseline"><font color="#000000"> The Fuzzy C-Means dialog box ( | + | <br /></font></div><div style="font-style: normal; margin-bottom: 6pt; margin-left: 0pt; margin-right: 0pt; margin-top: 14pt; text-align: left; text-decoration: none; text-indent: 0pt; text-transform: none; vertical-align: baseline">'''<font color="#000000"> To use the Fuzzy C-Means algorithm <br /></font>'''</div><div style="font-style: normal; font-weight: normal; margin-bottom: 0pt; margin-left: 18pt; margin-right: 0pt; margin-top: 6pt; text-align: left; text-decoration: none; text-indent: -18pt; text-transform: none; vertical-align: baseline"><font color="#000000"> 1 Select the original image.<br /></font></div><div style="font-style: normal; font-weight: normal; margin-bottom: 0pt; margin-left: 18pt; margin-right: 0pt; margin-top: 6pt; text-align: left; text-decoration: none; text-indent: -18pt; text-transform: none; vertical-align: baseline"><font color="#000000"> 2 Select Algorithms > Segmentation> Fuzzy C-Means > Single Channel in the MIPAV window.<br /></font></div><div style="font-style: normal; font-weight: normal; margin-bottom: 0pt; margin-left: 0pt; margin-right: 0pt; margin-top: 0pt; text-align: left; text-decoration: none; text-indent: 0pt; text-transform: none; vertical-align: baseline"><font color="#000000"> <br /></font></div><div style="font-style: normal; font-weight: normal; margin-bottom: 0pt; margin-left: 0pt; margin-right: 0pt; margin-top: 0pt; text-align: left; text-decoration: none; text-indent: 0pt; text-transform: none; vertical-align: baseline"><font color="#000000"> <br /></font></div><div style="font-style: normal; font-weight: normal; margin-bottom: 0pt; margin-left: 0pt; margin-right: 0pt; margin-top: 0pt; text-align: left; text-decoration: none; text-indent: 0pt; text-transform: none; vertical-align: baseline"><font color="#000000"> <br /></font></div><div style="font-style: normal; font-weight: normal; margin-bottom: 0pt; margin-left: 18pt; margin-right: 0pt; margin-top: 6pt; text-align: left; text-decoration: none; text-indent: 0pt; text-transform: none; vertical-align: baseline"><font color="#000000"> The Fuzzy C-Means dialog box (Figure 5) opens.<br /></font></div><div style="font-style: normal; font-weight: normal; margin-bottom: 0pt; margin-left: 0pt; margin-right: 0pt; margin-top: 0pt; text-align: left; text-decoration: none; text-indent: 0pt; text-transform: none; vertical-align: baseline"><font color="#000000"> |
{| border="1" cellpadding="5" | {| border="1" cellpadding="5" | ||
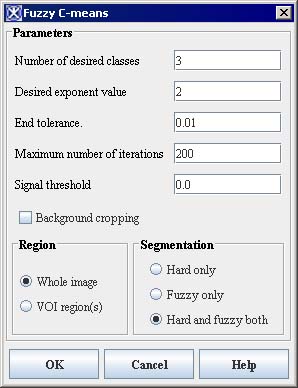
| − | |+ | + | |+ '''Figure 5. Fuzzy C-Means dialog box''' |
|- | |- | ||
| − | |||
| − | |||
| | | | ||
[[Image:FuzzyCMenas.jpg]] | [[Image:FuzzyCMenas.jpg]] | ||
| − | |||
|} | |} | ||
| − | <br /></font></div><div style="font-style: normal; font-weight: normal; margin-bottom: 0pt; margin-left: 18pt; margin-right: 0pt; margin-top: 6pt; text-align: left; text-decoration: none; text-indent: -18pt; text-transform: none; vertical-align: baseline"><font color="#000000"> 3 Complete the dialog box: <br /></font></div><div style="font-style: normal; font-weight: normal; margin-bottom: 0pt; margin-left: 36pt; margin-right: 0pt; margin-top: 6pt; text-align: left; text-decoration: none; text-indent: -12pt; text-transform: none; vertical-align: baseline"><font color="#000000"> In Number of desired classes, select either 2 classes if the CPF was stripped off the image previously or 3 classes if the CPF is still in the image.<br /></font></div><div style="font-style: normal; font-weight: normal; margin-bottom: 0pt; margin-left: 36pt; margin-right: 0pt; margin-top: 6pt; text-align: left; text-decoration: none; text-indent: -12pt; text-transform: none; vertical-align: baseline"><font color="#000000"> In Segmentation, select Hard only, which is the only segmentation needed for measurements.<br /></font></div><div style="font-style: normal; font-weight: normal; margin-bottom: 0pt; margin-left: 18pt; margin-right: 0pt; margin-top: 6pt; text-align: left; text-decoration: none; text-indent: -18pt; text-transform: none; vertical-align: baseline"><font color="#000000"> 4 Click OK. The Initial Centroids dialog box ( | + | <br /></font></div><div style="font-style: normal; font-weight: normal; margin-bottom: 0pt; margin-left: 18pt; margin-right: 0pt; margin-top: 6pt; text-align: left; text-decoration: none; text-indent: -18pt; text-transform: none; vertical-align: baseline"><font color="#000000"> 3 Complete the dialog box: <br /></font></div><div style="font-style: normal; font-weight: normal; margin-bottom: 0pt; margin-left: 36pt; margin-right: 0pt; margin-top: 6pt; text-align: left; text-decoration: none; text-indent: -12pt; text-transform: none; vertical-align: baseline"><font color="#000000"> In Number of desired classes, select either 2 classes if the CPF was stripped off the image previously or 3 classes if the CPF is still in the image.<br /></font></div><div style="font-style: normal; font-weight: normal; margin-bottom: 0pt; margin-left: 36pt; margin-right: 0pt; margin-top: 6pt; text-align: left; text-decoration: none; text-indent: -12pt; text-transform: none; vertical-align: baseline"><font color="#000000"> In Segmentation, select Hard only, which is the only segmentation needed for measurements.<br /></font></div><div style="font-style: normal; font-weight: normal; margin-bottom: 0pt; margin-left: 18pt; margin-right: 0pt; margin-top: 6pt; text-align: left; text-decoration: none; text-indent: -18pt; text-transform: none; vertical-align: baseline"><font color="#000000"> 4 Click OK. The Initial Centroids dialog box (Figure 6) opens.<br /></font></div><div style="font-style: normal; font-weight: normal; margin-bottom: 0pt; margin-left: 0pt; margin-right: 0pt; margin-top: 0pt; text-align: left; text-decoration: none; text-indent: 0pt; text-transform: none; vertical-align: baseline"><font color="#000000"> |
{| border="1" cellpadding="5" | {| border="1" cellpadding="5" | ||
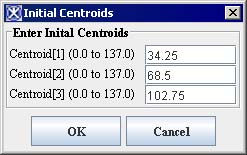
| − | |+ | + | |+ '''Figure 6. Initial Centroids dialog box''' |
|- | |- | ||
| − | |||
| − | |||
| | | | ||
[[Image:FuzzyCMeansInitialCentroids.jpg]] | [[Image:FuzzyCMeansInitialCentroids.jpg]] | ||
| − | |||
|} | |} | ||
| − | <br /></font></div><div style="font-style: normal; font-weight: normal; margin-bottom: 0pt; margin-left: 18pt; margin-right: 0pt; margin-top: 6pt; text-align: left; text-decoration: none; text-indent: -18pt; text-transform: none; vertical-align: baseline"><font color="#000000"> 5 Click OK. A series of progress messages appear. In a few moments when processing completes:<br /></font></div><div style="font-style: normal; font-weight: normal; margin-bottom: 0pt; margin-left: 36pt; margin-right: 0pt; margin-top: 6pt; text-align: left; text-decoration: none; text-indent: -12pt; text-transform: none; vertical-align: baseline"><font color="#000000"> Data appears on the Data page in the Output window ( | + | <br /></font></div><div style="font-style: normal; font-weight: normal; margin-bottom: 0pt; margin-left: 18pt; margin-right: 0pt; margin-top: 6pt; text-align: left; text-decoration: none; text-indent: -18pt; text-transform: none; vertical-align: baseline"><font color="#000000"> 5 Click OK. A series of progress messages appear. In a few moments when processing completes:<br /></font></div><div style="font-style: normal; font-weight: normal; margin-bottom: 0pt; margin-left: 36pt; margin-right: 0pt; margin-top: 6pt; text-align: left; text-decoration: none; text-indent: -12pt; text-transform: none; vertical-align: baseline"><font color="#000000"> Data appears on the Data page in the Output window (Figure 7)<br /></font></div><div style="font-style: normal; font-weight: normal; margin-bottom: 0pt; margin-left: 0pt; margin-right: 0pt; margin-top: 0pt; text-align: left; text-decoration: none; text-indent: 0pt; text-transform: none; vertical-align: baseline"><font color="#000000"> |
{| border="1" cellpadding="5" | {| border="1" cellpadding="5" | ||
| − | |+ | + | |+ '''Figure 7. Data on the Data page in the Output window''' |
|- | |- | ||
| − | |||
| − | |||
| | | | ||
[[Image:exampleOutputwindowTalairachdata.jpg]] | [[Image:exampleOutputwindowTalairachdata.jpg]] | ||
| − | |||
|} | |} | ||
| − | <br /> | + | <br /> |
| + | An image appears (Figure 8).<br /> | ||
{| border="1" cellpadding="5" | {| border="1" cellpadding="5" | ||
| − | |+ | + | |+ '''Figure 8. Image produced by using Fuzzy C-Means algorithm''' |
|- | |- | ||
| − | |||
| − | |||
| | | | ||
[[Image:exampleCompositeImageFUZZYCMeans.jpg]] | [[Image:exampleCompositeImageFUZZYCMeans.jpg]] | ||
| − | |||
|} | |} | ||
| − | <br / | + | <br /> |
[[Task 4, Transforming Talairach image and Talairach VOIs-1 to the original image]] | [[Task 4, Transforming Talairach image and Talairach VOIs-1 to the original image]] | ||
Revision as of 19:04, 7 March 2012
You can segment the original image using either the FANTASM plug-in program or the Fuzzy C-Means algorithm. The FANTASM plug-in program, a different version of the Fuzzy C-Means algorithm, provides segmentation that is less sensitive to noise. This section provides directions for both:
Using FANTASM to segment the image
Using the Fuzzy C-Means algorithm to segment the image
To use the FANTASM plug-in program
1 Select the original image.
2 Select Plug-In > Algorithms > FANTASM. The FANTASM dialog box opens.
| File:DialogboxFANTASM.gif |
3 Complete the dialog box:
In Number of desired classes, select either 2 classes if the CPF was stripped off the image previously or 3 classes if the CPF is still in the image.
In Segmentation, select Hard only, which is the only segmentation needed for measurements.
4 Click OK. The Initial Centroids dialog box opens.
5 Click OK.
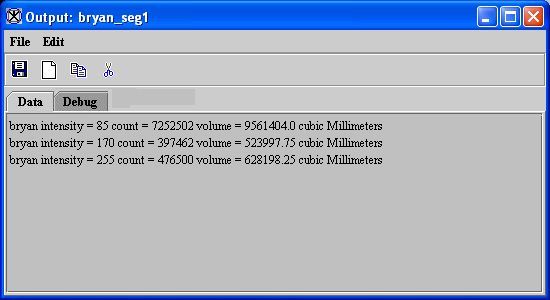
A series of progress messages appear, and data appears on the Data page in the Output window (Figure 3).
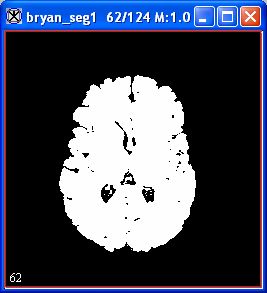
In a few moments, processing completes, and an image appears (Figure 4A).
To use the Fuzzy C-Means algorithm
1 Select the original image.
2 Select Algorithms > Segmentation> Fuzzy C-Means > Single Channel in the MIPAV window.
The Fuzzy C-Means dialog box (Figure 5) opens.
3 Complete the dialog box:
In Number of desired classes, select either 2 classes if the CPF was stripped off the image previously or 3 classes if the CPF is still in the image.
In Segmentation, select Hard only, which is the only segmentation needed for measurements.
4 Click OK. The Initial Centroids dialog box (Figure 6) opens.
5 Click OK. A series of progress messages appear. In a few moments when processing completes:
Data appears on the Data page in the Output window (Figure 7)
An image appears (Figure 8).
Task 4, Transforming Talairach image and Talairach VOIs-1 to the original image
