|
|
| Line 7: |
Line 7: |
| | | | |
| | === Performing AC-PC alignment === | | === Performing AC-PC alignment === |
| − | | + | In the Talairach system the anterior commissure is often referred as the "origin," because it is the origin of the Talairach grid. In this first semimanual task, you need to identify and set five separate landmark points, beginning with the anterior commissure. Setting these points aligns the anterior commissure and posterior commissure that forms the basis of the Talairach grid. The landmark points are:<br /> |
| − | <div style="font-style: normal; font-weight: normal; margin-bottom: 6pt; margin-left: 0pt; margin-right: 0pt; margin-top: 0pt; text-align: left; text-decoration: none; text-indent: 0pt; text-transform: none; vertical-align: baseline"><font color="#000000"> In the Talairach system the anterior commissure is often referred as the "origin," because it is the origin of the Talairach grid. In this first semimanual task, you need to identify and set five separate landmark points, beginning with the anterior commissure. Setting these points aligns the anterior commissure and posterior commissure that forms the basis of the Talairach grid. The landmark points, shown in [TechGuide_MappingBrainsTalairach.html#1291062 Figure 26], are:<br /></font></div><div style="font-style: normal; font-weight: normal; margin-bottom: 0pt; margin-left: 24pt; margin-right: 0pt; margin-top: 5pt; text-align: left; text-decoration: none; text-indent: -24pt; text-transform: none; vertical-align: baseline"><font color="#000000"> <span style="font-style: normal; text-decoration: none; text-transform: none; vertical-align: baseline">'''<font color="#000000">AC superior edge</font>'''</span>-Top middle of anterior commissure<br /></font></div><div style="font-style: normal; font-weight: normal; margin-bottom: 0pt; margin-left: 24pt; margin-right: 0pt; margin-top: 5pt; text-align: left; text-decoration: none; text-indent: -24pt; text-transform: none; vertical-align: baseline"><font color="#000000"> <span style="font-style: normal; text-decoration: none; text-transform: none; vertical-align: baseline">'''<font color="#000000">AC posterior margin</font>'''</span>-Rear middle of posterior commissure<br /></font></div><div style="font-style: normal; font-weight: normal; margin-bottom: 0pt; margin-left: 24pt; margin-right: 0pt; margin-top: 5pt; text-align: left; text-decoration: none; text-indent: -24pt; text-transform: none; vertical-align: baseline"><font color="#000000"> <span style="font-style: normal; text-decoration: none; text-transform: none; vertical-align: baseline">'''<font color="#000000">PC inferior edge</font>'''</span>-Bottom middle of posterior commissure<br /></font></div><div style="font-style: normal; font-weight: normal; margin-bottom: 0pt; margin-left: 24pt; margin-right: 0pt; margin-top: 5pt; text-align: left; text-decoration: none; text-indent: -24pt; text-transform: none; vertical-align: baseline"><font color="#000000"> <span style="font-style: normal; text-decoration: none; text-transform: none; vertical-align: baseline">'''<font color="#000000">First midsagittal point</font>'''</span>-Some point in the midsagittal plane; abbreviated as SG1<br /></font></div><div style="font-style: normal; font-weight: normal; margin-bottom: 0pt; margin-left: 24pt; margin-right: 0pt; margin-top: 5pt; text-align: left; text-decoration: none; text-indent: -24pt; text-transform: none; vertical-align: baseline"><font color="#000000"> <span style="font-style: normal; text-decoration: none; text-transform: none; vertical-align: baseline">'''<font color="#000000">Another midsagittal point</font>'''</span>-Some other point in the midsagittal plane; abbreviated as SG2<br /></font></div><div style="font-style: normal; font-weight: normal; margin-bottom: 0pt; margin-left: 0pt; margin-right: 0pt; margin-top: 0pt; text-align: left; text-decoration: none; text-indent: 0pt; text-transform: none; vertical-align: baseline"><font color="#000000"> <br /></font></div>
| + | '''AC superior edge'''-Top middle of anterior commissure<br /> |
| − | | + | '''AC posterior margin'''-Rear middle of posterior commissure<br /> |
| − | When you've set these points, the Talairach grid is formed from these axes (refer to [TechGuide_MappingBrainsTalairach.html#1221132 Figure 19]): | + | '''PC inferior edge'''-Bottom middle of posterior commissure<br /> |
| − | | + | '''First midsagittal point'''-Some point in the midsagittal plane; abbreviated as SG1<br /> |
| − | <div style="font-style: normal; font-weight: normal; margin-bottom: 0pt; margin-left: 24pt; margin-right: 0pt; margin-top: 5pt; text-align: left; text-decoration: none; text-indent: -24pt; text-transform: none; vertical-align: baseline"><font color="#000000"> <span style="font-style: normal; text-decoration: none; text-transform: none; vertical-align: baseline">'''<font color="#000000">Y axis</font>'''</span>-Anterior commissure and posterior commissure.<br /></font></div><div style="font-style: normal; font-weight: normal; margin-bottom: 0pt; margin-left: 24pt; margin-right: 0pt; margin-top: 5pt; text-align: left; text-decoration: none; text-indent: -24pt; text-transform: none; vertical-align: baseline"><font color="#000000"> <span style="font-style: normal; text-decoration: none; text-transform: none; vertical-align: baseline">'''<font color="#000000">Z axis</font>'''</span>-The longitudinal (interhemispheric or midsagittal) fissure is aligned to the <span style="font-weight: normal; text-decoration: none; text-transform: none; vertical-align: baseline">''<font color="#000000">yz</font>''</span> plane, thus defining the <span style="font-weight: normal; text-decoration: none; text-transform: none; vertical-align: baseline">''<font color="#000000">z</font>''</span> axis.<br /></font></div><div style="font-style: normal; font-weight: normal; margin-bottom: 0pt; margin-left: 24pt; margin-right: 0pt; margin-top: 5pt; text-align: left; text-decoration: none; text-indent: -24pt; text-transform: none; vertical-align: baseline"><font color="#000000"> <span style="font-style: normal; text-decoration: none; text-transform: none; vertical-align: baseline">'''<font color="#000000">X axis</font>'''</span>-The right-left axis perpendicular to the <span style="font-weight: normal; text-decoration: none; text-transform: none; vertical-align: baseline">''<font color="#000000">y</font>''</span> and <span style="font-weight: normal; text-decoration: none; text-transform: none; vertical-align: baseline">''<font color="#000000">z</font>''</span> axes.<br /></font></div><div style="font-style: normal; font-weight: normal; margin-bottom: 0pt; margin-left: 0pt; margin-right: 0pt; margin-top: 0pt; text-align: left; text-decoration: none; text-indent: 0pt; text-transform: none; vertical-align: baseline"><font color="#000000"> | + | '''Another midsagittal point'''-Some other point in the midsagittal plane; abbreviated as SG2<br /> |
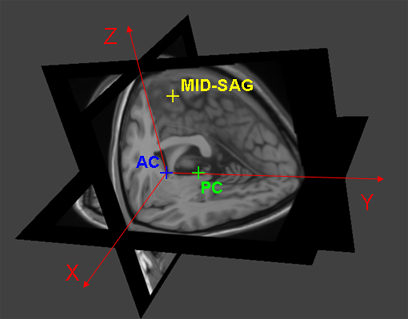
| | + | When you've set these points, the Talairach grid is formed from these axes (refer to Figure1):<br /> |
| | + | '''Y axis'''-Anterior commissure and posterior commissure.<br /> |
| | + | '''Z axis'''-The longitudinal (interhemispheric or midsagittal) fissure is aligned to the <span style="font-weight: normal; text-decoration: none; text-transform: none; vertical-align: baseline">''<font color="#000000">yz</font>''</span> plane, thus defining the <span style="font-weight: normal; text-decoration: none; text-transform: none; vertical-align: baseline">''<font color="#000000">z</font>''</span> axis.<br /></font></div><div style="font-style: normal; font-weight: normal; margin-bottom: 0pt; margin-left: 24pt; margin-right: 0pt; margin-top: 5pt; text-align: left; text-decoration: none; text-indent: -24pt; text-transform: none; vertical-align: baseline"><font color="#000000"> <span style="font-style: normal; text-decoration: none; text-transform: none; vertical-align: baseline">'''<font color="#000000">X axis</font>'''</span>-The right-left axis perpendicular to the <span style="font-weight: normal; text-decoration: none; text-transform: none; vertical-align: baseline">''<font color="#000000">y</font>''</span> and <span style="font-weight: normal; text-decoration: none; text-transform: none; vertical-align: baseline">''<font color="#000000">z</font>''</span> axes.<br /></font></div><div style="font-style: normal; font-weight: normal; margin-bottom: 0pt; margin-left: 0pt; margin-right: 0pt; margin-top: 0pt; text-align: left; text-decoration: none; text-indent: 0pt; text-transform: none; vertical-align: baseline"><font color="#000000"> |
| | | | |
| | {| border="1" cellpadding="5" | | {| border="1" cellpadding="5" |
| − | |+ <div style="font-style: normal; margin-bottom: 3pt; margin-left: 0pt; margin-right: 0pt; margin-top: 9pt; text-align: left; text-decoration: none; text-indent: 0pt; text-transform: none; vertical-align: baseline">'''<font color="#000000"> Figure 19. The <span style="text-decoration: none; text-transform: none; vertical-align: baseline">'''''<font color="#000000">x, y,</font>'''''</span> and <span style="text-decoration: none; text-transform: none; vertical-align: baseline">'''''<font color="#000000">z</font>'''''</span> planes in an image after AC-PC alignment<br /></font>'''</div> | + | |+ '''Figure 1. The <span style="text-decoration: none; text-transform: none; vertical-align: baseline">'''''<font color="#000000">x, y,</font>'''''</span> and <span style="text-decoration: none; text-transform: none; vertical-align: baseline">'''''<font color="#000000">z</font>'''''</span> planes in an image after AC-PC alignment'''<br /> |
| | |- | | |- |
| − | |
| |
| − | <div style="font-style: normal; font-weight: normal; margin-bottom: 0pt; margin-left: 0pt; margin-right: 0pt; margin-top: 1pt; text-align: left; text-decoration: none; text-indent: 0pt; text-transform: none; vertical-align: baseline"><font color="#000000"> <br clear="all" />{| align="center"
| |
| | | | | | |
| | [[Image:exampleTalairachPlanes.jpg]] | | [[Image:exampleTalairachPlanes.jpg]] |
| − | |}<br clear="all" /><br /></font></div>
| |
| | |} | | |} |
| | | | |
| − | <br /></font></div><div style="font-style: normal; margin-bottom: 6pt; margin-left: 0pt; margin-right: 0pt; margin-top: 14pt; text-align: left; text-decoration: none; text-indent: 0pt; text-transform: none; vertical-align: baseline">'''<font color="#000000"> To perform AC-PC alignment<br /></font>'''</div><div style="font-style: normal; font-weight: normal; margin-bottom: 0pt; margin-left: 18pt; margin-right: 0pt; margin-top: 6pt; text-align: left; text-decoration: none; text-indent: -18pt; text-transform: none; vertical-align: baseline"><font color="#000000"> 1 Open an image of the brain ([TechGuide_MappingBrainsTalairach.html#1221148 Figure 20]) that you want to put into Talairach space.<br /></font></div><div style="font-style: normal; font-weight: normal; margin-bottom: 0pt; margin-left: 0pt; margin-right: 0pt; margin-top: 0pt; text-align: left; text-decoration: none; text-indent: 0pt; text-transform: none; vertical-align: baseline"><font color="#000000"> | + | <br /> |
| | + | '''To perform AC-PC alignment'''<br /> |
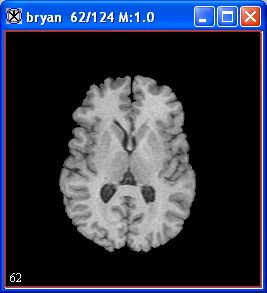
| | + | 1 Open an image of the brain (Figure 2) that you want to put into Talairach space.<br /> |
| | | | |
| | {| border="1" cellpadding="5" | | {| border="1" cellpadding="5" |
| − | |+ <div style="font-style: normal; margin-bottom: 3pt; margin-left: 0pt; margin-right: 0pt; margin-top: 9pt; text-align: left; text-decoration: none; text-indent: 0pt; text-transform: none; vertical-align: baseline">'''<font color="#000000"> Figure 20. An image of a brain to be put in Talairach space<br /></font>'''</div> | + | |+ '''Figure 2. An image of a brain to be put in Talairach space''' |
| | |- | | |- |
| − | |
| |
| − | <div style="font-style: normal; font-weight: normal; margin-bottom: 0pt; margin-left: 0pt; margin-right: 0pt; margin-top: 1pt; text-align: left; text-decoration: none; text-indent: 0pt; text-transform: none; vertical-align: baseline"><font color="#000000"> <br clear="all" />{| align="center"
| |
| | | | | | |
| | [[Image:exampleTalairachOrigBrain.jpg]] | | [[Image:exampleTalairachOrigBrain.jpg]] |
| − | |}<br clear="all" /><br /></font></div>
| |
| | |} | | |} |
| | | | |
| − | <br /></font></div><div style="font-style: normal; font-weight: normal; margin-bottom: 0pt; margin-left: 18pt; margin-right: 0pt; margin-top: 6pt; text-align: left; text-decoration: none; text-indent: -18pt; text-transform: none; vertical-align: baseline"><font color="#000000"> 2 Select Image > Attributes > Edit Attributes. The Image Attributes dialog box opens. <br /></font></div><div style="font-style: normal; font-weight: normal; margin-bottom: 0pt; margin-left: 18pt; margin-right: 0pt; margin-top: 6pt; text-align: left; text-decoration: none; text-indent: -18pt; text-transform: none; vertical-align: baseline"><font color="#000000"> 3 Click Resolutions. The Resolutions page ([TechGuide_MappingBrainsTalairach.html#1221164 Figure 21]) appears.<br /></font></div><div style="font-style: normal; font-weight: normal; margin-bottom: 0pt; margin-left: 0pt; margin-right: 0pt; margin-top: 0pt; text-align: left; text-decoration: none; text-indent: 0pt; text-transform: none; vertical-align: baseline"><font color="#000000"> | + | <br /> |
| | + | 2 Select Image > Attributes > Edit Attributes. The Image Attributes dialog box opens. <br /> |
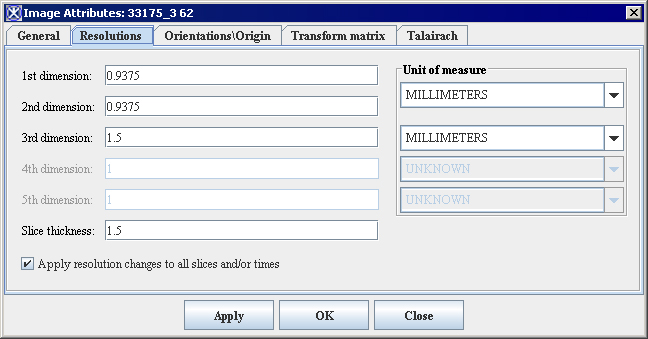
| | + | 3 Click Resolutions. The Resolutions page (Figure 3) appears.<br /> |
| | | | |
| | {| border="1" cellpadding="5" | | {| border="1" cellpadding="5" |
| − | |+ <div style="font-style: normal; margin-bottom: 3pt; margin-left: 0pt; margin-right: 0pt; margin-top: 9pt; text-align: left; text-decoration: none; text-indent: 0pt; text-transform: none; vertical-align: baseline">'''<font color="#000000"> Figure 21. Resolutions page in the Image Attributes dialog box<br /></font>'''</div> | + | |+ '''Figure 3. Resolutions page in the Image Attributes dialog box''' |
| | |- | | |- |
| − | |
| |
| − | <div style="font-style: normal; font-weight: normal; margin-bottom: 0pt; margin-left: 0pt; margin-right: 0pt; margin-top: 0pt; text-align: left; text-decoration: none; text-indent: 0pt; text-transform: none; vertical-align: baseline"><font color="#000000"> <br clear="all" />{| align="center"
| |
| | | | | | |
| | [[Image:ImageAttributesResolutions.jpg]] | | [[Image:ImageAttributesResolutions.jpg]] |
| − | |}<br clear="all" /><br /></font></div>
| |
| | |} | | |} |
| | | | |
| − | <br /></font></div><div style="font-style: normal; font-weight: normal; margin-bottom: 0pt; margin-left: 18pt; margin-right: 0pt; margin-top: 6pt; text-align: left; text-decoration: none; text-indent: -18pt; text-transform: none; vertical-align: baseline"><font color="#000000"> 4 Check the resolutions in 1st dim., 2nd dim., and 3rd dim to make sure they are correct, change them if they are incorrect, and click Apply.<br /></font></div><div style="font-style: normal; font-weight: normal; margin-bottom: 0pt; margin-left: 18pt; margin-right: 0pt; margin-top: 6pt; text-align: left; text-decoration: none; text-indent: -18pt; text-transform: none; vertical-align: baseline"><font color="#000000"> 5 Click Orientation. The Orientation page ([TechGuide_MappingBrainsTalairach.html#1221190 Figure 22]) appears.<br /></font></div><div style="font-style: normal; font-weight: normal; margin-bottom: 0pt; margin-left: 0pt; margin-right: 0pt; margin-top: 0pt; text-align: left; text-decoration: none; text-indent: 0pt; text-transform: none; vertical-align: baseline"><font color="#000000"> <br /></font></div><div style="font-style: normal; font-weight: normal; margin-bottom: 0pt; margin-left: 0pt; margin-right: 0pt; margin-top: 0pt; text-align: left; text-decoration: none; text-indent: 0pt; text-transform: none; vertical-align: baseline"><font color="#000000"> <br /></font></div><div style="font-style: normal; font-weight: normal; margin-bottom: 0pt; margin-left: 0pt; margin-right: 0pt; margin-top: 0pt; text-align: left; text-decoration: none; text-indent: 0pt; text-transform: none; vertical-align: baseline"><font color="#000000"> <br /></font></div><div style="font-style: normal; font-weight: normal; margin-bottom: 0pt; margin-left: 0pt; margin-right: 0pt; margin-top: 0pt; text-align: left; text-decoration: none; text-indent: 0pt; text-transform: none; vertical-align: baseline"><font color="#000000"> <br /></font></div><div style="font-style: normal; font-weight: normal; margin-bottom: 0pt; margin-left: 0pt; margin-right: 0pt; margin-top: 0pt; text-align: left; text-decoration: none; text-indent: 0pt; text-transform: none; vertical-align: baseline"><font color="#000000"> | + | <br /> |
| | + | 4 Check the resolutions in 1st dim., 2nd dim., and 3rd dim to make sure they are correct, change them if they are incorrect, and click Apply. |
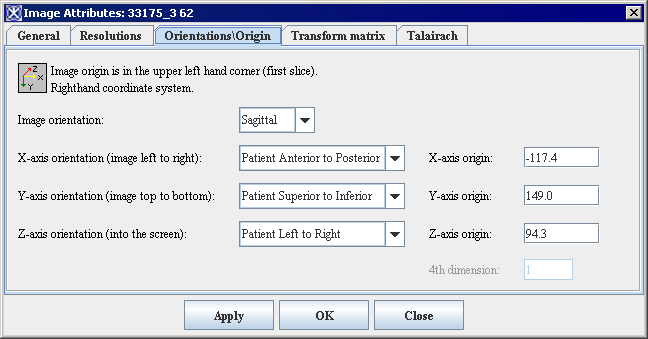
| | + | 5 Click Orientation. The Orientation page (Figure 4) appears.<br /> |
| | | | |
| | {| border="1" cellpadding="5" | | {| border="1" cellpadding="5" |
| − | |+ <div style="font-style: normal; margin-bottom: 3pt; margin-left: 0pt; margin-right: 0pt; margin-top: 9pt; text-align: left; text-decoration: none; text-indent: 0pt; text-transform: none; vertical-align: baseline">'''<font color="#000000"> Figure 22. Orientations page in the Image Attributes dialog box<br /></font>'''</div> | + | |+ '''Figure 4. Orientations page in the Image Attributes dialog box''' |
| | |- | | |- |
| − | |
| |
| − | <div style="font-style: normal; font-weight: normal; margin-bottom: 0pt; margin-left: 0pt; margin-right: 0pt; margin-top: 1pt; text-align: left; text-decoration: none; text-indent: 0pt; text-transform: none; vertical-align: baseline"><font color="#000000"> <br clear="all" />{| align="center"
| |
| | | | | | |
| | [[Image:ImageAttributesOrientationOrigin.jpg]] | | [[Image:ImageAttributesOrientationOrigin.jpg]] |
| − | |}<br clear="all" /><br /></font></div>
| |
| | |} | | |} |
| | | | |
| − | <br /></font></div><div style="font-style: normal; font-weight: normal; margin-bottom: 0pt; margin-left: 0pt; margin-right: 0pt; margin-top: 0pt; text-align: left; text-decoration: none; text-indent: 0pt; text-transform: none; vertical-align: baseline"><font color="#000000"> <br /></font></div><div style="font-style: normal; font-weight: normal; margin-bottom: 0pt; margin-left: 18pt; margin-right: 0pt; margin-top: 6pt; text-align: left; text-decoration: none; text-indent: -18pt; text-transform: none; vertical-align: baseline"><font color="#000000"> 6 Check the orientation of the image to make sure it is correct. <br /></font></div><div style="font-style: normal; font-weight: normal; margin-bottom: 5pt; margin-left: 0pt; margin-right: 36pt; margin-top: 5pt; text-align: left; text-decoration: none; text-indent: 0pt; text-transform: none; vertical-align: baseline"><font color="#000000"> <span style="font-style: normal; text-decoration: none; text-transform: none; vertical-align: baseline">'''<font color="#000000">Caution</font>'''</span><nowiki>: Classical alignment problems that occur with images are that resolutions and orientation for the original image are not set properly.</nowiki><br /></font></div><div style="font-style: normal; font-weight: normal; margin-bottom: 0pt; margin-left: 18pt; margin-right: 0pt; margin-top: 6pt; text-align: left; text-decoration: none; text-indent: -18pt; text-transform: none; vertical-align: baseline"><font color="#000000"> 7 Do one of the following:<br /></font></div><div style="font-style: normal; font-weight: normal; margin-bottom: 0pt; margin-left: 36pt; margin-right: 0pt; margin-top: 6pt; text-align: left; text-decoration: none; text-indent: -12pt; text-transform: none; vertical-align: baseline"><font color="#000000"> If the orientation is correct, go to the next step.<br /></font></div><div style="font-style: normal; font-weight: normal; margin-bottom: 0pt; margin-left: 36pt; margin-right: 0pt; margin-top: 6pt; text-align: left; text-decoration: none; text-indent: -12pt; text-transform: none; vertical-align: baseline"><font color="#000000"> If the orientation is incorrect: <br /></font></div><div style="font-style: normal; font-weight: normal; margin-bottom: 0pt; margin-left: 48pt; margin-right: 0pt; margin-top: 6pt; text-align: left; text-decoration: none; text-indent: -12pt; text-transform: none; vertical-align: baseline"><font color="#000000"> Make the necessary changes.<br /></font></div><div style="font-style: normal; font-weight: normal; margin-bottom: 0pt; margin-left: 48pt; margin-right: 0pt; margin-top: 6pt; text-align: left; text-decoration: none; text-indent: -12pt; text-transform: none; vertical-align: baseline"><font color="#000000"> Click Apply to apply the changes immediately.<br /></font></div><div style="font-style: normal; font-weight: normal; margin-bottom: 0pt; margin-left: 18pt; margin-right: 0pt; margin-top: 6pt; text-align: left; text-decoration: none; text-indent: -18pt; text-transform: none; vertical-align: baseline"><font color="#000000"> 8 Click Talairach. The Talairach page ([TechGuide_MappingBrainsTalairach.html#1267747 Figure 23]) appears.<br /></font></div><div style="font-style: normal; font-weight: normal; margin-bottom: 0pt; margin-left: 0pt; margin-right: 0pt; margin-top: 0pt; text-align: left; text-decoration: none; text-indent: 0pt; text-transform: none; vertical-align: baseline"><font color="#000000"> | + | <br /> |
| | + | 6 Check the orientation of the image to make sure it is correct. <br /> |
| | + | '''Caution''': Classical alignment problems that occur with images are that resolutions and orientation for the original image are not set properly.<br /> |
| | + | 7 Do one of the following:<br /> |
| | + | *If the orientation is correct, go to the next step.<br /> |
| | + | *If the orientation is incorrect: <br /> |
| | + | **Make the necessary changes.<br /> |
| | + | **Click Apply to apply the changes immediately.<br /> |
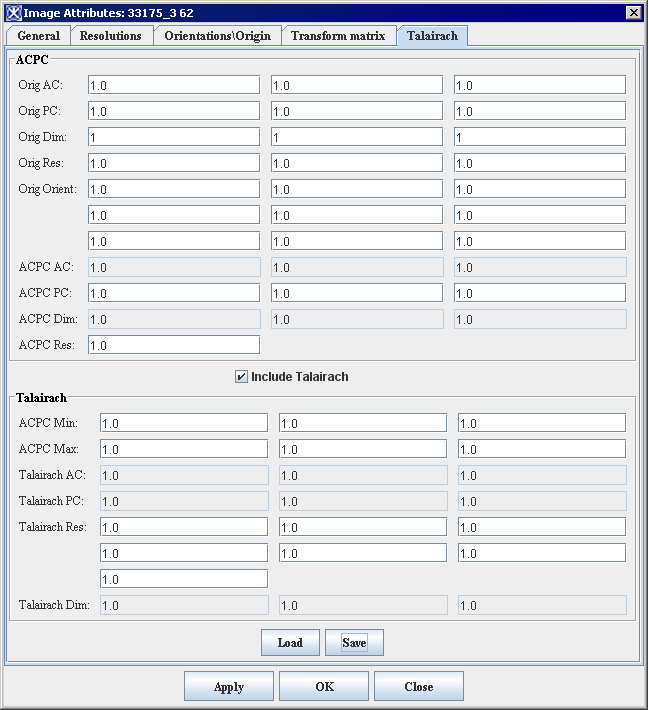
| | + | 8 Click Talairach. The Talairach page (Figure 5) appears.<br /> |
| | | | |
| | {| border="1" cellpadding="5" | | {| border="1" cellpadding="5" |
| − | |+ <div style="font-style: normal; margin-bottom: 3pt; margin-left: 0pt; margin-right: 0pt; margin-top: 9pt; text-align: left; text-decoration: none; text-indent: 0pt; text-transform: none; vertical-align: baseline">'''<font color="#000000"> Figure 23. Talairach page in the Image Attributes dialog box as it appears <span style="text-decoration: none; text-transform: none; vertical-align: baseline">'''''<font color="#000000">before</font>'''''</span> mapping the image to AC-PC or Talairach space<br /></font>'''</div> | + | |+ '''Figure 5. Talairach page in the Image Attributes dialog box as it appears <span style="text-decoration: none; text-transform: none; vertical-align: baseline">'''''<font color="#000000">before</font>'''''</span> mapping the image to AC-PC or Talairach space''' |
| | |- | | |- |
| − | |
| |
| − | <div style="font-style: normal; font-weight: normal; margin-bottom: 0pt; margin-left: 0pt; margin-right: 0pt; margin-top: 1pt; text-align: left; text-decoration: none; text-indent: 0pt; text-transform: none; vertical-align: baseline"><font color="#000000"> <br clear="all" />{| align="center"
| |
| | | | | | |
| | [[Image:ImageAttributesTalairach1.jpg]] | | [[Image:ImageAttributesTalairach1.jpg]] |
| − | |}<br clear="all" /><br /></font></div>
| |
| | |} | | |} |
| | | | |
| − | <br /></font></div><div style="font-style: normal; font-weight: normal; margin-bottom: 0pt; margin-left: 0pt; margin-right: 0pt; margin-top: 0pt; text-align: left; text-decoration: none; text-indent: 0pt; text-transform: none; vertical-align: baseline"><font color="#000000"> <br /></font></div><div style="font-style: normal; font-weight: normal; margin-bottom: 0pt; margin-left: 0pt; margin-right: 0pt; margin-top: 0pt; text-align: left; text-decoration: none; text-indent: 0pt; text-transform: none; vertical-align: baseline"><font color="#000000"> <br /></font></div><div style="font-style: normal; font-weight: normal; margin-bottom: 0pt; margin-left: 18pt; margin-right: 0pt; margin-top: 6pt; text-align: left; text-decoration: none; text-indent: -18pt; text-transform: none; vertical-align: baseline"><font color="#000000"> 9 Scroll down the window and notice that "1.0" or "1" appears in all of the fields in the ACPC group and the Talairach group. This data should change as a result of performing, first, the ACPC transformation on the image and, second, the Talairach transformation.<br /></font></div><div style="font-style: normal; font-weight: normal; margin-bottom: 0pt; margin-left: 18pt; margin-right: 0pt; margin-top: 6pt; text-align: left; text-decoration: none; text-indent: -18pt; text-transform: none; vertical-align: baseline"><font color="#000000"> | + | <br /> |
| | + | 9 Scroll down the window and notice that "1.0" or "1" appears in all of the fields in the ACPC group and the Talairach group. This data should change as a result of performing, first, the ACPC transformation on the image and, second, the Talairach transformation.<br /> |
| | | | |
| | [[Select Algorithms and Brain Tools for Talairach Transform]] | | [[Select Algorithms and Brain Tools for Talairach Transform]] |
Transforming, or converting, datasets into Talairach space provides scientists with the ability to identify important structures within the standard brain. The Talairach atlas is as much a reference system as it is a coordinate system.
The main steps involved in transforming a dataset into the Talairach coordinate system are:
In the Talairach system the anterior commissure is often referred as the "origin," because it is the origin of the Talairach grid. In this first semimanual task, you need to identify and set five separate landmark points, beginning with the anterior commissure. Setting these points aligns the anterior commissure and posterior commissure that forms the basis of the Talairach grid. The landmark points are:
AC superior edge-Top middle of anterior commissure
AC posterior margin-Rear middle of posterior commissure
PC inferior edge-Bottom middle of posterior commissure
First midsagittal point-Some point in the midsagittal plane; abbreviated as SG1
Another midsagittal point-Some other point in the midsagittal plane; abbreviated as SG2
When you've set these points, the Talairach grid is formed from these axes (refer to Figure1):
Y axis-Anterior commissure and posterior commissure.
axis.
