Sending and retrieving DICOM images
You can use MIPAV to query a DICOM-compatible archive or an imaging device that has, or is connected to, a DICOM server. A DICOM server is an application that processes DICOM query and retrieve requests. Because MIPAV is not equipped with a server, you cannot use this process to obtain DICOM files from another researcher who is also using MIPAV. You must use the receive process outlined in "Receiving and sending image files" instead. You can then select images from the query results and store them on your hard drive or another destination. The tasks involved in sending and retrieving DICOM images include the following:
- Setting up the hosts table
- Creating, editing, and deleting servers
- Connecting to DICOM devise
- Creating DICOM storage entries
Contents
DICOM Communication Panel dialog box
To set up the hosts table and to query, retrieve, receive, and send DICOM files, you use the DICOM Communication Panel dialog box. To view this dialog box, select File > DICOM Database Access in the MIPAV window. The DICOM Communication Panel dialog box opens.
This dialog box includes four tabbed pages:
- QR Client, which appears by default when the dialog box is first opened. Use this page to search for an image for a particular patient, physician, and time period.
- Send, which allows you to select the files to be sent to the DICOM imaging device, to select the specific imaging device from a list of available devices to which you want to send the files, and to send the files. This page also allows you to test the connection to the device that you selected.
- Hosts, which allows you to create a servers to which you are connected, edit the settings for servers, delete servers, and set the default server. It also allows you to create, edit, or delete storage destinations and set the default storage destination.
- Help, which provides instructions for setting up the hosts table and for sending and receiving images.
The following sections discuss these pages and explain in detail the contents of each page and how to use them.
Setting up the hosts table
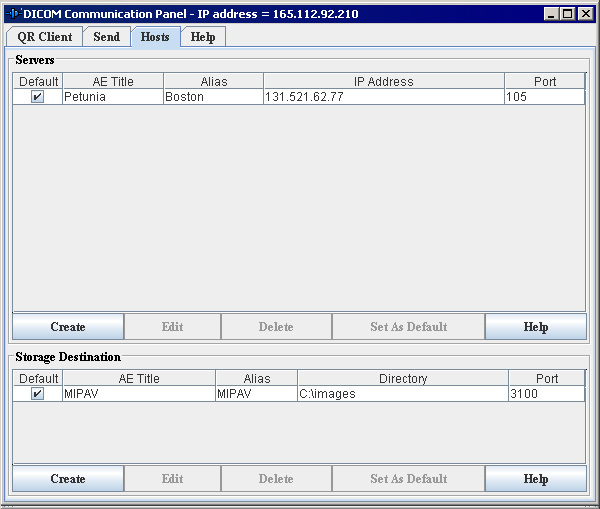
Before creating queries or receiving and sending images, you must set up the hosts table, which is on the Hosts page (Figure 7) in the DICOM Communication Panel dialog box. The hosts table stores information (application entity [AE] title, alias, IP address, and port number) about the devices to which you want to connect. Conversely, your computer's connection information must be stored in the hosts table of the devices to which you want to connect. Note that the title bar for the DICOM Communication Panel dialog box contains the internet protocol (IP) address for your workstation.
internet protocol (IP) address: A numeric ID that is used to identify your computer on a Transmission Control Protocol/Internet Protocol (TCP/IP) network. An example of a TCP/IP network is the Internet.
To display the Hosts page, select the Hosts tab in the dialog box. The Hosts page, shown in Figure 7, appears. The Servers panel on the Hosts page includes fields that contain identifying information for the devices to which you want to connect. (Although the panel is named Server, you should create an entry for any type of device to which you want to connect.) The Storage Destination panel holds entries that indicate where you want images to stored once you retrieve or receive them.
The following sections explain how to:
Create, edit, or delete entries in the Servers panel.</font>
Creating, editing, and deleting servers
You can create, edit, and delete entries in the Servers panel on the Hosts page (Figure 7). You must create an entry if you want to use MIPAV to query a server.
|
Servers
|
Default-Indicates that the device is the default. When you pose a query, data is sent to the default device.
| |
|
AE Title-Lists the title of the device's DICOM application entity. The AE Title is often set by the device's system administrator. The hosts table associates the AE Title with the IP address. The AE Title can be 16 alphanumeric characters or less. Note that the AE Title is case sensitive.
| ||
|
Alias-Specifies the alternative name for the device. The alternative name can be up to 16 alphanumeric characters.
| ||
|
IP Address-Specifies the internet protocol address for the device. An IP address identifies a device on a Transmission Control Protocol/Internet Protocol (TCP/IP) network. (An example of a TCP/IP network is the internet.) The hosts table associates the IP address with the AE Title. IP addresses are written as four numbers separated by periods.
| ||
|
|
Port-Identifies the port for the device's application program that you query, retrieve, receive, and send image files. A port is a logical connection endpoint that is the means that a program uses to identify a specific program running on a computer on a network (such as TCP/IP).
| |
|
Create
|
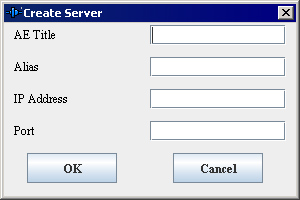
Allows you to add a new DICOM server. When you click Create, the Create Server dialog box opens.
| |
|
Edit
|
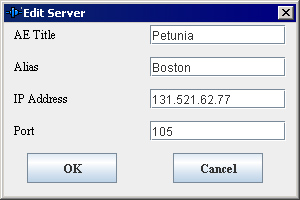
Allows you to edit a currently listed DICOM server. When you select the server you want to modify and click this button, the Edit Server dialog box appears.
| |
|
Delete
|
Deletes the DICOM server from the list of servers. To delete a server, select the server and then click this button. A message appears asking you to confirm the deletion.
| |
|
Set as default
|
Allows you to select the server to be used as the default server. Select a server and then click this button. The check mark moves to the Default check box beside the server you selected.
| |
|
Storage destination |
Default-Indicates, when selected, the default storage destination. When you retrieve or receive image data, it is stored in the default storage destination.
| |
|
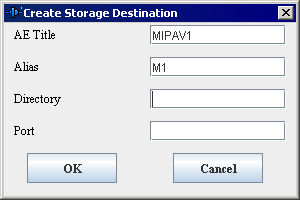
AE Title-Lists the title of the DICOM application entity. If the storage destination is on your machine, the AE title is typically preceded by MIPAV_. An example of a valid AE title is MIPAVSMITH23. The AE Title can be 16 alphanumeric characters or less. Note that the AE Title is case sensitive.
| ||
|
Alias-Specifies an alternative name for the storage destination. Alphanumeric characters are accepted.
| ||
|
Directory-Shows the full path name of the directory where images are stored. Alphanumeric characters are accepted.
| ||
|
Port-Identifies the port that your computer uses to receive images. By default, the port number is 3100.
| ||
|
Create
|
Allows you to add a new storage location. When you click Create, the Create Storage Destination dialog box appears.
| |
|
Edit
|
Lets you modify a listed storage location. Select the location you want to modify and click this button. The Edit Storage Destination dialog box opens.
| |
|
Delete
|
Allow you to delete a listed storage location. To delete a storage location, select the location and then click this button.
| |
|
Set as default
|
Allows you to select the storage location that is used by default. Select the location and click this button. The check mark moves from the current default location to the Default check box beside the location you selected.
| |
Connecting to a DICOM device
Connecting to a DICOM device
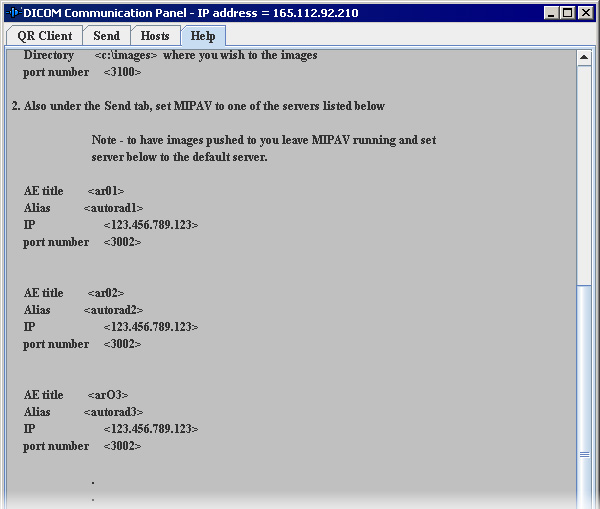
Before you begin, obtain the AE title, alias, IP address, and port number of the device to which you want to connect. The connection information for the NIH Kodak Cemax-Icon PACS appears when you click the Help tab. The Help page appears (Figure 8]). You must also contact the administrator of the device (including the NIH Kodak Cemax-Icon PACS) so that your connection information can be stored in their hosts table as well. Once you have all of the information, you can create an entry in the hosts table entry.
Contact Alberto Goldszal, CC, 6-7700 ext.226 to have your machine properly added to the server host table. You will need your IP address which can be found on the title bar of this frame.
|
AE title
|
Lists the title of the device's DICOM application entity. The AE Title is often set by the device's system administrator. The hosts table associates the AE Title with the IP address. The AE Title can be 16 alphanumeric characters or less. Note that the AE Title is case sensitive.
|
|
|
Alias
|
Specifies the alternative name for the device. The alternative name can be up to 16 alphanumeric characters.
| |
|
Address
|
Specifies the internet protocol (IP) address for the device. An IP address identifies a device on a Transmission Control Protocol/Internet Protocol (TCP/IP) network. (An example of a TCP/IP network is the internet.) The hosts table associates the IP address with the AE Title. IP addresses are written as four numbers separated by periods.
| |
|
Port
|
Identifies the port for the device's application program that you query, retrieve, receive, and send image files. A port is a logical connection endpoint that is the means that a program uses to identify a specific program running on a computer on a network (such as TCP/IP).
| |
|
OK
|
Applies the parameters that you specified and creates a new server.
| |
|
Cancel
|
Disregards any changes you made in this dialog box, closes the dialog box, and does not create a server.
| |
|
Help
|
Displays online help for this dialog box.
| |
To delete servers
1 Select the server in the Servers panel that you want to delete.
2 Click Delete. The Confirm Delete message opens.
3 Click Yes. MIPAV deletes the server from the Servers panel.
To select a default server
A default server is the server that is automatically selected when you first display the Hosts page of the DICOM Communications Panel dialog box. Unless you select another server as the default, it is the server to which MIPAV automatically sends images.
You can select the default server in either of the following ways:
- Double-click the server that you want as the default server in the Server panel.
- Select the server in the Servers panel that you want as the default server. The server is highlighted.
- Click Default.
A check mark moves from the check box for the previous default server to the Default check box beside the server you selected.
Creating, editing, and deleting storage destination entries
You can create, edit, and delete storage destination entries in the Storage Destination panel of the Hosts tabbed window (Figure 12). The storage destination indicates where to store the image files you retrieve or receive. You must create at least one storage destination.
</font>
1 Select the storage destination in the Storage Destination panel that you want to change.
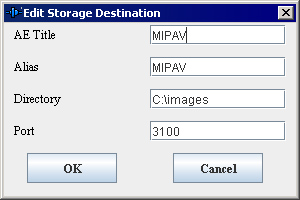
2 Click Edit. The Edit Storage Destination dialog box opens.
3 Modify the information in AE Title, Alias, Directory, and Port as required.
|
AE title
|
Lists the title of the device's DICOM application entity. The AE Title is often set by the device's system administrator. The hosts table associates the AE Title with the IP address. The AE Title can be 16 alphanumeric characters or less. Note that the AE Title is case sensitive.
|
|||
Specifies the alternative name for the device. The alternative name can be up to 16 alphanumeric characters.
| ||||
Shows the full path name of the directory where images are stored. Alphanumeric characters are accepted.
|
||||
|
Port
|
Identifies the port for the device's application program that you query, retrieve, receive, and send image files. A port is a logical connection endpoint that is the means that a program uses to identify a specific program running on a computer on a network (such as TCP/IP).
| |||
|
OK
|
Applies the parameters that you specified and creates a new storage location.
| |||
|
Cancel
|
Disregards any changes you made in this dialog box, closes the dialog box, and does not create a storage location.
| |||
|
Help
|
Displays online help for this dialog box.
| |||
To delete storage destinations
1 Select the storage destination in the Storage Destination panel that you want to delete.
2 Click Delete. A Confirm Delete message opens.
3 Click Yes. MIPAV deletes the storage destination from the Storage Destination panel.
To select a default storage destination
A default storage destination is the one that is automatically selected when you initially display the Hosts page of the DICOM Communications Panel dialog box. Unless you select another storage destination as the default, MIPAV automatically stores images in this location. You can select the default storage destination in either of the following ways:
- In the Storage Destination panel, double-click the entry that you want as the default storage destination.
- In the Storage Destination panel, select the entry that you want as the default storage destination. The server is highlighted.
- Click Default.
A check mark moves from the check box for the previous default storage destination to the Default check box beside the storage destination you selected.
Next: Testing the connection
