Segmenting Images Using Contours and Masks: Generating Masks
From MIPAV
Generating masks
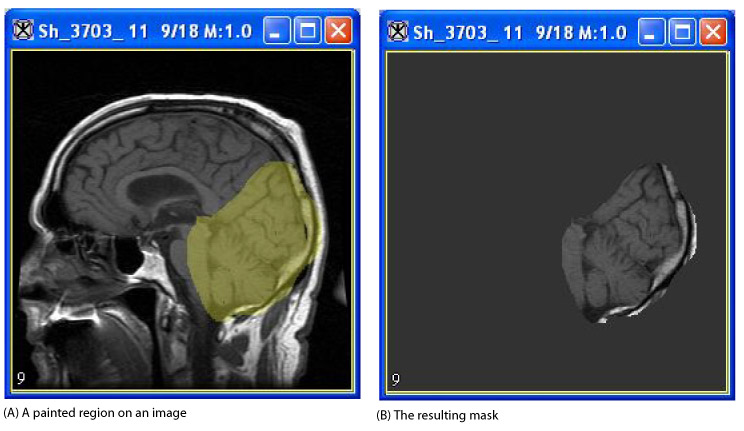
A mask is a filter that selectively includes or excludes certain values. You can create a mask that includes the VOI areas and excludes all other areas. Masks are particularly helpful if you use other applications to further analyze images because those programs may require that you supply a mask. An example of a mask appears in [MIPAV_Segmentation.html#1345222 Figure 181].
You can create masks using a variety of methods:
Use paint tools to manually create a mask, refer to [MIPAV_Segmentation.html#1348003 page 282]
Use Paint Grow Segmentation tool, refer to [MIPAV_Segmentation.html#1012743 page 294]
Use binary or short mask utilities, refer to [MIPAV_Segmentation.html#1610706 page 297]
Use the Advanced Paint tool, refer to [MIPAV_Segmentation.html#1604592 page 302]
Use the Power Paint tool, refer to [MIPAV_Segmentation.html#1617005 page 303]
MIPAV also provides algorithms that you can use to generate masks. These algorithms are addressed in volume 2 of the User's Guide.
Figure 181. Image with (A) a painted region and (B) the resulting mask
|
{| align="center"
|
|
|}
Manually creating a mask using paint
You can manually create a mask using the tools on the Paint toolbar, which is located in the MIPAV window. To create the mask, you first select the intensity level of the paint, along with the paint color and opacity value. Next, you paint on the image using the paint brush. You can adjust the size of the paint brush tip. When complete, you then commit the paint by choosing one of the following icons:
 - Masks Inside the Painted Area
 - Masks Outside the Painted Area
When you click one of these icons, it applies the intensity permanently to the image. You can then choose to save the image.
If the Paint toolbar does not appear in the MIPAV window, select Toolbars. The Toolbar menu lists four commands: VOI Toolbar, Paint Toolbar, Scripting Toolbar, and Image Toolbar. If a toolbar command has a check mark next to it, the toolbar is displayed; otherwise, it is hidden. To display the Paint toolbar, select Paint Toolbar. See also [MIPAV_QuickStart.html#2693414 "MIPAV toolbars" on page 21].
Manually generating a mask includes the following four steps:
Step 1, Selecting the paint intensity level
Step 2, Selecting a paint color
Step 3, Adjusting the opacity level of the paint
Step 4, Applying the paint
Step 1, Selecting the paint intensity level
The first step in manually creating a mask is to select the intensity level of the masked area.You can select the intensity level by using the eyedropper tool to select an intensity value that is already present in an image or by typing a specific intensity value in the Desired Paint Intensity dialog box.
To select the intensity level using the Eyedropper tool
 - Eyedropper
The allows you to copy an intensity level that is already present in the image. To use this tool, complete the following steps:
1 Click the Eyedropper icon, on the paint toolbar in the MIPAV window.
2 Click the area of the image that has the intensity level you want to copy. The intensity shown at the bottom of the MIPAV window changes to the intensity level in the part of the image you've selected.
Example: Initially, the intensity level button shows a zero on the button. However, when you click an area of the image, it displays the number that is associated with that part of the image, such as 250.
You can enter a specific intensity level value in the Desired Paint Intensity window. To do this, complete the following steps:
1 Click the Intensity button.
Note: If you changed the intensity level using the eyedropper or this button previously in your current MIPAV session, the number on the Intensity button would have changed from 0 to the number representing that earlier intensity level.
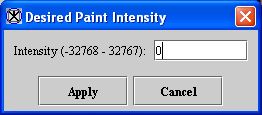
The Desired Paint Intensity dialog box opens.
2 Notice that the minimum and maximum intensity values appear in parentheses. These values depend on the image type, or data type, of the image.
Tip: You can look at the exact intensity levels in the image using  , the Magnify region icon.
Figure 182. Desired Paint Intensity dialog box
|
Intensity
|
Specifies the intensity, or strength, of the paint.
|
{| align="center"
|
|
|-
|
Apply
|
Applies the intensity that you specified to the image.
|-
|
Cancel
|
Disregards any changes that you made in this dialog box and closes the dialog box.
|-
|
Help
|
Displays online help for this dialog box.
|}
3 Type the desired level of intensity.
4 Click Apply to apply the intensity level to the paint. Note that the number on the Intensity button changes to the number you entered.
5 Click  or Cancel to close the dialog box.
Step 2, Selecting a paint color
 - Change Paint Color
After you select the intensity level, the next step is selecting the paint color. The program applies this color to the image so that you can easily see where you applied the new intensity. When you commit the changes to the image, the grayscale intensity level that you indicated in step 1 is permanently applied to the image.
To select a color, use the Change Paint Color icon, to display the Pick Paint Color dialog box ([MIPAV_Segmentation.html#1346190 Figure 184]). This dialog box includes three tabbed pages: Swatches page, which is always displayed first; the HSB page; and the RGB page. You can select a color on any of the pages.
To select a color from one of the 310 color swatches
1 Click the Change Paint Color icon. The Pick Paint Color dialog box ([MIPAV_Segmentation.html#1348107 Figure 183]) opens.
2 Stay on the Swatches page, or, if you moved to HSB or RGB pages, click Swatches to return to the Swatches page.
3 Click the desired color in the larger grid. The color appears in the Recent color grid on the right.
4 Click Close when done. The Pick Paint Color dialog box closes. The color you selected becomes the current paint color.
To select a color using the HSB model
1 Click the Change Paint Color icon. The Pick Paint Color dialog box opens.
2 Click HSB. The HSB page appears ([MIPAV_Segmentation.html#1346190 Figure 184]B).
3 Specify a color by entering specific numbers for the hue, saturation, and brightness values, or select the color from the color graphic.
Enter specific values into the H, S, and B boxes:
Type the hue value in H. The hue can be any number from 0 to 359. The numbers correspond to the degree numbers on the color square ([MIPAV_Segmentation.html#1033995 Figure 185]). For example, to specify a shade of blue, enter a number from 255 to 270. The slider automatically moves the correct hue on the color strip.
Type the saturation value in S. The level of saturation can be anywhere from 0 (gray) to 100 (full-strength hue). When you type a value into this box, a circle appears in the color square around the color with the specified saturation level. Colors to the left of the color graphic are circled if the saturation level is high. Lower saturated colors are found to the left of the color graphic.
Type the brightness value in B. The level of brightness can be anywhere from 0 (dark) to 100 (light). In the color graphic, a circle appears around the color with the specified brightness level. Colors near the top of the color graphic are circled if the saturation level is high. Darker colors are found near the bottom of the color graphic.
Select the hue, saturation, and brightness on the color square or color strip:
Drag the slider to select the desired hue from the color strip.
Select the shade you wish to use in the color square.
4 Click Close when done. The Pick Paint Color dialog box closes. The color you selected becomes the current paint color.
Pick Paint Color dialog box options
Figure 183. Swatches page in the Pick Paint Color dialog box
{| align="center" | 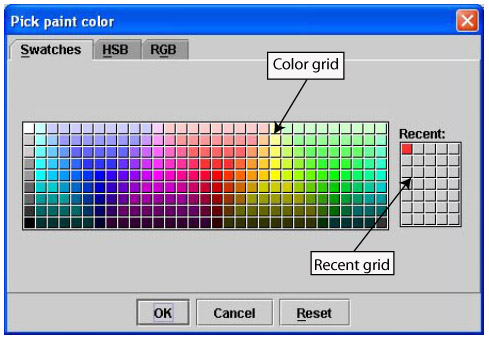 |} |}
|
|
Color grid
|
Shows the available colors. Select one of these colors and it appears in the Recent grid on the right.
|
|
Recent grid
|
Indicates colors that you have recently selected from the color grid on the left. MIPAV uses the last color that you selected from the color grid and that appears in this grid as the color of the background in the lightbox view once you select OK.
|
|
OK
|
Applies the parameters that you specified to crop the image.
|
|
Cancel
|
Disregards any changes you made in this dialog box, closes the dialog box, and does not crop the image.
|
|
Reset
|
Returns the color settings to their previous values.
|
|
Help
|
Displays online help for this dialog box.
|
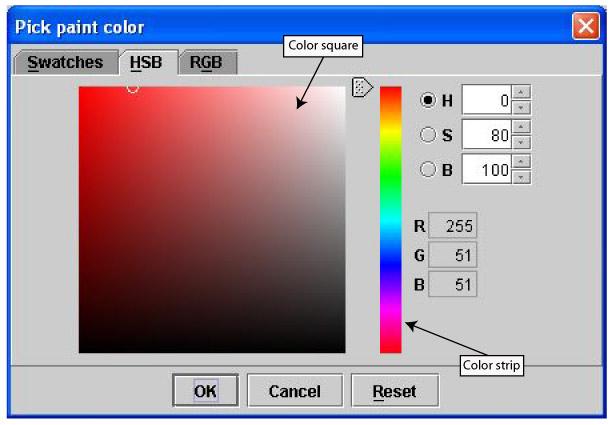
Figure 184. The HSB page in the Pick Paint Color dialog box
|
{| align="center"
|
|
|-
|
Color square
|
Specifies a specific color to be used as the background color.
|-
|
Color strip
|
Specifies a specific color to be used as the background color.
|-
|
H
|
Specifies the number representing the hue of the color.
|-
|
S
|
Specifies the number representing the saturation of the color.
|-
|
B
|
Specifies the number representing the brightness of the color.
|-
|
R
|
Specifies the number for the color used for the red channel.
|-
|
G
|
Specifies the number for the color used for the green channel.
|-
|
B
|
Specifies the number for the color used for the blue channel.
|-
|
OK
|
Applies the parameters that you specified to crop the image.
|-
|
Cancel
|
Disregards any changes you made in this dialog box, closes the dialog box, and does not crop the image.
|-
|
Reset
|
Returns the color settings to their previous values.
|-
|
Help
|
Displays online help for this dialog box.
|}
To select a color using the RGB model
1 Click the Change Paint Color icon. The Pick Paint Color dialog box opens.
2 Click RGB. The RGB page ([MIPAV_Segmentation.html#1346190 Figure 184]C) appears.
3 Specify the numbers for the three components (red, green, and blue), or use the sliders to select a color.
4 Click Close when done. The Pick Paint Color dialog box closes. The color you selected becomes the current paint color.
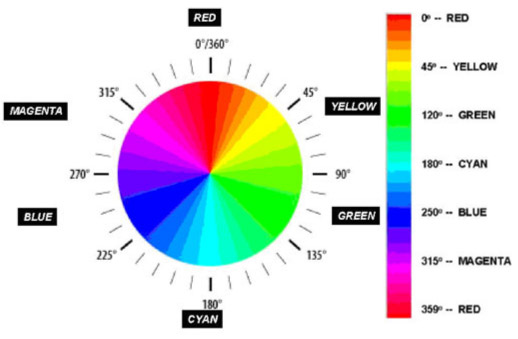
Figure 185. Munsell color wheel (left) and color strip (right)
|
Using the Hue, Saturation, and Brightness Color Model
|
|
The HSB color model defines colors by a combination of their hue, saturation, and brightness. The hue is the wavelength of light transmitted through or reflected from an object. The hue is more commonly known as color (such as magenta or green). Below is the Munsell color wheel. A color strip, which is derived from the color wheel, appears as well. Hues are represented by the degrees in the color wheel. (Since colors are graduated, the degrees in the figure are approximations and not necessarily absolute values. For example, yellow is approximately 45 degrees; 50 degrees is a different shade of yellow.
|
Primary colors (red, yellow, and blue) combine to create secondary colors (magenta, cyan, and green).Tertiary colors, such as orange, are also represented on the color wheel. The color strip is simply a different representation of the color wheel. Degrees and corresponding hues were added to the figure. Saturation is the strength or purity of the hue. To lessen the saturation, gray is added to the color. Thus, if pure orange is 70 percent saturated, the hue is a mixture of orange (70 percent) and gray (30 percent). Brightness is the relative darkness and lightness of a color; 0% brightness is black; 100% brightness is white. Â
|
|
{| align="center"
|
|
Â
|}
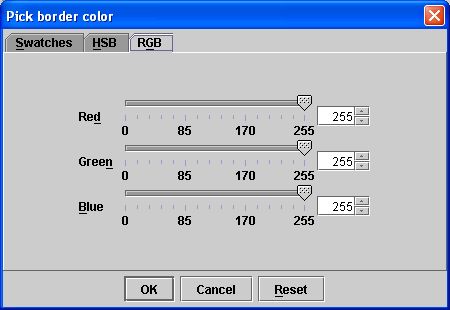
Figure 186. RGB page in the Pick Paint Color dialog box
|
{| align="center"
|
|
|-
|
Red slider and list box
|
Specifies the number representing the red channel. Either use the slider, or select the number in the list box.
|-
|
Green slider and list box
|
Specifies the number representing the green channel. Either use the slider, or select the number in the list box.
|-
|
Blue slider and list box
|
Specifies the number representing the blue channel. Either use the slider, or select the number in the list box.
|-
|
OK
|
Applies the parameters that you specified to crop the image.
|-
|
Cancel
|
Disregards any changes you made in this dialog box, closes the dialog box, and does not crop the image.
|-
|
Reset
|
Returns the color settings to their previous values.
|-
|
Help
|
Displays online help for this dialog box.
|}
Step 3, Adjust the opacity level of the paint
You can further refine the appearance of the paint selecting its opacity level. Opacity levels can range from 0.0 (transparent) to 1.0 (opaque).
To change the opacity level
 - Change Opacity of Paint
1 Click the Change Opacity of Paint icon on the Paint toolbar. The Paint Opacity window appears ([MIPAV_Segmentation.html#1038088 Figure 187]).
2 Drag the slider to the desired level of opacity. The current level appears in the bold print underneath the slider.
3 Click Close to apply the opacity level. The opacity level on the image changes according to your specifications.
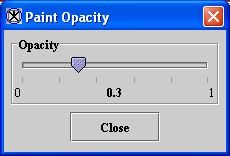
Figure 187. Paint Opacity dialog box
|
Opacity
|
Specifies the degree of transparency. To make the color more transparent, move the slider to left. To make it more opaque, move the slider to the right.
|
{| align="center"
|
|
|-
|
Close
|
Closes this dialog box.
|}
Step 4, Apply paint
Having selected the intensity level, paint color, and opacity level, you are now ready to paint on the image with the paintbrush.
 - Draw Using a Brush
To paint on the image
1 Click the Draw Using a Brush icon, on the Paint toolbar in the MIPAV window.
2 Specify the size of the paintbrush tip.
3 Click and drag the mouse button to paint on the drawing. You can select one pixel at a time, or drag the mouse button to draw paint strokes on the image.
Tip: You may need to use the magnification buttons to adjust the magnification level of the image.
If you make a mistake, you can erase or undo the painted area.
To erase paint from a specific area
 - Erases Paint
1 Click the Erase icon.
2 Select the size of the eraser tip.
3 Use the mouse to begin erasing. You can select one pixel at a time, or you can drag the mouse.
Tip: When erasing the paint, it may be easier to magnify the size of the image using the magnification icons.
To resume painting, click the Draw Using a Brush icon.
To erase all paint
 - Erase All Paint
 - Undo
1 Do one of the following as appropriate:
Click the Erase all paint icon, which removes all paint from the image.
Click the Undo last region paint icon, which allows you to undo the last paint stroke.
2 Click the Default Mode icon, when you have finished painting the image.
Step 5, Commit
When you visualize a dataset in MIPAV, a composite of several layers appears in the default image window. The image layer contains the original image. The next two layers contain the results of applied utilities, algorithms, and paint. The fourth layer contains VOI contour information. When you click the commit icons. e.g. the Masks Inside Painted Area icon or Masks Outside Painted Area icon, the paint and utility/algorithm layers are merged with the image layer and saved as a new file.
To commit changes, select one of the following commit icons:
- the Masks Inside Painted Area icon. This tool shows the image without the area you painted ([MIPAV_Segmentation.html#1609687 Figure 188]-C).
- the Masks Outside Painted Area icon. This tool removes the painted area from the image and shows only the removed area ([MIPAV_Segmentation.html#1609687 Figure 188]-B).
The software redraws the dataset with the intensity levels indicated on the image. You may need to adjust the lookup table (LUT) to see the image more clearly, as it has been dome for the image shown in [MIPAV_Segmentation.html#1609687 Figure 188]-C. Instructions for adjusting the LUT appear in Chapter 5, "Visualizing Images."
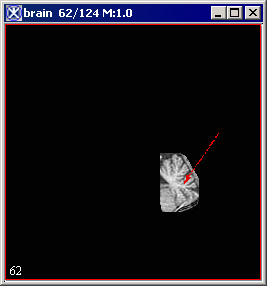
Figure 188. The painted region (a) and the mask produced using the Mask the Outside Painted Area tool (b) and Mask the Inside Painted Area tool (c). Here, arrows point to the painted region.
|
{| align="center"
|

|
a
|
{| align="center"
|
|}
b
|
{| align="center"
|
|}
c
|}
Creating a mask using the Paint Grow Segmentation method
You can create a mask using the paint grow segmentation method, which uses voxel aggregation to group voxels into larger regions. You begin by selecting a voxel to serve as the seed point, or starting point. The software applies paint color to all voxels touching the seed point that fall within the intensity range that you specify.
Note: You cannot apply the paint grow segmentation method to RGB images.
To create a mask using the Paint Grow tool
 - Fill an Area with Desired Color
1 Click the Fill an Area with Desired Color icon. The Paint Grow dialog box appears ([MIPAV_Segmentation.html#1026632 Figure 189]).
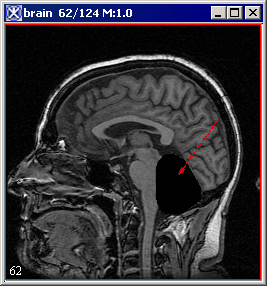
2 Select the seed point, which is used as a starting point for the paint grow operation. To do this, move the pointer to the image. As you move the cursor, the location and intensity of the voxel under the pointer tip appears in the Cursor position and voxel intensity text box. Click the voxel you want to designate as the seed point.
3 Adjust the delta values and parameters.
4 Click Apply when complete to begin the paint grow method. The Paint Grow dialog box closes.
To correct the mask
If the results are not what you want, do the following:
1 Click the Paint Grow button. The Paint Grow dialog box appears.
2 Select the seed point, which is used as a starting point for the paint grow operation. To do this, move the pointer to the image. As you move the cursor, the location and intensity of the voxel under the pointer tip appears in the Cursor position and voxel intensity text box. Click the voxel you want to designate as the seed point.
3 Adjust the delta values and parameters.
4 Click Apply when complete to begin the paint grow method. The Paint Grow dialog box closes.
If the results are not what you want, do either of the following:
Click the Undo last region paint icon, and start again.
Click the Erase icon, or click, the Erase all paint icon, to erase all paint.
To commit the mask
Click one of the following commit buttons:
- the Masks Inside Painted Area icon.
- the Masks Outside Painted Area icon.
Paint Grow dialog box options
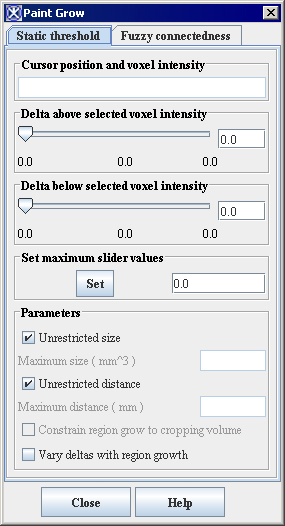
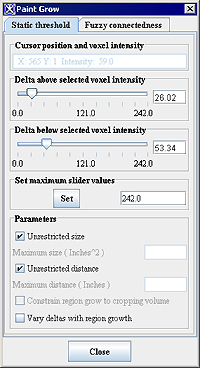
Figure 189. Paint Grow dialog box Â
|
Cursor position and voxel intensity
|
Indicates the coordinates and intensity of the pixel under the mouse pointer tip. This pixel is the seed point.
|
{| align="center"
|
|
|-
|
Delta above selected voxel intensity
|
Once a seed point has been selected, MIPAV uses this value to determine whether to fill adjacent voxels with color. The voxels that are filled must have intensity levels that fall within the range of the seed point intensity minus the lower delta value and the upper delta value. For example, if seed point has an intensity of 100.0, and the Delta Above Selected Pixel Intensity value is 10 and the Delta Below Selected Pixel Intensity value is 15, MIPAV color-fills adjacent voxels whose intensities range from 85.0 to 110.0.
|-
|
Delta below selected voxel intensity
|
Once a seed point is, MIPAV uses this value to determine whether to fill adjacent voxels with color. The voxels that are filled must have intensity levels that fall within the range of the seed point intensity minus the lower delta value and the upper delta value.
|-
| rowspan="5" colspan="1" |
Parameters:
Unrestricted size
Maximum size
Unrestricted distance
Maximum distance
| rowspan="5" colspan="2" |
Constrains the growth of the paint grow operation. Select the Unrestricted size and Unrestricted distance check boxes to allow the paint grow operation to be applied without restraint. If the Unrestricted size check box is not selected, type the maximum size (in cubic meters) of the paint grow region in the text box. If the Unrestricted distance check box is not selected, type the maximum distance from the original seed point in the text box.
|-
|-
|-
|-
|-
| rowspan="1" colspan="3" |
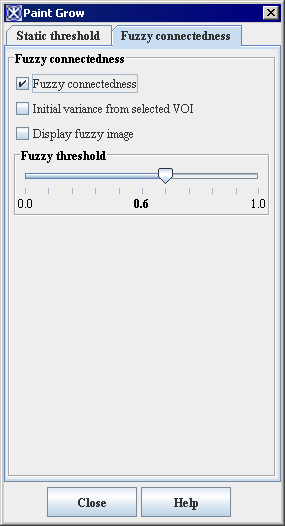
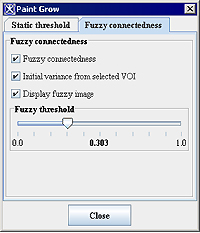
Fuzzy connectedness
|-
|
Fuzzy connectedness
| rowspan="1" colspan="2" |
Check tis box to use the fuzzy connectedness coefficient instead of static threshold. Here, Fuzzy connectedness represents the idea of connection or "hanging-togetherness" of image elements in an object by assigning a strength of connectedness to every possible path between every possible pair of image elements.
A fuzzy connected object is defined with a fuzzy threshold or the strength of connectedness.
|-
|
Initial variance from selected VOI
|
Uses the initial intensity values from the selected region of interest (VOI).
| rowspan="6" colspan="1" |
{| align="center"
|
|}
|-
|
Display fuzzy image
|
Displays the result image in a separate frame.
|-
|
Fuzzy threshold
|
is a threshold on the strength of connectedness of image elements.
|-
|
Close
|
Closes this dialog box.
|-
|
Cancel
|
Disregards any changes that you made in this dialog box and closes the dialog box.
|-
|
Help
|
Displays online help for this dialog box.
|}
Examples of using the Paint Grow tool
Here, is a step-by-step guide for selecting a region(s) of interest using the Paint Grow tool options. In this example we will use an image of the human eye and we will try to segment the blood vessels located on the retina.
First, make sure to adjust the contrast of your image so that the different tissues appear visually distinctive. For images with more than 8 bits per voxel you may want to use the various LUT available in MIPAV.
To segment blood vessels using the static threshold
1 Open the Paint Grow dialog box.
2 Use the mouse cursor to select the point on the image (on a blood vessel) which has the desired intensity value.
3 Use the Change Paint Color option to select the color (other than red) which will be used for painting.
4 On the Static Threshold tab, adjust the intensity thresholds so that the tissue you want to preserve is highlighted.
5 Check the Unrestricted size and Unrestricted distance options. This will allow the paint grow operation to be applied without restriction.
6 Watch the paint region growing.
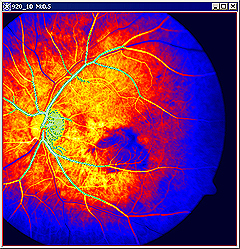
For example, when selecting the blood vessels, the image might look like the panel A for grayscale images or panel B for images after applying Blue LUT in the [MIPAV_Segmentation.html#1610564 Figure 190] below.
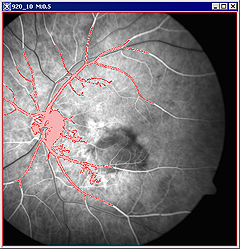
Figure 190. The Paint Grow tool was used to locate the blood vessels on the grayscale image (A) first, and then on the same image after applying the Blue LUT (B).
|
{| align="center"
|
|
A - the painted region appears in red (which is the default color)
|
{| align="center"
|
|}
|
{| align="center"
|
|}
B - the painted region appears in green, because we selected it as a color contrast to LUT colors
|}
To segment blood vessels using the Fuzzy Connectedness option
1 Open an image of interest.
2 You might consider to delineate a VOI on a region of the image which is of your interest, first. This is optional.
1 Open the Paint Grow dialog box, and then open the Fuzzy Connectedness tab.
2 Check the Fuzzy Connectedness check box to activate the tool.
3 Check the Initial variance from selected VOI box (optional).
4 Check the Display fuzzy image option to view the result in a new frame.
5 Use the mouse cursor to select the point on the image (on a blood vessel) which has the desired intensity value.
6 Adjust the Fuzzy thresholds so that the tissue you want to preserve is highlighted.
7 Watch the paint region appeared in a new frame.
For example, when selecting the blood vessels, the image might look like the panel A or panel B for images in the [MIPAV_Segmentation.html#1611374 Figure 191] below.
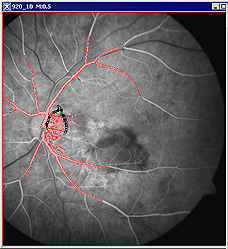
Figure 191. The Fuzzy Connectedness option.
|
{| align="center"
|
|
a - the painted region appears in red
|
{| align="center"
|

|}
b -the painted region also appears in a new frame
|
{| align="center"
|
|}
c
|}
Segmenting Images Using Contours and Masks:Converting VOI contours to masks


 |}
|}


