|
|
| Line 1: |
Line 1: |
| | == Generating masks == | | == Generating masks == |
| | | | |
| − | <div style="font-style: normal; font-weight: normal; margin-bottom: 6pt; margin-left: 0pt; margin-right: 0pt; margin-top: 0pt; text-align: left; text-decoration: none; text-indent: 0pt; text-transform: none; vertical-align: baseline"><font color="#000000"> A <span style="font-weight: normal; text-decoration: none; text-transform: none; vertical-align: baseline">''<font color="#000000">mask</font>''</span> is a filter that selectively includes or excludes certain values. You can create a mask that includes the VOI areas and excludes all other areas. Masks are particularly helpful if you use other applications to further analyze images because those programs may require that you supply a mask. An example of a mask appears in [MIPAV_Segmentation.html#1345222 Figure 181].<br /></font></div> | + | <div style="font-style: normal; font-weight: normal; margin-bottom: 6pt; margin-left: 0pt; margin-right: 0pt; margin-top: 0pt; text-align: left; text-decoration: none; text-indent: 0pt; text-transform: none; vertical-align: baseline"><font color="#000000"> A <span style="font-weight: normal; text-decoration: none; text-transform: none; vertical-align: baseline">''<font color="#000000">mask</font>''</span> is a filter that selectively includes or excludes certain values. You can create a mask that includes the VOI areas and excludes all other areas. Masks are particularly helpful if you use other applications to further analyze images because those programs may require that you supply a mask. An example of a mask appears in Figure 1.<br /></font></div> |
| | | | |
| | You can create masks using a variety of methods: | | You can create masks using a variety of methods: |
| | | | |
| − | <div style="font-style: normal; font-weight: normal; margin-bottom: 0pt; margin-left: 24pt; margin-right: 0pt; margin-top: 5pt; text-align: left; text-decoration: none; text-indent: -24pt; text-transform: none; vertical-align: baseline"><font color="#000000"> Use paint tools to manually create a mask, refer to [MIPAV_Segmentation.html#1348003 page 282]<br /></font></div><div style="font-style: normal; font-weight: normal; margin-bottom: 0pt; margin-left: 24pt; margin-right: 0pt; margin-top: 5pt; text-align: left; text-decoration: none; text-indent: -24pt; text-transform: none; vertical-align: baseline"><font color="#000000"> Use Paint Grow Segmentation tool, refer to [MIPAV_Segmentation.html#1012743 page 294]<br /></font></div><div style="font-style: normal; font-weight: normal; margin-bottom: 0pt; margin-left: 24pt; margin-right: 0pt; margin-top: 5pt; text-align: left; text-decoration: none; text-indent: -24pt; text-transform: none; vertical-align: baseline"><font color="#000000"> Use binary or short mask utilities, refer to [MIPAV_Segmentation.html#1610706 page 297]<br /></font></div><div style="font-style: normal; font-weight: normal; margin-bottom: 0pt; margin-left: 24pt; margin-right: 0pt; margin-top: 5pt; text-align: left; text-decoration: none; text-indent: -24pt; text-transform: none; vertical-align: baseline"><font color="#000000"> Use the Advanced Paint tool, refer to [MIPAV_Segmentation.html#1604592 page 302]<br /></font></div><div style="font-style: normal; font-weight: normal; margin-bottom: 0pt; margin-left: 24pt; margin-right: 0pt; margin-top: 5pt; text-align: left; text-decoration: none; text-indent: -24pt; text-transform: none; vertical-align: baseline"><font color="#000000"> Use the Power Paint tool, refer to [MIPAV_Segmentation.html#1617005 page 303]<br /></font></div>
| + | *Use paint tools to manually create a mask |
| | + | *Use Paint Grow Segmentation tool |
| | + | *Use binary or short mask utilities |
| | + | *Use the Advanced Paint tool |
| | + | *Use the Power Paint tool |
| | | | |
| | MIPAV also provides algorithms that you can use to generate masks. These algorithms are addressed in volume 2 of the <span style="font-weight: normal; text-decoration: none; text-transform: none; vertical-align: baseline">''<font color="#000000">User's Guide</font>''</span>. | | MIPAV also provides algorithms that you can use to generate masks. These algorithms are addressed in volume 2 of the <span style="font-weight: normal; text-decoration: none; text-transform: none; vertical-align: baseline">''<font color="#000000">User's Guide</font>''</span>. |
| Line 12: |
Line 16: |
| | | | |
| | {| border="1" cellpadding="5" | | {| border="1" cellpadding="5" |
| − | |+ <div style="font-style: normal; margin-bottom: 3pt; margin-left: 0pt; margin-right: 0pt; margin-top: 9pt; text-align: left; text-decoration: none; text-indent: 0pt; text-transform: none; vertical-align: baseline">'''<font color="#000000"> Figure 181. Image with (A) a painted region and (B) the resulting mask<br /></font>'''</div> | + | |+ <div style="font-style: normal; margin-bottom: 3pt; margin-left: 0pt; margin-right: 0pt; margin-top: 9pt; text-align: left; text-decoration: none; text-indent: 0pt; text-transform: none; vertical-align: baseline">'''<font color="#000000"> Figure 1. Image with (A) a painted region and (B) the resulting mask<br /></font>'''</div> |
| | |- | | |- |
| − | |
| |
| − | <div style="font-style: normal; font-weight: normal; margin-bottom: 0pt; margin-left: 0pt; margin-right: 0pt; margin-top: 0pt; text-align: left; text-decoration: none; text-indent: 0pt; text-transform: none; vertical-align: baseline"><font color="#000000"> <br clear="all" />{| align="center"
| |
| | | | | | |
| | [[Image:examplePaintandMask.jpg]] | | [[Image:examplePaintandMask.jpg]] |
| − | |}<br clear="all" /><br /></font></div>
| |
| | |} | | |} |
| | | | |
| − | <br /></font></div> | + | <br /> |
| | | | |
| | === Manually creating a mask using paint === | | === Manually creating a mask using paint === |
Revision as of 21:04, 13 February 2012
Generating masks
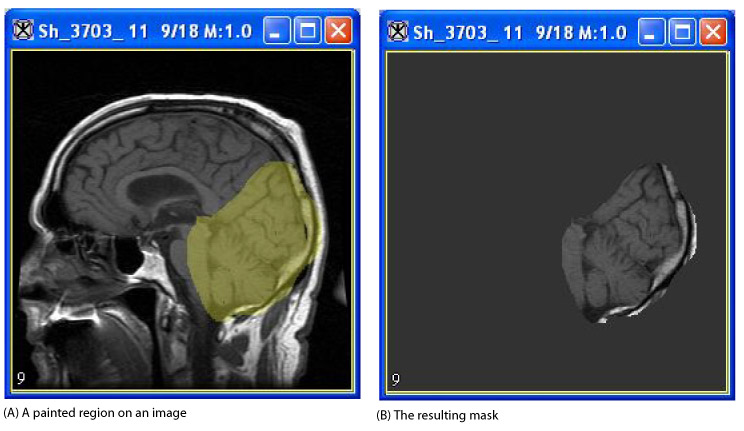
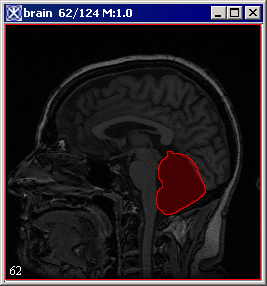
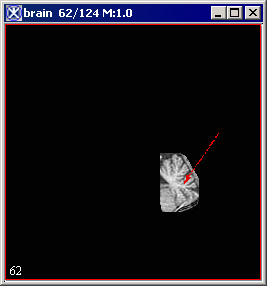
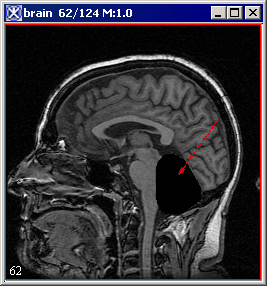
A mask is a filter that selectively includes or excludes certain values. You can create a mask that includes the VOI areas and excludes all other areas. Masks are particularly helpful if you use other applications to further analyze images because those programs may require that you supply a mask. An example of a mask appears in Figure 1.
You can create masks using a variety of methods:
- Use paint tools to manually create a mask
- Use Paint Grow Segmentation tool
- Use binary or short mask utilities
- Use the Advanced Paint tool
- Use the Power Paint tool
MIPAV also provides algorithms that you can use to generate masks. These algorithms are addressed in volume 2 of the User's Guide.
Figure 1. Image with (A) a painted region and (B) the resulting mask
|

|
Manually creating a mask using paint
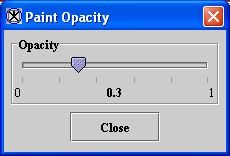
You can manually create a mask using the tools on the Paint toolbar, which is located in the MIPAV window. To create the mask, you first select the intensity level of the paint, along with the paint color and opacity value. Next, you paint on the image using the paint brush. You can adjust the size of the paint brush tip. When complete, you then commit the paint by choosing one of the following icons:
 - Masks Inside the Painted Area
 - Masks Outside the Painted Area
When you click one of these icons, it applies the intensity permanently to the image. You can then choose to save the image.
If the Paint toolbar does not appear in the MIPAV window, select Toolbars. The Toolbar menu lists four commands: VOI Toolbar, Paint Toolbar, Scripting Toolbar, and Image Toolbar. If a toolbar command has a check mark next to it, the toolbar is displayed; otherwise, it is hidden. To display the Paint toolbar, select Paint Toolbar. See also [MIPAV_QuickStart.html#2693414 "MIPAV toolbars" on page 21].
Manually generating a mask includes the following four steps:
Step 1, Selecting the paint intensity level
Step 2, Selecting a paint color
Step 3, Adjusting the opacity level of the paint
Step 4, Applying the paint
Step 1, Selecting the paint intensity level
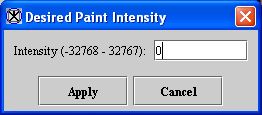
The first step in manually creating a mask is to select the intensity level of the masked area.You can select the intensity level by using the eyedropper tool to select an intensity value that is already present in an image or by typing a specific intensity value in the Desired Paint Intensity dialog box.
To select the intensity level using the Eyedropper tool
 - Eyedropper
The allows you to copy an intensity level that is already present in the image. To use this tool, complete the following steps:
1 Click the Eyedropper icon, on the paint toolbar in the MIPAV window.
2 Click the area of the image that has the intensity level you want to copy. The intensity shown at the bottom of the MIPAV window changes to the intensity level in the part of the image you've selected.
Example: Initially, the intensity level button shows a zero on the button. However, when you click an area of the image, it displays the number that is associated with that part of the image, such as 250.
You can enter a specific intensity level value in the Desired Paint Intensity window. To do this, complete the following steps:
1 Click the Intensity button.
Note: If you changed the intensity level using the eyedropper or this button previously in your current MIPAV session, the number on the Intensity button would have changed from 0 to the number representing that earlier intensity level.
The Desired Paint Intensity dialog box opens.
2 Notice that the minimum and maximum intensity values appear in parentheses. These values depend on the image type, or data type, of the image.
Tip: You can look at the exact intensity levels in the image using  , the Magnify region icon.
Figure 182. Desired Paint Intensity dialog box
|
Intensity
|
Specifies the intensity, or strength, of the paint.
|
{| align="center"
|

|
|-
|
Apply
|
Applies the intensity that you specified to the image.
|-
|
Cancel
|
Disregards any changes that you made in this dialog box and closes the dialog box.
|-
|
Help
|
Displays online help for this dialog box.
|}
3 Type the desired level of intensity.
4 Click Apply to apply the intensity level to the paint. Note that the number on the Intensity button changes to the number you entered.
5 Click  or Cancel to close the dialog box.
Step 2, Selecting a paint color
 - Change Paint Color
After you select the intensity level, the next step is selecting the paint color. The program applies this color to the image so that you can easily see where you applied the new intensity. When you commit the changes to the image, the grayscale intensity level that you indicated in step 1 is permanently applied to the image.
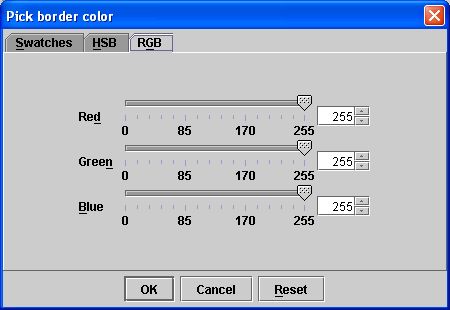
To select a color, use the Change Paint Color icon, to display the Pick Paint Color dialog box ([MIPAV_Segmentation.html#1346190 Figure 184]). This dialog box includes three tabbed pages: Swatches page, which is always displayed first; the HSB page; and the RGB page. You can select a color on any of the pages.
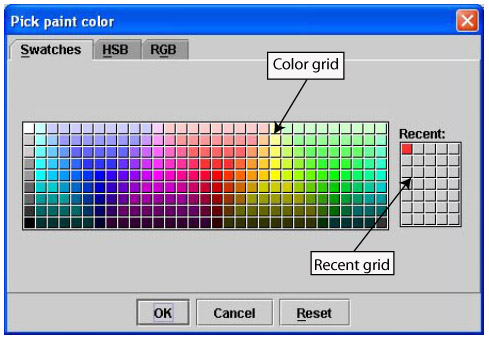
To select a color from one of the 310 color swatches
1 Click the Change Paint Color icon. The Pick Paint Color dialog box ([MIPAV_Segmentation.html#1348107 Figure 183]) opens.
2 Stay on the Swatches page, or, if you moved to HSB or RGB pages, click Swatches to return to the Swatches page.
3 Click the desired color in the larger grid. The color appears in the Recent color grid on the right.
4 Click Close when done. The Pick Paint Color dialog box closes. The color you selected becomes the current paint color.
To select a color using the HSB model
1 Click the Change Paint Color icon. The Pick Paint Color dialog box opens.
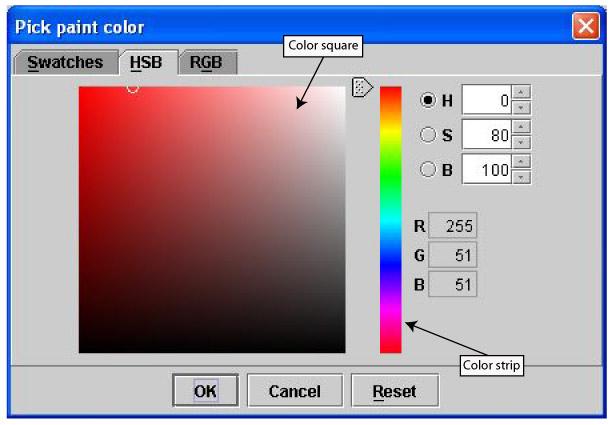
2 Click HSB. The HSB page appears ([MIPAV_Segmentation.html#1346190 Figure 184]B).
3 Specify a color by entering specific numbers for the hue, saturation, and brightness values, or select the color from the color graphic.
Enter specific values into the H, S, and B boxes:
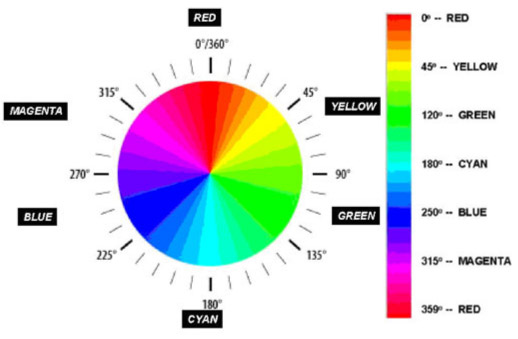
Type the hue value in H. The hue can be any number from 0 to 359. The numbers correspond to the degree numbers on the color square ([MIPAV_Segmentation.html#1033995 Figure 185]). For example, to specify a shade of blue, enter a number from 255 to 270. The slider automatically moves the correct hue on the color strip.
Type the saturation value in S. The level of saturation can be anywhere from 0 (gray) to 100 (full-strength hue). When you type a value into this box, a circle appears in the color square around the color with the specified saturation level. Colors to the left of the color graphic are circled if the saturation level is high. Lower saturated colors are found to the left of the color graphic.
Type the brightness value in B. The level of brightness can be anywhere from 0 (dark) to 100 (light). In the color graphic, a circle appears around the color with the specified brightness level. Colors near the top of the color graphic are circled if the saturation level is high. Darker colors are found near the bottom of the color graphic.
Select the hue, saturation, and brightness on the color square or color strip:
Drag the slider to select the desired hue from the color strip.
Select the shade you wish to use in the color square.
4 Click Close when done. The Pick Paint Color dialog box closes. The color you selected becomes the current paint color.
Pick Paint Color dialog box options
Figure 183. Swatches page in the Pick Paint Color dialog box
{| align="center" |  |} |}
|
|
Color grid
|
Shows the available colors. Select one of these colors and it appears in the Recent grid on the right.
|
|
Recent grid
|
Indicates colors that you have recently selected from the color grid on the left. MIPAV uses the last color that you selected from the color grid and that appears in this grid as the color of the background in the lightbox view once you select OK.
|
|
OK
|
Applies the parameters that you specified to crop the image.
|
|
Cancel
|
Disregards any changes you made in this dialog box, closes the dialog box, and does not crop the image.
|
|
Reset
|
Returns the color settings to their previous values.
|
|
Help
|
Displays online help for this dialog box.
|
Figure 184. The HSB page in the Pick Paint Color dialog box
|
{| align="center"
|

|
|-
|
Color square
|
Specifies a specific color to be used as the background color.
|-
|
Color strip
|
Specifies a specific color to be used as the background color.
|-
|
H
|
Specifies the number representing the hue of the color.
|-
|
S
|
Specifies the number representing the saturation of the color.
|-
|
B
|
Specifies the number representing the brightness of the color.
|-
|
R
|
Specifies the number for the color used for the red channel.
|-
|
G
|
Specifies the number for the color used for the green channel.
|-
|
B
|
Specifies the number for the color used for the blue channel.
|-
|
OK
|
Applies the parameters that you specified to crop the image.
|-
|
Cancel
|
Disregards any changes you made in this dialog box, closes the dialog box, and does not crop the image.
|-
|
Reset
|
Returns the color settings to their previous values.
|-
|
Help
|
Displays online help for this dialog box.
|}
