Difference between revisions of "Reviewing VOI statistics"
From MIPAV
|
|
| Line 1: |
Line 1: |
| − |
| |
| | | | |
| | <div style="font-style: normal; font-weight: normal; margin-bottom: 6pt; margin-left: 0pt; margin-right: 0pt; margin-top: 0pt; text-align: left; text-decoration: none; text-indent: 0pt; text-transform: none; vertical-align: baseline"><font color="#000000"> The Logging page ([MIPAV_QuickStart.html#2672530 Figure 37]) displays the statistics in tabular form. Whether or not you chose a type of statistic on the Statistics Options page, the table includes a heading for each type. Blanks cells in the table indicate that you did not choose to obtain that particular type of statistics.<br /></font></div><div style="font-style: normal; font-weight: normal; margin-bottom: 0pt; margin-left: 0pt; margin-right: 0pt; margin-top: 0pt; text-align: left; text-decoration: none; text-indent: 0pt; text-transform: none; vertical-align: baseline"><font color="#000000"> | | <div style="font-style: normal; font-weight: normal; margin-bottom: 6pt; margin-left: 0pt; margin-right: 0pt; margin-top: 0pt; text-align: left; text-decoration: none; text-indent: 0pt; text-transform: none; vertical-align: baseline"><font color="#000000"> The Logging page ([MIPAV_QuickStart.html#2672530 Figure 37]) displays the statistics in tabular form. Whether or not you chose a type of statistic on the Statistics Options page, the table includes a heading for each type. Blanks cells in the table indicate that you did not choose to obtain that particular type of statistics.<br /></font></div><div style="font-style: normal; font-weight: normal; margin-bottom: 0pt; margin-left: 0pt; margin-right: 0pt; margin-top: 0pt; text-align: left; text-decoration: none; text-indent: 0pt; text-transform: none; vertical-align: baseline"><font color="#000000"> |
| Line 523: |
Line 522: |
| | | | |
| | <br /></font></div> | | <br /></font></div> |
| − | | + | [[Choosing the default file types to display or save]] |
| − | === Choosing the default file types to display or save ===
| + | |
| − | | + | |
| − | <div style="font-style: normal; font-weight: normal; margin-bottom: 6pt; margin-left: 0pt; margin-right: 0pt; margin-top: 0pt; text-align: left; text-decoration: none; text-indent: 0pt; text-transform: none; vertical-align: baseline"><font color="#000000"> When you using MIPAV, chances are that you are working with the same type of files every day or perhaps for a certain period of time. For example, suppose you normally work with medical files (files whose extensions are .dcm, .xml, .ima, .img, .mnc, .sig, .head, etc.). In this situation, when opening or saving images, you want to see only the medical files, not other file types. One of the ways of customizing MIPAV is the ability to show only specific types of files by default.<br /></font></div>
| + | |
| − | | + | |
| − | The File Filter Default box on the MIPAV Options dialog box allows you to choose which types of files should be shown in the Files of type box in the Open Image and Save Image as dialog boxes.
| + | |
| − | | + | |
| − | <div style="font-style: normal; margin-bottom: 6pt; margin-left: 0pt; margin-right: 0pt; margin-top: 14pt; text-align: left; text-decoration: none; text-indent: 0pt; text-transform: none; vertical-align: baseline">'''<font color="#000000"> To choose the default file types to display or save<br /></font>'''</div><div style="font-style: normal; font-weight: normal; margin-bottom: 0pt; margin-left: 18pt; margin-right: 0pt; margin-top: 6pt; text-align: left; text-decoration: none; text-indent: -18pt; text-transform: none; vertical-align: baseline"><font color="#000000"> 1 Select Help > MIPAV Options. The MIPAV Options dialog box opens.<br /></font></div><div style="font-style: normal; font-weight: normal; margin-bottom: 0pt; margin-left: 18pt; margin-right: 0pt; margin-top: 6pt; text-align: left; text-decoration: none; text-indent: -18pt; text-transform: none; vertical-align: baseline"><font color="#000000"> 2 Click File. The File page appears.<br /></font></div><div style="font-style: normal; font-weight: normal; margin-bottom: 0pt; margin-left: 18pt; margin-right: 0pt; margin-top: 6pt; text-align: left; text-decoration: none; text-indent: -18pt; text-transform: none; vertical-align: baseline"><font color="#000000"> 3 Click File filter default. The Choose File Filter dialog box appears.<br /></font></div><div style="font-style: normal; font-weight: normal; margin-bottom: 0pt; margin-left: 0pt; margin-right: 0pt; margin-top: 0pt; text-align: left; text-decoration: none; text-indent: 0pt; text-transform: none; vertical-align: baseline"><font color="#000000"> <br /></font></div><div style="font-style: normal; font-weight: normal; margin-bottom: 0pt; margin-left: 18pt; margin-right: 0pt; margin-top: 6pt; text-align: left; text-decoration: none; text-indent: -18pt; text-transform: none; vertical-align: baseline"><font color="#000000"> 4 Select one of the file filters. You can choose one of the following collections of file types:<br /></font></div><div style="font-style: normal; font-weight: normal; margin-bottom: 0pt; margin-left: 36pt; margin-right: 0pt; margin-top: 6pt; text-align: left; text-decoration: none; text-indent: -12pt; text-transform: none; vertical-align: baseline"><font color="#000000"> All (*.*)<br /></font></div><div style="font-style: normal; font-weight: normal; margin-bottom: 0pt; margin-left: 36pt; margin-right: 0pt; margin-top: 0pt; text-align: left; text-decoration: none; text-indent: -12pt; text-transform: none; vertical-align: baseline"><font color="#000000"> AVI (*.avi)<br /></font></div><div style="font-style: normal; font-weight: normal; margin-bottom: 0pt; margin-left: 36pt; margin-right: 0pt; margin-top: 0pt; text-align: left; text-decoration: none; text-indent: -12pt; text-transform: none; vertical-align: baseline"><font color="#000000"> Class files (*.class)<br /></font></div><div style="font-style: normal; font-weight: normal; margin-bottom: 0pt; margin-left: 36pt; margin-right: 0pt; margin-top: 0pt; text-align: left; text-decoration: none; text-indent: -12pt; text-transform: none; vertical-align: baseline"><font color="#000000"> FreeSurfer (*.asc)<br /></font></div><div style="font-style: normal; font-weight: normal; margin-bottom: 0pt; margin-left: 36pt; margin-right: 0pt; margin-top: 0pt; text-align: left; text-decoration: none; text-indent: -12pt; text-transform: none; vertical-align: baseline"><font color="#000000"> General (*.gif, *.jpeg, *.jpg, *.pict, *.psd, *.tif, *.tiff)<br /></font></div><div style="font-style: normal; font-weight: normal; margin-bottom: 0pt; margin-left: 36pt; margin-right: 0pt; margin-top: 0pt; text-align: left; text-decoration: none; text-indent: -12pt; text-transform: none; vertical-align: baseline"><font color="#000000"> Graphs (*.plt)<br /></font></div><div style="font-style: normal; font-weight: normal; margin-bottom: 0pt; margin-left: 36pt; margin-right: 0pt; margin-top: 0pt; text-align: left; text-decoration: none; text-indent: -12pt; text-transform: none; vertical-align: baseline"><font color="#000000"> Look-up tables files (*.lut)<br /></font></div><div style="font-style: normal; font-weight: normal; margin-bottom: 0pt; margin-left: 36pt; margin-right: 0pt; margin-top: 0pt; text-align: left; text-decoration: none; text-indent: -12pt; text-transform: none; vertical-align: baseline"><font color="#000000"> Matrix files (*.mtx, *.mat)<br /></font></div><div style="font-style: normal; font-weight: normal; margin-bottom: 0pt; margin-left: 36pt; margin-right: 0pt; margin-top: 0pt; text-align: left; text-decoration: none; text-indent: -12pt; text-transform: none; vertical-align: baseline"><font color="#000000"> Medical (*.dcm, *.xml, *.ima, *,img, *.mnc, *.sig, *.head)<br /></font></div><div style="font-style: normal; font-weight: normal; margin-bottom: 0pt; margin-left: 36pt; margin-right: 0pt; margin-top: 0pt; text-align: left; text-decoration: none; text-indent: -12pt; text-transform: none; vertical-align: baseline"><font color="#000000"> Microscopy (*.avi, *.ics, *.lsm, *.pic, *.stk, *.tif, *.tiff, *.xml)<br /></font></div><div style="font-style: normal; font-weight: normal; margin-bottom: 0pt; margin-left: 36pt; margin-right: 0pt; margin-top: 0pt; text-align: left; text-decoration: none; text-indent: -12pt; text-transform: none; vertical-align: baseline"><font color="#000000"> Misc. (*.avi, *.bmp, *.pcx, *.png, *.tga, *.xbm, *. xpm)<br /></font></div><div style="font-style: normal; font-weight: normal; margin-bottom: 0pt; margin-left: 36pt; margin-right: 0pt; margin-top: 0pt; text-align: left; text-decoration: none; text-indent: -12pt; text-transform: none; vertical-align: baseline"><font color="#000000"> Optical (*.avi, *.bmp, *.img, *.jpg, *.pict, *.psd, *.tif, *.tiff, *.xml)<br /></font></div><div style="font-style: normal; font-weight: normal; margin-bottom: 0pt; margin-left: 36pt; margin-right: 0pt; margin-top: 0pt; text-align: left; text-decoration: none; text-indent: -12pt; text-transform: none; vertical-align: baseline"><font color="#000000"> Project (*.xml)<br /></font></div><div style="font-style: normal; font-weight: normal; margin-bottom: 0pt; margin-left: 36pt; margin-right: 0pt; margin-top: 0pt; text-align: left; text-decoration: none; text-indent: -12pt; text-transform: none; vertical-align: baseline"><font color="#000000"> Script files (*.sct)<br /></font></div><div style="font-style: normal; font-weight: normal; margin-bottom: 0pt; margin-left: 36pt; margin-right: 0pt; margin-top: 0pt; text-align: left; text-decoration: none; text-indent: -12pt; text-transform: none; vertical-align: baseline"><font color="#000000"> Surface files (*.sur, *.wrl)<br /></font></div><div style="font-style: normal; font-weight: normal; margin-bottom: 0pt; margin-left: 36pt; margin-right: 0pt; margin-top: 0pt; text-align: left; text-decoration: none; text-indent: -12pt; text-transform: none; vertical-align: baseline"><font color="#000000"> Transfer function files (*.fun)<br /></font></div><div style="font-style: normal; font-weight: normal; margin-bottom: 0pt; margin-left: 36pt; margin-right: 0pt; margin-top: 0pt; text-align: left; text-decoration: none; text-indent: -12pt; text-transform: none; vertical-align: baseline"><font color="#000000"> VOI files (*.voi)<br /></font></div><div style="font-style: normal; font-weight: normal; margin-bottom: 0pt; margin-left: 36pt; margin-right: 0pt; margin-top: 0pt; text-align: left; text-decoration: none; text-indent: -12pt; text-transform: none; vertical-align: baseline"><font color="#000000"> Nonlinear transformation files (*.nlt)<br /></font></div><div style="font-style: normal; font-weight: normal; margin-bottom: 0pt; margin-left: 36pt; margin-right: 0pt; margin-top: 0pt; text-align: left; text-decoration: none; text-indent: -12pt; text-transform: none; vertical-align: baseline"><font color="#000000"> User Defined<br /></font></div><div style="font-style: normal; font-weight: normal; margin-bottom: 0pt; margin-left: 18pt; margin-right: 0pt; margin-top: 6pt; text-align: left; text-decoration: none; text-indent: -18pt; text-transform: none; vertical-align: baseline"><font color="#000000"> 5 Click OK. The Choose File Type dialog box closes and the file type you chose appears on the File filter default button.<br /></font></div><div style="font-style: normal; font-weight: normal; margin-bottom: 0pt; margin-left: 18pt; margin-right: 0pt; margin-top: 6pt; text-align: left; text-decoration: none; text-indent: -18pt; text-transform: none; vertical-align: baseline"><font color="#000000"> 6 Click Apply in the MIPAV Options dialog box. This change takes effect immediately.<br /></font></div>
| + | |
| − | | + | |
| − | See [MIPAV_QuickStart.html#2183598 Figure 51 on page 79].
| + | |
| − | | + | |
| − | <div style="font-style: normal; font-weight: normal; margin-bottom: 0pt; margin-left: 0pt; margin-right: 0pt; margin-top: 0pt; text-align: left; text-decoration: none; text-indent: 0pt; text-transform: none; vertical-align: baseline"><font color="#000000">
| + | |
| − | | + | |
| − | {| border="1" cellpadding="5"
| + | |
| − | |+ <div style="font-style: normal; margin-bottom: 3pt; margin-left: 0pt; margin-right: 0pt; margin-top: 9pt; text-align: left; text-decoration: none; text-indent: 0pt; text-transform: none; vertical-align: baseline">'''<font color="#000000"> Figure 52. The File Filter Default button is located on File toolbar of the MIPAV Options dialog box. The Choose File Filter dialog box appears when you press that button<br /></font>'''</div>
| + | |
| − | |-
| + | |
| − | |
| + | |
| − | <div style="font-style: normal; font-weight: normal; margin-bottom: 0pt; margin-left: 0pt; margin-right: 0pt; margin-top: 1pt; text-align: left; text-decoration: none; text-indent: 0pt; text-transform: none; vertical-align: baseline"><font color="#000000"> <br clear="all" />{| align="center"
| + | |
| − | |
| + | |
| − | [[Image:SelectFileFilters.jpg]]
| + | |
| − | |}<br clear="all" /><br /></font></div>
| + | |
| − | |}
| + | |
| − | | + | |
| − | <br /></font></div><div style="font-style: normal; margin-bottom: 6pt; margin-left: 0pt; margin-right: 0pt; margin-top: 14pt; text-align: left; text-decoration: none; text-indent: 0pt; text-transform: none; vertical-align: baseline">'''<font color="#000000"> To verify that the filters you chose are used as the default filters<br /></font>'''</div><div style="font-style: normal; font-weight: normal; margin-bottom: 0pt; margin-left: 18pt; margin-right: 0pt; margin-top: 6pt; text-align: left; text-decoration: none; text-indent: -18pt; text-transform: none; vertical-align: baseline"><font color="#000000"> 1 Select File > Open > Image(A). The Open Image dialog box appears. The Files of type box should show the filters you chose.<br /></font></div><div style="font-style: normal; font-weight: normal; margin-bottom: 0pt; margin-left: 18pt; margin-right: 0pt; margin-top: 6pt; text-align: left; text-decoration: none; text-indent: -18pt; text-transform: none; vertical-align: baseline"><font color="#000000"> 2 Select File > Save Image as. The Save Image as dialog box opens with the Files of type box listing the file filters you chose.<br /></font></div><div style="font-style: normal; font-weight: normal; margin-bottom: 0pt; margin-left: 0pt; margin-right: 0pt; margin-top: 0pt; text-align: left; text-decoration: none; text-indent: 0pt; text-transform: none; vertical-align: baseline"><font color="#000000">
| + | |
| − | | + | |
| − | {| border="1" cellpadding="5"
| + | |
| − | |+ <div style="font-style: normal; margin-bottom: 3pt; margin-left: 0pt; margin-right: 0pt; margin-top: 9pt; text-align: left; text-decoration: none; text-indent: 0pt; text-transform: none; vertical-align: baseline">'''<font color="#000000"> Figure 53. Setting up the Medical file filter as a default filter. The Save As dialog box offers only Medical file types as types to save<br /></font>'''</div>
| + | |
| − | |-
| + | |
| − | |
| + | |
| − | <div style="font-style: normal; font-weight: normal; margin-bottom: 0pt; margin-left: 0pt; margin-right: 0pt; margin-top: 0pt; text-align: left; text-decoration: none; text-indent: 0pt; text-transform: none; vertical-align: baseline"><font color="#000000"> Â <br /></font></div><div style="font-style: normal; font-weight: normal; margin-bottom: 0pt; margin-left: 0pt; margin-right: 0pt; margin-top: 0pt; text-align: left; text-decoration: none; text-indent: 0pt; text-transform: none; vertical-align: baseline"><font color="#000000"> Â <br /></font></div><div style="font-style: normal; font-weight: normal; margin-bottom: 0pt; margin-left: 0pt; margin-right: 0pt; margin-top: 0pt; text-align: left; text-decoration: none; text-indent: 0pt; text-transform: none; vertical-align: baseline"><font color="#000000"> <br clear="all" />{| align="center"
| + | |
| − | |
| + | |
| − | [[Image:SelectFileFiltersMedical.jpg]]
| + | |
| − | |}<br clear="all" /><br /></font></div>
| + | |
| − | |}
| + | |
| − | | + | |
| − | <br /></font></div><div style="font-style: normal; font-weight: normal; margin-bottom: 0pt; margin-left: 0pt; margin-right: 0pt; margin-top: 0pt; text-align: left; text-decoration: none; text-indent: 0pt; text-transform: none; vertical-align: baseline"><font color="#000000"> <br /></font></div>
| + | |
| − | | + | |
| − | === Adding shortcuts ===
| + | |
| − | | + | |
| − | <div style="font-style: normal; font-weight: normal; margin-bottom: 6pt; margin-left: 0pt; margin-right: 0pt; margin-top: 0pt; text-align: left; text-decoration: none; text-indent: 0pt; text-transform: none; vertical-align: baseline"><font color="#000000"> MIPAV allows you to create shortcuts using the Ctrl, Alt, and Shift keys plus the alphanumeric key of your choice. Shortcuts provide a quick way for you to perform a command on a menu or a command on one of the toolbars. <br /></font></div><div style="font-style: normal; font-weight: normal; margin-bottom: 4pt; margin-left: 0pt; margin-right: 0pt; margin-top: 0pt; text-align: left; text-decoration: none; text-indent: 0pt; text-transform: none; vertical-align: baseline"><font color="#0000ff"> <span style="font-style: normal; text-decoration: none; text-transform: none; vertical-align: baseline">'''<font color="#0000ff">Example:</font>'''</span> Suppose you frequently clone images. Rather than taking the time to select Utilities > Clone, you may find it easier and faster to simply press Ctrl C, the keys you assigned to the shortcut.<br /></font></div><div style="font-style: normal; margin-bottom: 6pt; margin-left: 0pt; margin-right: 0pt; margin-top: 14pt; text-align: left; text-decoration: none; text-indent: 0pt; text-transform: none; vertical-align: baseline">'''<font color="#000000"> To add shortcut keys<br /></font>'''</div><div style="font-style: normal; font-weight: normal; margin-bottom: 0pt; margin-left: 18pt; margin-right: 0pt; margin-top: 6pt; text-align: left; text-decoration: none; text-indent: -18pt; text-transform: none; vertical-align: baseline"><font color="#000000"> 1 Select Help > Shortcut editor. The Shortcuts dialog box opens.<br /></font></div><div style="font-style: normal; font-weight: normal; margin-bottom: 0pt; margin-left: 18pt; margin-right: 0pt; margin-top: 6pt; text-align: left; text-decoration: none; text-indent: -18pt; text-transform: none; vertical-align: baseline"><font color="#000000"> 2 Click Add. The New Shortcut dialog box opens. See [MIPAV_QuickStart.html#2697214 Figure 54]-1.<br /></font></div><div style="font-style: normal; font-weight: normal; margin-bottom: 0pt; margin-left: 18pt; margin-right: 0pt; margin-top: 6pt; text-align: left; text-decoration: none; text-indent: -18pt; text-transform: none; vertical-align: baseline"><font color="#000000"> 3 Select Ctrl, Alt, or Shift or any combination of these check boxes. You can select only one of these check boxes, or you can select any combination of these check boxes. Valid selections can include only Ctrl, only Alt, or only Shift, or you can select Ctrl and Alt, Ctrl and Shift, Alt and Shift, or all three of the check boxes. See [MIPAV_QuickStart.html#2697214 Figure 54]-2.<br /></font></div><div style="font-style: normal; font-weight: normal; margin-bottom: 0pt; margin-left: 18pt; margin-right: 0pt; margin-top: 6pt; text-align: left; text-decoration: none; text-indent: -18pt; text-transform: none; vertical-align: baseline"><font color="#000000"> 4 Type an alphanumeric character in Character, and then press OK.<br /></font></div><div style="font-style: normal; font-weight: normal; margin-bottom: 0pt; margin-left: 18pt; margin-right: 0pt; margin-top: 6pt; text-align: left; text-decoration: none; text-indent: -18pt; text-transform: none; vertical-align: baseline"><font color="#000000"> 5 A message appears directing you to select a command on a menu or in a toolbar. See [MIPAV_QuickStart.html#2697214 Figure 54]-3. Press OK again. The message disappears.<br /></font></div><div style="font-style: normal; font-weight: normal; margin-bottom: 0pt; margin-left: 18pt; margin-right: 0pt; margin-top: 6pt; text-align: left; text-decoration: none; text-indent: -18pt; text-transform: none; vertical-align: baseline"><font color="#000000"> 6 Select a toolbar icon or select a command on a menu in the MIPAV window to which you want to assign this shortcut. A message appears indicating that the shortcut was successfully created. See [MIPAV_QuickStart.html#2697214 Figure 54]-4.<br /></font></div><div style="font-style: normal; font-weight: normal; margin-bottom: 0pt; margin-left: 18pt; margin-right: 0pt; margin-top: 6pt; text-align: left; text-decoration: none; text-indent: -18pt; text-transform: none; vertical-align: baseline"><font color="#000000"> 7 Click OK. The message disappears, and the shortcut appears on the Shortcuts dialog box.<br /></font></div><div style="font-style: normal; font-weight: normal; margin-bottom: 0pt; margin-left: 0pt; margin-right: 0pt; margin-top: 0pt; text-align: left; text-decoration: none; text-indent: 0pt; text-transform: none; vertical-align: baseline"><font color="#000000">
| + | |
| − | | + | |
| − | {| border="1" cellpadding="5"
| + | |
| − | |+ <div style="font-style: normal; margin-bottom: 3pt; margin-left: 0pt; margin-right: 0pt; margin-top: 9pt; text-align: left; text-decoration: none; text-indent: 0pt; text-transform: none; vertical-align: baseline">'''<font color="#000000"> Figure 54. Creating a new shortcut. Steps 1-4 are explained in the text above<br /></font>'''</div>
| + | |
| − | |-
| + | |
| − | |
| + | |
| − | <div style="font-style: normal; font-weight: normal; margin-bottom: 0pt; margin-left: 0pt; margin-right: 0pt; margin-top: 1pt; text-align: left; text-decoration: none; text-indent: 0pt; text-transform: none; vertical-align: baseline"><font color="#000000"> <br clear="all" />{| align="center"
| + | |
| − | |
| + | |
| − | [[Image:Shortcuts.jpg]]
| + | |
| − | |}<br clear="all" /><br /></font></div>
| + | |
| − | |}
| + | |
| − | | + | |
| − | <br /></font></div><div style="font-style: normal; margin-bottom: 6pt; margin-left: 0pt; margin-right: 0pt; margin-top: 14pt; text-align: left; text-decoration: none; text-indent: 0pt; text-transform: none; vertical-align: baseline">'''<font color="#000000"> To remove shortcut keys<br /></font>'''</div><div style="font-style: normal; font-weight: normal; margin-bottom: 0pt; margin-left: 18pt; margin-right: 0pt; margin-top: 6pt; text-align: left; text-decoration: none; text-indent: -18pt; text-transform: none; vertical-align: baseline"><font color="#000000"> 1 Select Help > Shortcut editor. The Shortcuts dialog box opens.<br /></font></div><div style="font-style: normal; font-weight: normal; margin-bottom: 0pt; margin-left: 0pt; margin-right: 0pt; margin-top: 0pt; text-align: left; text-decoration: none; text-indent: 0pt; text-transform: none; vertical-align: baseline"><font color="#000000"> <br /></font></div><div style="font-style: normal; font-weight: normal; margin-bottom: 0pt; margin-left: 18pt; margin-right: 0pt; margin-top: 6pt; text-align: left; text-decoration: none; text-indent: -18pt; text-transform: none; vertical-align: baseline"><font color="#000000"> 2 Select the shortcut you want to delete.<br /></font></div><div style="font-style: normal; font-weight: normal; margin-bottom: 0pt; margin-left: 18pt; margin-right: 0pt; margin-top: 6pt; text-align: left; text-decoration: none; text-indent: -18pt; text-transform: none; vertical-align: baseline"><font color="#000000"> 3 Click Remove. MIPAV removes the shortcut, and the shortcut disappears from the list of shortcuts in the Shortcuts dialog box.<br /></font></div><div style="font-style: normal; font-weight: normal; margin-bottom: 5pt; margin-left: 0pt; margin-right: 0pt; margin-top: 5pt; text-align: left; text-decoration: none; text-indent: 0pt; text-transform: none; vertical-align: baseline"><font color="#000000"> <span style="font-style: normal; text-decoration: none; text-transform: none; vertical-align: baseline">'''<font color="#000000">Note:</font>'''</span> Make sure you want to delete the shortcut. You cannot undo the deletion. <br /></font></div>
| + | |
| − | | + | |
| − | === Developing and using plug-in programs ===
| + | |
| − | | + | |
| − | <div style="font-style: normal; font-weight: normal; margin-bottom: 6pt; margin-left: 0pt; margin-right: 0pt; margin-top: 0pt; text-align: left; text-decoration: none; text-indent: 0pt; text-transform: none; vertical-align: baseline"><font color="#000000"> A<span style="font-weight: normal; text-decoration: none; text-transform: none; vertical-align: baseline">''<font color="#000000"> plug-in</font>''</span> program allows you to add customized functionality to MIPAV. Before you create a plug-in, you should have a strong understanding of the underlying structure of MIPAV's software design and data structure. Because plug-ins are written in Java, you should also have a basic understanding of that programming language. After you create the plug-in, you must then install it. Once it is installed, you can access it from the Plug-Ins menu in the main MIPAV window. Plug-ins are addressed in Chapter 12, "Developing Plug-in Programs", in the <span style="font-weight: normal; text-decoration: none; text-transform: none; vertical-align: baseline">''<font color="#000000">MIPAV User's Guide</font>''</span>.<br /></font></div>
| + | |
| − | | + | |
| − | == Quitting MIPAV ==
| + | |
| − | | + | |
| − | <div style="font-style: normal; margin-bottom: 6pt; margin-left: 0pt; margin-right: 0pt; margin-top: 14pt; text-align: left; text-decoration: none; text-indent: 0pt; text-transform: none; vertical-align: baseline">'''<font color="#000000"> <span style="font-style: normal; text-decoration: none; text-transform: none; vertical-align: baseline">'''<font color="#000000">To end a MIPAV session</font>'''</span><br /></font>'''</div><div style="font-style: normal; font-weight: normal; margin-bottom: 0pt; margin-left: 18pt; margin-right: 0pt; margin-top: 6pt; text-align: left; text-decoration: none; text-indent: -18pt; text-transform: none; vertical-align: baseline"><font color="#000000"> 1 Select File > Exit-MIPAV. The MIPAV-Exit dialog box appears asking if you really want to exit the program. See [MIPAV_QuickStart.html#1994161 Figure 55].<br /></font></div><div style="font-style: normal; font-weight: normal; margin-bottom: 0pt; margin-left: 18pt; margin-right: 0pt; margin-top: 6pt; text-align: left; text-decoration: none; text-indent: -18pt; text-transform: none; vertical-align: baseline"><font color="#000000"> 2 Click Yes to end the session.<br /></font></div>
| + | |
| − | | + | |
| − | [[Image:X.jpg]] You can also exit MIPAV by clicking on Close at the top right of the MIPAV window.
| + | |
| − | | + | |
| − | <div style="font-style: normal; font-weight: normal; margin-bottom: 0pt; margin-left: 0pt; margin-right: 0pt; margin-top: 0pt; text-align: left; text-decoration: none; text-indent: 0pt; text-transform: none; vertical-align: baseline"><font color="#000000">
| + | |
| − | | + | |
| − | {| border="1" cellpadding="5"
| + | |
| − | |+ <div style="font-style: normal; margin-bottom: 3pt; margin-left: 0pt; margin-right: 0pt; margin-top: 9pt; text-align: left; text-decoration: none; text-indent: 0pt; text-transform: none; vertical-align: baseline">'''<font color="#000000"> Figure 55. MIPAV Exit Confirmation dialog box <br /></font>'''</div>
| + | |
| − | |-
| + | |
| − | |
| + | |
| − | <div style="font-style: normal; font-weight: normal; margin-bottom: 0pt; margin-left: 0pt; margin-right: 0pt; margin-top: 0pt; text-align: left; text-decoration: none; text-indent: 0pt; text-transform: none; vertical-align: baseline"><font color="#000000"> <br clear="all" />{| align="center"
| + | |
| − | |
| + | |
| − | [[Image:ExitMIPAV.jpg]]
| + | |
| − | |}<br clear="all" /><br /></font></div>
| + | |
| − | |}
| + | |
| − | | + | |
| − | <br /></font></div>
| + | |
| − | | + | |
| − | </blockquote>
| + | |
| − | ----
| + | |
| − | | + | |
| − | {| align="right"
| + | |
| − | | align="right" | <font size="1"> [http://www.webworks.com [[Image:webworks.gif]]]<br /> Quadralay Corporation<br /> http://www.webworks.com<br /> Voice: (512) 719-3399<br /> Fax: (512) 719-3606<br />[mailto:sales@webworks.com sales@webworks.com]<br /></font>
| + | |
| − | |}
| + | |
| − | | + | |
| − | {| width="331"
| + | |
| − | |
| + | |
| − | [MIPAV_titleVolume1.html [[Image:navtoc.gif|TOC]] ]
| + | |
| − | |
| + | |
| − | [MIPAV_Installing.html [[Image:navprev.gif|PREV]] ]
| + | |
| − | |
| + | |
| − | [MIPAV_ImageBasics.html [[Image:navnext.gif|NEXT]] ]
| + | |
| − | |
| + | |
| − | [MIPAV_Glossary.html [[Image:navidx.gif|INDEX]] ]
| + | |
| − | |}
| + | |
Revision as of 19:32, 7 February 2012
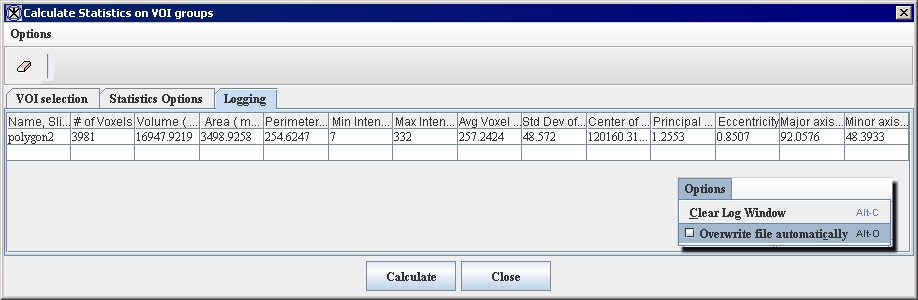
The Logging page ([MIPAV_QuickStart.html#2672530 Figure 37]) displays the statistics in tabular form. Whether or not you chose a type of statistic on the Statistics Options page, the table includes a heading for each type. Blanks cells in the table indicate that you did not choose to obtain that particular type of statistics.
Figure 37. The Logging page in the Calculate Statistics on VOI Groups window
|
{| align="center"
|
|
|}
Each time you calculate the statistics for a VOI the Statistics Generator adds another row of statistics to the table. Note that the first column in the table lists the name of the VOI and, if appropriate, the slice and contour numbers. Also, you can change the width of each of the columns in the table by dragging the line between the columns in the heading.
You can include and review the statistics file in a database or in a spreadsheet program by double-clicking on the file name in Windows Explorer window and, in the Open with dialog box, selecting the application in which you want to open the file.
When the number of rows in the table exceeds the length of the Logging page, scroll bars appear on the right side of the table to allow you to scroll from the beginning or to the end of the table.
If at any time you want to clear, or erase, all of the rows of the table, select Options > Clear log window. The complete table disappears from the Logging page, which is now totally gray.
|
Overwriting statistics files
If you previously ran the Statistics Generator and obtained statistics, after you click Calculate a message appears stating that a statistics file already exists. It asks whether to overwrite the file or to cancel the action.
{| align="center"
|

|
If you not want to overwrite the file, click Cancel. The following warning message appears.
{| align="center"
|

|}
Return to the VOI selection page and choose another file name in the VOI statistic file destination box. Then click Calculate to obtain the new set of statistics. The Statistics Generator calculates the statistics and saves them in the file that you indicated. The statistics appear on the Logging page.
If it's all right to overwrite the file, click Overwrite. The Statistics Generator calculates the statistics and overwrites the previously recorded statistics file.
Tip: If you always want the Statistics Generator to overwrite the file, either select Options > Overwrite file automatically or press Alt O.
{| align="center"
|
|}
Go to the next task: [MIPAV_QuickStart.html#2672512 ``Reviewing the statistics''].
|}
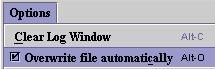
Modifying image resolutions
To modify the image resolution
1 Open an image.
2 Select Image > Attributes > Edit attributes in the MIPAV window. The Image Attributes dialog box opens. See[MIPAV_QuickStart.html#2675737 Figure 38].
3 Click Resolutions. The Resolution page appears.
4 Modify the resolutions.
5 Click Apply.
6 Click OK or Close when complete. The window closes.
Figure 38. The Resolutions tab of the Image Attributes dialog box; the Unit of Resolutions list box shows different units available in MIPAV
|
{| align="center"
|
|
|}
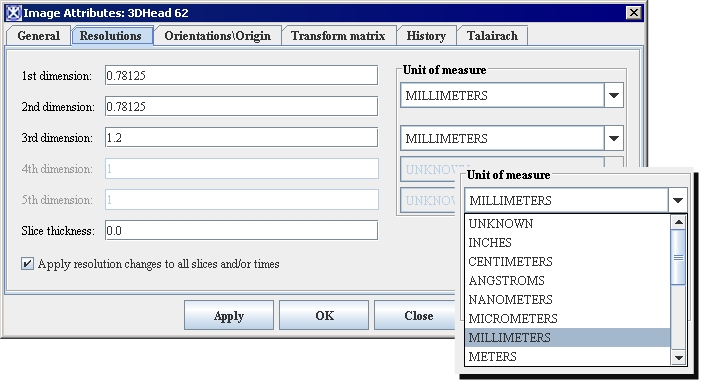
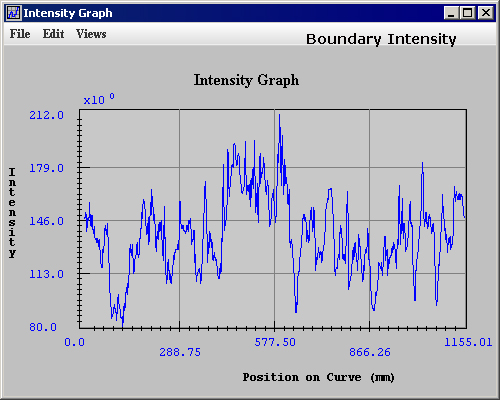
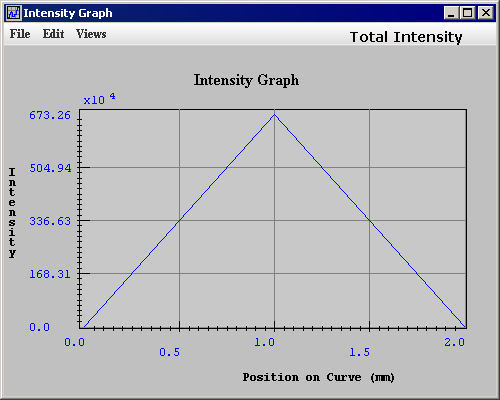
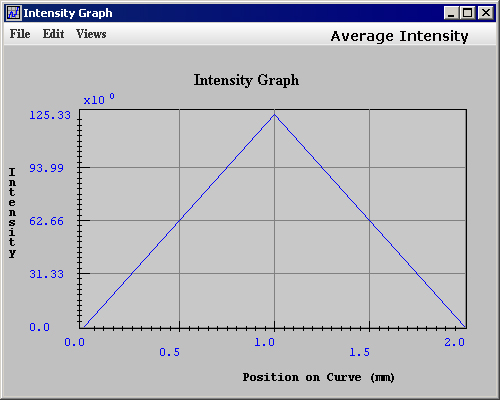
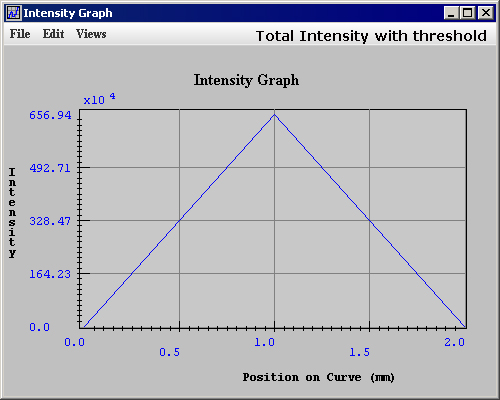
Generating graphs (intensity profiles)
MIPAV can generate a graph of the intensity values of a region bound by a VOI. You can then save this graph or intensity profile, to a file for future reference.
Generating new graphs
You can generate an intensity profile for any VOI.
To generate a graph of a VOI
1 Select a VOI in an image window.
2 Use the right mouse button to call the context menu, then select one of the following:
Graph > Boundary Intensity
Graph > Total Intensity
Graph > Average Intensity
Graph > Total Intensity with Threshold
Graph > Average Intensity with Threshold
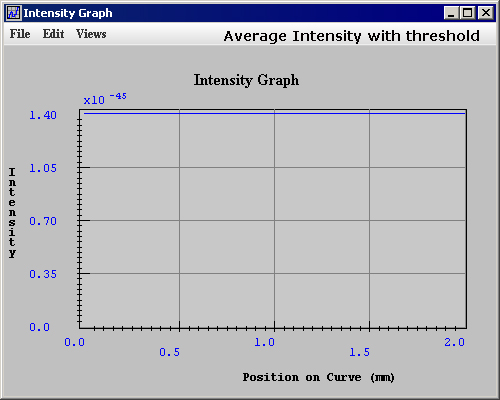
The chosen Intensity Graph window appears. Each function on the graph represents the intensity levels within each channel. Refer to [MIPAV_QuickStart.html#2896827 Figure 39].
3 Close the graph by either selecting File > Close graph or pressing ctrl x.
.
Figure 39. The Intensity graphs
|
{| align="center"
|
|
|
{| align="center"
|
|}
Boundary Intensity
|
{| align="center"
|
|}
Total Intensity
|-
|
{| align="center"
|
|}
Average Intensity
|
{| align="center"
|
|}
Total Intensity with Threshold
|
{| align="center"
|
|}
Average Intensity with Threshold
|}
Saving graphs to a file
To save a graph
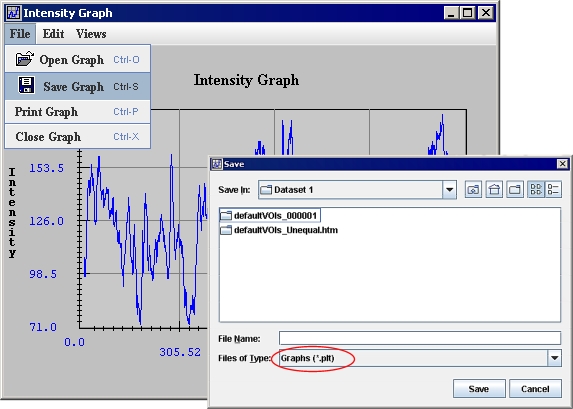
1 Select File > Save graph in the Intensity Graph window or press Ctrl S.
The Save dialog box appears. See [MIPAV_QuickStart.html#2679981 Figure 40].
2 Type a name for the graph in File name.
3 Make sure that Graphs (.plt) appears in Files of type. Refer to [MIPAV_QuickStart.html#2679981 Figure 40].
4 Click Save. MIPAV saves the file under a specified name.
Printing graphs
To print graphs
1 Select File > Print graph in the Intensity Graph window. The Print dialog box appears.
2 In the dialog box, select the printer and adjust the print options if necessary.
3 Click OK to print the graph or image on your default printer.
Figure 40. Saving and printing intensity graphs
|
{| align="center"
|
|
|}
Saving and printing images
This section explains how to save images to the same format (as when opened) or in a different format. It also shows how to print images. In addition, it explains how to save an image as a TIFF file.
Saving images to the same format
To save an image file in the same format (as when opened)
1 Do one of the following in the MIPAV window:
Click the Save Image icon or use the Ctrl S combination of keys.
Select File > Save Image.
The Save dialog box appears ([MIPAV_QuickStart.html#1045607 Figure 41]).
2 In the dialog box, type the name of the file in File name and click Save.
Figure 41. Save dialog box
|
{| align="center"
|
|
|}
Note: If you prefer for MIPAV to use the style of Open and Save dialog boxes that are used by the operating system (e.g., Microsoft Windows, Unix, or Apple) on your computer, read the section on [MIPAV_QuickStart.html#1013570 "Using platform-specific Open and Save dialog boxes" on page 74].
Capturing images as TIFF(RGB) files
MIPAV allows you to capture entire images or portions of images as RGB TIFF files.
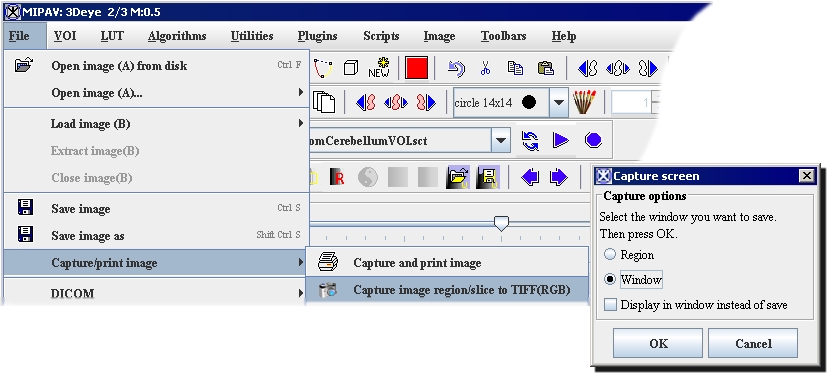
1 Select File > Capture image to TIFF(RGB) in the MIPAV window. The Capture Screen dialog box opens. See [MIPAV_QuickStart.html#2681571 Figure 42].
2 To capture only a portion of the image:
Select Region, then draw a rectangle with the mouse around the region in the image you want to save. Click OK. The Save dialog box opens. Type the name of the file in File Name, and select the TIFF type of file. Click Save. The region is saved under the specified file name.
3 To capture the entire image:
Select Window, then click OK. The Save dialog box opens. Follow the instructions provided by the dialog box to save the image in TIFF format.
Figure 42. Capturing images or image regions
|
{| align="center"
|
|
|}
To display the region in a separate window rather than save it, select Display in Window Instead of Save. The selected region appears in a separate window.
To display the image in a separate window rather than save it, select Display in Window Instead of Save. The entire image appears in a separate window.
Saving images as
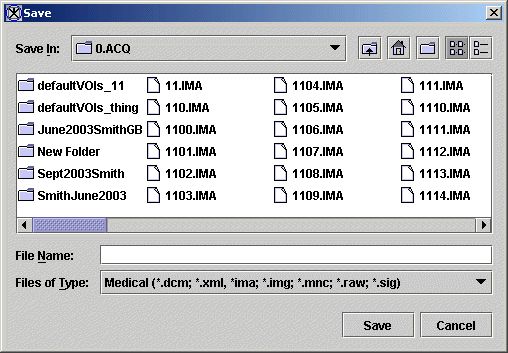
MIPAV uses the file extension to save image into various formats. Thus, saving an image with the extension of TIFF causes the image to be saved as a TIFF image. Saving an image with the extension of IMG causes the image to be saved as an Analyze image. See [MIPAV_AppCSupportedFormats.html#1330116 Table 1] for file extensions supported by MIPAV.
To save images as RGB TIFF files
1 Select File > Save as in the MIPAV window.
The Save Image as dialog box appears.
2 Type the name of the image in File name. Make sure you add .tiff as the extension.
3 Click Save. MIPAV saves the file as a TIFF file under the name you specified.
To save images to MINC format
1 Select File > Save As.The Save Image as dialog box appears. See [MIPAV_QuickStart.html#1045607 Figure 41].
2 Type the name of the file in File name. Make sure you add .mnc as the extension.
3 The Attributes to Save dialog box appears. See [MIPAV_QuickStart.html#1994056 Figure 44].
4 Complete the text boxes with the appropriate information. Note that the x, y, and z values differ from DICOM.
5 Click Save. MIPAV saves the image to MINC format.
|
Image orientation
|
Specify the image orientation here if need. Note that, often the proper value is already entered in the dialog box. Then use the appropriate list boxes to specify the X, Y and Z axis orientation. L/R Start - TBD L/R Space - TBD P/A Start - TBD P/A Space - TBD I/S Start - TBD I/S Space - TBD
|
{| align="center"
|

|
Â
|-
|
OK
| rowspan="1" colspan="2" |
Saves the selected image based on your choices in this dialog box.
|-
|
Cancel
| rowspan="1" colspan="2" |
Disregards changes you made in this dialog box and closes the dialog box.
|-
| rowspan="1" colspan="3" |
Figure 43. MINC Attributes to Save dialog box
|}
Figure 44. The MINC Attributes to Save dialog box and comparison of MINC and DICOM image orientation
|
{| align="center"
|

|
|}
Saving images to XML format
To record a history of actions that were performed on images, you should save the images to XML format. When you save images to XML format, MIPAV creates two files for each image: a RAW file, which contains image data, and an XML file. The XML file includes image attributes, such as action history. You can view the attributes of an image by selecting Image > Attributes > Edit Attributes or by viewing the .xml file using a text editor or an internet browser. For more information on recording a history of actions, refer to [MIPAV_QuickStart.html#1014435 "Saving a history of actions on images (TBD)" on page 76].
To save images to XML format
1 Select File > Save as.
The Save Image as dialog box opens.
2 Accept the name currently in File name or type a new name. Make sure you add .xml as the extension.
3 Click Save.
MIPAV saves the file under the name and extension you specified and begins, from this point on, recording a history of actions performed on the image.
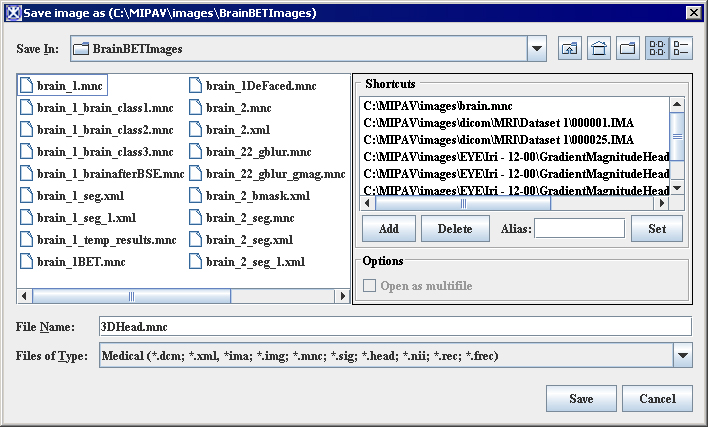
Saving images to another format or renaming images
To save images to format different from the original file
1 Select File > Save as.The Save Image as dialog box appears ([MIPAV_QuickStart.html#2683829 Figure 45]).
2 Type the new name in File name. To save the file in a different format, change the file extension. A list of extensions appears in [MIPAV_AppCSupportedFormats.html#1330116 Table 1 on page 563].
3 Click Save. MIPAV saves the file under the name and extension you specified.
To rename images
1 Select File > Save as. The Save Image as dialog appears ([MIPAV_QuickStart.html#2683829 Figure 45]).
2 Type the new name in File name. Either keep the extension already specified or change it to another file type. A list of extensions appears in [MIPAV_AppCSupportedFormats.html#1330116 Table 1 on page 563].
3 Click Save. MIPAV saves the file under the name and extension you specified.
Figure 45. Save Image as dialog box
|
{| align="center"
|
|
|}
Printing Images
MIPAV offers the following printing command File > Capture and Print Image. This command calls the Print dialog box. Using this dialog you can set up a printer (to do it press the Properties button) or a file for printing (using the Print to File option), select the print copies and print range (all pages, current page, or selected pages).
To print an image with its current options:
Choose File > Capture and Print Image, and click OK.
To set printer and page setup options:
1 Choose File > Capture and Print Image.
2 Select an installed printer from the pop-up list at the top of the dialog box.
3 Set additional options, such as paper size and layout, as desired. The available options depend on your printer, print drivers, and operating system.
Customizing MIPAV
You can set the following MIPAV configuration options:
[MIPAV_QuickStart.html#2095084 "Showing or hiding the splash screen on start-up" on page 68]
[MIPAV_QuickStart.html#1013570 "Using platform-specific Open and Save dialog boxes" on page 74]
[MIPAV_QuickStart.html#1014151 "Debugging MIPAV" on page 76]
[MIPAV_QuickStart.html#1014435 "Saving a history of actions on images (TBD)" on page 76]
[MIPAV_QuickStart.html#2183666 "Choosing the default file types to display or save" on page 79]
[MIPAV_QuickStart.html#2396737 "Adding shortcuts" on page 82]
[MIPAV_QuickStart.html#2398581 "Developing and using plug-in programs" on page 84]
Showing or hiding the splash screen on start-up
The splash screen is the window that first appears briefly when you start MIPAV. It appears immediately before the MIPAV window and the Output window open. The splash screen displays the name of the program and the MIPAV logo.
By default, MIPAV always displays the splash screen on start-up unless you decide to hide it. To do so, you need to change the option in the MIPAV Options dialog box.
To hide the splash screen or prevent it from appearing on start-up
1 Select Help > Program Options. The MIPAV Options dialog box ([MIPAV_QuickStart.html#2176265 Figure 47]) opens.
2 Clear the Display Splash Screen box.
3 Click Close.
After you quit MIPAV and then start it again, the splash screen doesn't appear.
To show the splash screen
After hiding the splash screen, you may later decide to display it.
1 Select Help > Program Options. The MIPAV Options dialog box ([MIPAV_QuickStart.html#2176265 Figure 47]) opens.
2 Mark Display splash screen. A check mark appears in the check box.
3 Click Apply, and then click Close.
After you quit MIPAV and then start it again, the splash screen appears.
Figure 46. The Display page in the MIPAV Options dialog
|
Display Splash screen
|
Displays the MIPAV opening splash screen, or title screen, when MIPAV is started. By default, this check box is clear.
|
{| align="center" | 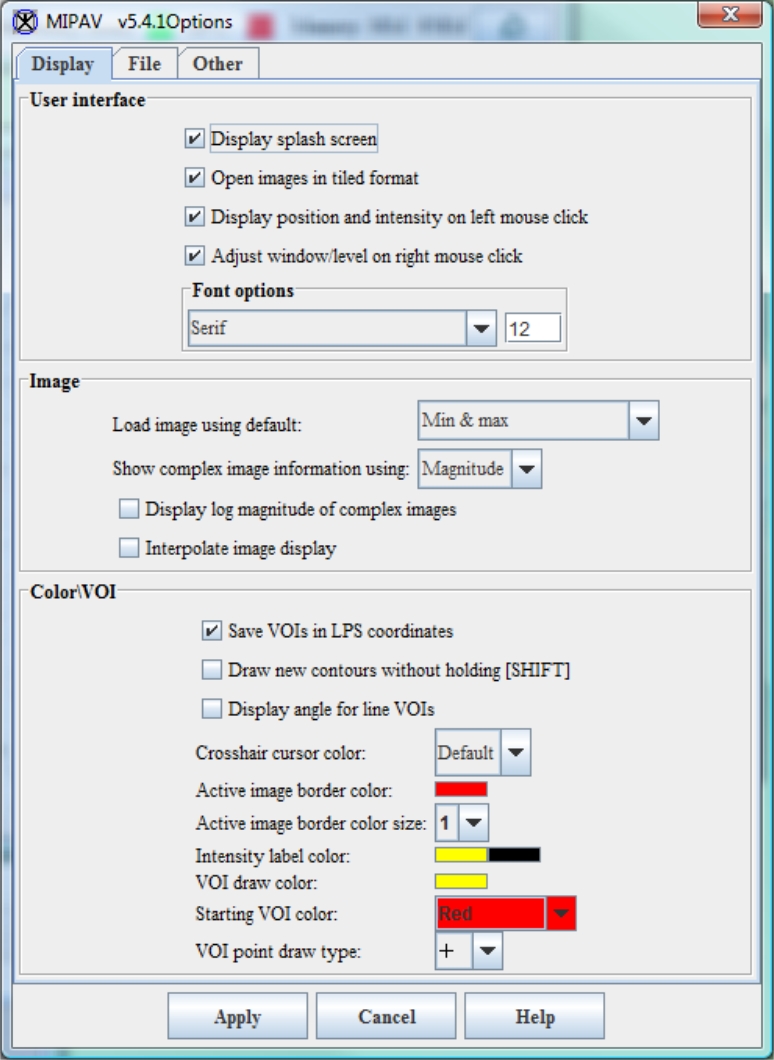 |} |}
|
|
Use platform-style File dialog boxes
|
Uses the style of Open and Save dialog boxes that are provided with the operating system of your computer, rather than the MIPAV style. For more information, refer to [MIPAV_QuickStart.html#1013570 "Using platform-specific Open and Save dialog boxes" on page 74]. By default, this check box is clear.
|
|
Show Scripting toolbar
|
Shows the Scripting toolbar, which you can use to create and run scripts, in the MIPAV window. By default, this check box is clear.
|
|
Show Paint toolbar
|
Shows the Paint toolbar, which allows you to paint directly on images. By default, this check box is clear.
|
|
Show Paint border
|
Shows a border around the painted area. By default, this check box is clear.
|
|
Snap paint cursor to pixels
|
Causes the paint cursor to snap to the nearest pixel.
|
|
Recently used image list
|
Specifies the number of recently displayed images that appear near the bottom of the File menu on the MIPAV window. To open a recently displayed image, simply select the image on the File menu. The number of images that can be displayed can be from 2 to 9. By default, the number of images displayed on the File menu is 4.
|
|
Crosshair cursor color
|
Specifies the color of the crosshair cursor. You can choose from several colors and styles. By default, the color is set to "Default."
|
|
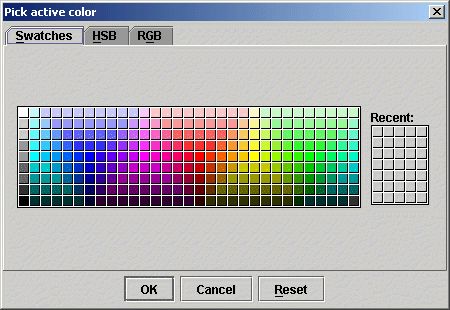
Active image border color
|
Specifies the color of the border around images. When you click on this box, the Pick Active Color dialog box, which allows you to select a different color, opens.
{| align="center"
|
|
By default, the color is red.
|-
|
VOI draw color
| rowspan="1" colspan="2" |
Allows you to choose the color that is used to draw VOIs. After you finish drawing VOIs, the completed VOIs appear in the Starting VOI color.
|-
|
Starting VOI color
| rowspan="1" colspan="2" |
Allows you to select the initial color for completed VOIs. That is, when you draw VOIs, they appear in the color chosen for VOI draw color; the completely drawn VOIs appear in the color you selected for this field.
|-
|
Apply
| rowspan="1" colspan="2" |
Saves and immediately applies all of the selected parameters in this dialog box.
|-
|
Cancel
| rowspan="1" colspan="2" |
Disregards any changes you made in this dialog box, closes the dialog box, and does not save the specified options.
|-
|
Help
| rowspan="1" colspan="2" |
Displays online help for this dialog box
|}
Figure 47. The File page in the MIPAV Options dialog boxÂ
|
Prompt overwrite on save
|
Displays a prompt, or message, when you save a file under the same name as an already existing file. The message indicates that saving the file under the same name as an existing file overwrites the file.
|
{| align="center"
|
|
|-
|
Save all on save
|
Saves the active image and all VOIs presently displayed on the image so that the next time you open the image MIPAV opens the image and VOIs. The VOIs are saved in a subdirectory of the directory in which the image is stored.
By default, this check box is clear.
|-
|
Save dialog settings
|
Saves the settings you specified on algorithm dialog boxes so that the next time you use the algorithms, your specific settings override the default settings.
By default, this check box is clear.
|-
|
Save XML header with Analyze images
| rowspan="1" colspan="2" |
Saves an XML header for an Analyze image when the image is saved. If you choose this option, the image has two headers: the normal header and an XML header. Both point to the image file.
By default, this check box is clear.
|-
|
Save thumbnails for XML files
| rowspan="1" colspan="2" |
Saves a thumbnail image in the XML header, allowing you to view the thumbnails in the image browser
|-
|
Compress image in zip format when saved as XML
| rowspan="1" colspan="2" |
Compresses images in a zip format when they are saved in XML format. When an image is saved in XML format, MIPAV produces a RAW file that describes the image and an XML file that includes image attributes. When you select this check box, MIPAV compresses only the RAW file, which compensates for the size of the RAW file.
By default, this check box is clear.
|-
|
Default frame rate for Save-image-as AVI
| rowspan="1" colspan="2" |
Specifies the default frame rate in frames per second for images that are saved as AVI.
By default, this check box is clear. If you select this option, the default frame rate is 10.0.
|-
|
File filter default
| rowspan="1" colspan="2" |
Specifies the types of files that should be shown in the Files of type box in the Open Image and Save Image as dialog boxes. Refer to [MIPAV_QuickStart.html#2183666 "Choosing the default file types to display or save" on page 79] for more information.
|-
|
Apply
| rowspan="1" colspan="2" |
Saves and immediately applies all of the selected parameters in this dialog box.
|-
|
Cancel
| rowspan="1" colspan="2" |
Disregards any changes you made in this dialog box, closes the dialog box, and does not save the specified options.
|-
|
Help
| rowspan="1" colspan="2" |
Displays online help for this dialog box
|}
{| border="1" cellpadding="5" |+ Figure 48. The Other page in the MIPAV Options dialog boxÂ
|- | Save dialog settings
| Saves the active dialog box settings in a log file.
| rowspan="2" colspan="1" |
{| align="center" | 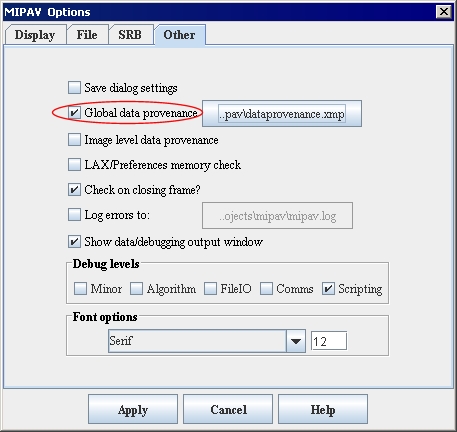 |}
|}
|- | Global data provenance
| Keeps a global record of all of the actions-algorithms and utilities-performed on images. The history may be viewed in the MIPAV system data provenance dialog box.
By default, this check box is clear.
|- | Image level data provenance
| rowspan="1" colspan="2" | Keeps a record of all of the actions-algorithms and utilities-performed on images. The history may be viewed in the Image data provenance dialog box while the actions are performed, or in the XML file when an image is saved to an XML file.
By default, this check box is clear.
|- | LAX/Preferences memory check
| rowspan="1" colspan="2" | Enables MIPAV developers to debug the program. If you experience problems with the program, you may be asked to select this check box.
Recommendation: Do not select this check box unless otherwise instructed by MIPAV development. By default, this check box is clear.
|- | Check on closing frame?
| rowspan="1" colspan="2" | Adds messages to confirm deletions of images. By default, this check box is clear.
|- | Log errors to:
| rowspan="1" colspan="2" | Allows you to select the file in which MIPAV records any errors that occur. By default MIPAV logs errors to C:\Program Files\mipav\mipav.log unless the name and path of the log file was changed during installation.
|- | Debug levels: Minor
| rowspan="1" colspan="2" | Records only minor error messages in mipav.log.
|- | Debug levels: Algorithm
| rowspan="1" colspan="2" | Records only error messages with algorithms in mipav.log.
|- | Debug levels: FileIO
| rowspan="1" colspan="2" | Records only FileIO (file input and output) error messages in mipav.log.
|- | Debug levels: Comms
| rowspan="1" colspan="2" | Records only error messages involving communications in mipav.log.
|- | Debug levels: Scripts
| rowspan="1" colspan="2" | Records all error messages in mipav.log.
|- | Apply
| rowspan="1" colspan="2" | Saves and immediately applies all of the selected parameters in this dialog box.
|- | Cancel
| rowspan="1" colspan="2" | Disregards any changes you made in this dialog box, closes the dialog box, and does not save the specified options.
|- | Help
| rowspan="1" colspan="2" | Displays online help for this dialog box.
|}
|
Jargon version:
|
A version of Jargon API library, which should be used to communicate to the SRB server. Select one from the list;
|
{| align="center"
|
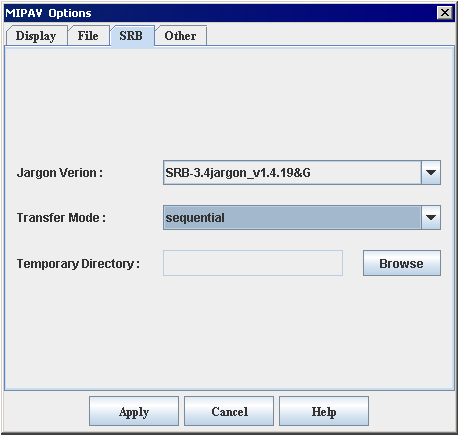
|
|-
|
Transfer Mode
|
Parallel or sequential specifies the file transfer protocol. There are SRB parallel transfer protocol and SRB sequential transfer protocol available;
|-
|
Temporary Directory
|
Is your local directory, where you keep your files which need to be transferred FROM or TO the SRB server.
See also [MIPAV_ConnectingToSRBBIRN.html#1253667 "Connecting to SRB BIRN" ].
|-
|
Apply
| rowspan="1" colspan="2" |
Saves and immediately applies all of the selected parameters in this dialog box.
|-
|
Cancel
| rowspan="1" colspan="2" |
Disregards any changes you made in this dialog box, closes the dialog box, and does not save the specified options.
|-
|
Help
| rowspan="1" colspan="2" |
Displays online help for this dialog box.
|}
Figure 49. The SRB tab
Using platform-specific Open and Save dialog boxes
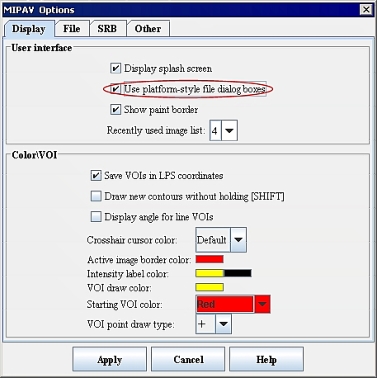
By default, MIPAV uses its own version of Open and Save dialog boxes, which provide you with the ability to assign aliases, or shortcuts, to frequently used images. Aliases make it easy to locate images, a feature that may be attractive if you work with the same images for a period of time. However, you may prefer instead to use the style of Open and Save dialog boxes that are provided with the operating system of your computer. To do so, you need to select the Use platform-style File dialog boxes check box in the MIPAV Options dialog box. See [MIPAV_QuickStart.html#1994088 Figure 50 on page 75].
If this check box is selected and your computer is running Microsoft Windows, MIPAV displays the Windows style of Open and Save dialog boxes. If you use a Sun terminal, when this check box is selected, MIPAV displays the standard Unix-style Open and Save dialog boxes. On Apple MacIntosh computers, MIPAV displays dialog boxes that are standard with that operating system.
To use platform-specific dialog boxes
1 Select Help > Program Options. The MIPAV Options dialog box opens. See [MIPAV_QuickStart.html#1994088 Figure 50 on page 75].
2 Mark Use Platform-Style File Dialog Boxes. A check mark appears in the check box.
3 Click Apply, then click Close. The dialog box closes.
Figure 50. MIPAV Options dialog box showing Use platform-style File dialog boxes check box
|
{| align="center"
|
|
|}
Debugging MIPAV
You can track debugging information and error messages generated by MIPAV during a session by placing it in debug mode. If errors occur during the session, the program displays any error messages in the Output window on the Debug page. By default, the debug mode is off when you start the program.
Recommendation: The debugging information is primarily intended for MIPAV developers and not for users. The best course for a user is to leave the debug mode Off unless a MIPAV developer asks for he/she to turn it on.
For more information about MIPAV debug mode, please refer to [MIPAVTroubleShooting.html#1337667 "Troubleshooting" ], [MIPAVTroubleShooting.html#1337690 "Placing MIPAV in debug mode" on page 558].
Saving a history of actions on images (TBD)
MIPAV allows you to keep a history of all of the actions-the algorithms and utilities-that you perform on images. The history includes the specific parameters that were set for the action. In addition, if you save the images as XML, the history of actions and their parameters appears in the dataset attributes section near the beginning of the MIPAV header file (the XML file). Each action appears between the <HISTORY> and </HISTORY> tags.
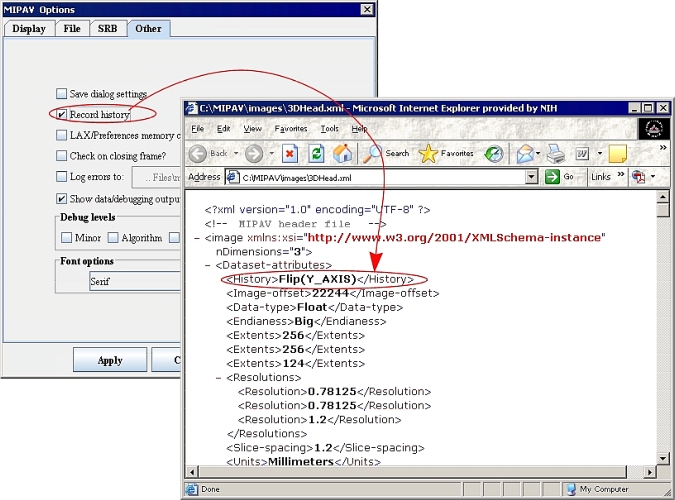
By default, MIPAV does not record a history of actions unless you specifically select the Record history check box in the MIPAV Options > Other dialog box. TBD.
To record a history of actions taken on images TBD
1 Select Help > Program Options in the MIPAV window. The MIPAV Options dialog box appears.
2 Mark Record history. A check mark appears in the check box.
3 Click Apply. From this point on, MIPAV records the actions performed on all images until you clear the Record history check box.
Refer to [MIPAV_QuickStart.html#2183598 Figure 51] and [MIPAV_QuickStart.html#2274000 "To view the history of actions recorded in the XML file TBD" on page 78].
To view the history of actions as they are performed
The History page in the Image Attributes dialog box allows you to view the list of actions immediately after they are performed.
The following example illustrates how to do this:
1 Make sure that the Record History check box was selected in the MIPAV Options dialog box.
2 Open a sample image.
3 Select Image > Attributes > Edit attributes. The Image Attributes dialog box opens.
4 Select History. The History page appears.
5 Click the image to make it the active window.
6 Select Utilities > Flip > Horizontal. The image is flipped horizontally, and the words "Flip(Y_AXIS)" appear on the History page in the Image Attributes dialog box.
7 Perform other actions on the image, such as algorithms or other utilities. Note that these actions appear on the History page.
You can type directly onto the History page of the Image Attributes dialog box, letting you add comments to the history, which you can save and print.
|
Under What Circumstances Do Actions Fail to Appear on the History Page?
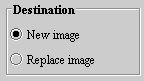
If MIPAV is fully operational, actions performed on an image always appear on the History page of the Image Attributes dialog box and in the XML file for that image. However, it's important to know whether the actions were performed on the original image or on the replacement image. {| align="left"
|
|
Several algorithms and utilities offer a choice of either generating a new image (New image check box) or replacing the original image (Replace image check box). If you choose New image and want to see the actions performed on that image, you must select Image > Attributes > Edit Attributes to open an Image Attributes dialog box for the new image. If, however, you select Replace image, the History page on the Image Attributes dialog box for the original image displays the actions. To illustrate this point, open a sample image; select Image > Attributes > Edit Attributes to display the Image Attributes dialog box; and select History to display the History page. Perform an action such as Utilities > Image Margins, mark New image in the dialog box, and then click OK. Notice that the action does not appear on the History page. Click on the new image; select Image > Attributes > Edit Attributes; and select History. The History page shows the AddImageMargins action for the new image.
|}
To view the history of actions recorded in the XML file TBD
1 Save the sample image as an XML file by selecting File > Save Image as. The Save Image as dialog box opens.
2 Select the directory where you want to save the file in the Save in box.
3 Type the name of the file-use "SampleImage" as the file name-and type an ".xml" file extension in the File Name box so that the complete file name is "SampleImage.xml."
4 Click Save.
5 Open Windows Explorer by right-clicking on Start and then selecting Explore. The Windows Explorer window opens.
6 Navigate to the directory where you stored the XML file. This directory should have two files named "SampleImage": "SampleImage.raw" and "SampleImage.xml."
7 Double-click "SampleImage.xml." An internet browser page, such as Internet Explorer or Mozilla, appears displaying an XML page.
Notice that, immediately after the <Dataset-attributes> tag, the following line appears:
<History>Flip(Y_AXIS)</History>
Each action that you perform on the image appears between its own <History> and </History> tags. See also [MIPAV_QuickStart.html#2183598 Figure 51].
Figure 51. The Record History check box is located in the MIPAV Options dialog box > Other tab. Actions recorded are shown in the header of open XML file. TBD
|
{| align="center"
|
|
|}
Choosing the default file types to display or save


