Difference between revisions of "Reviewing VOI statistics"
From MIPAV
|
|
| Line 32: |
Line 32: |
| | | | |
| | [[Image:messageFileExistsWarning.jpg]] | | [[Image:messageFileExistsWarning.jpg]] |
| − | |}<br clear="all" /></div> <div class="CellBody">Return to the VOI selection page and choose another file name in the VOI statistic file destination box. Then click Calculate to obtain the new set of statistics. The Statistics Generator calculates the statistics and saves them in the file that you indicated. The statistics appear on the Logging page.</div> <div class="CellBody"><span style="font-weight: normal; text-decoration: none; text-transform: none; vertical-align: baseline">''<font color="#000000">If it's all right to overwrite the file,</font>''</span> click Overwrite. The Statistics Generator calculates the statistics and overwrites the previously recorded statistics file. </div> <div class="CellBody"><span style="font-style: normal; text-decoration: none; text-transform: none; vertical-align: baseline">'''<font color="#000000">Tip:</font>'''</span> If you always want the Statistics Generator to overwrite the file, either select Options > Overwrite file automatically or press Alt O.<br clear="all" />
| + | <br clear="all" /></div> <div class="CellBody">Return to the VOI selection page and choose another file name in the VOI statistic file destination box. Then click Calculate to obtain the new set of statistics. The Statistics Generator calculates the statistics and saves them in the file that you indicated. The statistics appear on the Logging page.</div> <div class="CellBody"><span style="font-weight: normal; text-decoration: none; text-transform: none; vertical-align: baseline">''<font color="#000000">If it's all right to overwrite the file,</font>''</span> click Overwrite. The Statistics Generator calculates the statistics and overwrites the previously recorded statistics file. </div> <div class="CellBody"><span style="font-style: normal; text-decoration: none; text-transform: none; vertical-align: baseline">'''<font color="#000000">Tip:</font>'''</span> If you always want the Statistics Generator to overwrite the file, either select Options > Overwrite file automatically or press Alt O.<br clear="all" /> |
| | | | |
| | [[Image:menuOptionsOverwriteFileNoEdges.jpg]] | | [[Image:menuOptionsOverwriteFileNoEdges.jpg]] |
| − | |}<br clear="all" /></div> <div class="CellBody">Go to the next task: "Reviewing the statistics". </div>
| + | <br clear="all" /></div> <div class="CellBody">Go to the next task: "Reviewing the statistics". </div> |
| − | |}
| + | |
| | | | |
| | <br /></font></div><div style="font-style: normal; font-weight: normal; margin-bottom: 0pt; margin-left: 0pt; margin-right: 0pt; margin-top: 0pt; text-align: left; text-decoration: none; text-indent: 0pt; text-transform: none; vertical-align: baseline"><font color="#000000"> <br /></font></div> | | <br /></font></div><div style="font-style: normal; font-weight: normal; margin-bottom: 0pt; margin-left: 0pt; margin-right: 0pt; margin-top: 0pt; text-align: left; text-decoration: none; text-indent: 0pt; text-transform: none; vertical-align: baseline"><font color="#000000"> <br /></font></div> |
Revision as of 18:26, 9 February 2012
Reviewing the Statistics
The Logging page (Figure 37) displays the statistics in tabular form. Whether or not you chose a type of statistic on the Statistics Options page, the table includes a heading for each type. Blanks cells in the table indicate that you did not choose to obtain that particular type of statistics.
Figure 37. The Logging page in the Calculate Statistics on VOIÂ Groups window
|
|
Each time you calculate the statistics for a VOI the Statistics Generator adds another row of statistics to the table. Note that the first column in the table lists the name of the VOI and, if appropriate, the slice and contour numbers. Also, you can change the width of each of the columns in the table by dragging the line between the columns in the heading.
You can include and review the statistics file in a database or in a spreadsheet program by double-clicking on the file name in Windows Explorer window and, in the Open with dialog box, selecting the application in which you want to open the file.
When the number of rows in the table exceeds the length of the Logging page, scroll bars appear on the right side of the table to allow you to scroll from the beginning or to the end of the table.
If at any time you want to clear, or erase, all of the rows of the table, select Options > Clear log window. The complete table disappears from the Logging page, which is now totally gray.
|
Overwriting statistics files
If you previously ran the Statistics Generator and obtained statistics, after you click Calculate a message appears stating that a statistics file already exists. It asks whether to overwrite the file or to cancel the action.
|

|
If you not want to overwrite the file, click Cancel. The following warning message appears.

Return to the VOI selection page and choose another file name in the VOI statistic file destination box. Then click Calculate to obtain the new set of statistics. The Statistics Generator calculates the statistics and saves them in the file that you indicated. The statistics appear on the Logging page.
If it's all right to overwrite the file, click Overwrite. The Statistics Generator calculates the statistics and overwrites the previously recorded statistics file.
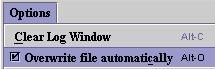
Tip: If you always want the Statistics Generator to overwrite the file, either select Options > Overwrite file automatically or press Alt O.
Go to the next task: "Reviewing the statistics".
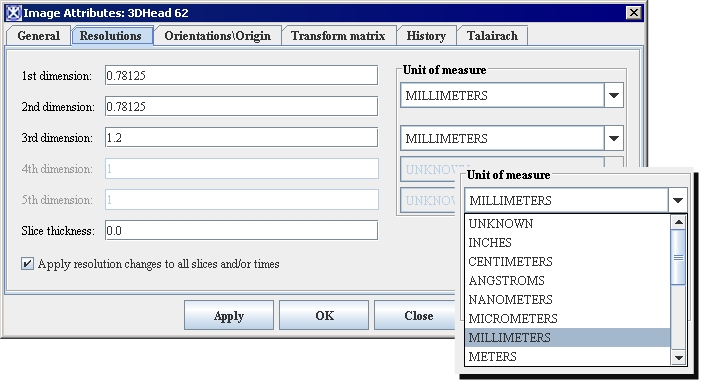
Modifying image resolutions
To modify the image resolution
1 Open an image.
2 Select Image > Attributes > Edit attributes in the MIPAV window. The Image Attributes dialog box opens. See[MIPAV_QuickStart.html#2675737 Figure 38].
3 Click Resolutions. The Resolution page appears.
4 Modify the resolutions.
5 Click Apply.
6 Click OK or Close when complete. The window closes.
Figure 38. The Resolutions tab of the Image Attributes dialog box; the Unit of Resolutions list box shows different units available in MIPAV
|
|
|
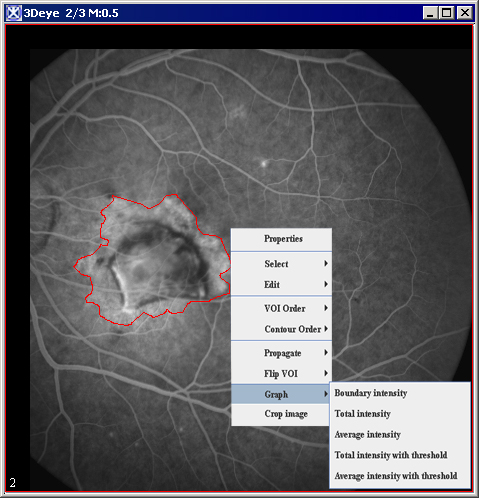
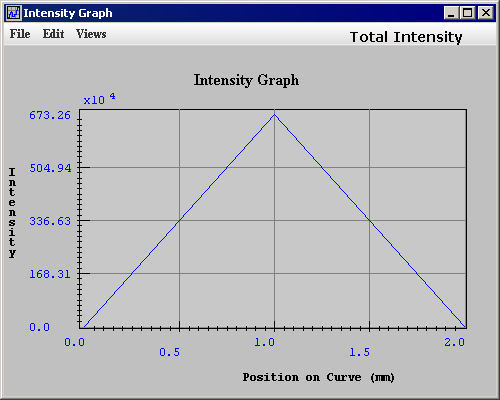
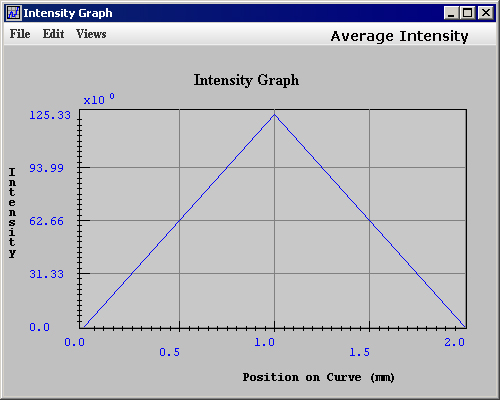
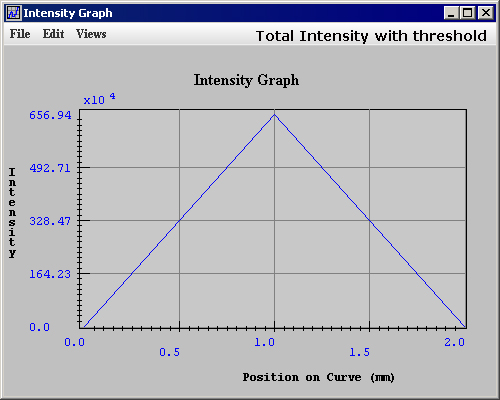
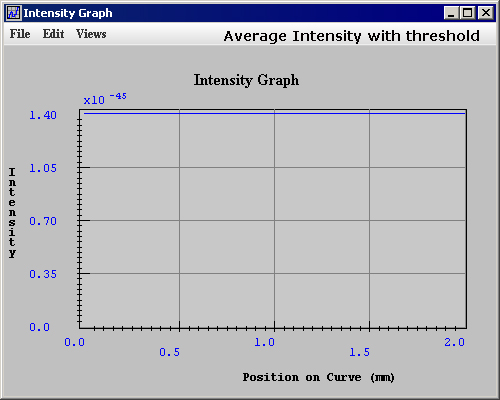
Generating graphs (intensity profiles)
MIPAV can generate a graph of the intensity values of a region bound by a VOI. You can then save this graph or intensity profile, to a file for future reference.
Generating new graphs
You can generate an intensity profile for any VOI.
To generate a graph of a VOI
1 Select a VOI in an image window.
2 Use the right mouse button to call the context menu, then select one of the following:
Graph > Boundary Intensity
Graph > Total Intensity
Graph > Average Intensity
Graph > Total Intensity with Threshold
Graph > Average Intensity with Threshold
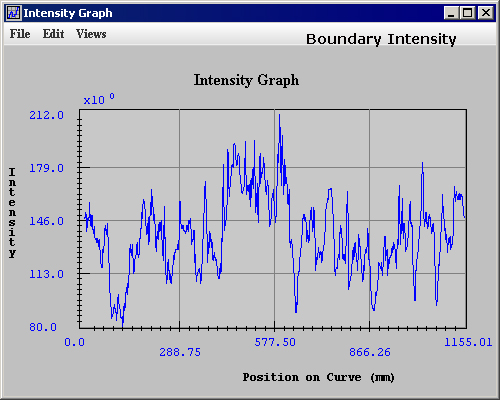
The chosen Intensity Graph window appears. Each function on the graph represents the intensity levels within each channel. Refer to [MIPAV_QuickStart.html#2896827 Figure 39].
3 Close the graph by either selecting File > Close graph or pressing ctrl x.
.
Figure 39. The Intensity graphs
|
{| align="center"
|
|
|
{| align="center"
|
|}
Boundary Intensity
|
{| align="center"
|
|}
Total Intensity
|-
|
{| align="center"
|
|}
Average Intensity
|
{| align="center"
|
|}
Total Intensity with Threshold
|
{| align="center"
|
|}
Average Intensity with Threshold
|}
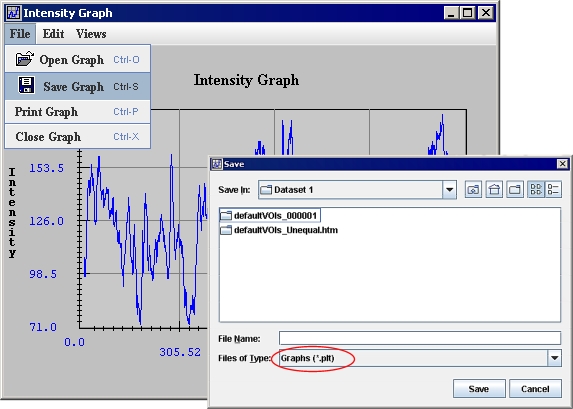
Saving graphs to a file
To save a graph
1 Select File > Save graph in the Intensity Graph window or press Ctrl S.
The Save dialog box appears. See [MIPAV_QuickStart.html#2679981 Figure 40].
2 Type a name for the graph in File name.
3 Make sure that Graphs (.plt) appears in Files of type. Refer to [MIPAV_QuickStart.html#2679981 Figure 40].
4 Click Save. MIPAV saves the file under a specified name.
Printing graphs
To print graphs
1 Select File > Print graph in the Intensity Graph window. The Print dialog box appears.
2 In the dialog box, select the printer and adjust the print options if necessary.
3 Click OK to print the graph or image on your default printer.
Figure 40. Saving and printing intensity graphs
|
{| align="center"
|
|
|}
Saving and printing images
This section explains how to save images to the same format (as when opened) or in a different format. It also shows how to print images. In addition, it explains how to save an image as a TIFF file.
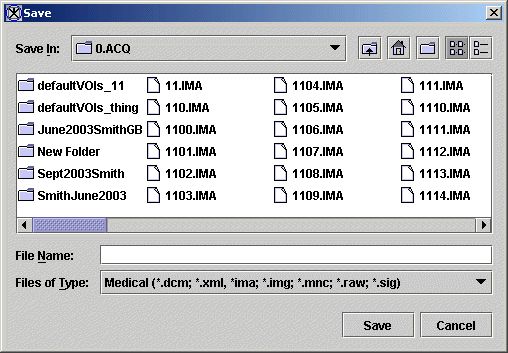
Saving images to the same format
To save an image file in the same format (as when opened)
1 Do one of the following in the MIPAV window:
Click the Save Image icon or use the Ctrl S combination of keys.
Select File > Save Image.
The Save dialog box appears ([MIPAV_QuickStart.html#1045607 Figure 41]).
2 In the dialog box, type the name of the file in File name and click Save.
Figure 41. Save dialog box
|
{| align="center"
|
|
|}
Note: If you prefer for MIPAV to use the style of Open and Save dialog boxes that are used by the operating system (e.g., Microsoft Windows, Unix, or Apple) on your computer, read the section on [MIPAV_QuickStart.html#1013570 "Using platform-specific Open and Save dialog boxes" on page 74].
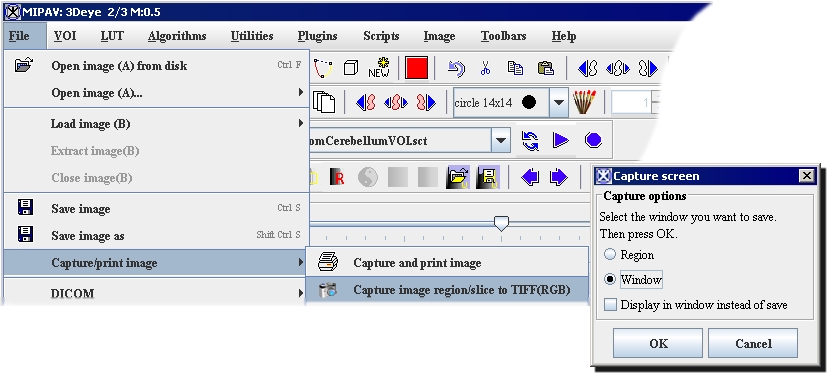
Capturing images as TIFF(RGB) files
MIPAV allows you to capture entire images or portions of images as RGB TIFF files.
1 Select File > Capture image to TIFF(RGB) in the MIPAV window. The Capture Screen dialog box opens. See [MIPAV_QuickStart.html#2681571 Figure 42].
2 To capture only a portion of the image:
Select Region, then draw a rectangle with the mouse around the region in the image you want to save. Click OK. The Save dialog box opens. Type the name of the file in File Name, and select the TIFF type of file. Click Save. The region is saved under the specified file name.
3 To capture the entire image:
Select Window, then click OK. The Save dialog box opens. Follow the instructions provided by the dialog box to save the image in TIFF format.
Figure 42. Capturing images or image regions
|
{| align="center"
|
|
|}
To display the region in a separate window rather than save it, select Display in Window Instead of Save. The selected region appears in a separate window.
To display the image in a separate window rather than save it, select Display in Window Instead of Save. The entire image appears in a separate window.
Saving images as
MIPAV uses the file extension to save image into various formats. Thus, saving an image with the extension of TIFF causes the image to be saved as a TIFF image. Saving an image with the extension of IMG causes the image to be saved as an Analyze image. See [MIPAV_AppCSupportedFormats.html#1330116 Table 1] for file extensions supported by MIPAV.
To save images as RGB TIFF files
1 Select File > Save as in the MIPAV window.
The Save Image as dialog box appears.
2 Type the name of the image in File name. Make sure you add .tiff as the extension.
3 Click Save. MIPAV saves the file as a TIFF file under the name you specified.
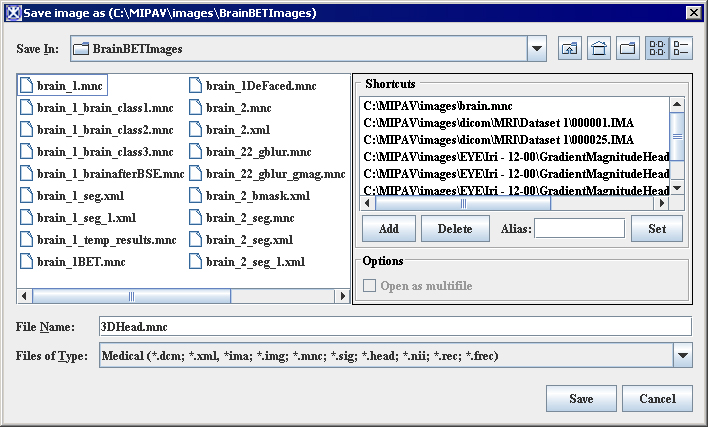
To save images to MINC format
1 Select File > Save As.The Save Image as dialog box appears. See [MIPAV_QuickStart.html#1045607 Figure 41].
2 Type the name of the file in File name. Make sure you add .mnc as the extension.
3 The Attributes to Save dialog box appears. See [MIPAV_QuickStart.html#1994056 Figure 44].
4 Complete the text boxes with the appropriate information. Note that the x, y, and z values differ from DICOM.
5 Click Save. MIPAV saves the image to MINC format.
|
Image orientation
|
Specify the image orientation here if need. Note that, often the proper value is already entered in the dialog box. Then use the appropriate list boxes to specify the X, Y and Z axis orientation. L/R Start - TBD L/R Space - TBD P/A Start - TBD P/A Space - TBD I/S Start - TBD I/S Space - TBD
|
{| align="center"
|

|
Â
|-
|
OK
| rowspan="1" colspan="2" |
Saves the selected image based on your choices in this dialog box.
|-
|
Cancel
| rowspan="1" colspan="2" |
Disregards changes you made in this dialog box and closes the dialog box.
|-
| rowspan="1" colspan="3" |
Figure 43. MINC Attributes to Save dialog box
|}
Figure 44. The MINC Attributes to Save dialog box and comparison of MINC and DICOM image orientation
|
{| align="center"
|

|
|}
Saving images to XML format
To record a history of actions that were performed on images, you should save the images to XML format. When you save images to XML format, MIPAV creates two files for each image: a RAW file, which contains image data, and an XML file. The XML file includes image attributes, such as action history. You can view the attributes of an image by selecting Image > Attributes > Edit Attributes or by viewing the .xml file using a text editor or an internet browser. For more information on recording a history of actions, refer to [MIPAV_QuickStart.html#1014435 "Saving a history of actions on images (TBD)" on page 76].
To save images to XML format
1 Select File > Save as.
The Save Image as dialog box opens.
2 Accept the name currently in File name or type a new name. Make sure you add .xml as the extension.
3 Click Save.
MIPAV saves the file under the name and extension you specified and begins, from this point on, recording a history of actions performed on the image.
Saving images to another format or renaming images
To save images to format different from the original file
1 Select File > Save as.The Save Image as dialog box appears ([MIPAV_QuickStart.html#2683829 Figure 45]).
2 Type the new name in File name. To save the file in a different format, change the file extension. A list of extensions appears in [MIPAV_AppCSupportedFormats.html#1330116 Table 1 on page 563].
3 Click Save. MIPAV saves the file under the name and extension you specified.
To rename images
1 Select File > Save as. The Save Image as dialog appears ([MIPAV_QuickStart.html#2683829 Figure 45]).
2 Type the new name in File name. Either keep the extension already specified or change it to another file type. A list of extensions appears in [MIPAV_AppCSupportedFormats.html#1330116 Table 1 on page 563].
3 Click Save. MIPAV saves the file under the name and extension you specified.
Figure 45. Save Image as dialog box
|
{| align="center"
|
|
|}
Printing Images
MIPAV offers the following printing command File > Capture and Print Image. This command calls the Print dialog box. Using this dialog you can set up a printer (to do it press the Properties button) or a file for printing (using the Print to File option), select the print copies and print range (all pages, current page, or selected pages).
To print an image with its current options:
Choose File > Capture and Print Image, and click OK.
To set printer and page setup options:
1 Choose File > Capture and Print Image.
2 Select an installed printer from the pop-up list at the top of the dialog box.
3 Set additional options, such as paper size and layout, as desired. The available options depend on your printer, print drivers, and operating system.
Customizing MIPAV
You can set the following MIPAV configuration options:
[MIPAV_QuickStart.html#2095084 "Showing or hiding the splash screen on start-up" on page 68]
[MIPAV_QuickStart.html#1013570 "Using platform-specific Open and Save dialog boxes" on page 74]
[MIPAV_QuickStart.html#1014151 "Debugging MIPAV" on page 76]
[MIPAV_QuickStart.html#1014435 "Saving a history of actions on images (TBD)" on page 76]
[MIPAV_QuickStart.html#2183666 "Choosing the default file types to display or save" on page 79]
[MIPAV_QuickStart.html#2396737 "Adding shortcuts" on page 82]
[MIPAV_QuickStart.html#2398581 "Developing and using plug-in programs" on page 84]
Showing or hiding the splash screen on start-up
The splash screen is the window that first appears briefly when you start MIPAV. It appears immediately before the MIPAV window and the Output window open. The splash screen displays the name of the program and the MIPAV logo.
By default, MIPAV always displays the splash screen on start-up unless you decide to hide it. To do so, you need to change the option in the MIPAV Options dialog box.
To hide the splash screen or prevent it from appearing on start-up
1 Select Help > Program Options. The MIPAV Options dialog box ([MIPAV_QuickStart.html#2176265 Figure 47]) opens.
2 Clear the Display Splash Screen box.
3 Click Close.
After you quit MIPAV and then start it again, the splash screen doesn't appear.
To show the splash screen


