|
|
| (One intermediate revision by the same user not shown) |
| Line 1: |
Line 1: |
| − | === Recording scripts ===
| + | '''To record a script using the Scripts toolbar:'''<br /> |
| | + | 1 Start MIPAV. The initial MIPAV window and the Output window open.<br /> |
| | + | 2 Open the images on which you want to run the script. The MIPAV window expands.<br /> |
| | + | 3 Click the Start Recording Script icon on the scripting toolbar. See Figure 7.<br /> |
| | | | |
| − | <div style="font-style: normal; margin-bottom: 6pt; margin-left: 0pt; margin-right: 0pt; margin-top: 14pt; text-align: left; text-decoration: none; text-indent: 0pt; text-transform: none; vertical-align: baseline">'''<font color="#000000"> To record a script using the Scripts toolbar:<br /></font>'''</div><div style="font-style: normal; font-weight: normal; margin-bottom: 0pt; margin-left: 18pt; margin-right: 0pt; margin-top: 6pt; text-align: left; text-decoration: none; text-indent: -18pt; text-transform: none; vertical-align: baseline"><font color="#000000"> 1 Start MIPAV. The initial MIPAV window and the Output window open.<br /></font></div><div style="font-style: normal; font-weight: normal; margin-bottom: 0pt; margin-left: 18pt; margin-right: 0pt; margin-top: 6pt; text-align: left; text-decoration: none; text-indent: -18pt; text-transform: none; vertical-align: baseline"><font color="#000000"> 2 Open the images on which you want to run the script. The MIPAV window expands.<br /></font></div><div style="font-style: normal; font-weight: normal; margin-bottom: 0pt; margin-left: 18pt; margin-right: 0pt; margin-top: 6pt; text-align: left; text-decoration: none; text-indent: -18pt; text-transform: none; vertical-align: baseline"><font color="#000000"> 3 Click the Start Recording Script icon on the scripting toolbar. See Figure 7.<br /></font></div><div style="font-style: normal; font-weight: normal; margin-bottom: 0pt; margin-left: 0pt; margin-right: 0pt; margin-top: 0pt; text-align: left; text-decoration: none; text-indent: 0pt; text-transform: none; vertical-align: baseline"><font color="#000000">
| |
| | | | |
| | {| border="1" cellpadding="5" | | {| border="1" cellpadding="5" |
| − | |+ <div style="font-style: normal; margin-bottom: 3pt; margin-left: 0pt; margin-right: 0pt; margin-top: 9pt; text-align: left; text-decoration: none; text-indent: 0pt; text-transform: none; vertical-align: baseline">'''<font color="#000000"> Figure 7. Click the Start Recording Script icon to record a script <br /></font>'''</div> | + | |+ '''Figure 7. Click the Start Recording Script icon to record a script''' |
| | |- | | |- |
| | | | | | |
| Line 10: |
Line 12: |
| | |} | | |} |
| | | | |
| − | <br /></font></div><div style="font-style: normal; font-weight: normal; margin-bottom: 5pt; margin-left: 0pt; margin-right: 0pt; margin-top: 5pt; text-align: left; text-decoration: none; text-indent: 0pt; text-transform: none; vertical-align: baseline"><font color="#000000"> <span style="font-style: normal; text-decoration: none; text-transform: none; vertical-align: baseline">'''<font color="#000000">Note:</font>'''</span> The Start Recording Script icon turns red to indicate that MIPAV is now recording a script.<br /></font></div><div style="font-style: normal; font-weight: normal; margin-bottom: 0pt; margin-left: 0pt; margin-right: 0pt; margin-top: 0pt; text-align: left; text-decoration: none; text-indent: 0pt; text-transform: none; vertical-align: baseline"><font color="#000000"> <br /></font></div><div style="font-style: normal; font-weight: normal; margin-bottom: 0pt; margin-left: 18pt; margin-right: 0pt; margin-top: 6pt; text-align: left; text-decoration: none; text-indent: -18pt; text-transform: none; vertical-align: baseline"><font color="#000000"> 4 The Record New Script dialog box (Figure 9) opens. The following placard message appears at the top of the dialog box: <span style="font-weight: normal; text-decoration: none; text-transform: none; vertical-align: baseline">''<font color="#000000">The script is now recording. Your actions will appear below</font>''</span>.<br /></font></div><div style="font-style: normal; font-weight: normal; margin-bottom: 0pt; margin-left: 18pt; margin-right: 0pt; margin-top: 6pt; text-align: left; text-decoration: none; text-indent: -18pt; text-transform: none; vertical-align: baseline"><font color="#000000"> 5 Open any previously created VOIs that you want to use with the images. Perform any algorithm or utility.<br /></font></div><div style="font-style: normal; font-weight: normal; margin-bottom: 0pt; margin-left: 18pt; margin-right: 0pt; margin-top: 6pt; text-align: left; text-decoration: none; text-indent: -18pt; text-transform: none; vertical-align: baseline"><font color="#000000"> 6 Repeat steps above as needed.<br /></font></div><div style="font-style: normal; font-weight: normal; margin-bottom: 0pt; margin-left: 18pt; margin-right: 0pt; margin-top: 6pt; text-align: left; text-decoration: none; text-indent: -18pt; text-transform: none; vertical-align: baseline"><font color="#000000"> 7 In the Record New Script dialog box, select File > Save. The Save dialog box opens. Type a name for the script and either the <span style="font-weight: normal; text-decoration: none; text-transform: none; vertical-align: baseline">''<font color="#000000">.sct</font>''</span> or <span style="font-weight: normal; text-decoration: none; text-transform: none; vertical-align: baseline">''<font color="#000000">.xml</font>''</span> extension in File name.<br /></font></div><div style="font-style: normal; font-weight: normal; margin-bottom: 0pt; margin-left: 18pt; margin-right: 0pt; margin-top: 6pt; text-align: left; text-decoration: none; text-indent: -18pt; text-transform: none; vertical-align: baseline"><font color="#000000"> 8 Click Save. The program saves the script in the scripts home directory.<br /></font></div><div style="font-style: normal; font-weight: normal; margin-bottom: 0pt; margin-left: 18pt; margin-right: 0pt; margin-top: 6pt; text-align: left; text-decoration: none; text-indent: -18pt; text-transform: none; vertical-align: baseline"><font color="#000000"> 9 Click File > Exit to close the Record New Script dialog box. The dialog box closes. You should now be able to select and run the script from Current Script. <br /></font></div><div style="font-style: normal; font-weight: normal; margin-bottom: 0pt; margin-left: 0pt; margin-right: 0pt; margin-top: 0pt; text-align: left; text-decoration: none; text-indent: 0pt; text-transform: none; vertical-align: baseline"><font color="#000000">
| + | '''Note:''' The Start Recording Script icon turns red to indicate that MIPAV is now recording a script.<br /> |
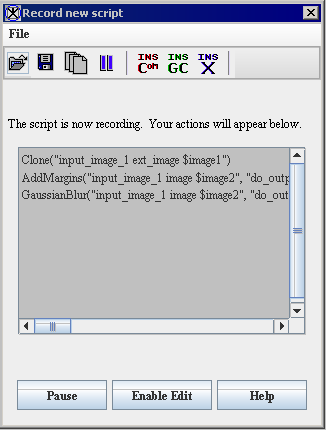
| | + | 4 The Record New Script dialog box (Figure 9) opens. The following placard message appears at the top of the dialog box: ''The script is now recording. Your actions will appear below''.<br /> |
| | + | 5 Open any previously created VOIs that you want to use with the images. Perform any algorithm or utility.<br /> |
| | + | 6 Repeat steps above as needed.<br /> |
| | + | 7 In the Record New Script dialog box, select File > Save. The Save dialog box opens. Type a name for the script and either the ''.sct'' or ''.xml'' extension in File name.<br /> |
| | + | 8 Click Save. The program saves the script in the scripts home directory.<br /> |
| | + | 9 Click File > Exit to close the Record New Script dialog box. The dialog box closes. You should now be able to select and run the script from Current Script. <br /> |
| | + | |
| | | | |
| | {| border="1" cellpadding="5" | | {| border="1" cellpadding="5" |
| − | |+ <div style="font-style: normal; margin-bottom: 3pt; margin-left: 0pt; margin-right: 0pt; margin-top: 9pt; text-align: left; text-decoration: none; text-indent: 0pt; text-transform: none; vertical-align: baseline">'''<font color="#000000"> Figure 9. Record New Script dialog box <br /></font>'''</div> | + | |+ '''Figure 9. Record New Script dialog box''' |
| | |- | | |- |
| | | rowspan="3" colspan="1" | | | | rowspan="3" colspan="1" | |
| Line 91: |
Line 100: |
| | |} | | |} |
| | | | |
| − | <br /></font></div><div style="font-style: normal; margin-bottom: 6pt; margin-left: 0pt; margin-right: 0pt; margin-top: 14pt; text-align: left; text-decoration: none; text-indent: 0pt; text-transform: none; vertical-align: baseline">'''<font color="#000000"> Recording a script using the Scripts > Record Script menu<br /></font>'''</div><div style="font-style: normal; font-weight: normal; margin-bottom: 0pt; margin-left: 18pt; margin-right: 0pt; margin-top: 6pt; text-align: left; text-decoration: none; text-indent: -18pt; text-transform: none; vertical-align: baseline"><font color="#000000"> 1 Start MIPAV. <br /></font></div><div style="font-style: normal; font-weight: normal; margin-bottom: 0pt; margin-left: 18pt; margin-right: 0pt; margin-top: 6pt; text-align: left; text-decoration: none; text-indent: -18pt; text-transform: none; vertical-align: baseline"><font color="#000000"> 2 Select Scripts > Record Script. The Record New Script dialog box opens. The following appears at the top of the dialog box: <span style="font-weight: normal; text-decoration: none; text-transform: none; vertical-align: baseline">''<font color="#000000">The script is now recording. Your actions will appear below</font>''</span>.<br /></font></div><div style="font-style: normal; font-weight: normal; margin-bottom: 0pt; margin-left: 0pt; margin-right: 0pt; margin-top: 0pt; text-align: left; text-decoration: none; text-indent: 0pt; text-transform: none; vertical-align: baseline"><font color="#000000">
| + | '''Recording a script using the Scripts > Record Script menu'''<br /> |
| | + | 1 Start MIPAV. <br /> |
| | + | 2 Select Scripts > Record Script. The Record New Script dialog box opens. The following appears at the top of the dialog box: ''The script is now recording. Your actions will appear below''.<br /> |
| | | | |
| | {| border="1" cellpadding="5" | | {| border="1" cellpadding="5" |
| − | |+ <div style="font-style: normal; margin-bottom: 3pt; margin-left: 0pt; margin-right: 0pt; margin-top: 9pt; text-align: left; text-decoration: none; text-indent: 0pt; text-transform: none; vertical-align: baseline">'''<font color="#000000"> Figure 10. Recording a script via Scripts > Record Script menu<br /></font>'''</div> | + | |+ '''Figure 10. Recording a script via Scripts > Record Script menu''' |
| | |- | | |- |
| | | | | | |
| Line 100: |
Line 111: |
| | |} | | |} |
| | | | |
| − | <br /></font></div><div style="font-style: normal; font-weight: normal; margin-bottom: 0pt; margin-left: 18pt; margin-right: 0pt; margin-top: 6pt; text-align: left; text-decoration: none; text-indent: -18pt; text-transform: none; vertical-align: baseline"><font color="#000000"> 3 Open an image on which you want to run the script. The MIPAV window expands. <br /></font></div><div style="font-style: normal; font-weight: normal; margin-bottom: 0pt; margin-left: 0pt; margin-right: 0pt; margin-top: 0pt; text-align: left; text-decoration: none; text-indent: 0pt; text-transform: none; vertical-align: baseline"><font color="#000000"> <br /></font></div><div style="font-style: normal; font-weight: normal; margin-bottom: 0pt; margin-left: 18pt; margin-right: 0pt; margin-top: 6pt; text-align: left; text-decoration: none; text-indent: -18pt; text-transform: none; vertical-align: baseline"><font color="#000000"> 4 Perform any algorithms or utilities that you want recorded in the script, as if you run recording from the Scripting toolbar.<br /></font></div><div style="font-style: normal; margin-bottom: 6pt; margin-left: 0pt; margin-right: 0pt; margin-top: 14pt; text-align: left; text-decoration: none; text-indent: 0pt; text-transform: none; vertical-align: baseline">'''<font color="#000000"> For example, <br /></font>'''</div>
| + | 3 Open an image on which you want to run the script. The MIPAV window expands. <br /> |
| − | | + | 4 Perform any algorithms or utilities that you want recorded in the script, as if you run recording from the Scripting toolbar.<br /> |
| | + | '''For example,''' <br /> |
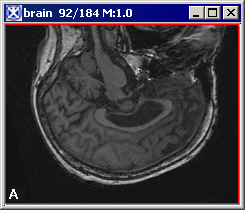
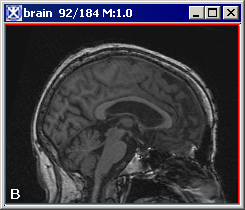
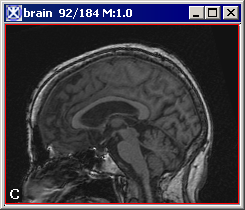
| | flip the image twice applying step by step the Flip Vertically and then Flip Horizontally option. See Figure 11. | | flip the image twice applying step by step the Flip Vertically and then Flip Horizontally option. See Figure 11. |
| − | | + | 5 The following appears in the Record New Script window:<br /> <div class="CellBody">Flip("input_image_1 ext_image $image1", "flip_axis string X")</div> <div class="CellBody">Flip("input_image_1 image $image1", "flip_axis string Y")</div> |
| − | <div style="font-style: normal; font-weight: normal; margin-bottom: 0pt; margin-left: 18pt; margin-right: 0pt; margin-top: 6pt; text-align: left; text-decoration: none; text-indent: -18pt; text-transform: none; vertical-align: baseline"><font color="#000000"> 5 The following appears in the Record New Script window:<br /></font></div> <div class="CellBody">Flip("input_image_1 ext_image $image1", "flip_axis string X")</div> <div class="CellBody">Flip("input_image_1 image $image1", "flip_axis string Y")</div><div style="font-style: normal; font-weight: normal; margin-bottom: 0pt; margin-left: 18pt; margin-right: 0pt; margin-top: 6pt; text-align: left; text-decoration: none; text-indent: -18pt; text-transform: none; vertical-align: baseline"><font color="#000000"> 6 Then, save the image in MINC format using the Save As option and specifying an <span style="font-style: normal; font-weight: normal; text-decoration: none; text-transform: none; vertical-align: baseline"><font color="#000000"><nowiki>*.mnc</nowiki></font></span> extension in the dialog box. [ <sup>3</sup>] The following string appears in the Record New Script window:<br /></font></div> <div class="CellBody"> SaveImageAs("input_image_1 ext_image $image1", "file_type string .mnc")</div><div style="font-style: normal; font-weight: normal; margin-bottom: 0pt; margin-left: 0pt; margin-right: 0pt; margin-top: 0pt; text-align: left; text-decoration: none; text-indent: 0pt; text-transform: none; vertical-align: baseline"><font color="#000000">
| + | 6 Then, save the image in MINC format using the Save As option and specifying an <span style="font-style: normal; font-weight: normal; text-decoration: none; text-transform: none; vertical-align: baseline"><font color="#000000"><nowiki>*.mnc</nowiki></font></span> extension in the dialog box. [ <sup>3</sup>] The following string appears in the Record New Script window:<br /> <div class="CellBody"> SaveImageAs("input_image_1 ext_image $image1", "file_type string .mnc")</div><div style="font-style: normal; font-weight: normal; margin-bottom: 0pt; margin-left: 0pt; margin-right: 0pt; margin-top: 0pt; text-align: left; text-decoration: none; text-indent: 0pt; text-transform: none; vertical-align: baseline"><font color="#000000"> |
| | | | |
| | {| border="1" cellpadding="5" | | {| border="1" cellpadding="5" |
| − | |+ <div style="font-style: normal; margin-bottom: 3pt; margin-left: 0pt; margin-right: 0pt; margin-top: 9pt; text-align: left; text-decoration: none; text-indent: 0pt; text-transform: none; vertical-align: baseline">'''<font color="#000000"> Figure 11. At the top: the flipping options available via the Image Toolbar. Below: the original image (A), the same image flipped vertically (B) and then horizontally (C)<br /></font>'''</div> | + | |+ '''Figure 11. At the top: the flipping options available via the Image Toolbar. Below: the original image (A), the same image flipped vertically (B) and then horizontally (C)''' |
| | |- | | |- |
| | | rowspan="1" colspan="3" | | | | rowspan="1" colspan="3" | |
| Line 120: |
Line 132: |
| | |} | | |} |
| | | | |
| − | <br /></font></div><div style="font-style: normal; font-weight: normal; margin-bottom: 0pt; margin-left: 0pt; margin-right: 0pt; margin-top: 0pt; text-align: left; text-decoration: none; text-indent: 0pt; text-transform: none; vertical-align: baseline"><font color="#000000"> <br /></font></div><div style="font-style: normal; font-weight: normal; margin-bottom: 0pt; margin-left: 18pt; margin-right: 0pt; margin-top: 6pt; text-align: left; text-decoration: none; text-indent: -18pt; text-transform: none; vertical-align: baseline"><font color="#000000"> 7 In the Record New Script dialog box, select File > Save. The Save dialog box opens.<br /></font></div><div style="font-style: normal; font-weight: normal; margin-bottom: 0pt; margin-left: 18pt; margin-right: 0pt; margin-top: 6pt; text-align: left; text-decoration: none; text-indent: -18pt; text-transform: none; vertical-align: baseline"><font color="#000000"> 8 Enter a name for the script, for example, <span style="font-weight: normal; text-decoration: none; text-transform: none; vertical-align: baseline">''<font color="#000000">FlippingImagesTwice.sct</font>''</span>, and then press Save. By default, the script will be saved in the Scripts Home directory. See "Scripts Home" for details.<br /></font></div><div style="font-style: normal; font-weight: normal; margin-bottom: 0pt; margin-left: 18pt; margin-right: 0pt; margin-top: 6pt; text-align: left; text-decoration: none; text-indent: -18pt; text-transform: none; vertical-align: baseline"><font color="#000000"> 9 Click File > Exit to close the Record New Script dialog box. The dialog box closes. <br /></font></div><div style="font-style: normal; font-weight: normal; margin-bottom: 0pt; margin-left: 18pt; margin-right: 0pt; margin-top: 6pt; text-align: left; text-decoration: none; text-indent: -18pt; text-transform: none; vertical-align: baseline"><font color="#000000"> 10 Use the Refresh button on the Scripts toolbar to refresh the Scripts Home directory. <br /></font></div><div style="font-style: normal; font-weight: normal; margin-bottom: 0pt; margin-left: 18pt; margin-right: 0pt; margin-top: 6pt; text-align: left; text-decoration: none; text-indent: -18pt; text-transform: none; vertical-align: baseline"><font color="#000000"> 11 You should now be able to select and run the script from the Current Script box. See Figure 11.<br /></font></div>
| + | 7 In the Record New Script dialog box, select File > Save. The Save dialog box opens.<br /> |
| | + | 8 Enter a name for the script, for example, <span style="font-weight: normal; text-decoration: none; text-transform: none; vertical-align: baseline">''<font color="#000000">FlippingImagesTwice.sct</font>''</span>, and then press Save. By default, the script will be saved in the Scripts Home directory. See "Scripts Home" for details.<br /> |
| | + | 9 Click File > Exit to close the Record New Script dialog box. The dialog box closes. <br /> |
| | + | 10 Use the Refresh button on the Scripts toolbar to refresh the Scripts Home directory. <br /> |
| | + | 11 You should now be able to select and run the script from the Current Script box. See Figure 11.<br /> |
| | | | |
| | ==== To pause recording a script ==== | | ==== To pause recording a script ==== |
| − |
| |
| − | <div style="font-style: normal; font-weight: normal; margin-bottom: 0pt; margin-left: 0pt; margin-right: 0pt; margin-top: 0pt; text-align: left; text-decoration: none; text-indent: 0pt; text-transform: none; vertical-align: baseline"><font color="#000000">
| |
| − |
| |
| | {| border="1" cellpadding="5" | | {| border="1" cellpadding="5" |
| | |+ | | |+ |
| Line 140: |
Line 153: |
| | |} | | |} |
| | | | |
| − | <br /></font></div><div style="font-style: normal; font-weight: normal; margin-bottom: 6pt; margin-left: 0pt; margin-right: 0pt; margin-top: 0pt; text-align: left; text-decoration: none; text-indent: 0pt; text-transform: none; vertical-align: baseline"><font color="#000000"> If you are interrupted or need to take a break while you are recording a script, use the Pause icon located on the Scripting toolbar. This allows you to stop recording the script. When you click Pause, the following message appears at the top of the Record New Script dialog box: <span style="font-weight: normal; text-decoration: none; text-transform: none; vertical-align: baseline">''<font color="#000000">The script is now paused. Press Resume to resume recording</font>''</span><nowiki>; and the Pause icon changes to Resume Recording. When you return to recording the script, click Resume Recording to resume.</nowiki><br /></font></div>
| + | If you are interrupted or need to take a break while you are recording a script, use the Pause icon located on the Scripting toolbar. This allows you to stop recording the script. When you click Pause, the following message appears at the top of the Record New Script dialog box: <span style="font-weight: normal; text-decoration: none; text-transform: none; vertical-align: baseline">''<font color="#000000">The script is now paused. Press Resume to resume recording</font>''</span><nowiki>; and the Pause icon changes to Resume Recording. When you return to recording the script, click Resume Recording to resume.</nowiki><br /> |
| | | | |
| | | | |
| | [[Running scripts]] | | [[Running scripts]] |
Figure 9. Record New Script dialog box
|
File
|
Open-Opens a previously saved script. When you select this command, the Open dialog box appears.
|

|
|
Save-Saves the script under the specified name. When you select this command, the Save dialog box opens.
|
|
Exit-Closes this dialog box without saving the script.
|
|
Open script
|
Open-Opens a previously saved script. When you select this command, the Open dialog box appears.
|

Save script |
Save-Saves the script under the specified name. When you select this command, the Save dialog box opens.
|
|
Pause scripting
|
Stops recording the script. When you select this icon, the icon changes to the Resume scripting icon.
|
 Resume scripting Resume scripting |
Activates the recording process again. When you select this icon, the icon changes to the Pause scripting icon.
|
 Insert comment Insert comment |
Allows you to insert a comment into the script. When you select this icon, the Input dialog box opens. Type the comment in Enter comment and click OK. MIPAV adds your comment into the script after the word Comment.
File:MIPAV Scripting18.gif
Figure 8. Input dialog box (A) showing a comment and (B) the comment as it appears in the scripting box
|
 Insert command to collect garbage (free memory) Insert command to collect garbage (free memory) |
Frees memory by inserting the command to collect garbage, a Java method that clears all unnecessarily reserved memory. For more information, refer to "Saving a history of actions on images (TBD)" .
|
 Insert command to end MIPAV Insert command to end MIPAV |
Inserts the command for exiting MIPAV (Exit) into the script, which allows MIPAV to close as a part of the script. Caution: Do not use the Exit command in MIPAV scripts unless you are calling the script from another program or scripts (Perl, C , Windows batch, etc.).
|
|
Scripting box
|
Displays the action commands (algorithms and utilities) and any comments in the script.
|
|
Pause
|
Stops recording the script. When you select this button, the name of the button changes to Resume.
|
|
Enable Edit
|
Paused the script recording first, then it allows you to make changes or corrections to the script. When you select this button, the scripting box turns from gray to white to indicate that 1) the script is paused and 2) that you can now type, copy, paste, or delete information from the script, and the button name changes to Disable Edit.
|
|
Disable Edit
|
Prevents any changes or corrections being made to the script from typing, pasting, inserting, or deleting information. It does, however, allow MIPAV to record actions on images. When you select this button, the scripting box turns from white to gray, and the button name changes to Enable Edit. It also restarts the script recording.
|
|
Help
|
Displays online help for this dialog box.
|
3 Open an image on which you want to run the script. The MIPAV window expands.
4 Perform any algorithms or utilities that you want recorded in the script, as if you run recording from the Scripting toolbar.
For example,
flip the image twice applying step by step the Flip Vertically and then Flip Horizontally option. See Figure 11.
6 Then, save the image in MINC format using the Save As option and specifying an
extension in the dialog box. [


