Difference between revisions of "Receiving and sending image files"

From MIPAV
Jump to: navigation, search
(Receiving and sending image files)
m
 
(2 intermediate revisions by one other user not shown)
Line 2: Line 2:
  
 
{| border="1" cellpadding="5"
 
{| border="1" cellpadding="5"
|+ <div style="font-style: normal; margin-bottom: 3pt; margin-left: 0pt; margin-right: 0pt; margin-top: 9pt; text-align: left; text-decoration: none; text-indent: 0pt; text-transform: none; vertical-align: baseline">'''<font color="#000000"> Figure 16. The Enable DICOM Receiver command is located on the File menu in the MIPAV window <br /></font>'''</div>
+
|+ '''Figure 16. The Enable DICOM Receiver command is located on the File menu in the MIPAV window <br />'''
 
|-
 
|-
 
|
 
|
Line 9: Line 9:
 
|}
 
|}
  
<br /></font></div><div style="font-style: normal; font-weight: normal; margin-bottom: 0pt; margin-left: 18pt; margin-right: 0pt; margin-top: 6pt; text-align: left; text-decoration: none; text-indent: -18pt; text-transform: none; vertical-align: baseline"><font color="#000000">  2 Click Hosts. The Hosts page appears.<br /></font></div><div style="font-style: normal; font-weight: normal; margin-bottom: 0pt; margin-left: 18pt; margin-right: 0pt; margin-top: 6pt; text-align: left; text-decoration: none; text-indent: -18pt; text-transform: none; vertical-align: baseline"><font color="#000000">  3 Make sure that the device that is sending the images has an entry in the Servers panel. (Conversely, your connection information should be in their hosts table.)<br /></font></div><div style="font-style: normal; font-weight: normal; margin-bottom: 0pt; margin-left: 18pt; margin-right: 0pt; margin-top: 6pt; text-align: left; text-decoration: none; text-indent: -18pt; text-transform: none; vertical-align: baseline"><font color="#000000">  4 Make sure that the default storage destination in the Storage Destination panel is the location where you want to store the images.<br /></font></div><div style="font-style: normal; font-weight: normal; margin-bottom: 0pt; margin-left: 18pt; margin-right: 0pt; margin-top: 6pt; text-align: left; text-decoration: none; text-indent: -18pt; text-transform: none; vertical-align: baseline"><font color="#000000">  5 Wait until the images are sent to you. After the images are sent, you can turn off the DICOM receiver by unchecking the File &gt; DICOM &gt;Enable DICOM Receiver option.<br /></font></div><div style="font-style: normal; margin-bottom: 6pt; margin-left: 0pt; margin-right: 0pt; margin-top: 14pt; text-align: left; text-decoration: none; text-indent: 0pt; text-transform: none; vertical-align: baseline">'''<font color="#000000"> To send image files<br /></font>'''</div><div style="font-style: normal; font-weight: normal; margin-bottom: 0pt; margin-left: 18pt; margin-right: 0pt; margin-top: 6pt; text-align: left; text-decoration: none; text-indent: -18pt; text-transform: none; vertical-align: baseline"><font color="#000000">  1 Click Send. The Send page (Figure 17) appears. <br /></font></div><div style="font-style: normal; font-weight: normal; margin-bottom: 0pt; margin-left: 18pt; margin-right: 0pt; margin-top: 6pt; text-align: left; text-decoration: none; text-indent: -18pt; text-transform: none; vertical-align: baseline"><font color="#000000">  2 Verify that the directory listed in Source directory is the directory in which the image files you want to send are located.<br /></font></div><div style="font-style: normal; font-weight: normal; margin-bottom: 0pt; margin-left: 18pt; margin-right: 0pt; margin-top: 6pt; text-align: left; text-decoration: none; text-indent: 0pt; text-transform: none; vertical-align: baseline"><font color="#000000"> <span style="font-style: normal; text-decoration: none; text-transform: none; vertical-align: baseline">'''<font color="#000000">If it is the correct directory</font>'''</span><span style="font-style: normal; font-weight: normal; text-decoration: none; text-transform: none; vertical-align: baseline"><font color="#000000">,</font></span> the image files that you want to send appear in the Listing panel.<br /></font></div><div style="font-style: normal; font-weight: normal; margin-bottom: 0pt; margin-left: 18pt; margin-right: 0pt; margin-top: 6pt; text-align: left; text-decoration: none; text-indent: 0pt; text-transform: none; vertical-align: baseline"><font color="#000000"> <span style="font-style: normal; text-decoration: none; text-transform: none; vertical-align: baseline">'''<font color="#000000">If it is not the correct directory</font>'''</span><span style="font-style: normal; font-weight: normal; text-decoration: none; text-transform: none; vertical-align: baseline"><font color="#000000">,</font></span> do either of the following:<br /></font></div><div style="font-style: normal; font-weight: normal; margin-bottom: 0pt; margin-left: 36pt; margin-right: 0pt; margin-top: 6pt; text-align: left; text-decoration: none; text-indent: -12pt; text-transform: none; vertical-align: baseline"><font color="#000000">  Click Browse to navigate to the correct directory. <br /></font></div><div style="font-style: normal; font-weight: normal; margin-bottom: 0pt; margin-left: 36pt; margin-right: 0pt; margin-top: 6pt; text-align: left; text-decoration: none; text-indent: -12pt; text-transform: none; vertical-align: baseline"><font color="#000000">  Type the full path of the directory in Source directory. Click Up Directory to view the parent directory.<br /></font></div><div style="font-style: normal; font-weight: normal; margin-bottom: 0pt; margin-left: 18pt; margin-right: 0pt; margin-top: 6pt; text-align: left; text-decoration: none; text-indent: -18pt; text-transform: none; vertical-align: baseline"><font color="#000000">  3 Select the destination to which you want to send the image files in Destination.<br /></font></div><div style="font-style: normal; font-weight: normal; margin-bottom: 0pt; margin-left: 18pt; margin-right: 0pt; margin-top: 6pt; text-align: left; text-decoration: none; text-indent: -18pt; text-transform: none; vertical-align: baseline"><font color="#000000">  4 Select the images you want to send in the Listing panel.<br /></font></div><div style="font-style: normal; font-weight: normal; margin-bottom: 0pt; margin-left: 18pt; margin-right: 0pt; margin-top: 6pt; text-align: left; text-decoration: none; text-indent: -18pt; text-transform: none; vertical-align: baseline"><font color="#000000">  5 Click Send Images to transmit copies of the selected images. Status messages that appraise you of the status of the send process appear in the Send status panel.<br /></font></div><div style="font-style: normal; font-weight: normal; margin-bottom: 5pt; margin-left: 0pt; margin-right: 0pt; margin-top: 5pt; text-align: left; text-decoration: none; text-indent: 0pt; text-transform: none; vertical-align: baseline"><font color="#000000"> <span style="font-style: normal; text-decoration: none; text-transform: none; vertical-align: baseline">'''<font color="#000000">Note:</font>'''</span> The destinations reflect the entries in the Server panel on the Hosts page. If the destination does not appear in Destination, you need to create a new server in the Server panel on the Hosts page. For instructions, refer to [MIPAV_DicomImages.html#1147719 page 96].<br /></font></div><div style="font-style: normal; font-weight: normal; margin-bottom: 0pt; margin-left: 0pt; margin-right: 0pt; margin-top: 5pt; text-align: left; text-decoration: none; text-indent: 0pt; text-transform: none; vertical-align: baseline"><font color="#000000"> <span style="font-style: normal; text-decoration: none; text-transform: none; vertical-align: baseline">'''<font color="#000000">Tip:</font>'''</span> To select more than one image file, hold down the &lt;CTRL&gt; or &lt;SHIFT&gt; key while you click the files you want to send.<br /></font></div>
+
<br />
 
+
2 Click Hosts. The Hosts page appears.<br />
<div style="font-style: normal; font-weight: normal; margin-bottom: 0pt; margin-left: 0pt; margin-right: 0pt; margin-top: 0pt; text-align: left; text-decoration: none; text-indent: 0pt; text-transform: none; vertical-align: baseline"><font color="#000000">
+
3 Make sure that the device that is sending the images has an entry in the Servers panel. (Conversely, your connection information should be in their hosts table.)<br />
 +
4 Make sure that the default storage destination in the Storage Destination panel is the location where you want to store the images.<br />
 +
5 Wait until the images are sent to you. After the images are sent, you can turn off the DICOM receiver by unchecking the File &gt; DICOM &gt;Enable DICOM Receiver option.<br />
 +
'''To send image files<br />'''
 +
1 Click Send. The Send page (Figure 17) appears. <br />
 +
2 Verify that the directory listed in Source directory is the directory in which the image files you want to send are located.<br />
 +
If it is the correct directory, the image files that you want to send appear in the Listing panel.<br />
 +
If it is not the correct directory, do either of the following:<br />
 +
*Click Browse to navigate to the correct directory. <br />
 +
*Type the full path of the directory in Source directory. Click Up Directory to view the parent directory.<br />
 +
3 Select the destination to which you want to send the image files in Destination.<br />
 +
4 Select the images you want to send in the Listing panel.<br />
 +
5 Click Send Images to transmit copies of the selected images. Status messages that appraise you of the status of the send process appear in the Send status panel.<br />
 +
'''Note:''' The destinations reflect the entries in the Server panel on the Hosts page. If the destination does not appear in Destination, you need to create a new server in the Server panel on the Hosts page. For instructions, refer to "DICOM Images".<br />
 +
To select more than one image file, hold down the &lt;CTRL&gt; or &lt;SHIFT&gt; key while you click the files you want to send.<br />
  
 
{| border="1" cellpadding="5"
 
{| border="1" cellpadding="5"
|+ <div style="font-style: normal; margin-bottom: 3pt; margin-left: 0pt; margin-right: 0pt; margin-top: 9pt; text-align: left; text-decoration: none; text-indent: 0pt; text-transform: none; vertical-align: baseline">'''<font color="#000000"> Figure 17. The Send tab of the DICOM Communications Panel dialog box <br /></font>'''</div>
+
|+ '''Figure 17. The Send tab of the DICOM Communications Panel dialog box '''  
 
|-
 
|-
 
| rowspan="1" colspan="2" |
 
| rowspan="1" colspan="2" |
Line 70: Line 84:
 
|}
 
|}
  
[[Displaying and editing DICOM tag information]]
+
'''Next:''' [[Displaying and editing DICOM tag information]]
 +
 
 +
[[Category:Help]]

Latest revision as of 13:10, 26 July 2012

When you receive image files, you do not pose a query or retrieve files from a list; you passively receive the images that are sent to you from another device. You can receive images from any device, including a computer running another copy of MIPAV, if your DICOM Receiver is turned on and the appropriate connection information was entered in the hosts table.
You can send DICOM images to DICOM-compatible servers, imaging equipment, or to other MIPAV applications that are up and running. Only a copy of the image files are sent, the original files remain in your source directory.
To receive image files
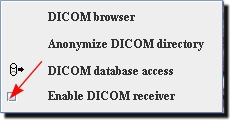
1 Turn on the DICOM receiver if you have not already done so. To turn on the receiver, click File > DICOM > Enable DICOM Receiver in the MIPAV window. A check mark appears next to the command.
Figure 16. The Enable DICOM Receiver command is located on the File menu in the MIPAV window

EnableDICOMREceiver.jpg


2 Click Hosts. The Hosts page appears.
3 Make sure that the device that is sending the images has an entry in the Servers panel. (Conversely, your connection information should be in their hosts table.)
4 Make sure that the default storage destination in the Storage Destination panel is the location where you want to store the images.
5 Wait until the images are sent to you. After the images are sent, you can turn off the DICOM receiver by unchecking the File > DICOM >Enable DICOM Receiver option.
To send image files
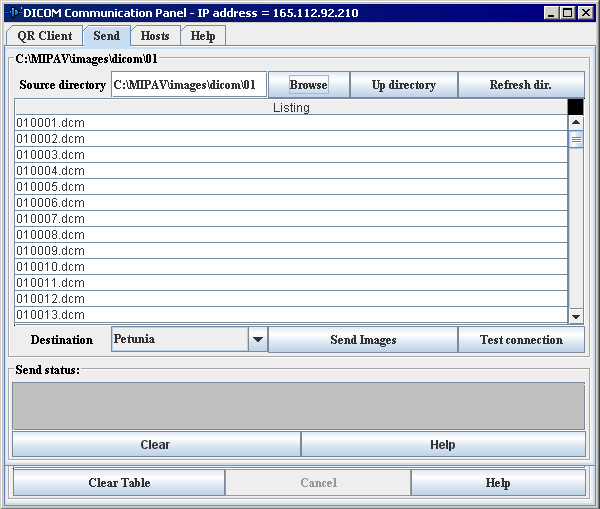
1 Click Send. The Send page (Figure 17) appears.
2 Verify that the directory listed in Source directory is the directory in which the image files you want to send are located.
If it is the correct directory, the image files that you want to send appear in the Listing panel.
If it is not the correct directory, do either of the following:

  • Click Browse to navigate to the correct directory.
  • Type the full path of the directory in Source directory. Click Up Directory to view the parent directory.

3 Select the destination to which you want to send the image files in Destination.
4 Select the images you want to send in the Listing panel.
5 Click Send Images to transmit copies of the selected images. Status messages that appraise you of the status of the send process appear in the Send status panel.
Note: The destinations reflect the entries in the Server panel on the Hosts page. If the destination does not appear in Destination, you need to create a new server in the Server panel on the Hosts page. For instructions, refer to "DICOM Images".
To select more than one image file, hold down the <CTRL> or <SHIFT> key while you click the files you want to send.

Figure 17. The Send tab of the DICOM Communications Panel dialog box

DICOM CommPanelSend.jpg

Source directory
Indicates the full path name for the directory where the image files you want to send are kept. To change the source directory, use Browse or Up directory.
Browse
Allows you to navigate to the directory for the images you want to send. When you click this button, the Open dialog box appears.
Up directory
Moves to the parent directory of the directory shown in Source Directory.
Refresh dir.
Updates the image files shown in the Listing panel.
Listing panel
Displays a read-only list of the image files in the source directory.
Destination
Indicates where the image files should be sent. Destinations in the drop down menu are the same as those listed in the hosts table (Server panel).
Send Images
Transmits copies of the selected image files to the destination indicated in Destination.
Test connection
Tests the connection between your server, or device, and the receiving or sending device.
Send status
Displays messages about the send process, such as whether it was completed successfully.
Clear
Erases all messages from the Send status panel.

Next: Displaying and editing DICOM tag information