|
|
| (4 intermediate revisions by one other user not shown) |
| Line 1: |
Line 1: |
| − | == Quantify Mask ==
| + | There are two algorithms Quantify Mask(s) and Quantify Using Mask that calculate Center of Mass, area (in resolutions), and number of pixels for a selected mask(s). The algorithms work with Boolean, byte, unsigned byte, and short masks.<br /> |
| − | | + | |
| − | <div style="font-style: normal; font-weight: normal; margin-bottom: 6pt; margin-left: 0pt; margin-right: 0pt; margin-top: 0pt; text-align: left; text-decoration: none; text-indent: 0pt; text-transform: none; vertical-align: baseline"><font color="#000000"> There are two algorithms Quantify Mask(s) and Quantify Using Mask that calculate Center of Mass, area (in resolutions), and number of pixels for a selected mask(s). The algorithms work with Boolean, byte, unsigned byte, and short masks.<br /></font></div><div style="font-style: normal; font-weight: normal; margin-bottom: 0pt; margin-left: 0pt; margin-right: 0pt; margin-top: 0pt; text-align: left; text-decoration: none; text-indent: 0pt; text-transform: none; vertical-align: baseline"><font color="#000000"> <br /></font></div><div style="font-style: normal; font-weight: normal; margin-bottom: 0pt; margin-left: 0pt; margin-right: 0pt; margin-top: 0pt; text-align: left; text-decoration: none; text-indent: 0pt; text-transform: none; vertical-align: baseline"><font color="#000000">
| + | |
| | | | |
| | {| border="1" cellpadding="5" | | {| border="1" cellpadding="5" |
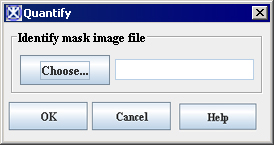
| − | |+ | + | |+ '''Figure 49. The Quantify dialog box''' |
| | |- | | |- |
| | | rowspan="1" colspan="3" | | | | rowspan="1" colspan="3" | |
| Line 14: |
Line 12: |
| | <div class="CellBody">Press to select an image mask from your hard drive.</div> | | <div class="CellBody">Press to select an image mask from your hard drive.</div> |
| | | rowspan="2" colspan="1" | | | | rowspan="2" colspan="1" | |
| − | <div style="font-style: normal; font-weight: normal; margin-bottom: 0pt; margin-left: 0pt; margin-right: 0pt; margin-top: 0pt; text-align: left; text-decoration: none; text-indent: 0pt; text-transform: none; vertical-align: baseline"><font color="#000000"> <br clear="all" />{| align="center"
| |
| − | |
| |
| | [[Image:QuantifyDialogBox.jpg]] | | [[Image:QuantifyDialogBox.jpg]] |
| − | |}<br clear="all" /><br /></font></div>
| |
| | |- | | |- |
| | | | | | |
| Line 33: |
Line 28: |
| | | rowspan="1" colspan="2" | | | | rowspan="1" colspan="2" | |
| | <div class="CellBody">Displays online help for this dialog box.</div> | | <div class="CellBody">Displays online help for this dialog box.</div> |
| − | |-
| + | |
| − | | rowspan="1" colspan="3" |
| + | |
| − | <div style="font-style: normal; margin-bottom: 3pt; margin-left: 0pt; margin-right: 0pt; margin-top: 9pt; text-align: left; text-decoration: none; text-indent: 0pt; text-transform: none; vertical-align: baseline">'''<font color="#000000"> Figure 269. The Quantify dialog box<br /></font>'''</div>
| + | |
| | |} | | |} |
| | + | '''To apply the Quantify Mask(s) algorithm:'''<br /> |
| | + | 1 Open an image of interest.<br /> |
| | + | 2 Create a mask as described in Chapter 8, "Generating masks".<br /> |
| | + | 3 Save the mask as Boolean, byte, unsigned byte, or short. <br /> |
| | + | 4 Alternatively, you can open the mask file from the disk using the Quantify dialog box options.<br /> |
| | + | |
| | + | '''Note:''' the algorithm doesn't work for paint masks.<br /> |
| | + | 5 Call Utilities>Quantify> Quantify Mask(s).<br /> |
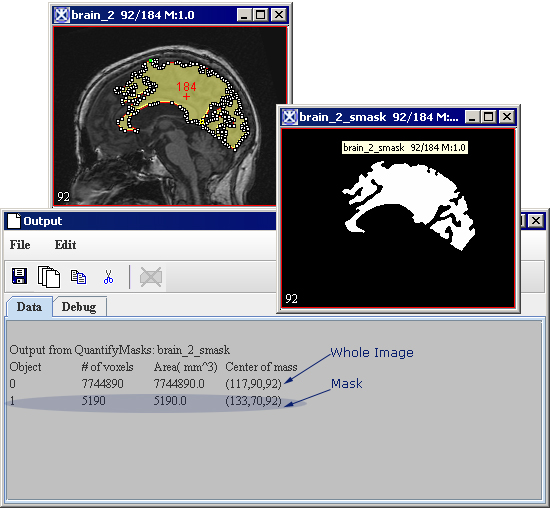
| | + | 6 The algorithm begins to run and the data appear in the Output window. See Figure 50.<br /> |
| | + | 7 Later, you can save the data using the File>Save Images option provided by the Output window.<br /> |
| | | | |
| − | <br /></font></div><div style="font-style: normal; margin-bottom: 6pt; margin-left: 0pt; margin-right: 0pt; margin-top: 14pt; text-align: left; text-decoration: none; text-indent: 0pt; text-transform: none; vertical-align: baseline">'''<font color="#000000"> To apply the Quantify Mask(s) algorithm:<br /></font>'''</div><div style="font-style: normal; font-weight: normal; margin-bottom: 0pt; margin-left: 18pt; margin-right: 0pt; margin-top: 6pt; text-align: left; text-decoration: none; text-indent: -18pt; text-transform: none; vertical-align: baseline"><font color="#000000"> 1 Open an image of interest.<br /></font></div><div style="font-style: normal; font-weight: normal; margin-bottom: 0pt; margin-left: 18pt; margin-right: 0pt; margin-top: 6pt; text-align: left; text-decoration: none; text-indent: -18pt; text-transform: none; vertical-align: baseline"><font color="#000000"> 2 Create a mask as described in Chapter 8, [MIPAV_Segmentation.html#998952 "Generating masks"].<br /></font></div><div style="font-style: normal; font-weight: normal; margin-bottom: 0pt; margin-left: 18pt; margin-right: 0pt; margin-top: 6pt; text-align: left; text-decoration: none; text-indent: -18pt; text-transform: none; vertical-align: baseline"><font color="#000000"> 3 Save the mask as Boolean, byte, unsigned byte, or short. <br /></font></div><div style="font-style: normal; font-weight: normal; margin-bottom: 0pt; margin-left: 18pt; margin-right: 0pt; margin-top: 6pt; text-align: left; text-decoration: none; text-indent: -18pt; text-transform: none; vertical-align: baseline"><font color="#000000"> 4 Alternatively, you can open the mask file from the disk using the Quantify dialog box options.<br /></font></div><div style="font-style: normal; font-weight: normal; margin-bottom: 5pt; margin-left: 0pt; margin-right: 0pt; margin-top: 5pt; text-align: left; text-decoration: none; text-indent: 0pt; text-transform: none; vertical-align: baseline"><font color="#000000"> <span style="font-style: normal; text-decoration: none; text-transform: none; vertical-align: baseline">'''<font color="#000000">Note:</font>'''</span> the algorithm doesn't work for paint masks.<br /></font></div><div style="font-style: normal; font-weight: normal; margin-bottom: 0pt; margin-left: 18pt; margin-right: 0pt; margin-top: 6pt; text-align: left; text-decoration: none; text-indent: -18pt; text-transform: none; vertical-align: baseline"><font color="#000000"> 5 Call Utilities>Quantify> Quantify Mask(s).<br /></font></div><div style="font-style: normal; font-weight: normal; margin-bottom: 0pt; margin-left: 18pt; margin-right: 0pt; margin-top: 6pt; text-align: left; text-decoration: none; text-indent: -18pt; text-transform: none; vertical-align: baseline"><font color="#000000"> 6 The algorithm begins to run and the data appear in the Output window. See [MIPAV_Utilities.html#1183321 Figure 270].<br /></font></div><div style="font-style: normal; font-weight: normal; margin-bottom: 0pt; margin-left: 18pt; margin-right: 0pt; margin-top: 6pt; text-align: left; text-decoration: none; text-indent: -18pt; text-transform: none; vertical-align: baseline"><font color="#000000"> 7 Later, you can save the data using the File>Save Images option provided by the Output window.<br /></font></div><div style="font-style: normal; font-weight: normal; margin-bottom: 0pt; margin-left: 0pt; margin-right: 0pt; margin-top: 0pt; text-align: left; text-decoration: none; text-indent: 0pt; text-transform: none; vertical-align: baseline"><font color="#000000">
| |
| | | | |
| | {| border="1" cellpadding="5" | | {| border="1" cellpadding="5" |
| − | |+ <div style="font-style: normal; margin-bottom: 3pt; margin-left: 0pt; margin-right: 0pt; margin-top: 9pt; text-align: left; text-decoration: none; text-indent: 0pt; text-transform: none; vertical-align: baseline">'''<font color="#000000"> Figure 270. The Quantify Mask(s) algorithm<br /></font>'''</div> | + | |+ '''Figure 50. The Quantify Mask(s) algorithm''' |
| | |- | | |- |
| − | |
| |
| − | <div style="font-style: normal; font-weight: normal; margin-bottom: 0pt; margin-left: 0pt; margin-right: 0pt; margin-top: 1pt; text-align: left; text-decoration: none; text-indent: 0pt; text-transform: none; vertical-align: baseline"><font color="#000000"> <br clear="all" />{| align="center"
| |
| | | | | | |
| | [[Image:QuantifyMasks.jpg]] | | [[Image:QuantifyMasks.jpg]] |
| − | |}<br clear="all" /><br /></font></div>
| |
| | |} | | |} |
| | + | '''To apply the Quantify Using Mask algorithm:'''<br /> |
| | + | 1 Open an image of interest.<br /> |
| | + | 2 Create the image mask as described in Chapter 8, "Generating masks".<br /> |
| | + | 3 Alternatively, you can open the mask file from the disk.<br /> |
| | + | 4 Call Utilities>Quantify> Quantify Using Mask.<br /> |
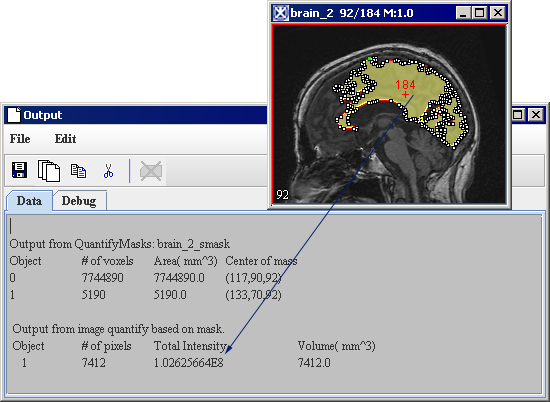
| | + | 5 The algorithm begins to run and the data appear in the Output window. See Figure 51.<br /> |
| | + | 6 Later, you can save the data using the File>Save Images option provided by the Output window.<br /> |
| | + | '''Note:''' the algorithm works with Boolean, byte, unsigned byte, and short masks, but it doesn't work with paint masks.<br /> |
| | | | |
| − | <br /></font></div><div style="font-style: normal; margin-bottom: 6pt; margin-left: 0pt; margin-right: 0pt; margin-top: 14pt; text-align: left; text-decoration: none; text-indent: 0pt; text-transform: none; vertical-align: baseline">'''<font color="#000000"> To apply the Quantify Using Mask algorithm:<br /></font>'''</div><div style="font-style: normal; font-weight: normal; margin-bottom: 0pt; margin-left: 18pt; margin-right: 0pt; margin-top: 6pt; text-align: left; text-decoration: none; text-indent: -18pt; text-transform: none; vertical-align: baseline"><font color="#000000"> 1 Open an image of interest.<br /></font></div><div style="font-style: normal; font-weight: normal; margin-bottom: 0pt; margin-left: 18pt; margin-right: 0pt; margin-top: 6pt; text-align: left; text-decoration: none; text-indent: -18pt; text-transform: none; vertical-align: baseline"><font color="#000000"> 2 Create the image mask as described in Chapter 8, [MIPAV_Segmentation.html#998952 "Generating masks"].<br /></font></div><div style="font-style: normal; font-weight: normal; margin-bottom: 0pt; margin-left: 18pt; margin-right: 0pt; margin-top: 6pt; text-align: left; text-decoration: none; text-indent: -18pt; text-transform: none; vertical-align: baseline"><font color="#000000"> 3 Alternatively, you can open the mask file from the disk.<br /></font></div><div style="font-style: normal; font-weight: normal; margin-bottom: 0pt; margin-left: 18pt; margin-right: 0pt; margin-top: 6pt; text-align: left; text-decoration: none; text-indent: -18pt; text-transform: none; vertical-align: baseline"><font color="#000000"> 4 Call Utilities>Quantify> Quantify Using Mask.<br /></font></div><div style="font-style: normal; font-weight: normal; margin-bottom: 0pt; margin-left: 18pt; margin-right: 0pt; margin-top: 6pt; text-align: left; text-decoration: none; text-indent: -18pt; text-transform: none; vertical-align: baseline"><font color="#000000"> 5 The algorithm begins to run and the data appear in the Output window. See [MIPAV_Utilities.html#1183502 Figure 271].<br /></font></div><div style="font-style: normal; font-weight: normal; margin-bottom: 0pt; margin-left: 18pt; margin-right: 0pt; margin-top: 6pt; text-align: left; text-decoration: none; text-indent: -18pt; text-transform: none; vertical-align: baseline"><font color="#000000"> 6 Later, you can save the data using the File>Save Images option provided by the Output window.<br /></font></div><div style="font-style: normal; font-weight: normal; margin-bottom: 5pt; margin-left: 0pt; margin-right: 0pt; margin-top: 5pt; text-align: left; text-decoration: none; text-indent: 0pt; text-transform: none; vertical-align: baseline"><font color="#000000"> <span style="font-style: normal; text-decoration: none; text-transform: none; vertical-align: baseline">'''<font color="#000000">Note:</font>'''</span> the algorithm works with Boolean, byte, unsigned byte, and short masks, but it doesn't work with paint masks.<br /></font></div><div style="font-style: normal; font-weight: normal; margin-bottom: 0pt; margin-left: 0pt; margin-right: 0pt; margin-top: 0pt; text-align: left; text-decoration: none; text-indent: 0pt; text-transform: none; vertical-align: baseline"><font color="#000000">
| |
| | | | |
| | {| border="1" cellpadding="5" | | {| border="1" cellpadding="5" |
| − | |+ <div style="font-style: normal; margin-bottom: 3pt; margin-left: 0pt; margin-right: 0pt; margin-top: 9pt; text-align: left; text-decoration: none; text-indent: 0pt; text-transform: none; vertical-align: baseline">'''<font color="#000000"> Figure 271. The Quantify Using Mask algorithm<br /></font>'''</div> | + | |+ '''Figure 51. The Quantify Using Mask algorithm''' |
| | |- | | |- |
| − | |
| |
| − | <div style="font-style: normal; font-weight: normal; margin-bottom: 0pt; margin-left: 0pt; margin-right: 0pt; margin-top: 1pt; text-align: left; text-decoration: none; text-indent: 0pt; text-transform: none; vertical-align: baseline"><font color="#000000"> <br clear="all" />{| align="center"
| |
| | | | | | |
| | [[Image:QuantifyUsingMask.jpg]] | | [[Image:QuantifyUsingMask.jpg]] |
| − | |}<br clear="all" /><br /></font></div>
| |
| | |} | | |} |
| | | | |
| − | <br /></font></div>
| + | == See also: == |
| | | | |
| | [[Replacing pixel/voxel value in images]] | | [[Replacing pixel/voxel value in images]] |
| | + | |
| | + | [[Category:Help]] |
There are two algorithms Quantify Mask(s) and Quantify Using Mask that calculate Center of Mass, area (in resolutions), and number of pixels for a selected mask(s). The algorithms work with Boolean, byte, unsigned byte, and short masks.


