|
|
| (5 intermediate revisions by one other user not shown) |
| Line 1: |
Line 1: |
| − | == Posing queries and retrieving images ==
| + | Use the QR Client page (Figure 15) in the DICOM Communication Panel dialog box to query a DICOM-compatible server, or device, and then retrieve files from the query results.<br /> |
| − | | + | '''Note:''' Before you begin, make sure your hosts table has the name of the device you want to query or from which you want to receive images. Conversely, your computer's connection information should also be in the other device's hosts table. For more information on setting up a hosts table, see "internet protocol (IP) address: A numeric ID that is used to identify your computer on a Transmission Control Protocol/Internet Protocol (TCP/IP) network. An example of a TCP/IP network is the Internet.".<br />'''To pose queries''' |
| − | <div style="font-style: normal; font-weight: normal; margin-bottom: 6pt; margin-left: 0pt; margin-right: 0pt; margin-top: 0pt; text-align: left; text-decoration: none; text-indent: 0pt; text-transform: none; vertical-align: baseline"><font color="#000000"> Use the QR Client page ([MIPAV_DicomImages.html#1048901 Figure 70]) in the DICOM Communication Panel dialog box to query a DICOM-compatible server, or device, and then retrieve files from the query results.<br /></font></div><div style="font-style: normal; font-weight: normal; margin-bottom: 5pt; margin-left: 0pt; margin-right: 0pt; margin-top: 5pt; text-align: left; text-decoration: none; text-indent: 0pt; text-transform: none; vertical-align: baseline"><font color="#000000"> <span style="font-style: normal; text-decoration: none; text-transform: none; vertical-align: baseline">'''<font color="#000000">Note:</font>'''</span> Before you begin, make sure your hosts table has the name of the device you want to query or from which you want to receive images. Conversely, your computer's connection information should also be in the other device's hosts table. For more information on setting up a hosts table, see "internet protocol (IP) address: A numeric ID that is used to identify your computer on a Transmission Control Protocol/Internet Protocol (TCP/IP) network. An example of a TCP/IP network is the Internet.".<br /></font></div><div style="font-style: normal; margin-bottom: 6pt; margin-left: 0pt; margin-right: 0pt; margin-top: 14pt; text-align: left; text-decoration: none; text-indent: 0pt; text-transform: none; vertical-align: baseline">'''<font color="#000000"> To pose queries<br /></font>'''</div><div style="font-style: normal; font-weight: normal; margin-bottom: 0pt; margin-left: 18pt; margin-right: 0pt; margin-top: 6pt; text-align: left; text-decoration: none; text-indent: -18pt; text-transform: none; vertical-align: baseline"><font color="#000000"> 1 Click QR Client in the DICOM Communication Panel dialog box. The QR Client page appears (Figure 15).<br /></font></div><div style="font-style: normal; font-weight: normal; margin-bottom: 0pt; margin-left: 18pt; margin-right: 0pt; margin-top: 6pt; text-align: left; text-decoration: none; text-indent: -18pt; text-transform: none; vertical-align: baseline"><font color="#000000"> 2 Construct your query by completing the fields in the Patient Query Information and Query Duration panels. As you fill in the information, keep the following in mind:<br /></font></div><div style="font-style: normal; font-weight: normal; margin-bottom: 0pt; margin-left: 36pt; margin-right: 0pt; margin-top: 6pt; text-align: left; text-decoration: none; text-indent: -12pt; text-transform: none; vertical-align: baseline"><font color="#000000"> You must specify at least one of the following: patient name, patient ID, study number, or physician.<br /></font></div><div style="font-style: normal; font-weight: normal; margin-bottom: 0pt; margin-left: 36pt; margin-right: 0pt; margin-top: 6pt; text-align: left; text-decoration: none; text-indent: -12pt; text-transform: none; vertical-align: baseline"><font color="#000000"> If the exact name, ID, or study number is not known, you can use the asterisk as a wildcard character. For example, if you type "<span style="font-style: normal; text-decoration: none; text-transform: none; vertical-align: baseline">'''<font color="#000000"><nowiki>*</nowiki></font>'''</span><span style="font-style: normal; font-weight: normal; text-decoration: none; text-transform: none; vertical-align: baseline"><font color="#000000">o</font></span><span style="font-style: normal; text-decoration: none; text-transform: none; vertical-align: baseline">'''<font color="#000000"><nowiki>*</nowiki></font>'''</span><span style="font-style: normal; font-weight: normal; text-decoration: none; text-transform: none; vertical-align: baseline"><font color="#000000">ston"</font></span> in the patient name field, all names that match this pattern, such as Houston or Johnston, appear in the result.<br /></font></div><div style="font-style: normal; font-weight: normal; margin-bottom: 0pt; margin-left: 18pt; margin-right: 0pt; margin-top: 6pt; text-align: left; text-decoration: none; text-indent: -18pt; text-transform: none; vertical-align: baseline"><font color="#000000"> 3 Click Send Query.<br /></font></div><div style="font-style: normal; font-weight: normal; margin-bottom: 0pt; margin-left: 18pt; margin-right: 0pt; margin-top: 6pt; text-align: left; text-decoration: none; text-indent: 0pt; text-transform: none; vertical-align: baseline"><font color="#000000"> The query result appears in the Query Result panel. To retrieve images, go to "To retrieve images".<br /></font></div><div style="font-style: normal; margin-bottom: 6pt; margin-left: 0pt; margin-right: 0pt; margin-top: 14pt; text-align: left; text-decoration: none; text-indent: 0pt; text-transform: none; vertical-align: baseline">'''<font color="#000000"> To erase the query<br /></font>'''</div>
| + | 1 Click QR Client in the DICOM Communication Panel dialog box. The QR Client page appears (Figure 15).<br /> |
| | + | 2 Construct your query by completing the fields in the Patient Query Information and Query Duration panels. As you fill in the information, keep the following in mind:<br /> |
| | + | You must specify at least one of the following: patient name, patient ID, study number, or physician.<br /> If the exact name, ID, or study number is not known, you can use the asterisk as a wildcard character. For example, if you type ''ston'' in the patient name field, all names that match this pattern, such as Houston or Johnston, appear in the result.<br /> |
| | + | 3 Click Send Query.<br /> |
| | + | The query result appears in the Query Result panel. To retrieve images, go to "To retrieve images".<br /> |
| | + | '''To erase the query<br />''' |
| | | | |
| | To erase the query and start again, click Clear in the Patient Query Information panel. | | To erase the query and start again, click Clear in the Patient Query Information panel. |
| | | | |
| − | <div style="font-style: normal; font-weight: normal; margin-bottom: 0pt; margin-left: 0pt; margin-right: 0pt; margin-top: 0pt; text-align: left; text-decoration: none; text-indent: 0pt; text-transform: none; vertical-align: baseline"><font color="#000000">
| |
| | | | |
| | ==QR Client page in the DICOM Communication Panel dialog box== | | ==QR Client page in the DICOM Communication Panel dialog box== |
| Line 111: |
Line 115: |
| | |} | | |} |
| | | | |
| − | <br /></font></div><div style="font-style: normal; margin-bottom: 6pt; margin-left: 0pt; margin-right: 0pt; margin-top: 14pt; text-align: left; text-decoration: none; text-indent: 0pt; text-transform: none; vertical-align: baseline">'''<font color="#000000"> To view information at different levels<br /></font>'''</div> | + | <br />'''To view information at different levels<br />''' |
| | | | |
| | You can view information at the patient, study, series, or image level. To go up or down a level, click Up or Down. Note that the level that is currently displayed appears at the left of the Up and Down buttons. | | You can view information at the patient, study, series, or image level. To go up or down a level, click Up or Down. Note that the level that is currently displayed appears at the left of the Up and Down buttons. |
| − | | + | '''To sort the query result list<br />''' |
| − | <div style="font-style: normal; margin-bottom: 6pt; margin-left: 0pt; margin-right: 0pt; margin-top: 14pt; text-align: left; text-decoration: none; text-indent: 0pt; text-transform: none; vertical-align: baseline">'''<font color="#000000"> To sort the query result list<br /></font>'''</div>
| + | |
| | | | |
| | Click Pat (patient), Pat ID (patient ID), or Referring Physician in the Query Result panel. The query result list is sorted in ascending order based on the column you chose. If you click the column title a second time, the list is resorted, this time in descending order, but again based on the title you chose. | | Click Pat (patient), Pat ID (patient ID), or Referring Physician in the Query Result panel. The query result list is sorted in ascending order based on the column you chose. If you click the column title a second time, the list is resorted, this time in descending order, but again based on the title you chose. |
| | | | |
| − | <div style="font-style: normal; margin-bottom: 6pt; margin-left: 0pt; margin-right: 0pt; margin-top: 14pt; text-align: left; text-decoration: none; text-indent: 0pt; text-transform: none; vertical-align: baseline">'''<font color="#000000"> To retrieve images<br /></font>'''</div><div style="font-style: normal; font-weight: normal; margin-bottom: 6pt; margin-left: 0pt; margin-right: 0pt; margin-top: 0pt; text-align: left; text-decoration: none; text-indent: 0pt; text-transform: none; vertical-align: baseline"><font color="#000000"> After you pose a query and receive the results, you can select the files that you want to retrieve from the list of query results. <br /></font></div><div style="font-style: normal; font-weight: normal; margin-bottom: 0pt; margin-left: 18pt; margin-right: 0pt; margin-top: 6pt; text-align: left; text-decoration: none; text-indent: -18pt; text-transform: none; vertical-align: baseline"><font color="#000000"> 1 Turn on the DICOM receiver if you have not already done so. <br /></font></div><div style="font-style: normal; font-weight: normal; margin-bottom: 0pt; margin-left: 18pt; margin-right: 0pt; margin-top: 6pt; text-align: left; text-decoration: none; text-indent: 0pt; text-transform: none; vertical-align: baseline"><font color="#000000"> To turn on the receiver, click File > DICOM Receiver On/Off in the MIPAV window. A check mark appears next to the option.<br /></font></div><div style="font-style: normal; font-weight: normal; margin-bottom: 0pt; margin-left: 18pt; margin-right: 0pt; margin-top: 6pt; text-align: left; text-decoration: none; text-indent: -18pt; text-transform: none; vertical-align: baseline"><font color="#000000"> 2 Select the images you want to copy from the Query Result panel on the QR Client page.<br /></font></div><div style="font-style: normal; font-weight: normal; margin-bottom: 0pt; margin-left: 18pt; margin-right: 0pt; margin-top: 6pt; text-align: left; text-decoration: none; text-indent: -18pt; text-transform: none; vertical-align: baseline"><font color="#000000"> 3 Click Retrieve Image in the Patient Query Information panel to copy the images to the default storage destination indicated in the hosts table. <br /></font></div><div style="font-style: normal; font-weight: normal; margin-bottom: 0pt; margin-left: 0pt; margin-right: 0pt; margin-top: 0pt; text-align: left; text-decoration: none; text-indent: 0pt; text-transform: none; vertical-align: baseline"><font color="#000000"> <br /></font></div><div style="font-style: normal; font-weight: normal; margin-bottom: 0pt; margin-left: 18pt; margin-right: 0pt; margin-top: 6pt; text-align: left; text-decoration: none; text-indent: 0pt; text-transform: none; vertical-align: baseline"><font color="#000000"> If you need to check the default storage destination: <br /></font></div><div style="font-style: normal; font-weight: normal; margin-bottom: 0pt; margin-left: 36pt; margin-right: 0pt; margin-top: 6pt; text-align: left; text-decoration: none; text-indent: -18pt; text-transform: none; vertical-align: baseline"><font color="#000000"> a Click Hosts to display the Hosts page<br /></font></div><div style="font-style: normal; font-weight: normal; margin-bottom: 0pt; margin-left: 36pt; margin-right: 0pt; margin-top: 6pt; text-align: left; text-decoration: none; text-indent: -18pt; text-transform: none; vertical-align: baseline"><font color="#000000"> b View the storage destinations in the Storage Destination panel<br /></font></div><div style="font-style: normal; font-weight: normal; margin-bottom: 0pt; margin-left: 36pt; margin-right: 0pt; margin-top: 6pt; text-align: left; text-decoration: none; text-indent: -18pt; text-transform: none; vertical-align: baseline"><font color="#000000"> c Click QR Client to return to the QR Client page<br /></font></div><div style="font-style: normal; font-weight: normal; margin-bottom: 0pt; margin-left: 18pt; margin-right: 0pt; margin-top: 6pt; text-align: left; text-decoration: none; text-indent: 0pt; text-transform: none; vertical-align: baseline"><font color="#000000"> As the images are copied, status information appears in the Query Retrieval Information panel. <br /></font></div><div style="font-style: normal; font-weight: normal; margin-bottom: 5pt; margin-left: 0pt; margin-right: 0pt; margin-top: 5pt; text-align: left; text-decoration: none; text-indent: 0pt; text-transform: none; vertical-align: baseline"><font color="#000000"> <span style="font-style: normal; text-decoration: none; text-transform: none; vertical-align: baseline">'''<font color="#000000">Note:</font>'''</span> If you have problems connecting to the device, you may want to test the connection. See Section "Testing the connection" for details.<br /></font></div><div style="font-style: normal; margin-bottom: 6pt; margin-left: 0pt; margin-right: 0pt; margin-top: 14pt; text-align: left; text-decoration: none; text-indent: 0pt; text-transform: none; vertical-align: baseline">'''<font color="#000000"> To sort the query retrieval information<br /></font>'''</div><div style="font-style: normal; font-weight: normal; margin-bottom: 6pt; margin-left: 0pt; margin-right: 0pt; margin-top: 0pt; text-align: left; text-decoration: none; text-indent: 0pt; text-transform: none; vertical-align: baseline"><font color="#000000"> To sort the information in the Query Retrieval Information panel, you can click Status, #, Source, Destination, Error, or ID.<br /></font></div><div style="font-style: normal; margin-bottom: 6pt; margin-left: 0pt; margin-right: 0pt; margin-top: 14pt; text-align: left; text-decoration: none; text-indent: 0pt; text-transform: none; vertical-align: baseline">'''<font color="#000000"> To cancel the retrieval<br /></font>'''</div>
| + | '''To retrieve images<br />''' |
| | + | After you pose a query and receive the results, you can select the files that you want to retrieve from the list of query results. <br /> |
| | + | 1 Turn on the DICOM receiver if you have not already done so. <br /> |
| | + | To turn on the receiver, click File > DICOM Receiver On/Off in the MIPAV window. A check mark appears next to the option.<br /> |
| | + | 2 Select the images you want to copy from the Query Result panel on the QR Client page.<br /> |
| | + | 3 Click Retrieve Image in the Patient Query Information panel to copy the images to the default storage destination indicated in the hosts table. <br /> |
| | + | If you need to check the default storage destination: <br /><div style="font-style: normal; font-weight: normal; margin-bottom: 0pt; margin-left: 36pt; margin-right: 0pt; margin-top: 6pt; text-align: left; text-decoration: none; text-indent: -18pt; text-transform: none; vertical-align: baseline"><font color="#000000"> a Click Hosts to display the Hosts page<br /></font></div><div style="font-style: normal; font-weight: normal; margin-bottom: 0pt; margin-left: 36pt; margin-right: 0pt; margin-top: 6pt; text-align: left; text-decoration: none; text-indent: -18pt; text-transform: none; vertical-align: baseline"><font color="#000000"> b View the storage destinations in the Storage Destination panel<br /></font></div><div style="font-style: normal; font-weight: normal; margin-bottom: 0pt; margin-left: 36pt; margin-right: 0pt; margin-top: 6pt; text-align: left; text-decoration: none; text-indent: -18pt; text-transform: none; vertical-align: baseline"><font color="#000000"> c Click QR Client to return to the QR Client page<br /></font></div><div style="font-style: normal; font-weight: normal; margin-bottom: 0pt; margin-left: 18pt; margin-right: 0pt; margin-top: 6pt; text-align: left; text-decoration: none; text-indent: 0pt; text-transform: none; vertical-align: baseline"><font color="#000000"> As the images are copied, status information appears in the Query Retrieval Information panel. <br /></font></div><div style="font-style: normal; font-weight: normal; margin-bottom: 5pt; margin-left: 0pt; margin-right: 0pt; margin-top: 5pt; text-align: left; text-decoration: none; text-indent: 0pt; text-transform: none; vertical-align: baseline"><font color="#000000"> <span style="font-style: normal; text-decoration: none; text-transform: none; vertical-align: baseline">'''<font color="#000000">Note:</font>'''</span> If you have problems connecting to the device, you may want to test the connection. See Section "Testing the connection" for details.<br /></font></div><div style="font-style: normal; margin-bottom: 6pt; margin-left: 0pt; margin-right: 0pt; margin-top: 14pt; text-align: left; text-decoration: none; text-indent: 0pt; text-transform: none; vertical-align: baseline">'''<font color="#000000"> To sort the query retrieval information<br /></font>'''</div><div style="font-style: normal; font-weight: normal; margin-bottom: 6pt; margin-left: 0pt; margin-right: 0pt; margin-top: 0pt; text-align: left; text-decoration: none; text-indent: 0pt; text-transform: none; vertical-align: baseline"><font color="#000000"> To sort the information in the Query Retrieval Information panel, you can click Status, #, Source, Destination, Error, or ID.<br /></font></div><div style="font-style: normal; margin-bottom: 6pt; margin-left: 0pt; margin-right: 0pt; margin-top: 14pt; text-align: left; text-decoration: none; text-indent: 0pt; text-transform: none; vertical-align: baseline">'''<font color="#000000"> To cancel the retrieval<br /></font>'''</div> |
| | | | |
| | Click Cancel in the Query Retrieval Information panel. | | Click Cancel in the Query Retrieval Information panel. |
| | + | |
| | + | '''Next:''' [[Receiving and sending image files]] |
| | + | |
| | + | [[Category:Help]] |
Latest revision as of 13:08, 26 July 2012
Use the QR Client page (Figure 15) in the DICOM Communication Panel dialog box to query a DICOM-compatible server, or device, and then retrieve files from the query results.
Note: Before you begin, make sure your hosts table has the name of the device you want to query or from which you want to receive images. Conversely, your computer's connection information should also be in the other device's hosts table. For more information on setting up a hosts table, see "internet protocol (IP) address: A numeric ID that is used to identify your computer on a Transmission Control Protocol/Internet Protocol (TCP/IP) network. An example of a TCP/IP network is the Internet.".
To pose queries
1 Click QR Client in the DICOM Communication Panel dialog box. The QR Client page appears (Figure 15).
2 Construct your query by completing the fields in the Patient Query Information and Query Duration panels. As you fill in the information, keep the following in mind:
You must specify at least one of the following: patient name, patient ID, study number, or physician.
If the exact name, ID, or study number is not known, you can use the asterisk as a wildcard character. For example, if you type ston in the patient name field, all names that match this pattern, such as Houston or Johnston, appear in the result.
3 Click Send Query.
The query result appears in the Query Result panel. To retrieve images, go to "To retrieve images".
To erase the query
To erase the query and start again, click Clear in the Patient Query Information panel.
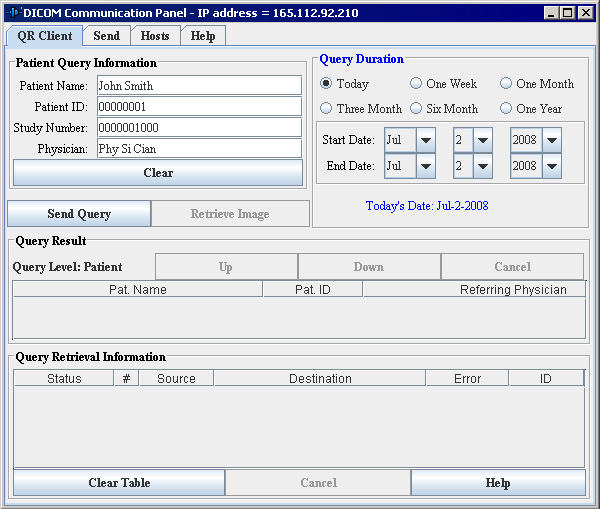
QR Client page in the DICOM Communication Panel dialog box
Figure 15. QR Client page in the DICOM Communication Panel dialog box
|
|
|
Patient Query Information
|
|
Patient Name
|
Indicates the full name of the patient. Alphanumeric characters are accepted. You can use an asterisk as a wild card character.
|
|
Patient ID
|
Indicates the primary hospital identification number or code for the patient. Numeric characters are accepted.
|
|
Study Number
|
Displays the user- or equipment-generated study identifier.
|
|
Physician
|
Indicates the physician(s) responsible for patient care at the time of the study.
|
|
Query Duration
|
|
Displays the time period the query covers. The options are: Today, One day, One week, One month, Three months, Six months, One year, Start date and End date.
|
|
Start Date
|
Indicates the date when medical specialist began acquiring study information.
|
|
End Date
|
Indicates the date when medical specialist completed the acquisition of study information.
|
|
Today's Date
|
Displays the current date.
|
|
Query Result
|
|
Pat. Name
|
Patient Name. Indicates the full name of the patient. You cannot edit this field; it is read-only.
|
|
Pat. ID
|
Patient Identification. Displays the primary hospital identification number or code for the patient. You cannot edit this field; it is read-only.
|
|
Referring Physician
|
Indicates the name of the physician who referred the patient. You cannot edit this field; it is read-only.
|
|
Query Retrieval Information
|
|
Status
|
Provides an update of the query retrieval process.
|
|
#
|
Indicates the image number that is currently being retrieved.
|
|
Source
|
Indicates the DICOM server from which the images are being retrieved.
|
|
Destination
|
Indicates where the image is stored (storage destination).
|
|
Error
|
Indicates whether an error has occurred.
|
|
ID
|
Displays the unique ID that is assigned to each query.
|
To view information at different levels
You can view information at the patient, study, series, or image level. To go up or down a level, click Up or Down. Note that the level that is currently displayed appears at the left of the Up and Down buttons.
To sort the query result list
Click Pat (patient), Pat ID (patient ID), or Referring Physician in the Query Result panel. The query result list is sorted in ascending order based on the column you chose. If you click the column title a second time, the list is resorted, this time in descending order, but again based on the title you chose.
To retrieve images
After you pose a query and receive the results, you can select the files that you want to retrieve from the list of query results.
1 Turn on the DICOM receiver if you have not already done so.
To turn on the receiver, click File > DICOM Receiver On/Off in the MIPAV window. A check mark appears next to the option.
2 Select the images you want to copy from the Query Result panel on the QR Client page.
3 Click Retrieve Image in the Patient Query Information panel to copy the images to the default storage destination indicated in the hosts table.
If you need to check the default storage destination:
a Click Hosts to display the Hosts page
b View the storage destinations in the Storage Destination panel
c Click QR Client to return to the QR Client page
As the images are copied, status information appears in the Query Retrieval Information panel.
Note: If you have problems connecting to the device, you may want to test the connection. See Section "Testing the connection" for details.
To sort the query retrieval information
To sort the information in the Query Retrieval Information panel, you can click Status, #, Source, Destination, Error, or ID.
To cancel the retrieval
Click Cancel in the Query Retrieval Information panel.
Next: Receiving and sending image files
