|
|
| Line 1: |
Line 1: |
| − | == Pad ==
| + | The Pad command on the Utilities menu allows to pad images with certain values specified by the user. <br /> |
| | + | |
| | + | '''To use the Pad utility'''<br /> |
| | + | 1 Open an image of interest.<br /> |
| | + | 2 Call Utilities>Pad.<br /> |
| | + | 3 The Pad Image dialog box appears. Enter the number of pixels to be padded on the left side, right side, top and bottom. If the image is a 3D image, you can also add a number slices to the front or back of the image. <br /> |
| | + | 4 Specify the intensity value for padded pixels.<br /> |
| | + | 5 Click OK. Depending on the selected option - New Image or Replace Image - the padded image appears either in a new image frame or replaces the original image.<br /> |
| | | | |
| − | <div style="font-style: normal; font-weight: normal; margin-bottom: 6pt; margin-left: 0pt; margin-right: 0pt; margin-top: 0pt; text-align: left; text-decoration: none; text-indent: 0pt; text-transform: none; vertical-align: baseline"><font color="#000000"> The Pad command on the Utilities menu allows to pad images with certain values specified by the user. <br /></font></div><div style="font-style: normal; margin-bottom: 6pt; margin-left: 0pt; margin-right: 0pt; margin-top: 14pt; text-align: left; text-decoration: none; text-indent: 0pt; text-transform: none; vertical-align: baseline">'''<font color="#000000"> To use the Pad utility<br /></font>'''</div><div style="font-style: normal; font-weight: normal; margin-bottom: 0pt; margin-left: 18pt; margin-right: 0pt; margin-top: 6pt; text-align: left; text-decoration: none; text-indent: -18pt; text-transform: none; vertical-align: baseline"><font color="#000000"> 1 Open an image of interest.<br /></font></div><div style="font-style: normal; font-weight: normal; margin-bottom: 0pt; margin-left: 18pt; margin-right: 0pt; margin-top: 6pt; text-align: left; text-decoration: none; text-indent: -18pt; text-transform: none; vertical-align: baseline"><font color="#000000"> 2 Call Utilities>Pad.<br /></font></div><div style="font-style: normal; font-weight: normal; margin-bottom: 0pt; margin-left: 18pt; margin-right: 0pt; margin-top: 6pt; text-align: left; text-decoration: none; text-indent: -18pt; text-transform: none; vertical-align: baseline"><font color="#000000"> 3 The Pad Image dialog box appears. Enter the number of pixels to be padded on the left side, right side, top and bottom. If the image is a 3D image, you can also add a number slices to the front or back of the image. <br /></font></div><div style="font-style: normal; font-weight: normal; margin-bottom: 0pt; margin-left: 18pt; margin-right: 0pt; margin-top: 6pt; text-align: left; text-decoration: none; text-indent: -18pt; text-transform: none; vertical-align: baseline"><font color="#000000"> 4 Specify the intensity value for padded pixels.<br /></font></div><div style="font-style: normal; font-weight: normal; margin-bottom: 0pt; margin-left: 18pt; margin-right: 0pt; margin-top: 6pt; text-align: left; text-decoration: none; text-indent: -18pt; text-transform: none; vertical-align: baseline"><font color="#000000"> 5 Click OK. Depending on the selected option - New Image or Replace Image - the padded image appears either in a new image frame or replaces the original image.<br /></font></div><div style="font-style: normal; font-weight: normal; margin-bottom: 0pt; margin-left: 0pt; margin-right: 0pt; margin-top: 0pt; text-align: left; text-decoration: none; text-indent: 0pt; text-transform: none; vertical-align: baseline"><font color="#000000"> <br /></font></div><div style="font-style: normal; font-weight: normal; margin-bottom: 0pt; margin-left: 0pt; margin-right: 0pt; margin-top: 0pt; text-align: left; text-decoration: none; text-indent: 0pt; text-transform: none; vertical-align: baseline"><font color="#000000"> <br /></font></div><div style="font-style: normal; font-weight: normal; margin-bottom: 0pt; margin-left: 0pt; margin-right: 0pt; margin-top: 0pt; text-align: left; text-decoration: none; text-indent: 0pt; text-transform: none; vertical-align: baseline"><font color="#000000">
| |
| | | | |
| | {| border="1" cellpadding="5" | | {| border="1" cellpadding="5" |
| − | |+ <div style="font-style: normal; margin-bottom: 3pt; margin-left: 0pt; margin-right: 0pt; margin-top: 9pt; text-align: left; text-decoration: none; text-indent: 0pt; text-transform: none; vertical-align: baseline">'''<font color="#000000"> Figure 47. The Pad Image dialog box <br /></font>'''</div> | + | |+ '''Figure 47. The Pad Image dialog box''' |
| | |- | | |- |
| | | rowspan="1" colspan="2" | | | | rowspan="1" colspan="2" | |
| Line 77: |
Line 83: |
| | | | |
| | {| border="1" cellpadding="5" | | {| border="1" cellpadding="5" |
| − | |+ <div style="font-style: normal; margin-bottom: 3pt; margin-left: 0pt; margin-right: 0pt; margin-top: 9pt; text-align: left; text-decoration: none; text-indent: 0pt; text-transform: none; vertical-align: baseline">'''<font color="#000000"> Figure 48. The original image (on your left) and the image padded to (10;10;10;10). The intensity value for padded pixels is set to 200<br /></font>'''</div> | + | |+ '''Figure 48. The original image (on your left) and the image padded to (10;10;10;10). The intensity value for padded pixels is set to 200''' |
| | |- | | |- |
| | | | | | |
Latest revision as of 19:43, 22 February 2012
The Pad command on the Utilities menu allows to pad images with certain values specified by the user.
To use the Pad utility
1 Open an image of interest.
2 Call Utilities>Pad.
3 The Pad Image dialog box appears. Enter the number of pixels to be padded on the left side, right side, top and bottom. If the image is a 3D image, you can also add a number slices to the front or back of the image.
4 Specify the intensity value for padded pixels.
5 Click OK. Depending on the selected option - New Image or Replace Image - the padded image appears either in a new image frame or replaces the original image.
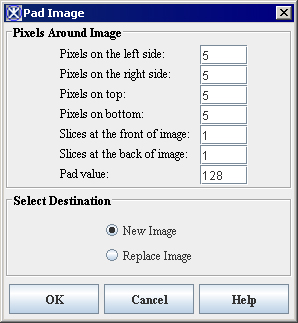
Figure 47. The Pad Image dialog box
|
Pixels Around Image
|
|
|
Pixels on the left side
|
Specify the number of pixels to add to the left side of the image.
|
|
Pixels on the right side
|
Specify the number of pixels to add to the right side of the image.
|
|
Pixels on top
|
Specify the number of pixels to add to the top of the image.
|
|
Pixels on bottom
|
Specify the number of pixels to add to the bottom of the image.
|
|
Slides at the front of image
|
Specify the number of slices to add to the front of the image.
|
|
Slides at the back of image
|
Specify the number of slices to add to the back of the image.
|
|
Pad value
|
Specify the intensity value for the added pixels.
|
|
Destination
|
|
New image
|
Shows the padded image in a new image window.
|
|
Replace image
|
Replaces the current active image with the padded image.
|
|
OK
|
Applies the padding values that you specified to the image.
|
|
Cancel
|
Disregards any changes you made in this dialog box and closes the dialog box.
|
|
Help
|
Displays online help for this dialog box.
|
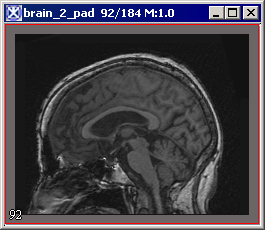
Figure 48. The original image (on your left) and the image padded to (10;10;10;10). The intensity value for padded pixels is set to 200
|

|
|
Quantify Mask


