Difference between revisions of "Maximum Intensity Projection"
(→Applying the Maximum Intensity Projection) |
(→Maximum Intensity Projection) |
||
| Line 1: | Line 1: | ||
| − | + | Maximum Intensity Projection (MIP) is a volume rendering technique for 3D images that projects in the visualization plane the voxels with maximum intensity that fall in the way of parallel rays traced from the viewpoint to the plane of projection. At each pixel the highest data value encountered along the corresponding viewing ray is determined. <br />MIP exploits the fact, that within MRI data sets the intensity values of vascular structures are higher than the intensity values of the surrounding tissue. By depicting the maximum intensity value seen through each pixel, the structure of the vessels contained in the image can be captured. <br /> | |
| − | + | ||
| − | + | ||
| − | + | ||
The method provides a very good understanding of the structures defined by high signal intensities. It also helps to avoid the problem with occluding structures, which can block visualization of thin inner parts. | The method provides a very good understanding of the structures defined by high signal intensities. It also helps to avoid the problem with occluding structures, which can block visualization of thin inner parts. | ||
| Line 13: | Line 10: | ||
<span style="font-style: normal; text-decoration: none; text-transform: none; vertical-align: baseline">'''<font color="#000000">X</font>'''</span> is a 2D image of size (<span style="font-weight: normal; text-decoration: none; text-transform: none; vertical-align: baseline">''<font color="#000000">y</font>''</span><nowiki>* </nowiki><span style="font-weight: normal; text-decoration: none; text-transform: none; vertical-align: baseline">''<font color="#000000">z</font>''</span>) formed by viewing along the <span style="font-weight: normal; text-decoration: none; text-transform: none; vertical-align: baseline">''<font color="#000000">x</font>''</span>-axis and selecting the highest intensities in the <span style="font-weight: normal; text-decoration: none; text-transform: none; vertical-align: baseline">''<font color="#000000">y</font>''</span>-<span style="font-weight: normal; text-decoration: none; text-transform: none; vertical-align: baseline">''<font color="#000000">z</font>''</span> plane. <span style="font-style: normal; text-decoration: none; text-transform: none; vertical-align: baseline">'''<font color="#000000">Y</font>'''</span> image is of size (<span style="font-weight: normal; text-decoration: none; text-transform: none; vertical-align: baseline">''<font color="#000000">x</font>''</span><nowiki>*</nowiki><span style="font-weight: normal; text-decoration: none; text-transform: none; vertical-align: baseline">''<font color="#000000">z</font>''</span>) formed by viewing along the <span style="font-weight: normal; text-decoration: none; text-transform: none; vertical-align: baseline">''<font color="#000000">y</font>''</span>-axis and selecting highest intensities in the <span style="font-weight: normal; text-decoration: none; text-transform: none; vertical-align: baseline">''<font color="#000000">x</font>''</span>-<span style="font-weight: normal; text-decoration: none; text-transform: none; vertical-align: baseline">''<font color="#000000">z</font>''</span> plane. Similarly, <span style="font-style: normal; text-decoration: none; text-transform: none; vertical-align: baseline">'''<font color="#000000">Z</font>'''</span> image is formed by viewing along the Z axis and selecting highest intensities in the <span style="font-weight: normal; text-decoration: none; text-transform: none; vertical-align: baseline">''<font color="#000000">x</font>''</span>-<span style="font-weight: normal; text-decoration: none; text-transform: none; vertical-align: baseline">''<font color="#000000">y</font>''</span> plane and is of size (<span style="font-weight: normal; text-decoration: none; text-transform: none; vertical-align: baseline">''<font color="#000000">x</font>''</span> * <span style="font-weight: normal; text-decoration: none; text-transform: none; vertical-align: baseline">''<font color="#000000">y</font>''</span>). | <span style="font-style: normal; text-decoration: none; text-transform: none; vertical-align: baseline">'''<font color="#000000">X</font>'''</span> is a 2D image of size (<span style="font-weight: normal; text-decoration: none; text-transform: none; vertical-align: baseline">''<font color="#000000">y</font>''</span><nowiki>* </nowiki><span style="font-weight: normal; text-decoration: none; text-transform: none; vertical-align: baseline">''<font color="#000000">z</font>''</span>) formed by viewing along the <span style="font-weight: normal; text-decoration: none; text-transform: none; vertical-align: baseline">''<font color="#000000">x</font>''</span>-axis and selecting the highest intensities in the <span style="font-weight: normal; text-decoration: none; text-transform: none; vertical-align: baseline">''<font color="#000000">y</font>''</span>-<span style="font-weight: normal; text-decoration: none; text-transform: none; vertical-align: baseline">''<font color="#000000">z</font>''</span> plane. <span style="font-style: normal; text-decoration: none; text-transform: none; vertical-align: baseline">'''<font color="#000000">Y</font>'''</span> image is of size (<span style="font-weight: normal; text-decoration: none; text-transform: none; vertical-align: baseline">''<font color="#000000">x</font>''</span><nowiki>*</nowiki><span style="font-weight: normal; text-decoration: none; text-transform: none; vertical-align: baseline">''<font color="#000000">z</font>''</span>) formed by viewing along the <span style="font-weight: normal; text-decoration: none; text-transform: none; vertical-align: baseline">''<font color="#000000">y</font>''</span>-axis and selecting highest intensities in the <span style="font-weight: normal; text-decoration: none; text-transform: none; vertical-align: baseline">''<font color="#000000">x</font>''</span>-<span style="font-weight: normal; text-decoration: none; text-transform: none; vertical-align: baseline">''<font color="#000000">z</font>''</span> plane. Similarly, <span style="font-style: normal; text-decoration: none; text-transform: none; vertical-align: baseline">'''<font color="#000000">Z</font>'''</span> image is formed by viewing along the Z axis and selecting highest intensities in the <span style="font-weight: normal; text-decoration: none; text-transform: none; vertical-align: baseline">''<font color="#000000">x</font>''</span>-<span style="font-weight: normal; text-decoration: none; text-transform: none; vertical-align: baseline">''<font color="#000000">y</font>''</span> plane and is of size (<span style="font-weight: normal; text-decoration: none; text-transform: none; vertical-align: baseline">''<font color="#000000">x</font>''</span> * <span style="font-weight: normal; text-decoration: none; text-transform: none; vertical-align: baseline">''<font color="#000000">y</font>''</span>). | ||
| − | + | '''Note:''' The MIP algorithm allows to set the minimum and maximum thresholds on the image before computation which aids in enhancing MIP visualization in certain cases. <br /> | |
==== Image Types ==== | ==== Image Types ==== | ||
| Line 26: | Line 23: | ||
To run the method, | To run the method, | ||
| − | + | 1 Open an image of interest.<br /> | |
| − | + | 2 Select Utilities > Maximum intensity projection (MIP). <br /> | |
| + | 3 The Maximum Intensity Projection dialog box appears. <br /> | ||
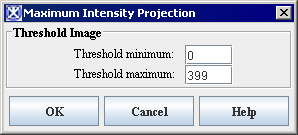
| + | 4 Complete the dialog box. You might choose to fill out two input fields - Threshold Minimum and Threshold Maximum; or just use the default values. These fields are initially populated with the minimum and maximum intensities of the image.<br /> | ||
| + | 5 Click OK.<br /> | ||
{| border="1" cellpadding="5" | {| border="1" cellpadding="5" | ||
| − | |+ | + | |+ '''Figure 43. The Maximum Intensity Projection dialog box. The input fields are initially populated with the maximum and minimum intensities of the image''' |
|- | |- | ||
| | | | ||
| Line 38: | Line 38: | ||
The algorithm begins to run, and a pop-up window appears with the status. The following message appears: <span style="font-weight: normal; text-decoration: none; text-transform: none; vertical-align: baseline">''<font color="#000000">Computing Maximum Intensity Projection</font>''</span>. When the algorithm has finished to run, the pop-up window closes and the three 2D images appear in three different windows. See Figure 44. | The algorithm begins to run, and a pop-up window appears with the status. The following message appears: <span style="font-weight: normal; text-decoration: none; text-transform: none; vertical-align: baseline">''<font color="#000000">Computing Maximum Intensity Projection</font>''</span>. When the algorithm has finished to run, the pop-up window closes and the three 2D images appear in three different windows. See Figure 44. | ||
| − | |||
| − | |||
{| border="1" cellpadding="5" | {| border="1" cellpadding="5" | ||
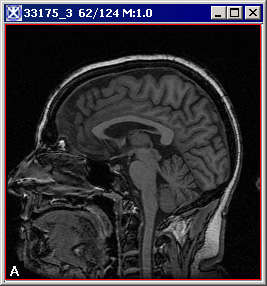
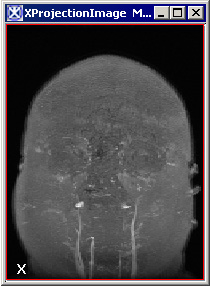
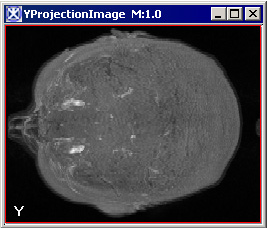
| − | |+ | + | |+ '''Figure 44. The original image (A) and three 2D result images; x-projection (X), y-projection (Y), and z-projection (Z)''' |
|- | |- | ||
| | | | ||
Latest revision as of 19:35, 22 February 2012
Maximum Intensity Projection (MIP) is a volume rendering technique for 3D images that projects in the visualization plane the voxels with maximum intensity that fall in the way of parallel rays traced from the viewpoint to the plane of projection. At each pixel the highest data value encountered along the corresponding viewing ray is determined.
MIP exploits the fact, that within MRI data sets the intensity values of vascular structures are higher than the intensity values of the surrounding tissue. By depicting the maximum intensity value seen through each pixel, the structure of the vessels contained in the image can be captured.
The method provides a very good understanding of the structures defined by high signal intensities. It also helps to avoid the problem with occluding structures, which can block visualization of thin inner parts.
Background
A MIP algorithm accepts a single grayscale 3D image and generates three 2D images representing the maximum intensities in x, y, and z directions.
Let I be an input grayscale 3D image of size (m*n* l). Let X, Y, and Z be the output 2D images representing the maximum intensities in x, y, and z directions.
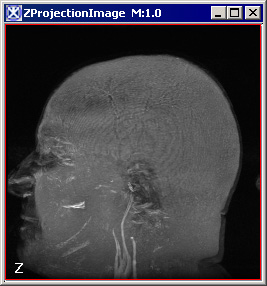
X is a 2D image of size (y* z) formed by viewing along the x-axis and selecting the highest intensities in the y-z plane. Y image is of size (x*z) formed by viewing along the y-axis and selecting highest intensities in the x-z plane. Similarly, Z image is formed by viewing along the Z axis and selecting highest intensities in the x-y plane and is of size (x * y).
Note: The MIP algorithm allows to set the minimum and maximum thresholds on the image before computation which aids in enhancing MIP visualization in certain cases.
Image Types
This algorithm works with 3D grayscale images (all image types except complex). By default, the result images are of type float.
Special Notes
The origin of the result images is at the top left corner and the original resolutions of the 3D image in all directions are preserved.
Applying the Maximum Intensity Projection
To run the method,
1 Open an image of interest.
2 Select Utilities > Maximum intensity projection (MIP).
3 The Maximum Intensity Projection dialog box appears.
4 Complete the dialog box. You might choose to fill out two input fields - Threshold Minimum and Threshold Maximum; or just use the default values. These fields are initially populated with the minimum and maximum intensities of the image.
5 Click OK.
The algorithm begins to run, and a pop-up window appears with the status. The following message appears: Computing Maximum Intensity Projection. When the algorithm has finished to run, the pop-up window closes and the three 2D images appear in three different windows. See Figure 44.
