Installing mipav
Contents
MIPAV system requirements
See the main page: MIPAV system requirements.
Installing MIPAV
Download the MIPAV installation package from MIPAV web site and save it to your hard drive. Then, run the installation program. Make sure that you have enough disk space and memory resources.
To download and install MIPAV:
- Either use this http://mipav.cit.nih.gov/download.php link to the Download MIPAV page, or type the MIPAV web address: http://mipav.cit.nih.gov/ into your browser. The Medical Image Processing, Analysis, & Visualization (MIPAV) web page opens.
- Click either the Version x.xx link or the Download link. The Download MIPAV page opens.
- Scroll down the page and fill out the yellow information form (required). The form is for information purposes only.
- For each version (e.g., Windows, Linux, Solaris, Macintosh, or Other Java-enabled platforms), click the appropriate platform link. The File Download dialog box opens. Follow the instructions provided by the dialog box.
- The page also provides the installation instructions for different platforms.
- Follow the installation instructions for your workstation's platform to install MIPAV.
Note: You might choose to download the tested release version or the nightly test-build, which is the most recent un-tested version.
MIPAV news and updates
To view the latest version of MIPAV available for download, go to the MIPAV web site. On the Home page, you find the number of the most current version of MIPAV and a list of enhancements and corrections.
To view MIPAV news and updates
- Go to the MIPAV web site.
- On the Home page, click What's New. The MIPAV Wiki page opens. This page lists the enhancements and corrections made to the most recent version of MIPAV.
GPU computing
See the main page: GPU computing.
Upgrading MIPAV
Generally, when a new version of MIPAV is available, a message is sent to the MIPAV mailing list. You can also find the latest version number if you go to the MIPAV web site and select the Download link.
Before upgrading MIPAV, make sure that you saved the DICOM hosts information. You need to re-enter this information when you reinstall/upgrade MIPAV, see Working with DICOM Images: Posing queries and retrieving images.
To upgrade MIPAV
- Download the installation file for the new version.
- Remove the existing copy of the software.
- Install the new version of the software.
Uninstalling MIPAV
When MIPAV is removed, all of the originally installed software components are removed from your hard drive. Note: files and folders created after installation, such as image dataset files, plug-ins, etc. are not removed.
To remove MIPAV from your computer
- Navigate to the directory where the MIPAV software is installed. If you are not sure of the location:
- Start MIPAV.
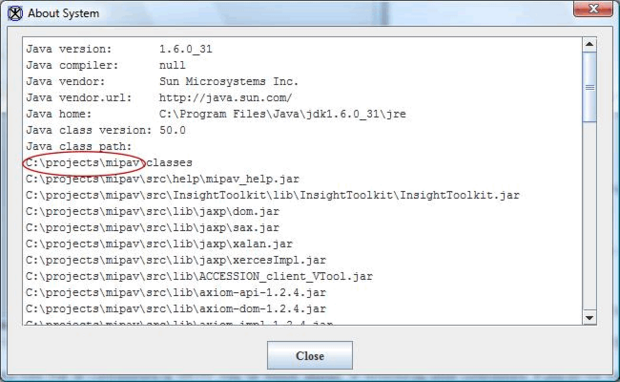
- Select Help > JVM information. The About window opens.
- Note the User Directory, it is listed under the Java class path.
For example: C:\projects\mipav
The installation directory is the same as User Directory.
- In the User Directory, navigate to the UninstallerData subdirectory.
- Run the MIPAV uninstallation file.
- Click Uninstall to begin the process.
- When finished, the Uninstall Complete window opens.
- Click Exit to close the window.
Note: If a component has not been removed, you can use the standard file deletion procedures for your platform to manually remove it. By default, all of MIPAV's components are stored in the directory where MIPAV was installed.

