Image submission plug-in
Both BRICS and FITBIR support the receipt of unprocessed brain images in DICOM format and processed images in a variety of formats including DICOM, MINC 1.0 and 2.0, Analyze, NIfTI-1, AFNI and SPM.
Contents
- 1 Introduction
- 2 Overview
- 3 Supported image formats
- 4 System requirements
- 5 Module input and output
- 6 Data for uploading
- 7 Image submission package
- 8 Running the Imaging Data Submission and Validation tool
- 9 Output log
- 10 Preview Image box
- 11 Error messages
- 12 What should be done next?
- 13 MIPAV notes
- 14 See also
Introduction
In order to ensure the quality of uploaded data and also to make data easy to query, the imaging data should be submitted in a specific format and range values should comply with the values defined in the data dictionary. All submitted research data must be validated against the values defined in the data dictionary prior to submission. To facilitate this process, we provide the Imaging Data Submission and Validation tool that assists researchers with the submission of imaging data. The tool is a component of the MIPAV (Medical Image Processing, Analysis, and Visualization) application. See also: BRICS data dictionary.
Overview
The Imaging Data Submission and Validation tool accepts the brain imaging data (in the form of brain image file and a CSV file) from a researcher and validates the metadata associated with the image files against the values defined in the data dictionary. It then creates an image submission package. The tool also provides a report of any data discrepancies, errors, and warnings received. If any validation errors are found, an image submission package cannot be created. In that case, the researched should edit data to fix all errors, first, and then re-validate the data.
See also:
- Data Repository tools
- Imaging data submission and validation module
- Data Upload module
- Data Download module
Supported image formats
The plug-in supports all file formats supported by MIPAV including processed and unprocessed brain images in DICOM format. If you are using different file format (not supported by MIPAV), please contact MIPAV support.
System requirements
The most recent version of 64-bit Java Runtime Environment (JRE) (6 or 7) is required in order to run the Imaging Data Submission and Validation module.
Module input and output
Module input:
- brain image(s) in one of supported formats,
- corresponding CSV files with metadata, see Imaging data.
Module output:
- the brain image(s) in one of supported formats,
- the CSV file(s) confirmed against the data dictionary and ready for validation by the Data Validation module,
- the Output log that lists all brain image files and CSV files added to the image submission package. It also displays the path(s) to the directory where the image package(s) is stored.
Data for uploading
Data can be uploaded in the form of a brain image file and a corresponding CSV file that contains some additional patient/subject/visit information (not stored in the image header) as well as image related metadata.
Required image information
The following information is required for all image submissions:
- The patient/subject information including - GUID, a patient/subject age, a study site name, and a visit date;
- The image information including - imaging study date and time, imaging file name, imaging file itself, imaging file format and modality, image QA/QC information.
Image files
The brain image file can be in the form of
- a single file in one of supported formats,
- a DICOM multifile or some other multifile in one of the supported formats,
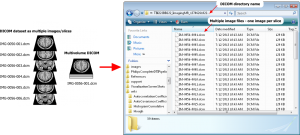
- a ZIP archive that contains an image dataset (e.g. DICOM dataset with images of multiple slices stored in separate image files - a multifile).
Multifiles
Multifiles or multivolume image datasets (multivolumes) are image datasets, (e.g. DICOM datasets), composed of multiple files. These are 3D (3-dimensional) or 4D (4-dimensional, including time as a 4th dimension) image datasets that contain images of multiple slices. See also: Image formats descriptions and Opening image files in MIPAV.
Each image slice is a few millimeters thick and often can be considered as a 2D image. Each image of a single slice has a header that contains both:
- The slice specific information,
- The information about the whole dataset.
A DICOM dataset can be stored on your computer as a set of multiple files - one file per each image slice. In that case it will occupy a whole directory.
To read more about DICOM image basics refer to "The Basic Structure of DICOM", by Charles Parisot, GE Medical Systems.
Including multifiles
There are 2 ways on how you can include a DICOM image (or any other brain 3D or 4D image that has multiple slices) as multifile into the image submission package:
- The easiest way is to 1) archive the DICOM image directory into a ZIP archive and 2) enter the ZIP archive file name in the corresponding column (Image Information.ImgFileName) in your CSV file.
- If you don't want to archive your DICOM dataset, you can include in your CSV file (in the Image Information.ImgFileName column) the name of the file that contains the image of the first slice in your DICOM dataset. In that case, you need to select the Open as Multifile option later when creating the image submission package.
See also: Open as Multifile.
CSV files
The structure of the CSV file should match a corresponding imaging form structure queryable by the query tool. See also: Using a CSV file.
For a sample CSV file please contact the Operations team - TBD.
If a researcher doesn't have a CSV file with metadata ready, he/she can use the Imaging Data Submission and Validation module to create one based on a chosen form structure.
See also: Using a form structure.
A form structure represents a grouping/collection of data elements used in BRICS data dictionary. A form structure is analogous to a case report form (CRF) (electronic or paper) where data elements are linked together for collection and display.
A data element is a logical unit of data used in BRICS. It contains a single piece of information of one kind. A data element has a name, precise definition, and a set of permissible values (codes), if applicable. A data element is not necessarily the smallest unit of data; it can be a unique combination of one or more smaller units. A data element occupies the space provided by field(s) on a paper/electronic case report form (CRF) or field(s) in a database record. BRICS allows a use of two types of data elements:
- Common data elements (CDEs), which are used across multiple studies and diseases/domains,
- And unique data elements (UDE), which are used to gather information for a particular study.
Both types of data elements are used in forms structures and to collect data.
Image submission package
The image submission package includes:
- A compressed brain image (ZIP),
- A JPG file that can be used as a thumbnail to preview the image in the database,
- A CSV file with the metadata describing the brain image. The data should match a queryable form structure.
Running the Imaging Data Submission and Validation tool
Before running the tool make sure that:
- You have your CSV file with image metadata ready,
- And that the "Image Information.ImgFileName" column in your CSV file has the correct image file name.
For a sample CSV file please contact the Operations team - TBD.
Location, location, location
By default, the CSV file with metadata and the imaging file(s) should be located in the same directory.
Output directory
When running the module you are asked to specify the Output directory which would be used by the module to store temporary files, validation logs, and image submission packages.
Specify the Output directory in the Output Directory for Validation tool box.
Using a CSV file
- Launch the Imaging Data Submission and Validation tool.
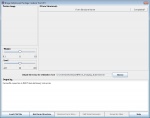
- The main plug-in window appears.
- In the main window, use the Load CSV File button to add the image file(s) and metadata file(s) (in CSV format) needed to create the image submission package.
- In the Choose CSV file window that appears, select the CSV file for upload and press Open. Use the navigation buttons to navigate to the folder where you store your CSV files.
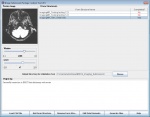
- The CSV file appears in the main window in the Form Structure Name table. The corresponding image file appears in the Preview Image box. See also: Opening an image as multifile.
- If the image file did not appear in the Preview Image box, review the error message issued by the system. Chances are that the CSV file has a wrong image file name/location. Review the CSV file and fix the image file name.
- In some cases the CSV appears as not completed (Status Completed is set to No). This means that some essential information is missing and you need to add this information manually.
- In order to add the missing information, press Add Form Structure. The Choose Form Structure dialog box appears listing the form structures available from the BRICS data dictionary.
- Select the corresponding form structure and press Add.
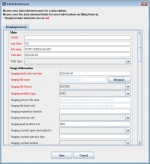
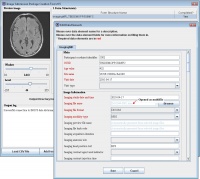
- The Edit Data Elements window appears populated with i) the data elements from the selected form structure and ii) with metadata from the CSV file.
- Review this information. Make sure that all required fields are filled in.
- Manually enter the missing image information. The required fields appear in red. If some of required fields are empty, the image submission package will fail validation.
- Upload the image file manually (if needed). Navigate to the Imaging File Name field and use the Browse button to select the file. The image thumbnail appears in the Preview box and the information from the file header populates into the corresponding fields. Refer to Using information from the file header for more info.
- When all required information is entered, press Save.
- In the main module window, select the Output directory which would be used by the Imaging Data Submission and Validation tool to store temporary files, validation logs and image submission packages.
- Press Generate Files. This will generate the image submission package. The output log message appears in the Output log window showing the progress, the image submission package file name(s) and location, and other helpful information. Finally, the image submission package appears in the Output directory.
Recommendations:
- Specify the the Output directory in the Output Directory for Validation tool box, that will help you to find the image submission package files.
- To view the tool progress, file location(s), and any messages issued by the tool, refer to the Output log window.
Using a form structure
- Run the Imaging Data Submission and Validation tool.
- The main plug-in window appears.
- Upload the corresponding form structure from the data dictionary, use the Add Form Structure button. The Choose Form Structure window appears displaying the form structures available from the BRICS data dictionary. Select the form structure and press Add.
- The Edit Data Elements window appears populated with the data elements from the selected form structure.
- To include the image file in the image submission package, navigate to the Imaging File Name field and use the Browse button to open the Open File dialog box and select the file. The image thumbnail appears in the Preview Image box and the information from the file header appears the corresponding fields. Refer to Using information from the file header for more info.
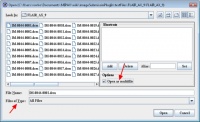
- To include an image dataset as multifile (e.g. DICOM dataset) in the image submission package, check the Open as multifile check-box in the Open File dialog box. The whole dataset will be included in the image submission package and the central slices appears as a thumbnail in the Preview Image box. See also: Opening an image as multifile and Multifiles.
- Review the information entered in the previous step. Make sure that all required fields (appear in red) are filled in. If some of required fields are empty, the form structure status will appear as not completed and the image submission package fails validation.
- Manually enter the missing information. In order to complete the image submission package, the following information is required: i) the patient/subject information including GUID, a patient/subject age, a study site name, and a visit date and ii) the image information including - the imaging study date and time, the imaging file name, the imaging file itself, imaging file format and modality. See also: Required image information.
- After all required fields have been filled in, press Save. Note that depending on the form structure required data may vary. Refer to Required image information for more info.
- Specify the output directory which would be used by the module to store temporary files, validation logs and image submission packages.
- Press Generate Files. This will generate the image submission package. The output log message appears in the Output log window showing the progress, the image submission package file name(s) and location, and other helpful information. Finally, the image submission package appears in the Output directory.
Recommendations:
- Specify the the Output directory in the Output Directory for Validation tool box, that will help you to find the image submission package files.
- To view the tool progress, file location(s), and any messages issued by the tool, refer to the Output log window.
Using information from the image file header
If you enter the image name into a CSV file in the "Image Information.ImgFileName" column, the Image Submission tool will read the information from the file header and populate it into the Edit Data Elements window.
For large data sets you can use a ZIP file, e.g. ImagingMR_1370626102276.zip file contains a DICOM dataset. See also: Multifiles and Opening an image as multifile.
If you need to manually upload image files,
- Navigate to the Imaging File Name field and use the Browse button to open the Open File dialog box.
- Navigate to the directory where the image file is located and select the file name from the list of files. Press Open.
- The information from the file header will be automatically populated into the Edit Data Elements window.
- The image preview appears in the Preview box in the main plug-in window.
What to do if the image file does not show up it the file directory?
If the image file did not appear in the directory you selected, check the files types listed in the Files of Type field located near the bottom of the dialog box.
To display all file types(recommended), select All Files or All.
Opening an image as multifile
Multifiles are image datasets (e.g. DICOM datasets) that are composed of multiple files. Each file contains a single image slice and has a header that contains both 1) the slice specific information and 2) the information about the whole dataset.
See also: Multifiles
To open an image as multifile:
- In the Open dialog box, navigate to the directory where the file is stored.
- Select the image file.
- Then, select the Open as Multifile check-box. The name of the image appears in the Imaging file name filed and the central slic appears in the Preview image box.
- The whole dataset will be included in the image submission package and the central slices appears as a thumbnail in the Preview Image box.
Output log
| When generating of the image submission package is complete, the log message appears in the Output Log window. The message lists all brain image files and CSV files added to the image submission package. It also displays the path(s) to the directory where the image package(s) is stored. |
Preview Image box
The Preview Image box displays a thumbnail for the uploaded image.
In order to have a better preview, you can change Window and Level settings.
- Settings for Window can be adjusted from 0.1 to 10,
- Settings for Level can be adjusted -255 to 255.
Error messages
| This error message appears when the information in the image file header does not match the information from the corresponding CSV file. You can choose to either use the information from the file header or from the CSV file. The better solution, though, would be to review your CSV file first and make sure it matches the image header information, and then to re-upload the updated CSV file. | |
| This error message appears when the CSV file points to the image file that does not exist or its name was misspelled. The solution is to review your CSV file and fix the image file name. |
What should be done next?
Use the Data Validation module to re-validate the CSV file from the image submission package. The Data Validation module assists researchers with the submission of both imaging and non-imaging data into the repository. The Data Validation module verifies that data conforms to the required format and range values defined in the data dictionary (note that for the imaging data this is going to be a second validation needed to ensure the quality of data). The Data Validation module validates the metadata associated with the imaging files identified by the user for submission against the data dictionary. If everything is OK, the Data Validation module creates a submission ticket and submission package. After that data are good for uploading. If errors are found, the module provides a detailed report of any data discrepancies, errors, and warnings. The module runs as a Java Web Start application locally on a user's computer (Java runtime environment is required).
Read more ...
The Data Validation module can be accessed via Data Repository > Validation Tool menu - TBD.
MIPAV notes
- If you run the Imaging Data Submission and Validation tool through MIPAV as a plug-in and it does not appear under Plugins > Generic in the Main menu, you might consider installing the plug-in. If the installed plug-in did not appear in the MIPAV menu under Plug-ins> Generic> FITBIRImage, restart MIPAV.
