|
|
| (One intermediate revision by the same user not shown) |
| Line 3: |
Line 3: |
| | If the pixel value from a chosen pixel in Image A equals zero, then the result pixel value is set equal to the corresponding Image B pixel value. Otherwise, the result pixel value is the same as for the Image A (i.e. stays unchanged). | | If the pixel value from a chosen pixel in Image A equals zero, then the result pixel value is set equal to the corresponding Image B pixel value. Otherwise, the result pixel value is the same as for the Image A (i.e. stays unchanged). |
| | | | |
| − | <div style="font-style: normal; font-weight: normal; margin-bottom: 0pt; margin-left: 36pt; margin-right: 0pt; margin-top: 0pt; text-align: left; text-decoration: none; text-indent: -12pt; text-transform: none; vertical-align: baseline"><font color="#000000"> Result=Image B, if Image A=0;<br /></font></div><div style="font-style: normal; font-weight: normal; margin-bottom: 0pt; margin-left: 36pt; margin-right: 0pt; margin-top: 0pt; text-align: left; text-decoration: none; text-indent: -12pt; text-transform: none; vertical-align: baseline"><font color="#000000"> otherwise, Result=Image A.<br /></font></div><div style="font-style: normal; font-weight: normal; margin-bottom: 0pt; margin-left: 0pt; margin-right: 0pt; margin-top: 0pt; text-align: left; text-decoration: none; text-indent: 0pt; text-transform: none; vertical-align: baseline"><font color="#000000">
| + | Result=Image B, if Image A=0;<br /> |
| | + | otherwise, Result=Image A.<br /> |
| | | | |
| | {| border="1" cellpadding="5" | | {| border="1" cellpadding="5" |
| − | |+ <div style="font-style: normal; margin-bottom: 3pt; margin-left: 0pt; margin-right: 0pt; margin-top: 9pt; text-align: left; text-decoration: none; text-indent: 0pt; text-transform: none; vertical-align: baseline">'''<font color="#000000"> Figure 31. OR(Image A; Image B)<br /></font>'''</div> | + | |+ '''Figure 31. OR(Image A; Image B)''' |
| | |- | | |- |
| | | | | | |
| Line 28: |
Line 29: |
| | | | |
| | {| border="1" cellpadding="5" | | {| border="1" cellpadding="5" |
| − | |+ <div style="font-style: normal; margin-bottom: 3pt; margin-left: 0pt; margin-right: 0pt; margin-top: 9pt; text-align: left; text-decoration: none; text-indent: 0pt; text-transform: none; vertical-align: baseline">'''<font color="#000000"> Figure 32. XOR(Image A; Image B)<br /></font>'''</div> | + | |+ '''Figure 32. XOR(Image A; Image B)''' |
| | |- | | |- |
| | | | | | |
| Line 51: |
Line 52: |
| | | | |
| | {| border="1" cellpadding="5" | | {| border="1" cellpadding="5" |
| − | |+ <div style="font-style: normal; margin-bottom: 3pt; margin-left: 0pt; margin-right: 0pt; margin-top: 9pt; text-align: left; text-decoration: none; text-indent: 0pt; text-transform: none; vertical-align: baseline">'''<font color="#000000"> Figure 33. Subtract(Image A; Image B)<br /></font>'''</div> | + | |+ '''Figure 33. Subtract(Image A; Image B)''' |
| | |- | | |- |
| | | | | | |
| Line 96: |
Line 97: |
| | | | |
| | {| border="1" cellpadding="5" | | {| border="1" cellpadding="5" |
| − | |+ <div style="font-style: normal; margin-bottom: 3pt; margin-left: 0pt; margin-right: 0pt; margin-top: 9pt; text-align: left; text-decoration: none; text-indent: 0pt; text-transform: none; vertical-align: baseline">'''<font color="#000000"> Figure 34. Image A after applying f(p)=pow(Image A;3). The function was applied for all three color channels. The result values greater than 255, as for the B channel, were set to 255<br /></font>'''</div> | + | |+ '''Figure 34. Image A after applying f(p)=pow(Image A;3). The function was applied for all three color channels. The result values greater than 255, as for the B channel, were set to 255''' |
| | |- | | |- |
| | | | | | |
| Line 113: |
Line 114: |
| | To run this algorithm, complete the following steps: | | To run this algorithm, complete the following steps: |
| | | | |
| − | <div style="font-style: normal; font-weight: normal; margin-bottom: 0pt; margin-left: 18pt; margin-right: 0pt; margin-top: 6pt; text-align: left; text-decoration: none; text-indent: -18pt; text-transform: none; vertical-align: baseline"><font color="#000000"> 1 Open at least two images. The images must have the same dimensions.<br /></font></div><div style="font-style: normal; font-weight: normal; margin-bottom: 0pt; margin-left: 18pt; margin-right: 0pt; margin-top: 6pt; text-align: left; text-decoration: none; text-indent: -18pt; text-transform: none; vertical-align: baseline"><font color="#000000"> 2 Select Utilities >Image Calculator. The dialog box opens. See Figure 35.<br /></font></div><div style="font-style: normal; font-weight: normal; margin-bottom: 0pt; margin-left: 18pt; margin-right: 0pt; margin-top: 6pt; text-align: left; text-decoration: none; text-indent: -18pt; text-transform: none; vertical-align: baseline"><font color="#000000"> 3 Use the Operator list box to select the math operator (Add, AND, Average, etc.).<br /></font></div><div style="font-style: normal; font-weight: normal; margin-bottom: 0pt; margin-left: 18pt; margin-right: 0pt; margin-top: 6pt; text-align: left; text-decoration: none; text-indent: -18pt; text-transform: none; vertical-align: baseline"><font color="#000000"> 4 Use the Image B list box to select Image B.<br /></font></div><div style="font-style: normal; font-weight: normal; margin-bottom: 0pt; margin-left: 18pt; margin-right: 0pt; margin-top: 6pt; text-align: left; text-decoration: none; text-indent: -18pt; text-transform: none; vertical-align: baseline"><font color="#000000"> 5 Check the Clip option if you want to clamp result data to the bounds of the input image type. Check the Promote option to promote image type so that the range of the result fits into the new image type. Refer to "clip mode" and "promotion mode" .<br /></font></div><div style="font-style: normal; font-weight: normal; margin-bottom: 0pt; margin-left: 18pt; margin-right: 0pt; margin-top: 6pt; text-align: left; text-decoration: none; text-indent: -18pt; text-transform: none; vertical-align: baseline"><font color="#000000"> 6 Click OK. The algorithm begins to run.<br /></font></div><div style="font-style: normal; font-weight: normal; margin-bottom: 0pt; margin-left: 18pt; margin-right: 0pt; margin-top: 6pt; text-align: left; text-decoration: none; text-indent: -18pt; text-transform: none; vertical-align: baseline"><font color="#000000"> 7 Depending on whether you selected New Image or Replace Image A, the result appears in a new window or replaces the image to which the algorithm was applied.<br /></font></div><div style="font-style: normal; font-weight: normal; margin-bottom: 0pt; margin-left: 0pt; margin-right: 0pt; margin-top: 0pt; text-align: left; text-decoration: none; text-indent: 0pt; text-transform: none; vertical-align: baseline"><font color="#000000"> <br /></font></div><div style="font-style: normal; font-weight: normal; margin-bottom: 0pt; margin-left: 0pt; margin-right: 0pt; margin-top: 0pt; text-align: left; text-decoration: none; text-indent: 0pt; text-transform: none; vertical-align: baseline"><font color="#000000"> <br /></font></div><div style="font-style: normal; font-weight: normal; margin-bottom: 0pt; margin-left: 0pt; margin-right: 0pt; margin-top: 0pt; text-align: left; text-decoration: none; text-indent: 0pt; text-transform: none; vertical-align: baseline"><font color="#000000">
| + | 1 Open at least two images. The images must have the same dimensions.<br /> |
| | + | 2 Select Utilities >Image Calculator. The dialog box opens. See Figure 35.<br /> |
| | + | 3 Use the Operator list box to select the math operator (Add, AND, Average, etc.).<br /> |
| | + | 4 Use the Image B list box to select Image B.<br /> |
| | + | 5 Check the Clip option if you want to clamp result data to the bounds of the input image type. Check the Promote option to promote image type so that the range of the result fits into the new image type. Refer to "clip mode" and "promotion mode" .<br /> |
| | + | 6 Click OK. The algorithm begins to run.<br /> |
| | + | 7 Depending on whether you selected New Image or Replace Image A, the result appears in a new window or replaces the image to which the algorithm was applied.<br /> |
| | | | |
| | {| border="1" cellpadding="5" | | {| border="1" cellpadding="5" |
| − | |+ <div style="font-style: normal; margin-bottom: 3pt; margin-left: 0pt; margin-right: 0pt; margin-top: 9pt; text-align: left; text-decoration: none; text-indent: 0pt; text-transform: none; vertical-align: baseline">'''<font color="#000000"> Figure 35. The Image Calculator dialog box options<br /></font>'''</div> | + | |+ '''Figure 35. The Image Calculator dialog box options''' |
| | |- | | |- |
| | | | | | |
| Line 124: |
Line 131: |
| | | rowspan="4" colspan="1" | | | | rowspan="4" colspan="1" | |
| | [[Image:ImageCalculatorDB.jpg]] | | [[Image:ImageCalculatorDB.jpg]] |
| − | |}<br clear="all" /><br /></font></div><div style="font-style: normal; font-weight: normal; margin-bottom: 0pt; margin-left: 0pt; margin-right: 0pt; margin-top: 0pt; text-align: left; text-decoration: none; text-indent: 0pt; text-transform: none; vertical-align: baseline"><font color="#000000"> <br /></font></div><div style="font-style: normal; font-weight: normal; margin-bottom: 0pt; margin-left: 0pt; margin-right: 0pt; margin-top: 0pt; text-align: left; text-decoration: none; text-indent: 0pt; text-transform: none; vertical-align: baseline"><font color="#000000"> <br /></font></div><div style="font-style: normal; font-weight: normal; margin-bottom: 0pt; margin-left: 0pt; margin-right: 0pt; margin-top: 0pt; text-align: left; text-decoration: none; text-indent: 0pt; text-transform: none; vertical-align: baseline"><font color="#000000"> <br /></font></div><div style="font-style: normal; font-weight: normal; margin-bottom: 0pt; margin-left: 0pt; margin-right: 0pt; margin-top: 0pt; text-align: left; text-decoration: none; text-indent: 0pt; text-transform: none; vertical-align: baseline"><font color="#000000"> <br /></font></div><div style="font-style: normal; font-weight: normal; margin-bottom: 0pt; margin-left: 0pt; margin-right: 0pt; margin-top: 0pt; text-align: left; text-decoration: none; text-indent: 0pt; text-transform: none; vertical-align: baseline"><font color="#000000"> <br /></font></div><div style="font-style: normal; font-weight: normal; margin-bottom: 0pt; margin-left: 0pt; margin-right: 0pt; margin-top: 0pt; text-align: left; text-decoration: none; text-indent: 0pt; text-transform: none; vertical-align: baseline"><font color="#000000"> <br /></font></div><div style="font-style: normal; font-weight: normal; margin-bottom: 0pt; margin-left: 0pt; margin-right: 0pt; margin-top: 0pt; text-align: left; text-decoration: none; text-indent: 0pt; text-transform: none; vertical-align: baseline"><font color="#000000"> <br /></font></div><div style="font-style: normal; font-weight: normal; margin-bottom: 0pt; margin-left: 0pt; margin-right: 0pt; margin-top: 0pt; text-align: left; text-decoration: none; text-indent: 0pt; text-transform: none; vertical-align: baseline"><font color="#000000"> <br /></font></div><div style="font-style: normal; font-weight: normal; margin-bottom: 0pt; margin-left: 0pt; margin-right: 0pt; margin-top: 0pt; text-align: left; text-decoration: none; text-indent: 0pt; text-transform: none; vertical-align: baseline"><font color="#000000"> <br /></font></div>
| |
| | |- | | |- |
| | | | | | |
Latest revision as of 19:14, 22 February 2012
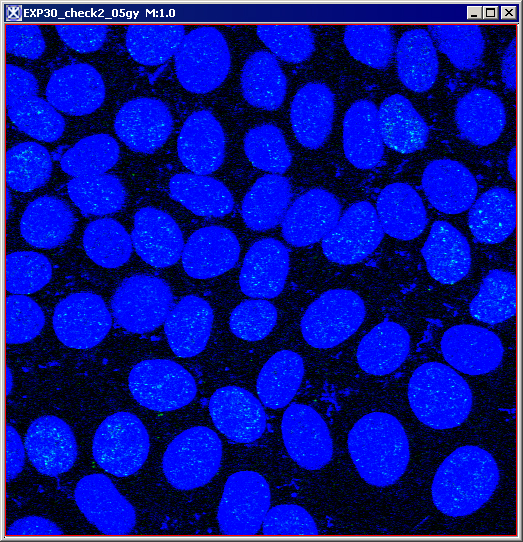
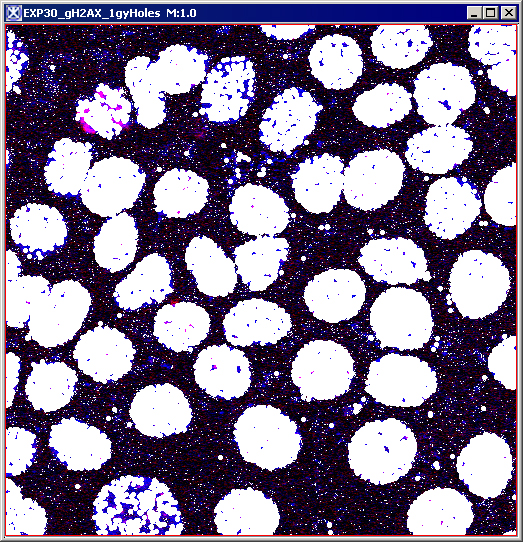
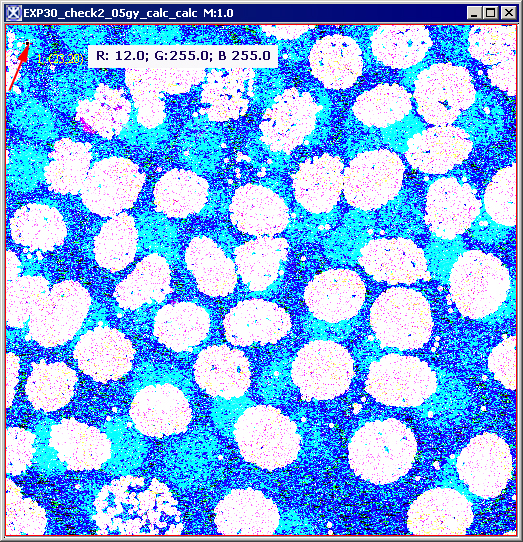
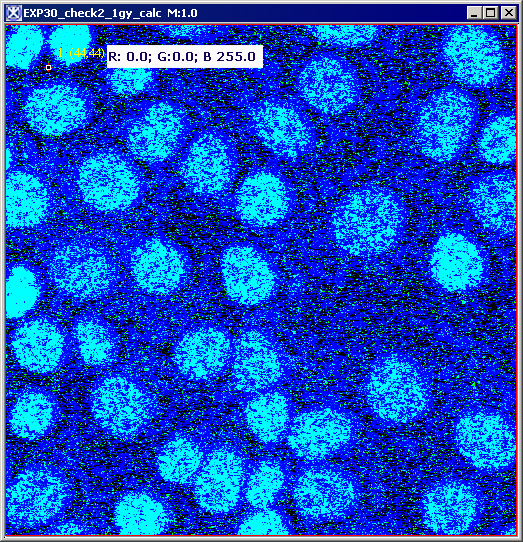
OR
If the pixel value from a chosen pixel in Image A equals zero, then the result pixel value is set equal to the corresponding Image B pixel value. Otherwise, the result pixel value is the same as for the Image A (i.e. stays unchanged).
Result=Image B, if Image A=0;
otherwise, Result=Image A.
Figure 31. OR(Image A; Image B)
|
|
|
|
|
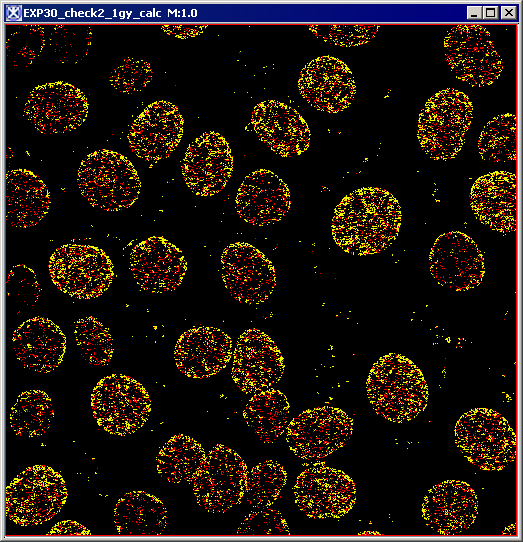
Image A
|
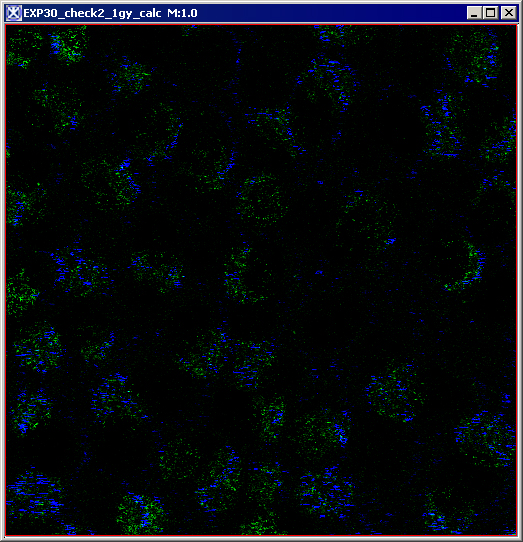
Image B
|
(Image A OR Image B)
|
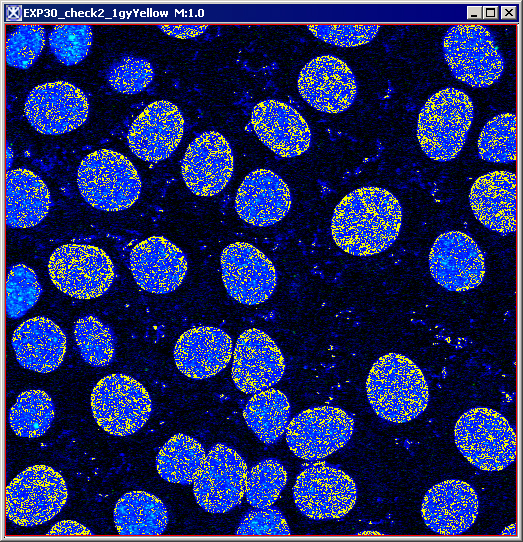
XOR
It overlays two images together, but then clears the area that is overlapped back to transparency. If both Image A and Image B pixel values are nonzero, then the result image is set to zero. If both Image A and Image B pixel values are zero, then the result image remains zero. If only one of Image A and Image B is nonzero, then the result retains or assumes the nonzero value.
Figure 32. XOR(Image A; Image B)
|
|
|
|
|
Image A
|
Image B
|
(Image A XOR Image B)
|
Subtract
Subtracts the pixel values of Image B from the corresponding pixel values of Image A.
Figure 33. Subtract(Image A; Image B)
|
|
|
|
|
Image A
|
Image B
|
Image A-Image B
|
Advanced math options
Abs
Generates the absolute value of the active image or selection.
Exp
Applies the function f(p) = exp(p) to each pixel (p) in the image or selection. For RGB images, this function is applied to all three color channels.
Ln
Applies the function f(p) = ln(p) to each pixel (p) of the image or selection. For RGB images, this function is applied to all three color channels.
Log
Applies the function f(p) = log(p) to each pixel (p) in the image or selection. For RGB images, this function is applied to all three color channels.
Pow
The function pow (x,y) produces a value of x raised to the power of y, e.g., pow(2,3) gives 8. For RGB images, this function is applied to all three color channels. In clip mode, for RGB images with byte values, results greater than 255 are set to 255. In promote destination image mode, the image will be promoted to ARGB_USHORT and capable of storing color values of up to 65535.
Sin, cos, tan
Apply the functions sin(p), cos(p), and tan(p) to each pixel (p) of the image or selection. For RGB images, the chosen function is applied to all three color channels.
Figure 34. Image A after applying f(p)=pow(Image A;3). The function was applied for all three color channels. The result values greater than 255, as for the B channel, were set to 255
|
|
|
|
Image A
|
f(p)=pow(Image A;3)
|
Applying the Image Calculator to images
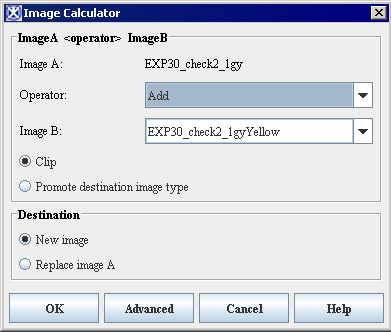
To run this algorithm, complete the following steps:
1 Open at least two images. The images must have the same dimensions.
2 Select Utilities >Image Calculator. The dialog box opens. See Figure 35.
3 Use the Operator list box to select the math operator (Add, AND, Average, etc.).
4 Use the Image B list box to select Image B.
5 Check the Clip option if you want to clamp result data to the bounds of the input image type. Check the Promote option to promote image type so that the range of the result fits into the new image type. Refer to "clip mode" and "promotion mode" .
6 Click OK. The algorithm begins to run.
7 Depending on whether you selected New Image or Replace Image A, the result appears in a new window or replaces the image to which the algorithm was applied.
Figure 35. The Image Calculator dialog box options
|
Image A
|
Image A.
|
|
|
Operator
|
Select the math operator from the list.
|
|
Image B
|
Select Image B from the list.
|
|
Clip
|
Select this option if you want the result image to be clamped at the maximum (minimum) value of Image A data type. See also "clip mode".
|
|
Promote destination image type
|
When this mode is selected and the result value is out of the legal range of Image A data type, then the result image type is promoted to a new data type with a data type range capable of expressing the minimum and maximum values. See also "promotion mode".
|
|
Destination
|
|
New image
|
The result image will open in a new image frame.
|
|
Replace image
|
The result image will replace Image A.
|
|
OK
|
Applies the algorithm according to the specifications in this dialog box.
|
|
Advanced
|
Calls the Enter Advanced Operator dialog box.
|
|
Cancel
|
Disregards any changes that you made in this dialog box and closes it.
|
|
Help
|
Displays online help for this dialog box.
|
Image Calculator: Advanced image calculator options


