Examples
From MIPAV
Examples:
Applying Face De-Identification, BSE, and Fuzzy C-Means
In this example, we will to show you how to record a script, and then run it in via the Scripting menu. The script includes:
1 Applying the Face De-Identification algorithm;
2 Applying the Extract Brain Surface (BET) algorithm;
3 And finally, performing brain segmentation using the Fuzzy C-Means > Single Channel algorithm.
To start recording the script:
Open an image of interest and then, press Start Recording Script button on the Scripts toolbar. The Record New Script dialog box appears indicating that recording a script is started.
Recording the Face De-Identification algorithm execution:
1 Call Algorithms > Brain Tools > Face De-Identification;
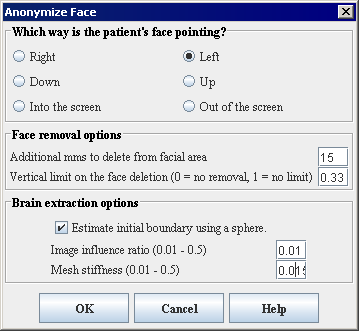
2 The Anonymize Face dialog box opens;
3 Fill out the dialog box as shown in [MIPAV_Scripting.html#1336039 Figure 290]. The right column displays the script text corresponding to the dialog box options;
4 Press OK to run the algorithm.
Figure 290. The Anonymize Face dialog box options and the corresponding script text. Here, "face_orientation int 2" is an image specific and corresponds to the Left option chosen in the "Which way is the patient's face pointing?" dialog
|
{| align="center"
|
|
|
FaceAnonymizerBET("input_image_1 ext_image $image1", "face_orientation int 2", "mms_to_delete_from_face int 15", "vertical_deletion_limit_ratio float 0.33", "bet_do_estimate_with_sphere boolean true", "bet_image_influence float 0.01", "bet_stiffness float 0.015")
|}
After the algorithm finishes running and the result image appears on the screen, make the result image active and call the next Extract Brain Surface (BET) algorithm.
Recording the BET algorithm execution:
1 Call Algorithms > Brain Tools > Extract Brain Surface (BET);
2 The Extract Brain dialog box opens;
3 Fill out the dialog box as shown in [MIPAV_Scripting.html#1336065 Figure 291]. The right column displays the part of the script corresponding to the dialog box options;
4 Press OK to start the algorithm.
Figure 291. The Extract Brain dialog box options and the corresponding script text. Here, "init_center_point list_float 114.22103,75.82523,94.18212" is an image specific
|
{| align="center"
|
File:Script BET DialogBox12.gif
|
|
ExtractBrain("input_image_1 image $image1", "orientation_type int 0", "do_use_sphere_estimation boolean false", "do_show_just_init_ellipse boolean false", "num_iterations int 100", "depth int 11", "image_ratio float 0.2", "stiffness float 0.15", "do_second_stage_erosion boolean false", "factor_above_median_to_erode float 0.0", "do_extract_paint boolean false", "do_init_with_center_of_mass boolean true", "init_center_point list_float 114.22103,75.82523,94.18212")
|}
After the algorithm finishes running and the result image appears on the screen, make the result image active and call the last algorithm - Fuzzy C-Means > Single Channel.
Recording the Fuzzy C-Means > Single Channel algorithm execution:
1 Call Algorithms > Segmentation > Fuzzy C-Means > Single Channel;
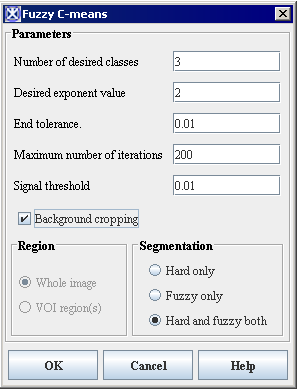
2 The Fuzzy C-Means dialog box opens;
3 Fill out the dialog box as shown in [MIPAV_Scripting.html#1336088 Figure 292]. The right column displays the part of the script corresponding to the dialog box options;
4 Press OK to start the algorithm.
Figure 292. The FUzzy C-Means dialog box options and the corresponding script text. Here, "centroids list_float 8318.767,20926.652,33534.54" is an image specific
|
{| align="center"
|
|
|
FuzzyCMeans("input_image_1 image $image1", "number_of_result_images int 4", "do_process_whole_image boolean true", "number_of_classes int 3", "exponent_q float 2.0", "do_crop_background boolean true", "threshold float 0.01", "end_tolerance float 0.01", "max_iterations int 200", "segmentation_type int 0", "centroids list_float 8318.767,20926.652,33534.54")
|}
After the algorithm finishes running and the result image appears on the screen, close all intermediate images, and then save the final image.
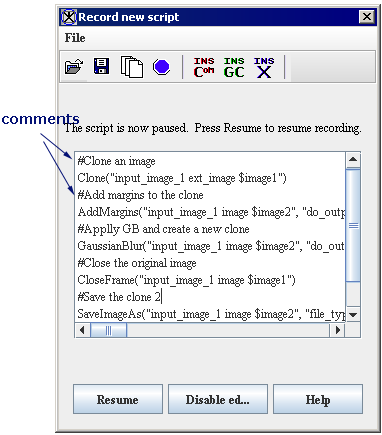
Now, save the script. You might consider to add comments to the script text. In order to do that,
1 Click the Insert Comment icon located on the Record New Script dialog box toolbar;
2 The Enter Comment window appears;
3 Type in the comment and press OK;
4 The comment text appears in the Record New Script dialog box;
5 Save the script;
6 Close the dialog box.
To run the script via the Scripts menu
1 Call Scripts > Run Script from the main MIPAV menu;
2 Select the script you've just recorded, and press OK;
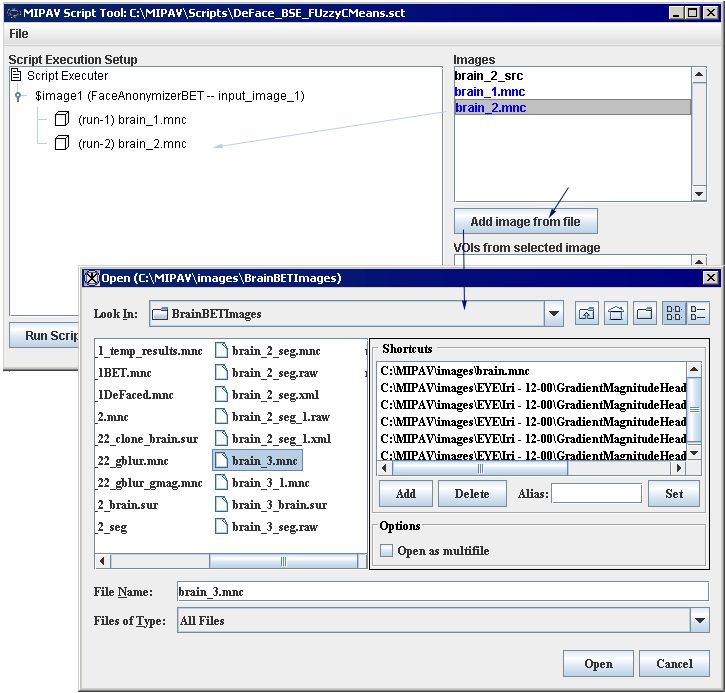
3 The MIPAV Script Tool dialog box opens;
4 In the dialog box, use the Add Images from File button to select and add images, on which you wish to run the script, to the Images window;
5 Then, use the mouse to drug images from the Images window to the Script Execution Setup window. Refer to [MIPAV_Scripting.html#1336128 Figure 293] and [MIPAV_Scripting.html#1340433 "Adding images to the Script Execution Setup" ]on [MIPAV_Scripting.html#1340433 page 450];
6 Press Run Script.
Figure 293. Adding images to the Images window, first, and then moving the images to the main Script execution Setup window
|
{| align="center"
|
|
|}
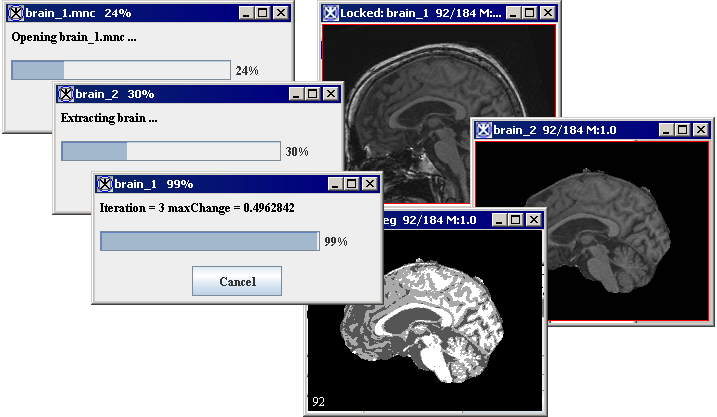
The script starts running and the intermediate images and progress bars appear on the screen. See [MIPAV_Scripting.html#1336142 Figure 294].
Figure 294. The script is running in group mode and the intermediate images and progress bars appear on the screen
|
{| align="center"
|
|
|}
When the algorithm finishes running, the progress bars disappear, and the results replace the original and intermediate images.
Script
The script text is shown below. Note that the comment strings included in the script start with "#".
# First Face De-Identification
FaceAnonymizerBET("input_image_1 ext_image $image1", "face_orientation int 2", "mms_to_delete_from_face int 15", "vertical_deletion_limit_ratio float 0.33", "bet_do_estimate_with_sphere boolean true", "bet_image_influence float 0.01", "bet_stiffness float 0.015")
#Here, "face_orientation int 2" is an image specific.
# Second BET
ExtractBrain("input_image_1 image $image1", "orientation_type int 0", "do_use_sphere_estimation boolean false", "do_show_just_init_ellipse boolean false", "num_iterations int 100", "depth int 11", "image_ratio float 0.2", "stiffness float 0.15", "do_second_stage_erosion boolean false", "factor_above_median_to_erode float 0.0", "do_extract_paint boolean false", "do_init_with_center_of_mass boolean true", "init_center_point list_float 114.22103,75.82523,94.18212")
#Here, "init_center_point list_float 114.22103,75.82523,94.18212" is an image specific.
# Third Fuzzy C-Means
FuzzyCMeans("input_image_1 image $image1", "number_of_result_images int 4", "do_process_whole_image boolean true", "number_of_classes int 3", "exponent_q float 2.0", "do_crop_background boolean true", "threshold float 0.01", "end_tolerance float 0.01", "max_iterations int 200", "segmentation_type int 0", "centroids list_float 8318.767,20926.652,33534.54")
#Here, "centroids list_float 8318.767,20926.652,33534.54" is an image specific.
#Closing intermediate images
CloseFrame("input_image_1 image $image4")
CloseFrame("input_image_1 image $image3")
CloseFrame("input_image_1 image $image2")
#Saving results
SaveImageAs("input_image_1 image $image5", "file_type string .xml")
Cloning images, adding margins, and applying gaussian blur
In this example, we will to show you how to record the script that does the following:
1 Clones an active image;
2 Adds margins to the clone;
3 Applies the Gaussian Blur algorithm to the clone, and produces the second clone;
4 Closes the original image and saves the clones.
To get started,
open an image of interest and then, press Start Recording Script button. The Record New Script dialog box appears indicating that recording a script is started, see [MIPAV_Scripting.html#1320274 Figure 295].
1 Call the Utilities > Clone (Copy). This clones the active image and the following string appears in the Recording Script dialog:
Clone("input_image_1 ext_image $image1")
Here, ext_ indicates that this image is not produced within the script, but must be selected by a user.
Here, the command in the script is Clone. This command clones an image which is labeled as $image1 in the script, and then passes it as input_image_1 parameter to the Clone operator.
Figure 295. The Record New Script dialog box appears indicating that recording a script is started. The initial script (A) and the script with comments (B)
|
{| align="center"
|

|
|
{| align="center"
|
|}
|}
2 Now, select the clone image and call Utilities > Add Image Margins. In the Add Image Border dialog box, specify the margins as shown in [MIPAV_Scripting.html#1320579 Figure 296] and press OK.
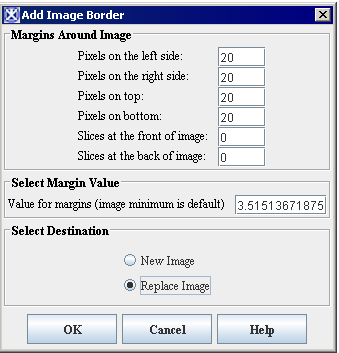
Figure 296. The Add Image Border dialog box options
|
{| align="center"
|
|
|
In the dialog box:
20 points margins are added to the top, bottom, left and right sides of the image
The Replace Image option is checked indicating that the modified image will appear in the same frame
|}
This adds margins to the image clone1, and the following string appears in the Recording Script dialog:
AddMargins("input_image_1 image $image2", "do_output_new_image boolean false", "left_side int 20", "right_side int 20", "top_side int 20", "bottom_side int 20", "front int 0", "back int 0", "margin_value double -5213.51513671875", "margin_value_rgb list_double 0.0,0.0,0.0")
Here, the command in the script is AddMargins(parameter1,...parameterN). Script parameters are as follows:
- "input_image_1 image $image2" shows that the script applies to the active image clone
- "do_output_new_image boolean false" indicates that the new image (with margins) appears in the same image frame replacing the old one[#1321322 4]
- "left_side int 20", "right_side int 20", "top_side int 20", "bottom_side int 20" are the image margins, refer to [MIPAV_Scripting.html#1320579 Figure 296]
- "front int 0", "back int 0" indicates that there are no slices added to the front and back of the image, refer to [MIPAV_Scripting.html#1320579 Figure 296]
- "margin_value double -5213.51513671875" - the margin fill value for grayscale images
- "margin_value_rgb list_double 0.0,0.0,0.0" - the margin fill value for RGB images
3 Select the clone image with margins and call Algorithms > Filters (spatial) > Gaussian Blur. In the Gaussian Blur dialog box that appears, specify the parameters as shown in [MIPAV_Scripting.html#1321344 Figure 297] and press OK.
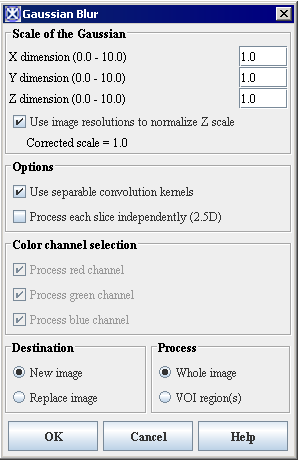
Figure 297. The Gaussian Blur dialog box
|
{| align="center"
|
|
|
Â
For the first time, use the default parameters for Scale of Gaussian, Options, and Color Channel Selection
Check the Destination > New Image option
Check the Process > Whole Image option
Press OK
|}
This applies the Gaussian Blur algorithm to the image clone, which now has margins added, and the following string appears in the Recording Script dialog:
GaussianBlur("input_image_1 image $image2", "do_output_new_image boolean true", "do_process_whole_image boolean true", "do_process_in_2.5D boolean false", "do_separable_convolution boolean true", "gauss_std_dev list_float 1.0,1.0,1.0", "gauss_do_z_resolution_correction boolean true", "do_process_r_g_b_channel list_boolean false,false,false")
Here, the command in the script is GaussianBlur(parameter1,...parameterN). The parameters are as follows:
- "input_image_1 image $image2" shows that the script applies to the image clone
- "do_output_new_image boolean true" indicates that the new image appears in a image frame
- "do_process_whole_image boolean true" indicates that the algorithm is applied to the whole image (not only to VOI regions)
- "do_separable_convolution boolean true" corresponds to checking the Use Separable Convolution Kernels option in the dialog box. For more information, refer to Volume 2 Algorithms, Section ``Applying the Gaussian Blur algorithm''
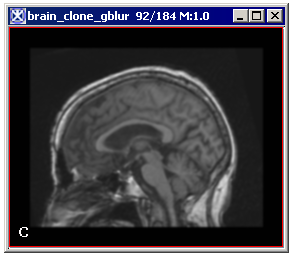
4 As a result, the second image clone appears on the screen. See [MIPAV_Scripting.html#1321946 Figure 298].
Figure 298. The original image (A), the first clone after applying margins (B), and the second clone (C) after applying Gaussian Blur
|
{| align="center"
|
File:ScriptingImage146.gif
|
|
|
{| align="center"
|
|}
|-
|
A
|
B
|
C
|}
5 Now, you can close the original image. And the following string appears in the script: CloseFrame("input_image_1 image $image1") indicating that the image frame has been closed.
6 You might save last two images. In order to do that, select the image frame, and then call File > Save Image As from the main MIPAV menu. The image will be saved in specified format in the chosen location. The following strings appears in the script: SaveImageAs("input_image_1 image $image2", "file_type string .mnc") indicating that the image has been saved as a MINC file.[#1342250 5]
7 To save the script, click File > Save. The program saves the script in the scripts home directory.
8 You might add the comments in the script. In order to do that, press the Insert Comment button, and enter the comment in the dialog box that appears. Add as many comments as needed. Then, save the script.
9 Click File > Exit to close the Record New Script dialog box. The dialog box closes. You should now be able to select and run the script from the Current Script box.
Applying gaussian blur and gradient magnitude
In this example, we want to show you the script that does the following:
1 Clones an image;
2 Apples Gaussian Blur to the clone;
3 Saves the clone;
4 Then, applies Gradient Magnitude to the saved clone;
5 Saves the result.
To get started,
open an image of interest and then, press the Start Recording Script button. The Record New Script dialog box appears indicating that recording a script is started. Refer to [MIPAV_Scripting.html#1320274 Figure 295].
1 Call the Utilities > Clone (Copy). This clones the active image and the following string appears in the Recording Script dialog box:
Clone("input_image_1 ext_image $image1")
2 Apply the Gaussian Blur algorithm to the clone. The following string appears in the Recording Script dialog box:
GaussianBlur("input_image_1 image $image2", "do_output_new_image boolean true", "do_process_whole_image boolean true", "do_process_in_2.5D boolean false", "do_separable_convolution boolean true", "gauss_std_dev list_float 1.1,1.1,1.1", "gauss_do_z_resolution_correction boolean true", "do_process_r_g_b_channel list_boolean false,false,false")
See also [MIPAV_Scripting.html#1332721 Figure 299] (Gaussian Blur).
3 Now, save the image which appears after applying Gaussian Blur. Use either File > Save Image or File > Save Image As option. The following string appears in the Recording Script dialog box:
SaveImageAs("input_image_1 image $image3", "file_type string .mnc")
4 Apply the Gradent Magnitude algorithm to the same image. The following string appears in the Recording Script dialog box:
GradientMagnitude("input_image_1 image $image3", "do_output_new_image boolean true", "do_process_whole_image boolean true", "do_process_in_2.5D boolean false", "do_separable_convolution boolean true", "gauss_std_dev list_float 1.0,1.0,1.0", "gauss_do_z_resolution_correction boolean true", "do_process_r_g_b_channel list_boolean false,false,false")
See also [MIPAV_Scripting.html#1332721 Figure 299] (Gradient Magnitude).
5 Save the image using the Save Image As option. The following string appears in the Recording Script dialog box:
SaveImageAs("input_image_1 image $image4", "file_type string .mnc")
6 Save the script, and then close the Recording Script dialog box. You should now be able to select and run the script from the Current Script box. If the script doesn't appear under Current Script, click the Refresh Script Listing icon and try again.
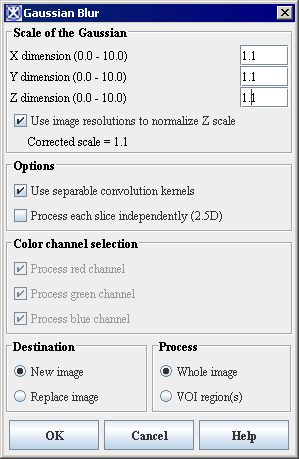
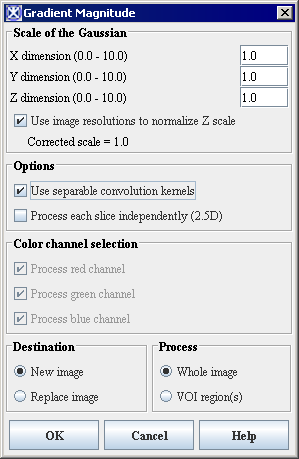
Figure 299. The Gaussian Blur and Gradient Magnitude parameters which were used to record the script
|
{| align="center"
|
|
|
{| align="center"
|
|}
|}
[MIPAV_Scripting.html#1332721 Figure 299] shows the options selected for the Gaussian Blur and Gradient Magnitude algorithms. You might consider to compare the parametes chosen in the dialog boxes with the corresponding text of the script as it shown in [MIPAV_Scripting.html#1332838 step 2] and [MIPAV_Scripting.html#1332676 step 4].
Tip: If the script doesn't appear under Current Script, click the Refresh Script Listing icon and try again.
In this example, we want to show you how to record the script which includes:
1 Delineating a VOI on the opened image
2 Extracting a surface from the VOI
Please, remember that to apply VOIs to images in scripts, you need to create and save the VOIs in advance of creating a script, and then, open and apply the VOIs while you are recording the script. In this example, we will use the VOI which helps extract the cerebellum from the brain image. See [MIPAV_Scripting.html#1330213 Figure 300].
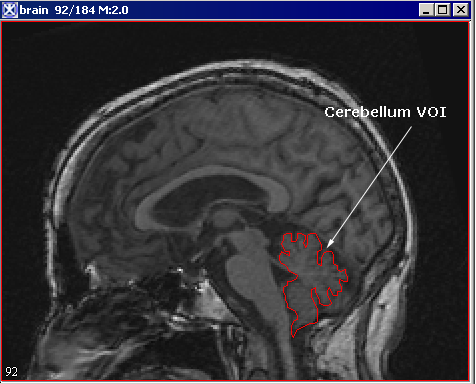
Figure 300. The Cerebellum VOI is delineated on the image
|
{| align="center"
|
|
|
To delineate the VOI on the image, use the Draw Polygon/Polyline VOI tool from the MIPAV toolbar. After you've created the VOI, save it through the VOI >Save VOI command.
|}
To record the script
Open an image of interest and then, press Start Recording Script button. The Record New Script dialog box appears indicating that recording a script is started.
1 Call the VOI > Open VOI menu, and then select the VOI file. The following string appears in the Record New Script dialog box:
OpenVOI("input_image_1 ext_image $image1")
Here, the command in the script is OpenVOI(parameters); in other words, apply a VOI to $image1, which is listed in the parameters list with a label input_image_1.
2 Now, select the VOI and then call Algorithms > Extract Surface (marching cubes).
3 In the Extract Surface dialog box that appears, specify the algorithm parameters as shown in [MIPAV_Scripting.html#1333077 Figure 301], then press OK.
4 The following string appears in the Record New Script dialog box:
ExtractSurfaceCubes("input_image_1 image $image1", "extraction_type string VOI", "do_decimate boolean true", "file_name string brain.sur", "do_blur_before_extraction boolean false", "blur_std_dev float 0.5")
Here, the command in the script is ExtractSurfaceCubes(parameter1,..parameterN). The parameters are as follows:
- "input_image_1 image $image1" indicates that the script is applying to the image
- "extraction_type string VOI" corresponds to selecting the VOI region option in the dialog box and indicates that the algorithm is applied only to the image region bounded by the VOI
- "do_decimate boolean true" corresponds to checking the Decimate Surface parameter in the dialog box
- "file_name string brain.sur" indicates that the extracted surface will be saved as the brain.sur file
- "do_blur_before_extraction boolean false" - shows that there is no blurring will be applying to the image before extraction. This corresponds to not checking the Blur by (Std.Dev.) checkbox
- "blur_std_dev float 0.5" - the default value for the Blur by (Std.Dev.) parameter. It is only used if the above parameter is set to true
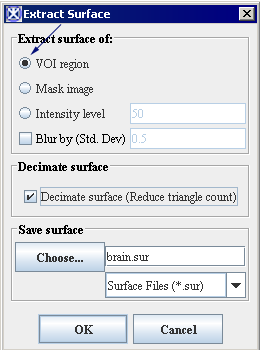
Figure 301. The Extract Surface dialog box
|
{| align="center"
|
|
|
Â
Check the VOI Region checkbox;
Check the Decimate Surface parameter;
Do not check the Blur by checkbox;
Enter the surface file name;
Press OK.
|}
5 Now, click File > Save. The program saves the script in the scripts home directory.
6 Click File > Exit to close the Record New Script dialog box. The dialog box closes. You should now be able to select and run the script from the Current Script box. If the script name doesn't appear in Current Script, press Refresh to reload the scripts home directory.
Tip: The file extension for the script file is ".sct." Make sure that you type this extension at the end of the file name.
Examples of working scripts
Below are the summary of the scripts that were used as examples in Section [MIPAV_Scripting.html#1318075 "Examples:" on page 456]. Comments using in the scripts are shown as #comment.
Script: Cloning an image, then adding margins and applying Gaussian Blur to the clone
#Clone an image
Clone("input_image_1 ext_image $image1")
#Add margins to the clone - $image1
AddMargins("input_image_1 image $image2", "do_output_new_image boolean false", "left_side int 20", "right_side int 20", "top_side int 20", "bottom_side int 20", "front int 0", "back int 0", "margin_value double -5213.51513671875", "margin_value_rgb list_double 0.0,0.0,0.0")
#Apply GB and create a new clone - $image2
GaussianBlur("input_image_1 image $image2", "do_output_new_image boolean true", "do_process_whole_image boolean true", "do_process_in_2.5D boolean false", "do_separable_convolution boolean true", "gauss_std_dev list_float 1.0,1.0,1.0", "gauss_do_z_resolution_correction boolean true", "do_process_r_g_b_channel list_boolean false,false,false")
#Close the original image
CloseFrame("input_image_1 image $image1")
#Save the clone 2 - $image2
SaveImageAs("input_image_1 image $image2", "file_type string .mnc")
Script: Flipping an image twice
#Flip the image vertically
Flip("input_image_1 ext_image $image1", "flip_axis string X")
#Flip the result image horizontally
Flip("input_image_1 image $image1", "flip_axis string Y")
#Save the result
SaveImageAs("input_image_1 ext_image $image1", "file_type string .mnc")
Script: Applying Gaussian Blur and then Gradient Magnitude
#Applying Gaussian Blur and sending output to as a new image frame - $image2
GaussianBlur("input_image_1 ext_image $image1", "do_output_new_image boolean true", "do_process_whole_image boolean true", "do_process_in_2.5D boolean false", "do_separable_convolution boolean true", "gauss_std_dev list_float 1.0,1.0,1.0", "gauss_do_z_resolution_correction boolean true", "do_process_r_g_b_channel list_boolean false,false,false")
#Applying Gradient Magnitude to $image2 and sending output to as a new image frame -$image3
GradientMagnitude("input_image_1 image $image2", "do_output_new_image boolean true", "do_process_whole_image boolean true", "do_process_in_2.5D boolean false", "do_separable_convolution boolean true", "gauss_std_dev list_float 1.0,1.0,1.0", "gauss_do_z_resolution_correction boolean true", "do_process_r_g_b_channel list_boolean false,false,false")
Combining scripts and other programs


