Difference between revisions of "Displaying and editing DICOM tag information"

From MIPAV
Jump to: navigation, search
(Displaying and editing DICOM tag information)
Line 1: Line 1:
<div style="font-style: normal; font-weight: normal; margin-bottom: 6pt; margin-left: 0pt; margin-right: 0pt; margin-top: 0pt; text-align: left; text-decoration: none; text-indent: 0pt; text-transform: none; vertical-align: baseline"><font color="#000000"> Once an image file is copied to the storage destination (usually your hard drive or a local device such as a zip drive), you can view and edit the information stored in the DICOM tags. As an option, you can display any of the DICOM tags as an overlay on the image, selecting the specific tags to display. You can also use MIPAV's <span style="font-style: normal; text-decoration: none; text-transform: none; vertical-align: baseline">'''<font color="#000000">anonymize feature</font>'''</span> to protect patient confidentiality. The anonymize feature allows you to delete information from selected DICOM tags in a single step from one image or from a whole directory of images. Refer to "Protecting patient privacy using Anonymize".<br /></font></div><div style="font-style: normal; margin-bottom: 6pt; margin-left: 0pt; margin-right: 0pt; margin-top: 14pt; text-align: left; text-decoration: none; text-indent: 0pt; text-transform: none; vertical-align: baseline">'''<font color="#000000"> To display the DICOM tags in an overlay over the image<br /></font>'''</div><div style="font-style: normal; font-weight: normal; margin-bottom: 0pt; margin-left: 18pt; margin-right: 0pt; margin-top: 6pt; text-align: left; text-decoration: none; text-indent: -18pt; text-transform: none; vertical-align: baseline"><font color="#000000">  1 Open a DICOM image in an image window.<br /></font></div><div style="font-style: normal; font-weight: normal; margin-bottom: 0pt; margin-left: 18pt; margin-right: 0pt; margin-top: 6pt; text-align: left; text-decoration: none; text-indent: -18pt; text-transform: none; vertical-align: baseline"><font color="#000000">  2 Select Image &gt; Show Image/DICOM Overlay (if it is not already selected) in the MIPAV window. The image window opens with the DICOM information overlaying the image (Figure 19).<br /></font></div><div style="font-style: normal; font-weight: normal; margin-bottom: 5pt; margin-left: 0pt; margin-right: 0pt; margin-top: 5pt; text-align: left; text-decoration: none; text-indent: 0pt; text-transform: none; vertical-align: baseline"><font color="#000000"> <span style="font-style: normal; text-decoration: none; text-transform: none; vertical-align: baseline">'''<font color="#000000">Note:</font>'''</span> You can open a DICOM image file as you would any other image file. Refer to Chapter 3 for more details.<br /></font></div><div style="font-style: normal; font-weight: normal; margin-bottom: 0pt; margin-left: 0pt; margin-right: 0pt; margin-top: 0pt; text-align: left; text-decoration: none; text-indent: 0pt; text-transform: none; vertical-align: baseline"><font color="#000000"> <br /></font></div><div style="font-style: normal; margin-bottom: 6pt; margin-left: 0pt; margin-right: 0pt; margin-top: 14pt; text-align: left; text-decoration: none; text-indent: 0pt; text-transform: none; vertical-align: baseline">'''<font color="#000000"> To choose which DICOM tags appear in the overlay<br /></font>'''</div><div style="font-style: normal; font-weight: normal; margin-bottom: 6pt; margin-left: 0pt; margin-right: 0pt; margin-top: 0pt; text-align: left; text-decoration: none; text-indent: 0pt; text-transform: none; vertical-align: baseline"><font color="#000000"> You may want only particular DICOM tags to appear in the overlay and at a specific spot in the overlay.<br /></font></div><div style="font-style: normal; font-weight: normal; margin-bottom: 0pt; margin-left: 18pt; margin-right: 0pt; margin-top: 6pt; text-align: left; text-decoration: none; text-indent: -18pt; text-transform: none; vertical-align: baseline"><font color="#000000">  1 Open a DICOM image in an image window.<br /></font></div><div style="font-style: normal; font-weight: normal; margin-bottom: 0pt; margin-left: 18pt; margin-right: 0pt; margin-top: 6pt; text-align: left; text-decoration: none; text-indent: -18pt; text-transform: none; vertical-align: baseline"><font color="#000000">  2 Select Image &gt; Show Image/DICOM Overlay (if it is not already selected) in the MIPAV window. The image window opens with the DICOM information overlaying the image.<br /></font></div><div style="font-style: normal; font-weight: normal; margin-bottom: 0pt; margin-left: 18pt; margin-right: 0pt; margin-top: 6pt; text-align: left; text-decoration: none; text-indent: -18pt; text-transform: none; vertical-align: baseline"><font color="#000000">  3 Select Image &gt; DICOM Overlay Options. The DICOM Overlay Options dialog box opens.<br /></font></div><div style="font-style: normal; font-weight: normal; margin-bottom: 0pt; margin-left: 18pt; margin-right: 0pt; margin-top: 6pt; text-align: left; text-decoration: none; text-indent: -18pt; text-transform: none; vertical-align: baseline"><font color="#000000">  4 Decide where you want to display the DICOM tags-in the upper left corner, lower left corner, upper right corner, or lower right corner of the image.<br /></font></div><div style="font-style: normal; font-weight: normal; margin-bottom: 0pt; margin-left: 18pt; margin-right: 0pt; margin-top: 6pt; text-align: left; text-decoration: none; text-indent: -18pt; text-transform: none; vertical-align: baseline"><font color="#000000">  5 Select a button under the Upper left corner, Lower left corner, Upper right corner, or Lower right corner panel as appropriate. The Select DICOM Tag for Overlay dialog box opens.<br /></font></div><div style="font-style: normal; font-weight: normal; margin-bottom: 0pt; margin-left: 18pt; margin-right: 0pt; margin-top: 6pt; text-align: left; text-decoration: none; text-indent: -18pt; text-transform: none; vertical-align: baseline"><font color="#000000">  6 Select the DICOM tag that you want to display in the overlay.<br /></font></div><div style="font-style: normal; font-weight: normal; margin-bottom: 0pt; margin-left: 18pt; margin-right: 0pt; margin-top: 6pt; text-align: left; text-decoration: none; text-indent: -18pt; text-transform: none; vertical-align: baseline"><font color="#000000">  7 Click OK. The Select DICOM Tag for Overlay dialog box closes, and the selected DICOM tags and names appears on the buttons in the panel on the DICOM Overlay Options dialog box.<br /></font></div><div style="font-style: normal; font-weight: normal; margin-bottom: 0pt; margin-left: 18pt; margin-right: 0pt; margin-top: 6pt; text-align: left; text-decoration: none; text-indent: -18pt; text-transform: none; vertical-align: baseline"><font color="#000000">  8 Click OK. The DICOM Overlay Options dialog box closes. The tags you selected appear on the overlay on the image.<br /></font></div>
+
Once an image file is copied to the storage destination (usually your hard drive or a local device such as a zip drive), you can view and edit the information stored in the DICOM tags. As an option, you can display any of the DICOM tags as an overlay on the image, selecting the specific tags to display. You can also use MIPAV's '''anonymize feature''' to protect patient confidentiality. The anonymize feature allows you to delete information from selected DICOM tags in a single step from one image or from a whole directory of images. Refer to "Protecting patient privacy using Anonymize".<br /><
 +
'''To display the DICOM tags in an overlay over the image'''<br />
 +
1 Open a DICOM image in an image window.<br />
 +
2 Select Image &gt; Show Image/DICOM Overlay (if it is not already selected) in the MIPAV window. The image window opens with the DICOM information overlaying the image (Figure 19).<br />
 +
'''Note:''' You can open a DICOM image file as you would any other image file. Refer to Chapter 3 for more details.<br />
 +
'''To choose which DICOM tags appear in the overlay'''<br />
 +
You may want only particular DICOM tags to appear in the overlay and at a specific spot in the overlay.<br />
 +
1 Open a DICOM image in an image window.<br />
 +
2 Select Image &gt; Show Image/DICOM Overlay (if it is not already selected) in the MIPAV window. The image window opens with the DICOM information overlaying the image.<br />
 +
3 Select Image &gt; DICOM Overlay Options. The DICOM Overlay Options dialog box opens.<br />
 +
4 Decide where you want to display the DICOM tags-in the upper left corner, lower left corner, upper right corner, or lower right corner of the image.<br />
 +
5 Select a button under the Upper left corner, Lower left corner, Upper right corner, or Lower right corner panel as appropriate. The Select DICOM Tag for Overlay dialog box opens.<br />
 +
6 Select the DICOM tag that you want to display in the overlay.<br />
 +
7 Click OK. The Select DICOM Tag for Overlay dialog box closes, and the selected DICOM tags and names appears on the buttons in the panel on the DICOM Overlay Options dialog box.<br />
 +
8 Click OK. The DICOM Overlay Options dialog box closes. The tags you selected appear on the overlay on the image.<br />
  
 
See Figure 19.
 
See Figure 19.
Line 5: Line 19:
 
If you decide that you do not want the tag to display on the overlay, simply select the button in the DICOM Overlay Options dialog box and select [Blank Overlay] at the top of the Select DICOM Tag for Overlay dialog box.
 
If you decide that you do not want the tag to display on the overlay, simply select the button in the DICOM Overlay Options dialog box and select [Blank Overlay] at the top of the Select DICOM Tag for Overlay dialog box.
  
<div style="font-style: normal; margin-bottom: 6pt; margin-left: 0pt; margin-right: 0pt; margin-top: 14pt; text-align: left; text-decoration: none; text-indent: 0pt; text-transform: none; vertical-align: baseline">'''<font color="#000000">  In the Select DICOM Tag for Overlay dialog box <br /></font>'''</div><div style="font-style: normal; font-weight: normal; margin-bottom: 0pt; margin-left: 24pt; margin-right: 0pt; margin-top: 5pt; text-align: left; text-decoration: none; text-indent: -24pt; text-transform: none; vertical-align: baseline"><font color="#000000"> To list tags in the ascending numerical order, click Tag;<br /></font></div><div style="font-style: normal; font-weight: normal; margin-bottom: 0pt; margin-left: 24pt; margin-right: 0pt; margin-top: 5pt; text-align: left; text-decoration: none; text-indent: -24pt; text-transform: none; vertical-align: baseline"><font color="#000000">  To list tags in the descending numerical order, click <span style="font-style: normal; font-weight: normal; text-decoration: none; text-transform: capitalize; vertical-align: baseline"><font color="#000000">shift</font></span> Tag;<br /></font></div><div style="font-style: normal; font-weight: normal; margin-bottom: 0pt; margin-left: 24pt; margin-right: 0pt; margin-top: 5pt; text-align: left; text-decoration: none; text-indent: -24pt; text-transform: none; vertical-align: baseline"><font color="#000000">  To list names of DICOM tags in alphabetical order, click Name;<br /></font></div><div style="font-style: normal; font-weight: normal; margin-bottom: 0pt; margin-left: 24pt; margin-right: 0pt; margin-top: 5pt; text-align: left; text-decoration: none; text-indent: -24pt; text-transform: none; vertical-align: baseline"><font color="#000000">  To list names of DICOM tags in reverse alphabetical order, click <span style="font-style: normal; font-weight: normal; text-decoration: none; text-transform: capitalize; vertical-align: baseline"><font color="#000000">shift</font></span> Name.<br /></font></div><div style="font-style: normal; margin-bottom: 6pt; margin-left: 0pt; margin-right: 0pt; margin-top: 14pt; text-align: left; text-decoration: none; text-indent: 0pt; text-transform: none; vertical-align: baseline">'''<font color="#000000"> To show grid on a DICOM image<br /></font>'''</div>
+
'''In the Select DICOM Tag for Overlay dialog box''' <br />
 +
To list tags in the ascending numerical order, click Tag;<br />
 +
To list tags in the descending numerical order, click <span style="font-style: normal; font-weight: normal; text-decoration: none; text-transform: capitalize; vertical-align: baseline"><font color="#000000">shift</font></span> Tag;<br />
 +
To list names of DICOM tags in alphabetical order, click Name;<br />
 +
To list names of DICOM tags in reverse alphabetical order, click shift Name.<br />
 +
'''To show grid on a DICOM image'''<br />
  
 
Open the image and then call Image &gt; Show Overlay Grid. To asses the grid options, call Image &gt; Grid Options.
 
Open the image and then call Image &gt; Show Overlay Grid. To asses the grid options, call Image &gt; Grid Options.
 
<div style="font-style: normal; font-weight: normal; margin-bottom: 0pt; margin-left: 0pt; margin-right: 0pt; margin-top: 0pt; text-align: left; text-decoration: none; text-indent: 0pt; text-transform: none; vertical-align: baseline"><font color="#000000">


{| border="1" cellpadding="5"
 
{| border="1" cellpadding="5"
|+ <div style="font-style: normal; margin-bottom: 3pt; margin-left: 0pt; margin-right: 0pt; margin-top: 9pt; text-align: left; text-decoration: none; text-indent: 0pt; text-transform: none; vertical-align: baseline">'''<font color="#000000"> Figure 18. The Grid Overlay Options dialog box<br /></font>'''</div>
+
|+ '''Figure 18. The Grid Overlay Options dialog box<br />'''
 
|-
 
|-
 
|
 
|
Line 19: Line 36:
  
 
{| border="1" cellpadding="5"
 
{| border="1" cellpadding="5"
|+ <div style="font-style: normal; margin-bottom: 3pt; margin-left: 0pt; margin-right: 0pt; margin-top: 9pt; text-align: left; text-decoration: none; text-indent: 0pt; text-transform: none; vertical-align: baseline">'''<font color="#000000"> Figure 19. DICOM Overlay Options dialog box <br /></font>'''</div>
+
|+ '''Figure 19. DICOM Overlay Options dialog box'''
 
|-
 
|-
 
| rowspan="1" colspan="2" |
 
| rowspan="1" colspan="2" |
Line 59: Line 76:
 
<div class="CellBody">Displays online help for this dialog box.</div>
 
<div class="CellBody">Displays online help for this dialog box.</div>
 
|}
 
|}
 
<br /></font></div><div style="font-style: normal; font-weight: normal; margin-bottom: 0pt; margin-left: 0pt; margin-right: 0pt; margin-top: 0pt; text-align: left; text-decoration: none; text-indent: 0pt; text-transform: none; vertical-align: baseline"><font color="#000000">


==Select DICOM Tag for Overlay dialog box==
 
==Select DICOM Tag for Overlay dialog box==
 
{| border="1" cellpadding="5"
 
{| border="1" cellpadding="5"
|+ <div style="font-style: normal; margin-bottom: 3pt; margin-left: 0pt; margin-right: 0pt; margin-top: 9pt; text-align: left; text-decoration: none; text-indent: 0pt; text-transform: none; vertical-align: baseline">'''<font color="#000000"> Figure 20. Select DICOM Tag for Overlay dialog box <br /></font>'''</div>
+
|+ '''Figure 20. Select DICOM Tag for Overlay dialog box '''
 
|-
 
|-
 
| rowspan="1" colspan="2" |
 
| rowspan="1" colspan="2" |
Line 100: Line 115:
 
|}
 
|}
  
<br /></font></div><div style="font-style: normal; margin-bottom: 6pt; margin-left: 0pt; margin-right: 0pt; margin-top: 14pt; text-align: left; text-decoration: none; text-indent: 0pt; text-transform: none; vertical-align: baseline">'''<font color="#000000"> To remove the DICOM tag overlay from the image<br /></font>'''</div><div style="font-style: normal; font-weight: normal; margin-bottom: 6pt; margin-left: 0pt; margin-right: 0pt; margin-top: 0pt; text-align: left; text-decoration: none; text-indent: 0pt; text-transform: none; vertical-align: baseline"><font color="#000000"> Show Image/DICOM Overlay is a toggle command. You click the command to turn it on or to turn if off. A check mark appears in the check box beside the command if it is on. To remove the DICOM tag overlay from the image, simply select Image &gt; Show Image/DICOM Overlay to turn it off.<br /></font></div><div style="font-style: normal; margin-bottom: 6pt; margin-left: 0pt; margin-right: 0pt; margin-top: 14pt; text-align: left; text-decoration: none; text-indent: 0pt; text-transform: none; vertical-align: baseline">'''<font color="#000000"> To edit DICOM tag information<br /></font>'''</div><div style="font-style: normal; font-weight: normal; margin-bottom: 0pt; margin-left: 18pt; margin-right: 0pt; margin-top: 6pt; text-align: left; text-decoration: none; text-indent: -18pt; text-transform: none; vertical-align: baseline"><font color="#000000"> 1 Open a DICOM image.<br /></font></div><div style="font-style: normal; font-weight: normal; margin-bottom: 0pt; margin-left: 18pt; margin-right: 0pt; margin-top: 6pt; text-align: left; text-decoration: none; text-indent: -18pt; text-transform: none; vertical-align: baseline"><font color="#000000">  2 Click Image &gt; Attributes &gt; View Header. The Info dialog box opens (Figure 21).<br /></font></div><div style="font-style: normal; font-weight: normal; margin-bottom: 0pt; margin-left: 18pt; margin-right: 0pt; margin-top: 6pt; text-align: left; text-decoration: none; text-indent: -18pt; text-transform: none; vertical-align: baseline"><font color="#000000">  3 In the dialog box, highlight the tag which you would like to edit, and then press the Edit Tag button.
+
<br />'''To remove the DICOM tag overlay from the image<br />''' Show Image/DICOM Overlay is a toggle command. You click the command to turn it on or to turn if off. A check mark appears in the check box beside the command if it is on. To remove the DICOM tag overlay from the image, simply select Image &gt; Show Image/DICOM Overlay to turn it off.<br />'''To edit DICOM tag information'''<br />
 +
1 Open a DICOM image.<br />
 +
2 Click Image &gt; Attributes &gt; View Header. The Info dialog box opens (Figure 21).<br />
 +
3 In the dialog box, highlight the tag which you would like to edit, and then press the Edit Tag button.
  
 
{| border="1" cellpadding="5"
 
{| border="1" cellpadding="5"
Line 149: Line 167:
 
|}
 
|}
  
<br /></font></div><div style="font-style: normal; font-weight: normal; margin-bottom: 0pt; margin-left: 18pt; margin-right: 0pt; margin-top: 6pt; text-align: left; text-decoration: none; text-indent: -18pt; text-transform: none; vertical-align: baseline"><font color="#000000">  4 Click Edit Tag. The Edit Tag dialog box appears (Figure 21).<br /></font></div><div style="font-style: normal; font-weight: normal; margin-bottom: 0pt; margin-left: 18pt; margin-right: 0pt; margin-top: 6pt; text-align: left; text-decoration: none; text-indent: -18pt; text-transform: none; vertical-align: baseline"><font color="#000000">  5 Type the new value in the New Tag Value text box. To apply the new tag value to all of the slices in the image dataset, click Apply this change to all slices in image.<br /></font></div><div style="font-style: normal; font-weight: normal; margin-bottom: 0pt; margin-left: 18pt; margin-right: 0pt; margin-top: 6pt; text-align: left; text-decoration: none; text-indent: -18pt; text-transform: none; vertical-align: baseline"><font color="#000000">  6 Click OK. The tag information is changed.<br /></font></div><div style="font-style: normal; font-weight: normal; margin-bottom: 0pt; margin-left: 0pt; margin-right: 0pt; margin-top: 0pt; text-align: left; text-decoration: none; text-indent: 0pt; text-transform: none; vertical-align: baseline"><font color="#000000"> <br /></font></div><div style="font-style: normal; font-weight: normal; margin-bottom: 5pt; margin-left: 0pt; margin-right: 0pt; margin-top: 5pt; text-align: left; text-decoration: none; text-indent: 0pt; text-transform: none; vertical-align: baseline"><font color="#000000"> <span style="font-style: normal; text-decoration: none; text-transform: none; vertical-align: baseline">'''<font color="#000000">Note:</font>'''</span> You cannot edit the following tags in the Info window: Dimension, Type, Min, Max, Orientation, Pixel Resolution, Unit of Measure, and Transformation Matrix. The Dimension and Unit of Measure tags are edited in the Image Attributes window.<br /></font></div>
+
<br />
 +
4 Click Edit Tag. The Edit Tag dialog box appears (Figure 21).<br />
 +
5 Type the new value in the New Tag Value text box. To apply the new tag value to all of the slices in the image dataset, click Apply this change to all slices in image.<br />
 +
6 Click OK. The tag information is changed.<br />
 +
'''Note:''' You cannot edit the following tags in the Info window: Dimension, Type, Min, Max, Orientation, Pixel Resolution, Unit of Measure, and Transformation Matrix. The Dimension and Unit of Measure tags are edited in the Image Attributes window.<br />
  
 
[[Protecting patient privacy using Anonymize]]
 
[[Protecting patient privacy using Anonymize]]

Revision as of 17:50, 17 February 2012

Once an image file is copied to the storage destination (usually your hard drive or a local device such as a zip drive), you can view and edit the information stored in the DICOM tags. As an option, you can display any of the DICOM tags as an overlay on the image, selecting the specific tags to display. You can also use MIPAV's anonymize feature to protect patient confidentiality. The anonymize feature allows you to delete information from selected DICOM tags in a single step from one image or from a whole directory of images. Refer to "Protecting patient privacy using Anonymize".
< To display the DICOM tags in an overlay over the image
1 Open a DICOM image in an image window.
2 Select Image > Show Image/DICOM Overlay (if it is not already selected) in the MIPAV window. The image window opens with the DICOM information overlaying the image (Figure 19).
Note: You can open a DICOM image file as you would any other image file. Refer to Chapter 3 for more details.
To choose which DICOM tags appear in the overlay
You may want only particular DICOM tags to appear in the overlay and at a specific spot in the overlay.
1 Open a DICOM image in an image window.
2 Select Image > Show Image/DICOM Overlay (if it is not already selected) in the MIPAV window. The image window opens with the DICOM information overlaying the image.
3 Select Image > DICOM Overlay Options. The DICOM Overlay Options dialog box opens.
4 Decide where you want to display the DICOM tags-in the upper left corner, lower left corner, upper right corner, or lower right corner of the image.
5 Select a button under the Upper left corner, Lower left corner, Upper right corner, or Lower right corner panel as appropriate. The Select DICOM Tag for Overlay dialog box opens.
6 Select the DICOM tag that you want to display in the overlay.
7 Click OK. The Select DICOM Tag for Overlay dialog box closes, and the selected DICOM tags and names appears on the buttons in the panel on the DICOM Overlay Options dialog box.
8 Click OK. The DICOM Overlay Options dialog box closes. The tags you selected appear on the overlay on the image.

See Figure 19.

If you decide that you do not want the tag to display on the overlay, simply select the button in the DICOM Overlay Options dialog box and select [Blank Overlay] at the top of the Select DICOM Tag for Overlay dialog box.

In the Select DICOM Tag for Overlay dialog box
To list tags in the ascending numerical order, click Tag;
To list tags in the descending numerical order, click shift Tag;
To list names of DICOM tags in alphabetical order, click Name;
To list names of DICOM tags in reverse alphabetical order, click shift Name.
To show grid on a DICOM image

Open the image and then call Image > Show Overlay Grid. To asses the grid options, call Image > Grid Options.

Figure 18. The Grid Overlay Options dialog box

GridOverlayOptions.jpg

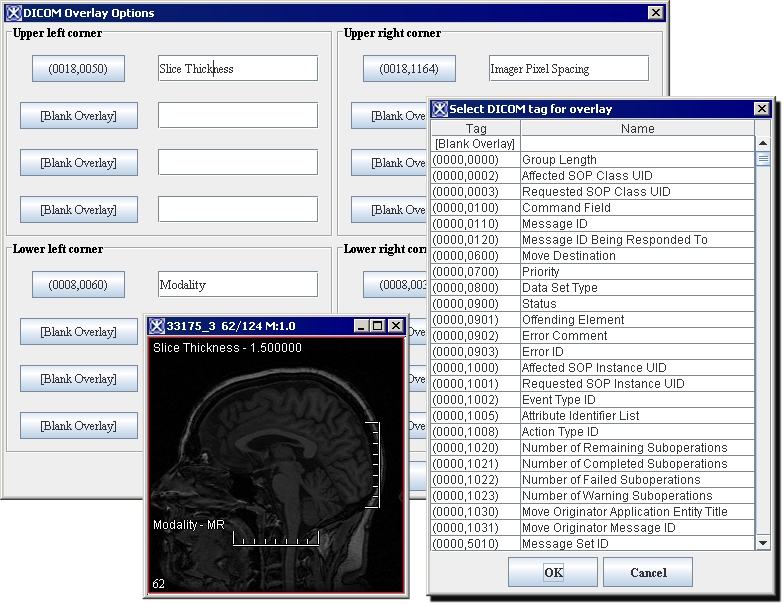
Figure 19. DICOM Overlay Options dialog box

DICOM OverlayOptions.jpg

Upper left corner
Specifies the DICOM tags you want to display in the upper left corner of the image. You can display from 1 to 4 DICOM tags.
Lower left corner
Specifies the DICOM tags you want to display in the lower left corner of the image. You can display from 1 to 4 DICOM tags.
Upper right corner
Specifies the DICOM tags you want to display in the upper right corner of the image. You can display from 1 to 4 DICOM tags.
Lower right corner
Specifies the DICOM tags you want to display in the lower right corner of the image. You can display from 1 to 4 DICOM tags.
OK
Displays the tag you selected on the button in the DICOM Overlay Options dialog box.
Cancel
Disregards any changes that you made in this dialog box and closes the dialog box.
Help
Displays online help for this dialog box.

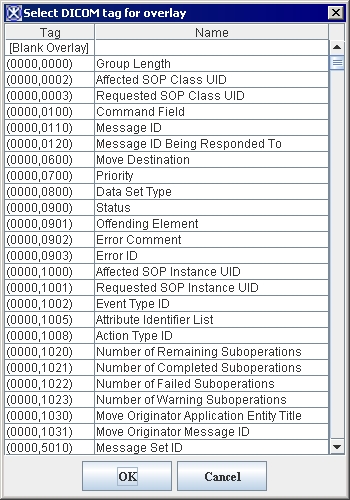
Select DICOM Tag for Overlay dialog box

Figure 20. Select DICOM Tag for Overlay dialog box

SelectDICOMTAGforOverlay.jpg

Tag
Lists each DICOM tag beside its name.
Name
Lists each DICOM name for the tag.
To list tags in the ascending numerical order, click Tag;
To list tags in the descending numerical order, click shift Tag;
To list names of DICOM tags in alphabetical order, click Name;
To list names of DICOM tags in reverce alphabetical order, click shift Name.
OK
Displays the tag you selected on the button in the DICOM Overlay Options dialog box.
Cancel
Disregards any changes that you made in this dialog box and closes the dialog box.
Help
Displays online help for this dialog box.


To remove the DICOM tag overlay from the image
Show Image/DICOM Overlay is a toggle command. You click the command to turn it on or to turn if off. A check mark appears in the check box beside the command if it is on. To remove the DICOM tag overlay from the image, simply select Image > Show Image/DICOM Overlay to turn it off.
To edit DICOM tag information
1 Open a DICOM image.
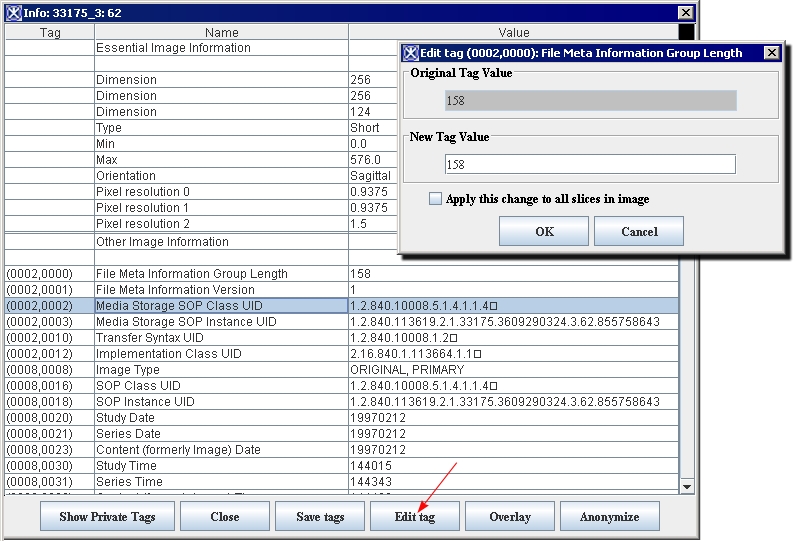
2 Click Image > Attributes > View Header. The Info dialog box opens (Figure 21).
3 In the dialog box, highlight the tag which you would like to edit, and then press the Edit Tag button.

Figure 21. Info dialog box (DICOM)

DICOM EditingTags.jpg

Tag column
Lists the DICOM tags.
Name column
Lists the name of the DICOM tags.
Value column
Lists the value assigned to each DICOM tag.
Show/Hide private tags
Shows or hides private tags (those that contain patient private information).
Close
Closes the dialog box.
Save tags
Saves the values of the tags that were changed.
Edit tag
Allows you to make changes to the values for the tags.
Anonymize
Anonymizes the image.


4 Click Edit Tag. The Edit Tag dialog box appears (Figure 21).
5 Type the new value in the New Tag Value text box. To apply the new tag value to all of the slices in the image dataset, click Apply this change to all slices in image.
6 Click OK. The tag information is changed.
Note: You cannot edit the following tags in the Info window: Dimension, Type, Min, Max, Orientation, Pixel Resolution, Unit of Measure, and Transformation Matrix. The Dimension and Unit of Measure tags are edited in the Image Attributes window.

Protecting patient privacy using Anonymize