From MIPAV
Developing plug-in programs
MIPAV provides the following classes for developing plug-in programs:
PlugInAlgorithm.class
PlugInFile.class
PlugInView.class
Plug-in programs are developed in the same way as the other Java programs are. The high-level steps of creating plug-ins follow.
1 Determining the type of plug-in program-Before you begin to write the code for the plug-in, determine the plug-in type: algorithm, file, or view. Refer to [MIPAV_Plugins.html#998891 "Determining the type of plug-in program" ].
2 Determining which version of Java to use-Detailed instructions appear in [MIPAV_Plugins.html#998930 "Determining which version of Java to use" ] and [MIPAV_Plugins.html#1624158 Figure 309].
3 Writing the source code-Some lines of code must appear in the source code so that the plug-in program interfaces correctly with MIPAV. Refer to [MIPAV_Plugins.html#1021684 "Writing the source code" ].
4 Building and compiling plug-in programs-You should keep back-up copies of the source and compiled files in case you need to update or change plug-in programs. See [MIPAV_Plugins.html#1286059 "Building and compiling plug-in programs" ].
5 Creating a self-contained plug-in frame-A self-contained plug-in is a Java application that does not rely on the default MIPAV user-interface, but, instead, hides MIPAV and display its own image(s) with action/algorithm handling specific to its frame. See [MIPAV_Plugins.html#1574675 "Creating a self-contained plug-in frame" ].
6 Installing plug-in programs-This section explains how to install plug-in programs. Refer to [MIPAV_Plugins.html#1572227 "Installing plug-in programs" ].
7 Sample plug-in programs-This section provides a couple of examples of MIPAV plug-ins. Refer to [MIPAV_Plugins.html#1300224 "Examples of MIPAV plug-ins" ].
Note: This section does not explain how to write a Java program; however, it explains what must be incorporated in the plug-in program so that it correctly interfaces with the MIPAV application.
Determining the type of plug-in program
The first step of creating a plug-in program is to determine the type you want to create, which depends on its purpose. As mentioned earlier, MIPAV plug-in programs can be of the algorithm, file, or view type. However, most users want MIPAV to perform very specific additional functions on images. Since these functions may not be currently available in MIPAV, users choose to add the functions by developing the algorithm type of plug-in program.
Determining which version of Java to use
To avoid compatibility problems when you create a plug-in program, use the same version of Java that was used to create MIPAV. To determine which version of Java the latest version of MIPAV uses, select Help > JVNM Information in the MIPAV window. The About System dialog box opens. See [MIPAV_Plugins.html#1624158 Figure 309].
Figure 309. About System dialog box
{| align="center" | 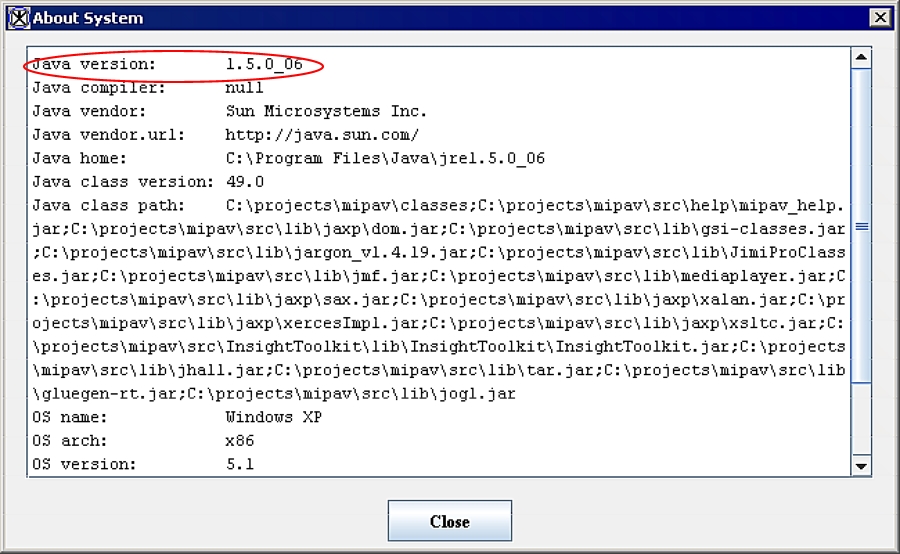 |} |}
|
The first line in the About System dialog box indicates the version of Java that was used to develop MIPAV. To obtain the correct version of Java, go to the following web site: <http://www.java.sun.com>
Writing the source code
Note: In this section, \$MIPAV is used to represent the MIPAV user directory, which is the directory where MIPAV is installed. The user directory is indicated in the About System dialog box. In the MIPAV main window, select Help > JVM Information to view the About System dialog box.
When you develop a plug-in for MIPAV, several lines must be present in the code so that it executes properly. Some mandatory code should be included in all plug-in files. Other code might change depending on the plug-in type.
Including mandatory code
The next three figures ([MIPAV_Plugins.html#1465012 Figure 310]-[MIPAV_Plugins.html#1178313 Figure 312]) show the mandatory source code needed for creating a file type of plug-in, a view type of plug-in, and an algorithm type of plug-in. The plug-ins directory of MIPAV includes these three files (e.g. C:\[$MIPAV]\mipav\plugins):
PlugInFile.java-Mandatory source code for a file type of plug-in. See [MIPAV_Plugins.html#1465012 Figure 310];
PlugInView.java-Mandatory source code for a view type of plug-in. See [MIPAV_Plugins.html#1178249 Figure 311];
PlugInAlgorithm.java-Mandatory source code for an algorithm type of plug-in. See [MIPAV_Plugins.html#1178313 Figure 312].
{| border="1" cellpadding="5" |+ Figure 310. Mandatory code for a file type of plug-in (PlugInFile.java). For readability purposes, keywords in all code reproduced in this chapter appear in bold, and comments appear in green type
|- | 1 package gov.nih.mipav.plugins;
2
3 import gov.nih.mipav.view.*;
4
5 import java.awt.*;
6
7 public interface PlugInFile extends PlugIn {
8
9 /**
10 * run
11 * @param UI MIPAV main user interface.
12 */
13 public void run(ViewUserInterface UI);
14 }
|}
{| border="1" cellpadding="5" |+ Figure 311. Mandatory code for a view type of plug-in (PlugInView.java). For readability purposes, keywords in all code reproduced in this chapter appear in bold, and comments appear in green type
|- | 1 package gov.nih.mipav.plugins;
2
3 import gov.nih.mipav.model.structures.*;
4 import gov.nih.mipav.view.*;
5
6 import java.awt.*;
7
8 public interface PlugInView extends PlugIn {
9
10 /**
11 * run
12 * @param UI MIPAV main user interface.
13 * @param parentFrame frame that displays the MIPAV image.
14 * Can be used as a parent frame when building
15 * dialogs.
16 * @param image model of the MIPAV image.
17 * @see ModelImage
18 * @see ViewJFrameImage
19 *
20 */
21 public void run(ViewUserInterface UI, Frame parentFrame, ModelImage image);
22 }
|} {| border="1" cellpadding="5" |+ Figure 312. Mandatory code for an algorithm type of plug-in (PlugInAlgorithm.java). For readability purposes, keywords in all code reproduced in this chapter appear in bold, and comments appear in green type
|- | 1 package gov.nih.mipav.plugins;
2
3 import gov.nih.mipav.model.structures.*;
4 import gov.nih.mipav.view.*;
5
6 import java.awt.*;
7
8
9 public interface PlugInAlgorithm extends PlugIn {
10
11 /**
12 * run
13 * @param UI MIPAV main user interface.
14 * @param parentFrame frame that displays the MIPAV image.
15 * Can be used as a parent frame when building
16 * dialogs.
17 * @param image model of the MIPAV image.
18 * @see ModelImage
19 * @see ViewJFrameImage
20 *
21 */
22 public void run(ViewUserInterface UI, Frame parentFrame, ModelImage image);
23
24
25 }
26
|}
Referencing files
To reference a class, you must specify it using the Import keyword. For example, line 2 in PlugInFile.java imports the view functions ([MIPAV_Plugins.html#1270153 Figure 313]).
Figure 313. Importing the view functions in PlugInFile.java
|
import gov.nih.mipav.view.*;
|
Lines 3, 4, and 6 in the PlugInView.java and PlugInAlgorithm.java files import the model structures, view functions, and the basic Java package that has GUI functions ([MIPAV_Plugins.html#1178962 Figure 314]).
Figure 314. Importing model structures, view functions, and [java.awt]
|
import gov.nih.mipav.model.structures.*; // MIPAV package where main
// MIPAV structures are located (e.g., model image)
import gov.nih.mipav.view.*;
Â
import java.awt.*
|
If you reference a class, you must include it in the plug-in package so that it can be called from the main file. After you write and compile, you must now install files in the user or home directory:
Windows
c:\Documents and Settings\<user ID>\mipav\plugins
UNIX
/user/<user ID>/mipav/plugins
An example of this appears in the first line of [MIPAV_Plugins.html#1022087 Figure 315].
Figure 315. Example of placing referenced files in the \$MIPAV\plugins directory
|
package plugins; // added to plugins pkg. so PlugInSampleStub may
// call it.
|
Lines of code that are dependent on plug-in type
Two lines of code depend on the type of plug-in program being developed:
Declaration
Parameters for the run method
Declaration
The declaration used in a plug-in depends on the type of plug-in being developed. For instance, in line 9 in PlugInAlgorithm.java ([MIPAV_Plugins.html#1178313 Figure 312]), the combination of words "public interface PlugInAlgorithm" indicates that the plug-in in an Algorithm. For File or View types of plug-ins, simply replace PlugInAlgorithm with PlugInFile (line 7 in PlugInFile.java, see [MIPAV_Plugins.html#1465012 Figure 310]) or PlugInView (line 8 in PlugInView.java, see [MIPAV_Plugins.html#1178249 Figure 311]), respectively.
Table 4. Declarations dependent on type of plug-in
|
Type of plug-in
|
Declaration
|
|
File
|
public interface PlugInFile extends PlugIn (
|
|
View
|
public interface PlugInView extends PlugIn (
|
|
Algorithm
|
public interface PlugInAlgorithm extends PlugIn (
|
Parameters for the run method
The parameters for the run method also depend on the plug-in type. Compare the run methods used in PlugInFile.java ([MIPAV_Plugins.html#1465012 Figure 310]), PlugInView.java ([MIPAV_Plugins.html#1178249 Figure 311]), and PlugInAlgorithm.java ([MIPAV_Plugins.html#1178313 Figure 312]).
Table 5. Parameters for run methods dependent on type of plug-in
|
Type of plug-in
|
Parameters for the run method
|
|
File
|
public void run(ViewUserInterface UI);
|
|
View
|
public void run(ViewUserInterface UI, Frame parentFrame, ModelImage image);
|
|
Algorithm
|
public void run(ViewUserInterface UI, Frame parentFrame, ModelImage image);
|
Figure 316. PlugInAlgorithm.java. For readability purposes, keywords in all code reproduced in this chapter appear in bold, and comments appear in green type
|
1 package gov.nih.mipav.plugins;
2
3 import gov.nih.mipav.model structures.*;
4 import gov.nih.mipav.view.*;
5
6 import java.awt *;
7
8 public interface PlugInAlgorithm extends PlugIn {
9
10 /**
11 * run
12 * @param UI MIPAV main user interface.
13 * @param parentFrame Frame that displays the MIPAV image.
14 * Can be used as a parent frame when building dialogs.
15 * @param image Model of the MIPAV image.
16 * @see ModelImage
17 * @see ViewJFrameImage
18 */
19 public void run(ViewUserInterface UI, Frame parentFrame, ModelImage image;)
20
21 }
|
Building and compiling plug-in programs
To build a new plug-in program for MIPAV, you must first install a build environment, alter the path environment variable, and compile the plug-in files.
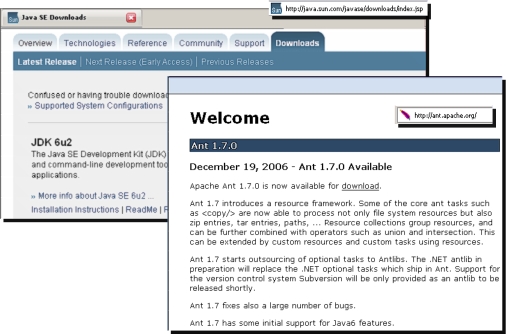
Installing a build environment
Figure 317. Download pages for Java SE Development Kit (JDK) and Apache Ant 1.7.0
|
{| align="center"
|
|
|}
Configuring the environment
To configure your environment, you need to add two new variables-JAVA_HOME and ANT_HOME-and update the path variable in your system.
On Windows workstations
1 Click Start > Control Panel. The Control Panel window opens.
2 Double-click the System icon. The System Properties dialog box opens.
3 Click Advanced. The Advanced page of the System Properties dialog box appears.
4 Click Environment Variables. The Environment Variables dialog box opens.
5 Decide whether to add and edit variables in the User variables box or the System variables box based on which users should have access to the Java SDK and Ant.
6 Add the JAVA_HOME variable to your environment:
a Click New. The New User Variable dialog box or the New System Variable dialog box opens.
b Type JAVA_HOME in Variable name.
c Type the path for the Java SDK on your computer (e.g., C:\Program Files\Java\jdk1.6.0_02) in Variable value.
d Click OK. The JAVA_HOME variable appears in either the User variables box or System variables box as appropriate.
7 Add the ANT_HOME variable to your environment by doing the following:
a Click New under either the User variables box or the System variables box. The New User Variable dialog box or the New System Variables dialog box opens as appropriate.
b Type ANT_HOME in Variable name.
c Type the path for the Ant on your computer (e.g., C:\Program Files\Ant\apache-ant-1.7.0) in Variable value.
d Click OK. The ANT_HOME variable appears in either the User variables box or System variables box as appropriate.
8 Update either the PATH variable in the User variables box or the Path variable in the System variables box by doing the following:
a Select the PATH variable in the User variables box, or select the Path variable in the System variables box.
b Click Edit under the User variables box, or click Edit under the System variables box. Either the Edit User Variable dialog box or the Edit System Variable dialog box opens.
c Type ;%JAVA_HOME%\bin;%ANT_HOME%\bin to the end of the PATH variable or to the end of the Path variable.
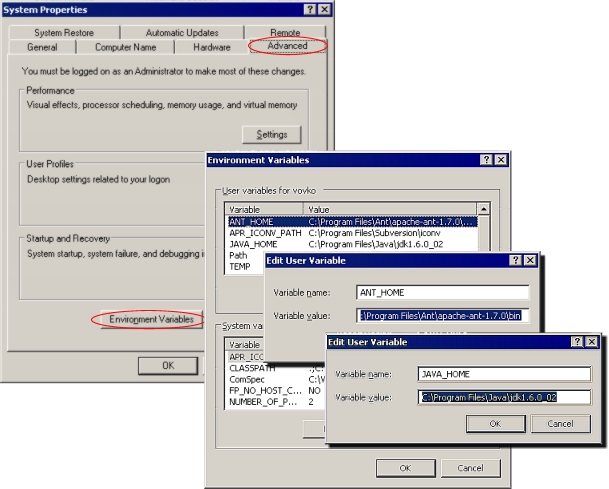
d Click OK. The edited variable appears either in the User variables box or the System variables box. See also [MIPAV_Plugins.html#1456599 Figure 318].
9 Open a new terminal for the change to take effect by doing the following:
a Click Start > Run. The Run dialog box opens.
b Type cmd in Open, and click OK. A terminal window opens.
10 Retrieve the sample Ant build file (build.xml) from the MIPAV web site and place it in the same directory as the plug-in.java files you want to compile.
11 Alter the dir.mipav and dir.jdk properties within the build.xml to point to the directory where MIPAV and the SDK are installed, respectively.
Figure 318. Configuring system variables for MS Windows
|
{| align="center"
|
|
|}
 |}
|}

