Data Validation module
In order to ensure the quality of uploaded data and also to make data easy to query, data should be submitted in a specific format and range values should comply with the values defined in the data dictionary. All submitted research data must be validated against the values defined in the data dictionary prior to submission. To facilitate this process, we provide the Data Validation module that assists researchers with the submission of their data.
Contents
Introduction
The Data Validation module accepts the data as CSV files from a researcher and validates the file content against the values defined in the data dictionary.
The module accepts CSV files from a researcher and validates the files' content against the values defined in the data dictionary. For thos CSV files that pass validation, the Data Validation module creates a submission ticket and submission package both in XML format. After that data are good for uploading. The submission ticket is used by the Data Upload module to upload the data (in the form of a corresponding submission package) to the repository.
If any validation errors or warnings are found, the module provides a detailed report of any data discrepancies, errors, and warnings received.
Validation warnings are just warnings and they did not prevent creating of the submission package. However, if any validation errors are found, a submission package cannot be created. In that case, the researched should edit data to fix all errors, first, and then re-validate the data.
See also:
- Data Repository tools
- Imaging data submission and validation module
- Data Upload module
- Data Download module
System requirements
The most recent version of Java Runtime Environment (JRE) (6 or 7) is required in order to run the Data Validation module.
Module input and output
Module input:
- CSV files with clinical data or imaging metadata.
Module output:
- a submission package and submission ticket (XML) ready for submission by the Data Upload module.
- an error log with validation errors and warnings (if any).
CSV files
The structure of a CSV file should match a corresponding form structure queryable by the query tool.
For more information about CSV files for data uploading, contact the data dictionary operations team - TBD.
Form structures
A form structure represents a grouping/collection of data elements used in BRICS data dictionary. A form structure is analogous to a case report form (CRF) (electronic or paper) where data elements are linked together for collection and display.
A data element is a logical unit of data used in BRICS. It contains a single piece of information of one kind. A data element has a name, precise definition, and a set of permissible values (codes), if applicable. A data element is not necessarily the smallest unit of data; it can be a unique combination of one or more smaller units. A data element occupies the space provided by field(s) on a paper/electronic case report form (CRF) or field(s) in a database record. BRICS allows a use of two types of data elements:
- Common data elements (CDEs), which are used across multiple studies and diseases/domains,
- And unique data elements (UDE), which are used to gather information for a particular study.
Both types of data elements are used in forms structures and to collect data.
Submission package
The submission package includes:
An example of a submission ticket:
<?xml version="1.0" encoding="UTF-8" standalone="true"?>
-<submissionTicket environment="production" version="2.0.2.108">-<submissionPackage types="CLINICAL" crcHash="55830a2aa77164ea834942e65e319a38" dataFileBytes="241686" bytes="19233" name="dataFile-1373248220203">-<datasets><dataset crcHash="82ff11c787fc3086ce5bbd9e7518e279" bytes="19233" name="WardMinus2DemoGUIDS.csv" type="CLINICAL" path="C:\Users\user1\Documents\TBI 2013\CSV\sampleCSV.csv"/></datasets><associatedFiles/></submissionPackage>
</submissionTicket>
Running the Data Validation module
The the Data Validation module runs locally on your machine. In order to launch the module, navigate to the Data Repository>Validate Data page and click the Launch the Validation Tool link.
Note that the most recent version of Java Runtime Environment (JRE) (6 or 7) is required in order to run the module. Make sure your computer has it installed.
- Click Launch Validation Tool. In the Opening window that appears, select Open with Java(TM) Web Start Launcher (default) and click OK. In the Java Runtime Environment window that appears next saying "Do you want to run this application?", click Run.
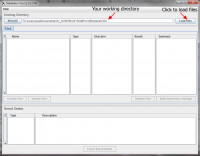
- The module dialog box appears. Click Browse (under Working Directory) to navigate to the directory where the files for submission (CSVs) are located. We call it your Working Directory.
- Select the directory and click Load files to load CSVs into the dialog box. The Loading Files window appears showing the progress.
- At some point the list of files from your working directory appears in the dialog box under Files.
- If your Working Directory contains only the CSV files designated for validation, select the files (click to highlight) to be validated and clock Validate Files. See Including and excluding files.
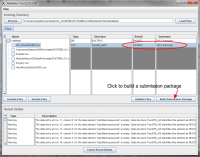
- The Validation module begins to run and validation errors/warnings (if any) appear in the Result Details table. Note: Files with warnings can be included into a submission package. However, files with errors must be fixed and re-validated.
- If there are no errors found in your CSV file(s), for each file that passes validation the following information appears in the Files table: 1) the form structure name appears in the Structure column, 2) the word PASSED appears in the Result column, and 3) the summary column contains only warnings but no errors. Note that a file that passed validation still can have a lot of warnings. That is OK. For more information about validation errors and warnings refer to Error log.
- Click Build Submission Package.
- For each validated CSV file, the submission package and submission ticket will be deposited in the same Working Directory as the original files submitted to the Validation Tool.
Including and excluding files
In the ideal world, your Working Directory should contain only CSV files for validation. Although very often it contains other files also (such as error logs and notes, etc.) In that case, you need to:
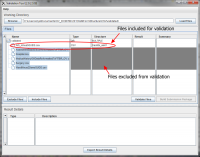
- Exclude from validation those files (and directories) that are not designated for validation. These files usually appear with Type= UNKNOWN under Files in the Working Directory;
- Include into validation the CSV data files that you would like to validate. These files have Type=CSV in the Files table.
Refer to Excluding files from validation and Including files for validation.
Excluding files from validation
To exclude files from validation, select individual file(s) (click to highlight) that are of TYPE UNKNOWN and those not needed for the submission. Hold Ctrl while clicking in order to highlight multiple files. Click Exclude Files.
Including files for validation
To include files for validation, select the CSV files you want to be validated and press Include Files. Hold Ctrl while clicking in order to highlight multiple files.
Error log
Validation errors and warnings appear in the Result Details table. Files with warnings can be validated. However, files with errors must be fixed and re-validated, and then resubmitted for another validation round.
Validation errors appear when a CSV file has entries that are
- Of different type than defines in the data dictionary, e.g. numbers instead of alphanumeric values;
- In different format (other than defiled in the data dictionary for this data element);
- Not listed among permissible values for this particular data element;
- Have more than 1 permissible value separated by a semicolon ";"
- Some other errors.
Validation warnings mostly appear when a data entry, which was defined as Required in the corresponding form structure, is missing in the CSV file.
Please don't be surprised when your validation error log appears having a ton of warnings, these can be easily ignored.
Fixing validation errors
Validation errors and warnings can be exported into a text file - that makes working with them and fixing errors much easier.
To export validation errors or warnings, or both,
- Click the Export Result Details,
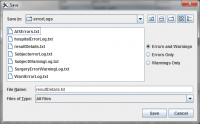
- In the Save dialog box that appears, a) select a directory where you would like to save validation logs, b) specify what types of error log entries you would like to export. These could be a) both errors and warnings (recommended only for smaller log files), b) errors only (recommended), or c) warnings only.
- Type in your own file name and press Save.
- The log file will be saved in the designated directory under the chosen name.
Recommendations:
- By default, an error log file is created and stored in the same directory as your working files. We recommend that you create a designated error log directory and save validation logs there.
- By default, an error log is saved under the "resultDetail.txt" name. We commend that you choose your own file name for an error log and that name is somehow related to the name of your data file. E.g. if you have a data file let say "MyData.csv" you give the corresponding error log file the following name "MyDataErroLog.txt".
After you have exported all validation errors,
- Open the log file in a text editor (MS Word, Notepad, Crimson, Notepadd++ - all these will work).
- Open your CSV file in MS Excel or your preferable text editor that can work with CSV (not MS Word!).
- Go through each entry in the error log and fix it in the CSV file. Save changes in the CSV file. Make sure you saved it as CSV.
- Re-validate the fixed CSV file. Make sure that all errors are gone.
- Create the submission package.
Recommendations:
- If you received a ton of validation errors, we commend that you work on fixing them in batches. Fix a few errors, save the fixed CSV file and re-run it through the Data Validation module. It will still give you a lot of errors, but we hope it would be fewer that before. Save the new error log and go through it fixing a few more errors. Re-run validation. Repeat these steps until you get 0 (zero) errors.
Next step - data upload
After all validation errors have been fixed and a submission package has been created, data can now be submitted to the system. To upload the submission package, use the Data Upload module. The module, runs locally your computer as a Java Web Start application (the latest version of Java runtime environment required).
Read more...


