Data Upload module
The Data Upload module helps researches to upload their data to the data repository. The data should be uploaded in the form of a submission package (XML) that has a unique identifier - a submission ticket (XML).
If you don't have a submission package ready, use the Data Validation module to create it. The module will also validate your data and make sure that they conform to the required format and range values defined in the Data Dictionary.
If you need to submit imaging data to the repository,
- Use the Imaging data submission and validation module to create the imaging submission set.
- Use the Data Validation module to re-validate the data and create a submission ticket and submission package.
System requirements
The most recent version of Java Runtime Environment (JRE) (6 or 7) is required in order to run the Data Upload module.
Running the Data Upload module
The Data Upload module runs locally on your machine. In order to launch the module, navigate to the Data Repository > Upload Data page and click the Launch the Upload Tool link.
Note: the most recent version of Java Runtime Environment (JRE) (6 or 7) is required in order to run the module. Make sure your computer has it installed.
- Click Launch the Upload Tool. In the Opening uploadTool.jnlp window that appears, select Open with Java(TM) Web Start Launcher (default) and click OK. In the Java Runtime Environment window that appears next saying "Do you want to run this application?", click Run.
- The EULE Agreement window appears displaying the data privacy user agreement. Read the agreement and click Accept if you agree.
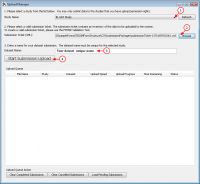
- The Upload Manager window appears.
In the Upload Manager window,
- Use the drop-down Study Name menu to select the study name. Use the Refresh button to update the list of studies.
- Navigate to the Submission Ticket (XML) box and use the Browse button to select the submission ticket file (XML) on your computer.
- Navigate to the Dataset Name text box and type in a unique name for your dataset. Note: The dataset name must be unique to the selected study. Make it a meaningful name - an easy one to search for.
- Press Start Submission Upload.
- The submission package appears in the Upload Queue table. In the Upload Queue table you can watch the progress of your submission(s). The table will update as file(s) are being uploaded to the system. For successful upload(s), the Status (see the Status column) will be designated as "Completed".
- If you need to cancel your submission, press Cancel.
- To clear the completed submissions list, use the Clear Completed Submissions button located at the bottom of the Upload Manager window.
- To clear the cancelled submissions list, use the Clear Cancelled Submissions button located at the bottom of the Upload Manager window.
- To load pending submissions, use the Load Pending Submissions button located at the bottom of the Upload Manager window.
Notes
- You can only upload data to the studies you have the data upload permissions.
- To make sure that the most recent list of studies is available for you, use the Refresh button to update the list of studies.
- The name assigned to the uploading dataset must be unique for the selected study.
- If you have any questions, please contact the operations team - TBD.

