|
|
| (4 intermediate revisions by the same user not shown) |
| Line 1: |
Line 1: |
| − | ==== Customizing the appearance of graphs - Modify graph dialog box ====
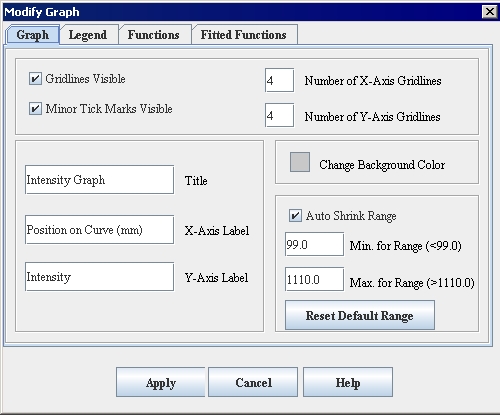
| + | You can adjust the appearance of graphs to interpret the information more clearly or easily. To customize graphs, you use the Modify Graph dialog box , which is accessible through Views > Modify Graph Features in both the Contour VOI window and the Intensity Graph window. The Modify Graph dialog box includes the following four tabbed pages: <br /> |
| − | | + | * ''Graph tab'', which allows you to show or hide the gridlines and tick marks, change the number of gridlines and background color of the graph, change the labels on the graph, and change the range values.<br /> |
| − | <div style="font-style: normal; font-weight: normal; margin-bottom: 6pt; margin-left: 0pt; margin-right: 0pt; margin-top: 0pt; text-align: left; text-decoration: none; text-indent: 0pt; text-transform: none; vertical-align: baseline"><font color="#000000"> You can adjust the appearance of graphs to interpret the information more clearly or easily. To customize graphs, you use the Modify Graph dialog box , which is accessible through Views > Modify Graph Features in both the Contour VOI window and the Intensity Graph window. The Modify Graph dialog box includes the following four tabbed pages: <br /></font></div><div style="font-style: normal; font-weight: normal; margin-bottom: 0pt; margin-left: 24pt; margin-right: 0pt; margin-top: 0pt; text-align: left; text-decoration: none; text-indent: -24pt; text-transform: none; vertical-align: baseline"><font color="#000000"> <span style="font-weight: normal; text-decoration: none; text-transform: none; vertical-align: baseline">''<font color="#000000">Graph tab</font>''</span>, which allows you to show or hide the gridlines and tick marks, change the number of gridlines and background color of the graph, change the labels on the graph, and change the range values.<br /></font></div><div style="font-style: normal; font-weight: normal; margin-bottom: 0pt; margin-left: 24pt; margin-right: 0pt; margin-top: 5pt; text-align: left; text-decoration: none; text-indent: -24pt; text-transform: none; vertical-align: baseline"><font color="#000000"> <span style="font-weight: normal; text-decoration: none; text-transform: none; vertical-align: baseline">''<font color="#000000">Legend tab</font>''</span>, which lets you determine whether a legend should appear on the graph and allows you to assign a specific name to each function.<br /></font></div><div style="font-style: normal; font-weight: normal; margin-bottom: 0pt; margin-left: 24pt; margin-right: 0pt; margin-top: 5pt; text-align: left; text-decoration: none; text-indent: -24pt; text-transform: none; vertical-align: baseline"><font color="#000000"> <span style="font-weight: normal; text-decoration: none; text-transform: none; vertical-align: baseline">''<font color="#000000">Functions tab</font>''</span>, which allows you to change the appearance of the functions in the graph. <br /></font></div><div style="font-style: normal; font-weight: normal; margin-bottom: 0pt; margin-left: 24pt; margin-right: 0pt; margin-top: 5pt; text-align: left; text-decoration: none; text-indent: -24pt; text-transform: none; vertical-align: baseline"><font color="#000000"> <span style="font-weight: normal; text-decoration: none; text-transform: none; vertical-align: baseline">''<font color="#000000">Fitted Functions tab</font>''</span>, which allows<span style="font-style: normal; text-decoration: none; text-transform: none; vertical-align: baseline">'''<font color="#000000"> </font>'''</span>you to modify the functions.<br /></font></div><div style="font-style: normal; font-weight: normal; margin-bottom: 0pt; margin-left: 0pt; margin-right: 0pt; margin-top: 0pt; text-align: left; text-decoration: none; text-indent: 0pt; text-transform: none; vertical-align: baseline"><font color="#000000"> <br /></font></div><div style="font-style: normal; font-weight: normal; margin-bottom: 0pt; margin-left: 0pt; margin-right: 0pt; margin-top: 0pt; text-align: left; text-decoration: none; text-indent: 0pt; text-transform: none; vertical-align: baseline"><font color="#000000">
| + | * ''Legend tab'', which lets you determine whether a legend should appear on the graph and allows you to assign a specific name to each function.<br /> |
| | + | * ''Functions tab'' , which allows you to change the appearance of the functions in the graph. <br /> |
| | + | * ''Fitted Functions tab'', which allows you to modify the functions.<br /> |
| | | | |
| | {| border="1" cellpadding="5" | | {| border="1" cellpadding="5" |
| − | |+ <div style="font-style: normal; margin-bottom: 3pt; margin-left: 0pt; margin-right: 0pt; margin-top: 9pt; text-align: left; text-decoration: none; text-indent: 0pt; text-transform: none; vertical-align: baseline">'''<font color="#000000"> Figure 13. The Graph page of the Modify Graph dialog box <br /></font>'''</div> | + | |+ '''Figure 13. The Graph page of the Modify Graph dialog box ''' |
| | |- | | |- |
| | | rowspan="1" colspan="3" | | | | rowspan="1" colspan="3" | |
| Line 87: |
Line 89: |
| | |} | | |} |
| | | | |
| − | <br /></font></div><div style="font-style: normal; font-weight: normal; margin-bottom: 0pt; margin-left: 0pt; margin-right: 0pt; margin-top: 0pt; text-align: left; text-decoration: none; text-indent: 0pt; text-transform: none; vertical-align: baseline"><font color="#000000"> <br /></font></div><div style="font-style: normal; margin-bottom: 6pt; margin-left: 0pt; margin-right: 0pt; margin-top: 14pt; text-align: left; text-decoration: none; text-indent: 0pt; text-transform: none; vertical-align: baseline">'''<font color="#000000"> To display or hide the points, or tick marks, on graphs<br /></font>'''</div><div style="font-style: normal; font-weight: normal; margin-bottom: 0pt; margin-left: 18pt; margin-right: 0pt; margin-top: 6pt; text-align: left; text-decoration: none; text-indent: -18pt; text-transform: none; vertical-align: baseline"><font color="#000000"> 1 Open an image.<br /></font></div><div style="font-style: normal; font-weight: normal; margin-bottom: 0pt; margin-left: 18pt; margin-right: 0pt; margin-top: 6pt; text-align: left; text-decoration: none; text-indent: -18pt; text-transform: none; vertical-align: baseline"><font color="#000000"> 2 Delineate a VOI on the image.<br /></font></div><div style="font-style: normal; font-weight: normal; margin-bottom: 0pt; margin-left: 18pt; margin-right: 0pt; margin-top: 6pt; text-align: left; text-decoration: none; text-indent: -18pt; text-transform: none; vertical-align: baseline"><font color="#000000"> 3 Generate an intensity profile (refer to [MIPAV_Analysis.html#1082499 "Generating graphs" on page 325]). Either the Contour VOI Graph window ([MIPAV_Analysis.html#1039942 Figure 204 on page 325]) or the Intensity Graph window ([MIPAV_Analysis.html#1038580 Figure 205 on page 329]) opens.<br /></font></div><div style="font-style: normal; font-weight: normal; margin-bottom: 0pt; margin-left: 18pt; margin-right: 0pt; margin-top: 6pt; text-align: left; text-decoration: none; text-indent: -18pt; text-transform: none; vertical-align: baseline"><font color="#000000"> 4 Select Views > Modify Graph Features in either the Contour VOI Graph window or the Intensity Graph window. The Graph page of the Modify Graph dialog box ([MIPAV_Analysis.html#1361809 Figure 207 on page 332]) appears.<br /></font></div><div style="font-style: normal; font-weight: normal; margin-bottom: 0pt; margin-left: 18pt; margin-right: 0pt; margin-top: 6pt; text-align: left; text-decoration: none; text-indent: -18pt; text-transform: none; vertical-align: baseline"><font color="#000000"> 5 Do one of the following:<br /></font></div><div style="font-style: normal; font-weight: normal; margin-bottom: 0pt; margin-left: 36pt; margin-right: 0pt; margin-top: 6pt; text-align: left; text-decoration: none; text-indent: -12pt; text-transform: none; vertical-align: baseline"><font color="#000000"> If you want to make the points appear on the graph, select Minor tick marks visible. A check mark appears in the check box. <br /></font></div><div style="font-style: normal; font-weight: normal; margin-bottom: 0pt; margin-left: 36pt; margin-right: 0pt; margin-top: 6pt; text-align: left; text-decoration: none; text-indent: -12pt; text-transform: none; vertical-align: baseline"><font color="#000000"> If you want to make the points invisible, clear Minor tick marks visible. <br /></font></div><div style="font-style: normal; font-weight: normal; margin-bottom: 600pt; margin-left: 0pt; margin-right: 0pt; margin-top: 0pt; text-align: left; text-decoration: none; text-indent: 0pt; text-transform: none; vertical-align: baseline"><font color="#000000"> <br /></font></div><div style="font-style: normal; font-weight: normal; margin-bottom: 0pt; margin-left: 18pt; margin-right: 0pt; margin-top: 6pt; text-align: left; text-decoration: none; text-indent: -18pt; text-transform: none; vertical-align: baseline"><font color="#000000"> 6 Click Apply. <br /></font></div><div style="font-style: normal; font-weight: normal; margin-bottom: 0pt; margin-left: 36pt; margin-right: 0pt; margin-top: 6pt; text-align: left; text-decoration: none; text-indent: -12pt; text-transform: none; vertical-align: baseline"><font color="#000000"> If you selected <span style="font-style: normal; text-decoration: none; text-transform: none; vertical-align: baseline">'''<font color="#000000">Minor tick marks visible</font>'''</span>, the tick marks along the <span style="font-weight: normal; text-decoration: none; text-transform: none; vertical-align: baseline">''<font color="#000000">X</font>''</span> and <span style="font-weight: normal; text-decoration: none; text-transform: none; vertical-align: baseline">''<font color="#000000">Y</font>''</span> axes in the graph appear.<br /></font></div><div style="font-style: normal; font-weight: normal; margin-bottom: 0pt; margin-left: 36pt; margin-right: 0pt; margin-top: 6pt; text-align: left; text-decoration: none; text-indent: -12pt; text-transform: none; vertical-align: baseline"><font color="#000000"> If you cleared <span style="font-style: normal; text-decoration: none; text-transform: none; vertical-align: baseline">'''<font color="#000000">Minor tick marks visible</font>'''</span>, the tick marks disappear from the graph.<br /></font></div><div style="font-style: normal; font-weight: normal; margin-bottom: 0pt; margin-left: 18pt; margin-right: 0pt; margin-top: 6pt; text-align: left; text-decoration: none; text-indent: -18pt; text-transform: none; vertical-align: baseline"><font color="#000000"> 7 Do one of the following:<br /></font></div><div style="font-style: normal; font-weight: normal; margin-bottom: 0pt; margin-left: 36pt; margin-right: 0pt; margin-top: 6pt; text-align: left; text-decoration: none; text-indent: -12pt; text-transform: none; vertical-align: baseline"><font color="#000000"> Close the Modify Graph dialog box. <br /></font></div><div style="font-style: normal; font-weight: normal; margin-bottom: 0pt; margin-left: 36pt; margin-right: 0pt; margin-top: 6pt; text-align: left; text-decoration: none; text-indent: -12pt; text-transform: none; vertical-align: baseline"><font color="#000000"> Keep the Modify Graph dialog box open to continue modifying the graph.<br /></font></div><div style="font-style: normal; font-weight: normal; margin-bottom: 0pt; margin-left: 0pt; margin-right: 0pt; margin-top: 0pt; text-align: left; text-decoration: none; text-indent: 0pt; text-transform: none; vertical-align: baseline"><font color="#000000"> <br /></font></div><div style="font-style: normal; font-weight: normal; margin-bottom: 0pt; margin-left: 0pt; margin-right: 0pt; margin-top: 0pt; text-align: left; text-decoration: none; text-indent: 0pt; text-transform: none; vertical-align: baseline"><font color="#000000"> <br /></font></div><div style="font-style: normal; font-weight: normal; margin-bottom: 0pt; margin-left: 0pt; margin-right: 0pt; margin-top: 0pt; text-align: left; text-decoration: none; text-indent: 0pt; text-transform: none; vertical-align: baseline"><font color="#000000"> <br /></font></div><div style="font-style: normal; margin-bottom: 6pt; margin-left: 0pt; margin-right: 0pt; margin-top: 14pt; text-align: left; text-decoration: none; text-indent: 0pt; text-transform: none; vertical-align: baseline">'''<font color="#000000"> To display or hide the gridlines on graphs<br /></font>'''</div><div style="font-style: normal; font-weight: normal; margin-bottom: 0pt; margin-left: 18pt; margin-right: 0pt; margin-top: 6pt; text-align: left; text-decoration: none; text-indent: -18pt; text-transform: none; vertical-align: baseline"><font color="#000000"> 1 Open an image.<br /></font></div><div style="font-style: normal; font-weight: normal; margin-bottom: 0pt; margin-left: 18pt; margin-right: 0pt; margin-top: 6pt; text-align: left; text-decoration: none; text-indent: -18pt; text-transform: none; vertical-align: baseline"><font color="#000000"> 2 Delineate a VOI on the image.<br /></font></div><div style="font-style: normal; font-weight: normal; margin-bottom: 0pt; margin-left: 18pt; margin-right: 0pt; margin-top: 6pt; text-align: left; text-decoration: none; text-indent: -18pt; text-transform: none; vertical-align: baseline"><font color="#000000"> 3 Generate an intensity profile (refer to "Generating graphs"). Either the Contour VOI Graph window (Figure 10) or the Intensity Graph window (Figure 11) opens.<br /></font></div><div style="font-style: normal; font-weight: normal; margin-bottom: 0pt; margin-left: 18pt; margin-right: 0pt; margin-top: 6pt; text-align: left; text-decoration: none; text-indent: -18pt; text-transform: none; vertical-align: baseline"><font color="#000000"> 4 Select Views > Modify Graph Features in either Contour VOI Graph window or the Intensity Graph window. The Graph page of the Modify Graph dialog box (Figure 13) appears.<br /></font></div><div style="font-style: normal; font-weight: normal; margin-bottom: 0pt; margin-left: 18pt; margin-right: 0pt; margin-top: 6pt; text-align: left; text-decoration: none; text-indent: -18pt; text-transform: none; vertical-align: baseline"><font color="#000000"> 5 Do one of the following:<br /></font></div><div style="font-style: normal; font-weight: normal; margin-bottom: 0pt; margin-left: 36pt; margin-right: 0pt; margin-top: 6pt; text-align: left; text-decoration: none; text-indent: -12pt; text-transform: none; vertical-align: baseline"><font color="#000000"> To make the gridlines appear on the graph, select, if not already selected, Gridlines visible. A check mark appears in the check box.<br /></font></div><div style="font-style: normal; font-weight: normal; margin-bottom: 0pt; margin-left: 36pt; margin-right: 0pt; margin-top: 6pt; text-align: left; text-decoration: none; text-indent: -12pt; text-transform: none; vertical-align: baseline"><font color="#000000"> To make the gridlines disappear from the graph, clear Gridlines visible. The check box is empty.<br /></font></div><div style="font-style: normal; font-weight: normal; margin-bottom: 0pt; margin-left: 0pt; margin-right: 0pt; margin-top: 0pt; text-align: left; text-decoration: none; text-indent: 0pt; text-transform: none; vertical-align: baseline"><font color="#000000">
| + | '''To display or hide the points, or tick marks, on graphs'''<br /> |
| | + | 1 Open an image.<br /> |
| | + | 2 Delineate a VOI on the image.<br /> |
| | + | 3 Generate an intensity profile (refer to "Generating graphs" ). Either the Contour VOI Graph window or the Intensity Graph window opens.<br /> |
| | + | 4 Select Views > Modify Graph Features in either the Contour VOI Graph window or the Intensity Graph window. The Graph page of the Modify Graph dialog box appears.<br /> |
| | + | 5 Do one of the following:<br /> |
| | + | If you want to make the points appear on the graph, select Minor tick marks visible. A check mark appears in the check box. <br /> |
| | + | If you want to make the points invisible, clear Minor tick marks visible. <br /> |
| | + | 6 Click Apply. <br /> |
| | + | If you selected '''Minor tick marks visible''', the tick marks along the ''X'' and ''Y'' axes in the graph appear.<br /> |
| | + | If you cleared '''Minor tick marks visible''', the tick marks disappear from the graph.<br /> |
| | + | 7 Do one of the following:<br /> |
| | + | * Close the Modify Graph dialog box. <br /> |
| | + | * Keep the Modify Graph dialog box open to continue modifying the graph.<br /> |
| | + | |
| | + | '''To display or hide the gridlines on graphs<br />''' |
| | + | 1 Open an image.<br /> |
| | + | 2 Delineate a VOI on the image.<br /> |
| | + | 3 Generate an intensity profile (refer to "Generating graphs"). Either the Contour VOI Graph window (Figure 10) or the Intensity Graph window (Figure 11) opens.<br /> |
| | + | 4 Select Views > Modify Graph Features in either Contour VOI Graph window or the Intensity Graph window. The Graph page of the Modify Graph dialog box (Figure 13) appears.<br /> |
| | + | 5 Do one of the following:<br /> |
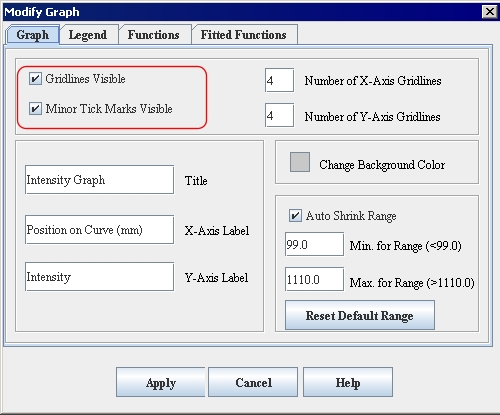
| | + | * To make the gridlines appear on the graph, select, if not already selected, Gridlines visible. A check mark appears in the check box.<br /> |
| | + | * To make the gridlines disappear from the graph, clear Gridlines visible. The check box is empty.<br /> |
| | | | |
| | {| border="1" cellpadding="5" | | {| border="1" cellpadding="5" |
| − | |+ <div style="font-style: normal; margin-bottom: 3pt; margin-left: 0pt; margin-right: 0pt; margin-top: 9pt; text-align: left; text-decoration: none; text-indent: 0pt; text-transform: none; vertical-align: baseline">'''<font color="#000000"> Figure 14. Displaying or hiding the gridlines and tick marks on the graph <br /></font>'''</div> | + | |+ '''Figure 14. Displaying or hiding the gridlines and tick marks on the graph ''' |
| | |- | | |- |
| | | | | | |
| | [[Image:VOIGraphsModifyGraphGraphGriidlines.jpg]] | | [[Image:VOIGraphsModifyGraphGraphGriidlines.jpg]] |
| | |} | | |} |
| | + | 6 Click Apply.<br /> |
| | + | If you selected Gridlines visible, horizontal and vertical gridlines appear in the graph.<br /> |
| | + | If you cleared the check box, the gridlines disappear from the graph.<br /> |
| | + | 7 Do one of the following:<br /> |
| | + | * Close the Modify Graph dialog box. <br /> |
| | + | * Keep the Modify Graph dialog box open to continue modifying the graph.<br /> |
| | + | |
| | + | '''To change the number of gridlines in graphs'''<br /> |
| | + | 1 Select Views > Modify Graph Features in either the Contour VOI Graph window (Figure 10) or the Intensity Graph window (Figure 11). The Graph page of the Modify Graph dialog box (Figure 13) appears.<br /> |
| | + | 2 Change the number of ''X'' -axis gridlines in Number of ''X'' -axis gridlines (Figure 15) by specifying a value from 1 to 50. The default number of gridlines is 4. <br /> |
| | + | 3 Change the number of ''Y'' -axis gridlines in Number of ''Y'' -axis gridlines (Figure 15) by specifying a value from 1 to 50. The default number of gridlines is 4.<br /> |
| | | | |
| − | <br /></font></div><div style="font-style: normal; font-weight: normal; margin-bottom: 0pt; margin-left: 18pt; margin-right: 0pt; margin-top: 6pt; text-align: left; text-decoration: none; text-indent: -18pt; text-transform: none; vertical-align: baseline"><font color="#000000"> 6 Click Apply.<br /></font></div><div style="font-style: normal; font-weight: normal; margin-bottom: 0pt; margin-left: 36pt; margin-right: 0pt; margin-top: 6pt; text-align: left; text-decoration: none; text-indent: -12pt; text-transform: none; vertical-align: baseline"><font color="#000000"> If you selected Gridlines visible, horizontal and vertical gridlines appear in the graph.<br /></font></div><div style="font-style: normal; font-weight: normal; margin-bottom: 0pt; margin-left: 36pt; margin-right: 0pt; margin-top: 6pt; text-align: left; text-decoration: none; text-indent: -12pt; text-transform: none; vertical-align: baseline"><font color="#000000"> If you cleared the check box, the gridlines disappear from the graph.<br /></font></div><div style="font-style: normal; font-weight: normal; margin-bottom: 0pt; margin-left: 18pt; margin-right: 0pt; margin-top: 6pt; text-align: left; text-decoration: none; text-indent: -18pt; text-transform: none; vertical-align: baseline"><font color="#000000"> 7 Do one of the following:<br /></font></div><div style="font-style: normal; font-weight: normal; margin-bottom: 0pt; margin-left: 36pt; margin-right: 0pt; margin-top: 6pt; text-align: left; text-decoration: none; text-indent: -12pt; text-transform: none; vertical-align: baseline"><font color="#000000"> Close the Modify Graph dialog box. <br /></font></div><div style="font-style: normal; font-weight: normal; margin-bottom: 0pt; margin-left: 36pt; margin-right: 0pt; margin-top: 6pt; text-align: left; text-decoration: none; text-indent: -12pt; text-transform: none; vertical-align: baseline"><font color="#000000"> Keep the Modify Graph dialog box open to continue modifying the graph.<br /></font></div><div style="font-style: normal; font-weight: normal; margin-bottom: 0pt; margin-left: 0pt; margin-right: 0pt; margin-top: 0pt; text-align: left; text-decoration: none; text-indent: 0pt; text-transform: none; vertical-align: baseline"><font color="#000000"> <br /></font></div><div style="font-style: normal; margin-bottom: 6pt; margin-left: 0pt; margin-right: 0pt; margin-top: 14pt; text-align: left; text-decoration: none; text-indent: 0pt; text-transform: none; vertical-align: baseline">'''<font color="#000000"> To change the number of gridlines in graphs<br /></font>'''</div><div style="font-style: normal; font-weight: normal; margin-bottom: 0pt; margin-left: 18pt; margin-right: 0pt; margin-top: 6pt; text-align: left; text-decoration: none; text-indent: -18pt; text-transform: none; vertical-align: baseline"><font color="#000000"> 1 Select Views > Modify Graph Features in either the Contour VOI Graph window (Figure 10) or the Intensity Graph window (Figure 11). The Graph page of the Modify Graph dialog box (Figure 13) appears.<br /></font></div><div style="font-style: normal; font-weight: normal; margin-bottom: 0pt; margin-left: 18pt; margin-right: 0pt; margin-top: 6pt; text-align: left; text-decoration: none; text-indent: -18pt; text-transform: none; vertical-align: baseline"><font color="#000000"> 2 Change the number of <span style="font-weight: normal; text-decoration: none; text-transform: none; vertical-align: baseline">''<font color="#000000">X</font>''</span>-axis gridlines in Number of <span style="font-weight: normal; text-decoration: none; text-transform: none; vertical-align: baseline">''<font color="#000000">X</font>''</span>-axis gridlines (Figure 15) by specifying a value from 1 to 50. The default number of gridlines is 4. <br /></font></div><div style="font-style: normal; font-weight: normal; margin-bottom: 0pt; margin-left: 18pt; margin-right: 0pt; margin-top: 6pt; text-align: left; text-decoration: none; text-indent: -18pt; text-transform: none; vertical-align: baseline"><font color="#000000"> 3 Change the number of <span style="font-weight: normal; text-decoration: none; text-transform: none; vertical-align: baseline">''<font color="#000000">Y</font>''</span>-axis gridlines in Number of <span style="font-weight: normal; text-decoration: none; text-transform: none; vertical-align: baseline">''<font color="#000000">Y</font>''</span>-axis gridlines (Figure 15) by specifying a value from 1 to 50. The default number of gridlines is 4.<br /></font></div><div style="font-style: normal; font-weight: normal; margin-bottom: 0pt; margin-left: 0pt; margin-right: 0pt; margin-top: 0pt; text-align: left; text-decoration: none; text-indent: 0pt; text-transform: none; vertical-align: baseline"><font color="#000000">
| |
| | | | |
| | {| border="1" cellpadding="5" | | {| border="1" cellpadding="5" |
| − | |+ <div style="font-style: normal; margin-bottom: 3pt; margin-left: 0pt; margin-right: 0pt; margin-top: 9pt; text-align: left; text-decoration: none; text-indent: 0pt; text-transform: none; vertical-align: baseline">'''<font color="#000000"> Figure 15. Number of <span style="text-decoration: none; text-transform: none; vertical-align: baseline">'''''<font color="#000000">X</font>'''''</span>-axis and <span style="text-decoration: none; text-transform: none; vertical-align: baseline">'''''<font color="#000000">Y</font>'''''</span>-axis gridlines<br /></font>'''</div> | + | |+ '''Figure 15. Number of ''X'' -axis and ''Y'' -axis gridlines'''<br /> |
| | |- | | |- |
| | | | | | |
| | [[Image:exampleNumberGridlines.jpg]] | | [[Image:exampleNumberGridlines.jpg]] |
| | |} | | |} |
| | + | 4 Click Apply. <br /> |
| | + | The number of horizontal and vertical gridlines that you specified appear in the graph in the Intensity Graph window.<br /> |
| | + | '''Tip:''' If you specify many gridlines, to see the gridlines more clearly, resize the Modify Graph dialog box.<br /> |
| | + | 5 Do one of the following:<br /> |
| | + | * Close the Modify Graph dialog box. <br /> |
| | + | * Keep the Modify Graph dialog box open to continue modifying the graph.<br /> |
| | | | |
| − | <br /></font></div><div style="font-style: normal; font-weight: normal; margin-bottom: 0pt; margin-left: 0pt; margin-right: 0pt; margin-top: 0pt; text-align: left; text-decoration: none; text-indent: 0pt; text-transform: none; vertical-align: baseline"><font color="#000000"> <br /></font></div><div style="font-style: normal; font-weight: normal; margin-bottom: 0pt; margin-left: 0pt; margin-right: 0pt; margin-top: 0pt; text-align: left; text-decoration: none; text-indent: 0pt; text-transform: none; vertical-align: baseline"><font color="#000000"> <br /></font></div><div style="font-style: normal; font-weight: normal; margin-bottom: 0pt; margin-left: 18pt; margin-right: 0pt; margin-top: 6pt; text-align: left; text-decoration: none; text-indent: -18pt; text-transform: none; vertical-align: baseline"><font color="#000000"> 4 Click Apply. <br /></font></div><div style="font-style: normal; font-weight: normal; margin-bottom: 0pt; margin-left: 18pt; margin-right: 0pt; margin-top: 6pt; text-align: left; text-decoration: none; text-indent: 0pt; text-transform: none; vertical-align: baseline"><font color="#000000"> The number of horizontal and vertical gridlines that you specified appear in the graph in the Intensity Graph window.<br /></font></div><div style="font-style: normal; font-weight: normal; margin-bottom: 0pt; margin-left: 0pt; margin-right: 0pt; margin-top: 5pt; text-align: left; text-decoration: none; text-indent: 0pt; text-transform: none; vertical-align: baseline"><font color="#000000"> <span style="font-style: normal; text-decoration: none; text-transform: none; vertical-align: baseline">'''<font color="#000000">Tip:</font>'''</span> If you specify many gridlines, to see the gridlines more clearly, resize the Modify Graph dialog box.<br /></font></div><div style="font-style: normal; font-weight: normal; margin-bottom: 0pt; margin-left: 18pt; margin-right: 0pt; margin-top: 6pt; text-align: left; text-decoration: none; text-indent: -18pt; text-transform: none; vertical-align: baseline"><font color="#000000"> 5 Do one of the following:<br /></font></div><div style="font-style: normal; font-weight: normal; margin-bottom: 0pt; margin-left: 24pt; margin-right: 0pt; margin-top: 5pt; text-align: left; text-decoration: none; text-indent: -24pt; text-transform: none; vertical-align: baseline"><font color="#000000"> Close the Modify Graph dialog box. <br /></font></div><div style="font-style: normal; font-weight: normal; margin-bottom: 0pt; margin-left: 24pt; margin-right: 0pt; margin-top: 5pt; text-align: left; text-decoration: none; text-indent: -24pt; text-transform: none; vertical-align: baseline"><font color="#000000"> Keep the Modify Graph dialog box open to continue modifying the graph.<br /></font></div><div style="font-style: normal; font-weight: normal; margin-bottom: 0pt; margin-left: 0pt; margin-right: 0pt; margin-top: 0pt; text-align: left; text-decoration: none; text-indent: 0pt; text-transform: none; vertical-align: baseline"><font color="#000000"> <br /></font></div><div style="font-style: normal; margin-bottom: 6pt; margin-left: 0pt; margin-right: 0pt; margin-top: 14pt; text-align: left; text-decoration: none; text-indent: 0pt; text-transform: none; vertical-align: baseline">'''<font color="#000000"> To change the graph title and labels on the <span style="text-decoration: none; text-transform: none; vertical-align: baseline">'''''<font color="#000000">X</font>'''''</span> and <span style="text-decoration: none; text-transform: none; vertical-align: baseline">'''''<font color="#000000">Y</font>'''''</span> axes <br /></font>'''</div><div style="font-style: normal; font-weight: normal; margin-bottom: 0pt; margin-left: 18pt; margin-right: 0pt; margin-top: 6pt; text-align: left; text-decoration: none; text-indent: -18pt; text-transform: none; vertical-align: baseline"><font color="#000000"> 1 Open an image.<br /></font></div><div style="font-style: normal; font-weight: normal; margin-bottom: 0pt; margin-left: 18pt; margin-right: 0pt; margin-top: 6pt; text-align: left; text-decoration: none; text-indent: -18pt; text-transform: none; vertical-align: baseline"><font color="#000000"> 2 Delineate a VOI on the image.<br /></font></div><div style="font-style: normal; font-weight: normal; margin-bottom: 0pt; margin-left: 18pt; margin-right: 0pt; margin-top: 6pt; text-align: left; text-decoration: none; text-indent: -18pt; text-transform: none; vertical-align: baseline"><font color="#000000"> 3 Generate an intensity profile (refer to [MIPAV_Analysis.html#1082499 "Generating graphs" on page 325]). Either the Contour VOI Graph window ([MIPAV_Analysis.html#1039942 Figure 204 on page 325]) or the Intensity Graph window ([MIPAV_Analysis.html#1038580 Figure 205 on page 329]) opens.<br /></font></div><div style="font-style: normal; font-weight: normal; margin-bottom: 0pt; margin-left: 18pt; margin-right: 0pt; margin-top: 6pt; text-align: left; text-decoration: none; text-indent: -18pt; text-transform: none; vertical-align: baseline"><font color="#000000"> 4 Select Views > Modify Graph Features in Contour VOI Graph window or the Intensity Graph window. The Graph page of the Modify Graph dialog box ([MIPAV_Analysis.html#1361809 Figure 207 on page 332]) appears.<br /></font></div><div style="font-style: normal; font-weight: normal; margin-bottom: 0pt; margin-left: 18pt; margin-right: 0pt; margin-top: 6pt; text-align: left; text-decoration: none; text-indent: -18pt; text-transform: none; vertical-align: baseline"><font color="#000000"> 5 Type the new title and axes labels in Title, <span style="font-weight: normal; text-decoration: none; text-transform: none; vertical-align: baseline">''<font color="#000000">X</font>''</span>-axis label, and <span style="font-weight: normal; text-decoration: none; text-transform: none; vertical-align: baseline">''<font color="#000000">Y</font>''</span>-axis label boxes (Figure 16).<br /></font></div><div style="font-style: normal; font-weight: normal; margin-bottom: 0pt; margin-left: 0pt; margin-right: 0pt; margin-top: 0pt; text-align: left; text-decoration: none; text-indent: 0pt; text-transform: none; vertical-align: baseline"><font color="#000000">
| + | '''To change the graph title and labels on the ''X'' and ''Y'' axes '''<br /> |
| | + | 1 Open an image.<br /> |
| | + | 2 Delineate a VOI on the image.<br /> |
| | + | 3 Generate an intensity profile (refer to "Generating graphs". Either the Contour VOI Graph window or the Intensity Graph window opens.<br /> |
| | + | 4 Select Views > Modify Graph Features in Contour VOI Graph window or the Intensity Graph window. The Graph page of the Modify Graph dialog box appears.<br /> |
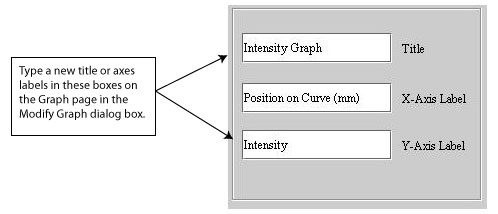
| | + | 5 Type the new title and axes labels in Title, ''X''-axis label, and ''Y'' -axis label boxes (Figure 16).<br /> |
| | | | |
| | {| border="1" cellpadding="5" | | {| border="1" cellpadding="5" |
| − | |+ <div style="font-style: normal; margin-bottom: 3pt; margin-left: 0pt; margin-right: 0pt; margin-top: 9pt; text-align: left; text-decoration: none; text-indent: 0pt; text-transform: none; vertical-align: baseline">'''<font color="#000000"> Figure 16. Title, <span style="text-decoration: none; text-transform: none; vertical-align: baseline">'''''<font color="#000000">X</font>'''''</span>-axis label, and <span style="text-decoration: none; text-transform: none; vertical-align: baseline">'''''<font color="#000000">Y</font>'''''</span>-axis label boxes in the Modify Graph dialog box<br /></font>'''</div> | + | |+ '''Figure 16. Title, ''X'' -axis label, and ''Y'' -axis label boxes in the Modify Graph dialog box'''<br /> |
| | |- | | |- |
| | | | | | |
| | [[Image:exampleAxesLabels.jpg]] | | [[Image:exampleAxesLabels.jpg]] |
| | |} | | |} |
| − | | + | 6 Click Apply. <br /> |
| − | <br /></font></div><div style="font-style: normal; font-weight: normal; margin-bottom: 0pt; margin-left: 18pt; margin-right: 0pt; margin-top: 6pt; text-align: left; text-decoration: none; text-indent: -18pt; text-transform: none; vertical-align: baseline"><font color="#000000"> 6 Click Apply. <br /></font></div><div style="font-style: normal; font-weight: normal; margin-bottom: 0pt; margin-left: 18pt; margin-right: 0pt; margin-top: 6pt; text-align: left; text-decoration: none; text-indent: 0pt; text-transform: none; vertical-align: baseline"><font color="#000000"> The new title appears number of horizontal and vertical gridlines that you specified now appear in the graph (Figure 17).<br /></font></div><div style="font-style: normal; font-weight: normal; margin-bottom: 0pt; margin-left: 0pt; margin-right: 0pt; margin-top: 5pt; text-align: left; text-decoration: none; text-indent: 0pt; text-transform: none; vertical-align: baseline"><font color="#000000"> <span style="font-style: normal; text-decoration: none; text-transform: none; vertical-align: baseline">'''<font color="#000000">Tip:</font>'''</span> If you specify many gridlines, you might want to resize the Modify Graph dialog box to see the gridlines more clearly.<br /></font></div><div style="font-style: normal; font-weight: normal; margin-bottom: 0pt; margin-left: 18pt; margin-right: 0pt; margin-top: 6pt; text-align: left; text-decoration: none; text-indent: -18pt; text-transform: none; vertical-align: baseline"><font color="#000000"> 7 Do one of the following:<br /></font></div><div style="font-style: normal; font-weight: normal; margin-bottom: 0pt; margin-left: 24pt; margin-right: 0pt; margin-top: 5pt; text-align: left; text-decoration: none; text-indent: -24pt; text-transform: none; vertical-align: baseline"><font color="#000000"> Close the Modify Graph dialog box. <br /></font></div><div style="font-style: normal; font-weight: normal; margin-bottom: 0pt; margin-left: 24pt; margin-right: 0pt; margin-top: 5pt; text-align: left; text-decoration: none; text-indent: -24pt; text-transform: none; vertical-align: baseline"><font color="#000000"> Keep the Modify Graph dialog box open to continue modifying the graph.<br /></font></div><div style="font-style: normal; font-weight: normal; margin-bottom: 0pt; margin-left: 0pt; margin-right: 0pt; margin-top: 0pt; text-align: left; text-decoration: none; text-indent: 0pt; text-transform: none; vertical-align: baseline"><font color="#000000"> <br /></font></div><div style="font-style: normal; font-weight: normal; margin-bottom: 0pt; margin-left: 0pt; margin-right: 0pt; margin-top: 0pt; text-align: left; text-decoration: none; text-indent: 0pt; text-transform: none; vertical-align: baseline"><font color="#000000">
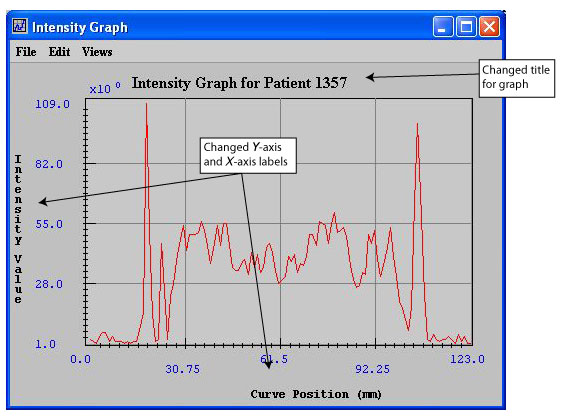
| + | The new title appears number of horizontal and vertical gridlines that you specified now appear in the graph (Figure 17).<br /> |
| | + | '''Tip:''' If you specify many gridlines, you might want to resize the Modify Graph dialog box to see the gridlines more clearly.<br /> |
| | + | 7 Do one of the following:<br /> |
| | + | * Close the Modify Graph dialog box. <br /> |
| | + | * Keep the Modify Graph dialog box open to continue modifying the graph.<br /> |
| | | | |
| | {| border="1" cellpadding="5" | | {| border="1" cellpadding="5" |
| − | |+ <div style="font-style: normal; margin-bottom: 3pt; margin-left: 0pt; margin-right: 0pt; margin-top: 9pt; text-align: left; text-decoration: none; text-indent: 0pt; text-transform: none; vertical-align: baseline">'''<font color="#000000"> Figure 17. Changed title and axes labels in the Intensity Graph window <br /></font>'''</div> | + | |+ '''Figure 17. Changed title and axes labels in the Intensity Graph window''' |
| | |- | | |- |
| | | | | | |
| Line 123: |
Line 172: |
| | |} | | |} |
| | | | |
| − | <br /></font></div><div style="font-style: normal; margin-bottom: 6pt; margin-left: 0pt; margin-right: 0pt; margin-top: 14pt; text-align: left; text-decoration: none; text-indent: 0pt; text-transform: none; vertical-align: baseline">'''<font color="#000000"> To change the background color of graphs<br /></font>'''</div><div style="font-style: normal; font-weight: normal; margin-bottom: 0pt; margin-left: 18pt; margin-right: 0pt; margin-top: 6pt; text-align: left; text-decoration: none; text-indent: -18pt; text-transform: none; vertical-align: baseline"><font color="#000000"> 1 Open an image.<br /></font></div><div style="font-style: normal; font-weight: normal; margin-bottom: 0pt; margin-left: 18pt; margin-right: 0pt; margin-top: 6pt; text-align: left; text-decoration: none; text-indent: -18pt; text-transform: none; vertical-align: baseline"><font color="#000000"> 2 Delineate a VOI on the image.<br /></font></div><div style="font-style: normal; font-weight: normal; margin-bottom: 0pt; margin-left: 18pt; margin-right: 0pt; margin-top: 6pt; text-align: left; text-decoration: none; text-indent: -18pt; text-transform: none; vertical-align: baseline"><font color="#000000"> 3 Generate an intensity profile (refer to [MIPAV_Analysis.html#1082499 "Generating graphs" on page 325]). Either the Contour VOI Graph window or the Intensity Graph window opens.<br /></font></div><div style="font-style: normal; font-weight: normal; margin-bottom: 0pt; margin-left: 18pt; margin-right: 0pt; margin-top: 6pt; text-align: left; text-decoration: none; text-indent: -18pt; text-transform: none; vertical-align: baseline"><font color="#000000"> 4 Select Views > Modify Graph Features in either the Contour VOI Graph window or the Intensity Graph window. The Graph page of the Modify Graph dialog box (Figure 13) appears.<br /></font></div><div style="font-style: normal; font-weight: normal; margin-bottom: 0pt; margin-left: 18pt; margin-right: 0pt; margin-top: 6pt; text-align: left; text-decoration: none; text-indent: -18pt; text-transform: none; vertical-align: baseline"><font color="#000000"> 5 Select Change background color ([MIPAV_Analysis.html#1045304 Figure 212]).<br /></font></div><div style="font-style: normal; font-weight: normal; margin-bottom: 0pt; margin-left: 0pt; margin-right: 0pt; margin-top: 0pt; text-align: left; text-decoration: none; text-indent: 0pt; text-transform: none; vertical-align: baseline"><font color="#000000">
| + | '''To change the background color of graphs'''<br /> |
| | + | 1 Open an image.<br /> |
| | + | 2 Delineate a VOI on the image.<br /> |
| | + | 3 Generate an intensity profile (refer to "Generating graphs"). Either the Contour VOI Graph window or the Intensity Graph window opens.<br /> |
| | + | 4 Select Views > Modify Graph Features in either the Contour VOI Graph window or the Intensity Graph window. The Graph page of the Modify Graph dialog box (Figure 13) appears.<br /> |
| | + | 5 Select Change background color.<br /> |
| | | | |
| | {| border="1" cellpadding="5" | | {| border="1" cellpadding="5" |
| − | |+ <div style="font-style: normal; margin-bottom: 3pt; margin-left: 0pt; margin-right: 0pt; margin-top: 9pt; text-align: left; text-decoration: none; text-indent: 0pt; text-transform: none; vertical-align: baseline">'''<font color="#000000"> Figure 18. Change background color button<br /></font>'''</div> | + | |+ '''Figure 18. Change background color button''' |
| | |- | | |- |
| | | | | | |
| Line 132: |
Line 186: |
| | |} | | |} |
| | | | |
| − | <br /></font></div><div style="font-style: normal; font-weight: normal; margin-bottom: 0pt; margin-left: 18pt; margin-right: 0pt; margin-top: 6pt; text-align: left; text-decoration: none; text-indent: 0pt; text-transform: none; vertical-align: baseline"><font color="#000000"> The Pick Background Color dialog box (Figure 19) opens. <br /></font></div><div style="font-style: normal; font-weight: normal; margin-bottom: 0pt; margin-left: 0pt; margin-right: 0pt; margin-top: 0pt; text-align: left; text-decoration: none; text-indent: 0pt; text-transform: none; vertical-align: baseline"><font color="#000000">
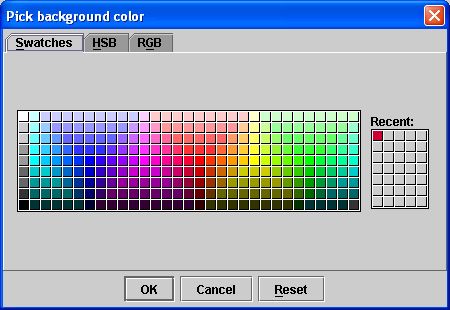
| + | The Pick Background Color dialog box (Figure 19) opens. <br /> |
| | | | |
| | {| border="1" cellpadding="5" | | {| border="1" cellpadding="5" |
| − | |+ <div style="font-style: normal; margin-bottom: 3pt; margin-left: 0pt; margin-right: 0pt; margin-top: 9pt; text-align: left; text-decoration: none; text-indent: 0pt; text-transform: none; vertical-align: baseline">'''<font color="#000000"> Figure 19. Pick Background Color dialog box<br /></font>'''</div> | + | |+ '''Figure 19. Pick Background Color dialog box''' |
| | |- | | |- |
| | | | | | |
| Line 141: |
Line 195: |
| | |} | | |} |
| | | | |
| − | <br /></font></div><div style="font-style: normal; font-weight: normal; margin-bottom: 0pt; margin-left: 18pt; margin-right: 0pt; margin-top: 6pt; text-align: left; text-decoration: none; text-indent: -18pt; text-transform: none; vertical-align: baseline"><font color="#000000"> 6 Select a color from one of the three pages in this dialog box. Refer to "To change background and border colors" for information on how to select a color. Refer to "To change background and border colors" for information on how to select a color.<br /></font></div><div style="font-style: normal; font-weight: normal; margin-bottom: 0pt; margin-left: 18pt; margin-right: 0pt; margin-top: 6pt; text-align: left; text-decoration: none; text-indent: -18pt; text-transform: none; vertical-align: baseline"><font color="#000000"> 7 Click OK to apply the color to the graph background. The Pick Background Color dialog box closes, and the graph background (Figure 20) changes to the color you selected.<br /></font></div><div style="font-style: normal; font-weight: normal; margin-bottom: 0pt; margin-left: 0pt; margin-right: 0pt; margin-top: 0pt; text-align: left; text-decoration: none; text-indent: 0pt; text-transform: none; vertical-align: baseline"><font color="#000000">
| + | 6 Select a color from one of the three pages in this dialog box. Refer to "To change background and border colors" for information on how to select a color. Refer to "To change background and border colors" for information on how to select a color.<br /> |
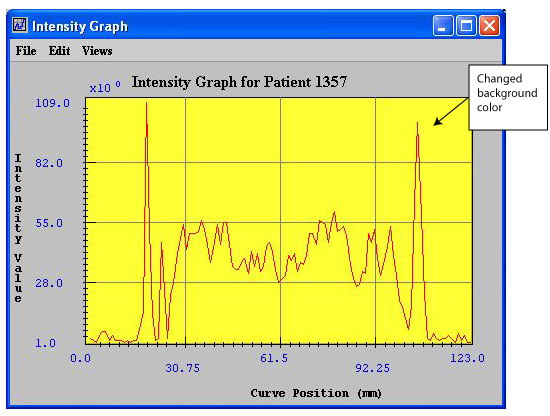
| | + | 7 Click OK to apply the color to the graph background. The Pick Background Color dialog box closes, and the graph background (Figure 20) changes to the color you selected.<br /> |
| | | | |
| | {| border="1" cellpadding="5" | | {| border="1" cellpadding="5" |
| − | |+ <div style="font-style: normal; margin-bottom: 3pt; margin-left: 0pt; margin-right: 0pt; margin-top: 9pt; text-align: left; text-decoration: none; text-indent: 0pt; text-transform: none; vertical-align: baseline">'''<font color="#000000"> Figure 20. Changed background color for the graph<br /></font>'''</div> | + | |+ '''Figure 20. Changed background color for the graph''' |
| | |- | | |- |
| | | | | | |
| Line 150: |
Line 205: |
| | |} | | |} |
| | | | |
| − | <br /></font></div><div style="font-style: normal; font-weight: normal; margin-bottom: 0pt; margin-left: 0pt; margin-right: 0pt; margin-top: 0pt; text-align: left; text-decoration: none; text-indent: 0pt; text-transform: none; vertical-align: baseline"><font color="#000000"> <br /></font></div><div style="font-style: normal; margin-bottom: 6pt; margin-left: 0pt; margin-right: 0pt; margin-top: 14pt; text-align: left; text-decoration: none; text-indent: 0pt; text-transform: none; vertical-align: baseline">'''<font color="#000000"> To reset graphs to their original background colors<br /></font>'''</div><div style="font-style: normal; font-weight: normal; margin-bottom: 6pt; margin-left: 0pt; margin-right: 0pt; margin-top: 0pt; text-align: left; text-decoration: none; text-indent: 0pt; text-transform: none; vertical-align: baseline"><font color="#000000"> To return either the intensity graph or the contour VOI graph back to its default colors, select Views > Reset Graph to Original or press Ctrl Z in either the Contour VOI Graph window or Intensity Graph window as appropriate.<br /></font></div>
| + | '''To reset graphs to their original background colors''' |
| | + | To return either the intensity graph or the contour VOI graph back to its default colors, select Views > Reset Graph to Original or press Ctrl Z in either the Contour VOI Graph window or Intensity Graph window as appropriate.<br /> |
| | + | |
| | | | |
| | [[Changing the legends for functions]] | | [[Changing the legends for functions]] |
You can adjust the appearance of graphs to interpret the information more clearly or easily. To customize graphs, you use the Modify Graph dialog box , which is accessible through Views > Modify Graph Features in both the Contour VOI window and the Intensity Graph window. The Modify Graph dialog box includes the following four tabbed pages:
6 Click Apply.
If you selected Gridlines visible, horizontal and vertical gridlines appear in the graph.
If you cleared the check box, the gridlines disappear from the graph.
7 Do one of the following:
4 Click Apply.
The number of horizontal and vertical gridlines that you specified appear in the graph in the Intensity Graph window.
Tip: If you specify many gridlines, to see the gridlines more clearly, resize the Modify Graph dialog box.
5 Do one of the following:
6 Click Apply.
The new title appears number of horizontal and vertical gridlines that you specified now appear in the graph (Figure 17).
Tip: If you specify many gridlines, you might want to resize the Modify Graph dialog box to see the gridlines more clearly.
7 Do one of the following:
The Pick Background Color dialog box (Figure 19) opens.
6 Select a color from one of the three pages in this dialog box. Refer to "To change background and border colors" for information on how to select a color. Refer to "To change background and border colors" for information on how to select a color.
7 Click OK to apply the color to the graph background. The Pick Background Color dialog box closes, and the graph background (Figure 20) changes to the color you selected.
