Difference between revisions of "Allocating Memory in MIPAV"
From MIPAV
|
|
| Line 7: |
Line 7: |
| | 3 Click OK to close the dialog box.<br /></font></div><div style="font-style: normal; font-weight: normal; margin-bottom: 0pt; margin-left: 0pt; margin-right: 0pt; margin-top: 0pt; text-align: left; text-decoration: none; text-indent: 0pt; text-transform: none; vertical-align: baseline"><font color="#000000"> | | 3 Click OK to close the dialog box.<br /></font></div><div style="font-style: normal; font-weight: normal; margin-bottom: 0pt; margin-left: 0pt; margin-right: 0pt; margin-top: 0pt; text-align: left; text-decoration: none; text-indent: 0pt; text-transform: none; vertical-align: baseline"><font color="#000000"> |
| | | | |
| − | {| border="1" cellpadding="5"
| + | '''Figure 3. Change Java-Runtime Memory Allocation dialog box ''' |
| − | |+ '''Figure 3. Change Java-Runtime Memory Allocation dialog box '''
| + | {|- |
| − | |- | + | |
| | [[Image:ChangeMemoryAllocation.jpg|center]] | | [[Image:ChangeMemoryAllocation.jpg|center]] |
| − | |}<br clear="all" /><br /></font></div> | + | |}<br clear="all" /><br /> |
| | |} | | |} |
| | | | |
Revision as of 15:43, 8 February 2012
Allocating memory in MIPAV
When you run MIPAV for the first time you must specify the amount of memory that you would like to allocate, so that MIPAV can take the full advantage of the memory resources available in your machine.
1 Select Help > Memory allocation in the MIPAV window. The Change JavaRuntime Memory Allocation dialog box opens. See Figure 3.
2 Change the maximum heap size number so that it reflects the maximum amount of memory that should be allocated.
In a Microsoft Windows system, you can specify a maximum to 1.2 or 1.3 Gb. If additional memory is needed, MIPAV allocates it until the memory reaches the maximum heap size that you specify.
3 Click OK to close the dialog box.
Figure 3. Change Java-Runtime Memory Allocation dialog box
|}
You must restart of MIPAV for the changes to take effect. To exit MIPAV, select File > Exit. Then, restart the software.
To allocate additional memory
The first step is to view how much memory is currently being used and to free needlessly reserved memory. Then, if necessary, you may need to allocate additional memory.
To determine how much memory is currently being used by MIPAV
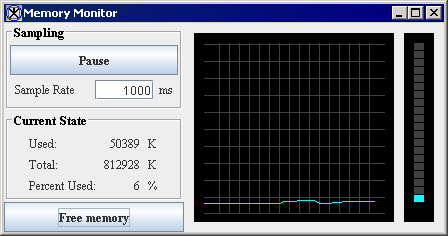
1 Select Help > Memory Usage in the MIPAV window. The Memory Monitor dialog box appears ([MIPAV_QuickStart.html#2605386 Figure 4]).
When MIPAV performs a function, such as visualizing an image file, it uses memory. When the function completes (i.e., the visualized image closed), you can manually free the memory so it can be used for another function.
The Memory Monitor dialog box shows how much memory is allocated and how much memory has been used. The vertical bar on the right of the window displays a pictorial representation of the ratio of allocated memory or amount of memory used. The chart shows the memory usage for the past 3 minutes and 45 seconds. The chart is updated every second.
If you want to constantly monitor your memory resources, you can leave the Memory Monitor dialog box open on your desktop. Otherwise, close it.
2 Click Free memory to free memory.
Figure 4. Memory Monitor dialog box
|
{| align="center"
|
|
|}
If you need more memory, you can allocate virtual memory or disk swap space if there is free space on your hard drive. For instructions on how to do this, refer to the documentation for your system. If you cannot assign more virtual memory or disk swap space, you may need to install additional memory.
To manually free the memory
As Java-based programs run, they often leave old variables, objects, or constructors in memory. For instance, if you delineate a VOI, the coordinates of the contours may remain in memory even after you close the image. Java provides a method called the garbage collector (or memory recycling) that automatically freeing objects that are no longer referenced by the program and clears all unnecessarily reserved memory. Generally, the software does this automatically when free memory becomes very limited. However, you can run the garbage collector at any time to free memory by clicking the Memory Usage button. Refer to [MIPAV_QuickStart.html#2610559 Figure 5].
To allocate additional memory,
Repeat the steps described in [MIPAV_QuickStart.html#2606046 "Allocating memory in MIPAV" on page 11].
Figure 5. Running the garbage collector to free the memory in MIPAV
|
{| align="center"
|

|
|}
Opening and loading image files
MIPAV displays images in windows, or frames, that you can move or arrange around the desktop ([MIPAV_QuickStart.html#2620880 Figure 6]). You can display as many image datasets as needed as long as your computer has enough allocated memory.
Note: The amount of memory required depends on the number of image datasets that are open and the size of each image file. For more information, refer to [MIPAV_QuickStart.html#2605340 "Managing memory resources" on page 10].
You can either open or load an image file. When you open an image file, MIPAV displays the image in a new image window. Loading an image file imports the file into an image window in which another image file is open. In other words, two image files share a common image window.
Understanding image windows
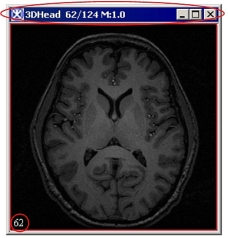
An image window ([MIPAV_QuickStart.html#2620880 Figure 6]) consists of a title bar and an image itself.
Figure 6. An image window
|
{| align="center"
|
|
|
Â
The title bar displays:
the image file name, e.g. "3DHead";
the number of the current slice and the total number of slices in the dataset, e.g. 62/124;
the magnification level, e.g. M:1.0.
The number of the current slice is also shown in the lower left corner of the image.
|}
You can move an image window around your desktop by clicking the title bar and dragging the window to a new location.
Sometimes, depending on the view, a toolbar or menu bar also appears in the image window. For example, the image window using the light box view contains a toolbar and menu bar. See also [MIPAV_QuickStart.html#2628867 "Displaying images using the lightbox view" on page 26].
Image A and Image B
In MIPAV, the first image opened in an image window (see [MIPAV_QuickStart.html#2620613 "Understanding image windows" ]) is referred to as Image A. When you load, or import, a second image in the same window, MIPAV refers to the second image as Image B.
Supported formats
You can use MIPAV to open or load files of a variety of medical and generic graphics and multimedia file formats. [MIPAV_AppCSupportedFormats.html#1330116 Table 1] lists the format, extension, and whether MIPAV can read or write files of a particular format. The extension, which is the last few characters of a file name including the period, indicates the file format. For example, in the file name DOE255.ima, the extension .ima indicates that the file is stored in DICOM format. In the table, the Read column indicates that MIPAV can display image files of a particular format. When a file is read, it is stored in main memory so that MIPAV can access it. The Write column means that MIPAV can copy the data from the memory to a storage destination, such as your hard disk. In this context, write is synonymous with save.
For more information on file formats, the list of supported formats and other information, refer to Appendix C: [MIPAV_AppCSupportedFormats.html#1256636 "Supported formats" ][MIPAV_AppCSupportedFormats.html#1330116 Table 1 on page 563].
Image Browser
|
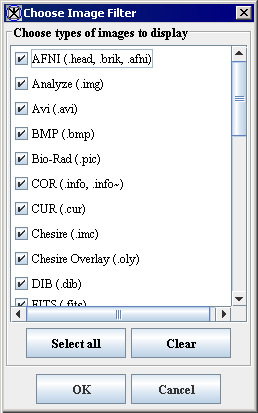
You can select the image formats to display using the File > Open Image(A) > Image Browser menu. This opens the Choose Image Filter dialog box. In this dialog box, use the check boxes to select the image types which you would like to use in MIPAV.
|
{| align="center"
|
|
|-
|
Select All
|
Selects all image types.
|-
|
Clear
| rowspan="1" colspan="2" |
Removes selection.
|-
|
OK
| rowspan="1" colspan="2" |
Applies the image type selection to MIPAV.
|-
|
Cancel
| rowspan="1" colspan="2" |
Disregards any changes you made in this dialog box and closes the dialog box.
|-
| rowspan="1" colspan="3" |
Figure 7. Choose Image Filter dialog box
|}
Opening image files
The Open Image A from disk menu allows you to open an image which is stored on your hard drive (or network drive).
Figure 8. FIle > Open menu
|
{| align="center"
|

|
|}
The Open Image A menu ([MIPAV_QuickStart.html#2389196 Figure 8]) provides you with additional options such as to open a single image file, or image sequence, or Leica series images - the images that were taken on a Leica microscope. You can also call Create Blank Image to create a blank image (refer to [MIPAV_QuickStart.html#1046617 "Creating new images" on page 41]).
To open an image file or multifiles
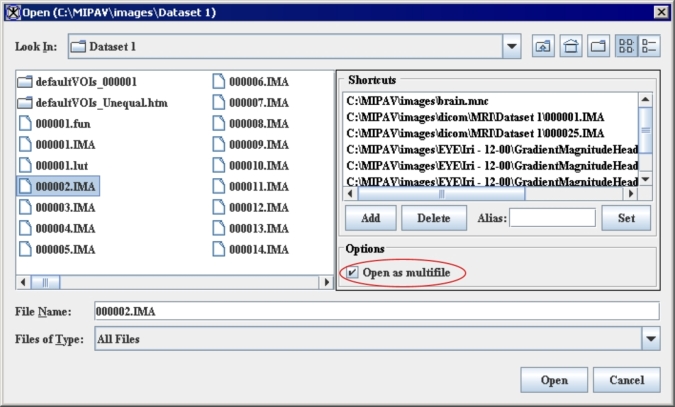
An option on the Open Image dialog box ([MIPAV_QuickStart.html#2389196 Figure 8]), which appears after you select File > Open Image(A), is Open as multifile. This option lets you open the image as a multifile.
Multifiles are image datasets that are composed of multiple files.
1 Select File > Open Image(A) from disk. The Open Image dialog box ([MIPAV_QuickStart.html#2614455 Figure 9]) opens.
2 Navigate to the directory where the file is stored.
3 Select an image file.
4 To open the image file as a multifile, select the Open as multifile box.
The name of the image appears in File Name.
Figure 9. Open as Multifile option
|
{| align="center"
|
|
|}
If you can't find the image,
check the files types listed in Files of Type (showing in [MIPAV_QuickStart.html#2614455 Figure 9]) near the bottom of the dialog box. If the file type you are looking for does not appear in Files of Type, select All Files or All.
To form a 4D dataset in Analyze format,
use Open as multifile to open a series of individual 3D Analyze, formatted, consecutively ordered images.For example, you can use Open as multifile to open an array of TIFF, JPEG, BMP, etc., files if their file names meet the following format: foo_001.tiff, foo_002.tiff, foo_003, etc. where foo is the name of the file.
MIPAV window
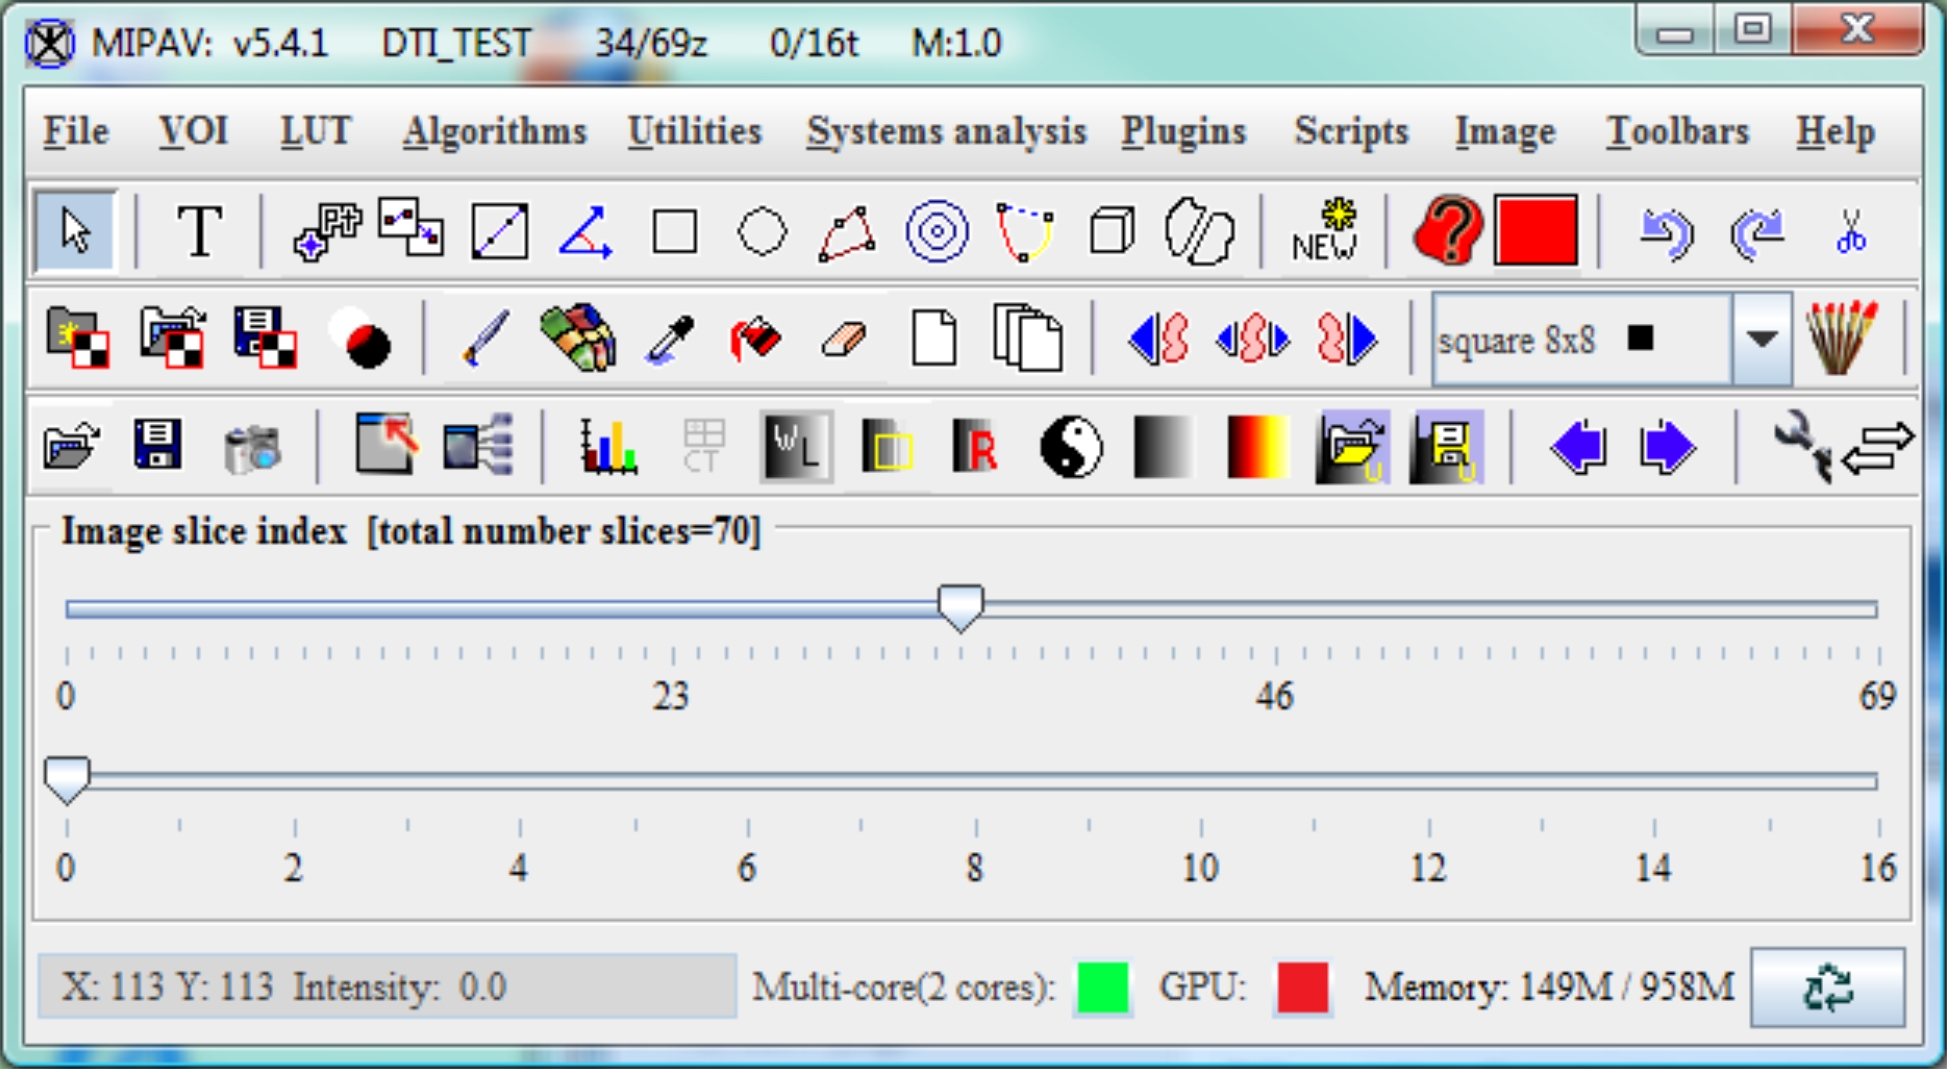
After the first image is opened, the MIPAV window changes. It includes more menus, the title bar displays more information, and tool bars appear. Because the MIPAV window is context sensitive, it displays or hides commands on the menus depending on the characteristics of the image file that is opened. If you opened a dataset file that contains more than one image, an image slice slider also appears. Refer to [MIPAV_QuickStart.html#1020845 Figure 10].
Figure 10. Expanded MIPAV window showing toolbars, image slider, and more menus after the first image is opened. See also [MIPAV_QuickStart.html#2693414 "MIPAV toolbars" on page 21]
|
{| align="center"
|
|
|}
If you prefer for MIPAV to use the style of Open and Save dialog boxes that are used by the operating system (e.g., Microsoft Windows, Unix, or Apple) on your computer, read the section on [MIPAV_QuickStart.html#1013570 "Using platform-specific Open and Save dialog boxes" on page 74].
Loading image files
When you load an image file, MIPAV imports it into an existing image window. The loaded image shares the same window with another image file. Loading a file allows you to compare two datasets.
To load an image file
1 Open the first image by selecting File > Open Image(A) from disk. The image appears in an image window.
2 Select the title bar of the image window (in this case, the image that you just opened) in which you want to load another image.
3 Select one of the following:
File > Load Image (B) > From Frame to load another image dataset from an already opened image dataset;
File > Load Image (B) > From File to load another image dataset;
File > Load Image (B) > Create a Blank Image to create a blank image.
4 If you chose Image (B) from File, the Open dialog box appears, see [MIPAV_QuickStart.html#2614455 Figure 9]. Select the image file you want to load, and click OK.
If MIPAV does not recognize the type of file based on its extension, the Choose Image Filter dialog box opens (see also [MIPAV_QuickStart.html#2697974 "Image Browser" on page 16]). Here, select the file type and click OK.
As the image file is loading, a pop-up window appears with the status. When the image file finishes loading, it appears in the image window. At this point, take note of several changes:
MIPAV pseudo-color was applied to the images in the image frame. The pseudo-color indicates that two images are loaded in the same image frame.
In the MIPAV window, the Active Image and Alphablending slider appears. The slider allows you to control which image is displayed in the foreground of the window. The image in the foreground is the active image. You can adjust the translucency of the alpha channels in each image using the technique.
5 If you chose Image (B) from Frame, the Load Image onto <file name> ([MIPAV_QuickStart.html#2754711 Figure 11]) opens. Select one of the images in Set as Image (B), and then click OK. The image is loaded onto the first image file.
Note: The abbreviations (A) or (B) appear after some commands. (A), which is the abbreviation for "Image A," indicates that the option is applied to the first image opened in an image window. (B), which is the abbreviation for "Image B," indicates that the option is applied to second image loaded in the image window. For example, if you select Close Image (B), MIPAV closes the second image (Image B) that was loaded in the image window.
Figure 11. After loading an Image B, the Active Image and Alphablending slider appears in the main MIPAV window. The slider allows you to control which image is displayed in the foreground of the window
|
{| align="center"
|
File:MIPAV QuickStart181.gif
|
|}
Note: MIPAV recognizes files types by the file extension. For example, if you select an image named "Smith.tiff", MIPAV tries to open the file as a TIFF file. If that image is actually a JPEG file and mistakenly has the TIFF extension, MIPAV fails to open the file.
MIPAV toolbars


