Difference between revisions of "Adding noise to images"
From MIPAV
(Created page with '== Adding noise to images == <div style="font-style: normal; font-weight: normal; margin-bottom: 6pt; margin-left: 0pt; margin-right: 0pt; margin-top: 0pt; text-align: left; tex...') |
(→Adding noise to images) |
||
| Line 1: | Line 1: | ||
== Adding noise to images == | == Adding noise to images == | ||
| − | <div style="font-style: normal; font-weight: normal; margin-bottom: 6pt; margin-left: 0pt; margin-right: 0pt; margin-top: 0pt; text-align: left; text-decoration: none; text-indent: 0pt; text-transform: none; vertical-align: baseline"><font color="#000000"> Adding noise to images allows you to test the robustness and performance of an algorithm in the presence of known amounts of noise. When you select Utilities > Noise, the program clamps either Gaussian or Uniform noise to the lowest or highest value in the source image type.<br /></font></div><div style="font-style: normal; font-weight: normal; margin-bottom: 4pt; margin-left: 0pt; margin-right: 0pt; margin-top: 0pt; text-align: left; text-decoration: none; text-indent: 0pt; text-transform: none; vertical-align: baseline"><font color="#0000ff"> For example, for a byte image, if the intensity of the source pixel is 120 and noise is 15, then intensity noise = 135. This value (135) would be clamped to the maximum pixel value for a byte image (127).<br /></font></div><div style="font-style: normal; font-weight: normal; margin-bottom: 6pt; margin-left: 0pt; margin-right: 0pt; margin-top: 0pt; text-align: left; text-decoration: none; text-indent: 0pt; text-transform: none; vertical-align: baseline"><font color="#000000"> This class relies heavily on the Java Random class and is used to generate a stream of pseudorandom numbers. The class uses a 48-bit seed, which is modified using a linear congruency formula (refer to Donald Knuth, <span style="font-weight: normal; text-decoration: none; text-transform: none; vertical-align: baseline">''<font color="#000000">The Art of Computer Programming</font>''</span>, Volume 2, Section 3.2.1.).<br /></font></div><div style="font-style: normal; margin-bottom: 6pt; margin-left: 0pt; margin-right: 0pt; margin-top: 14pt; text-align: left; text-decoration: none; text-indent: 0pt; text-transform: none; vertical-align: baseline">'''<font color="#000000"> To add noise to images<br /></font>'''</div><div style="font-style: normal; font-weight: normal; margin-bottom: 0pt; margin-left: 18pt; margin-right: 0pt; margin-top: 6pt; text-align: left; text-decoration: none; text-indent: -18pt; text-transform: none; vertical-align: baseline"><font color="#000000"> 1 Open an image on which you want to test the effectiveness of an algorithm.<br /></font></div><div style="font-style: normal; font-weight: normal; margin-bottom: 0pt; margin-left: 18pt; margin-right: 0pt; margin-top: 6pt; text-align: left; text-decoration: none; text-indent: -18pt; text-transform: none; vertical-align: baseline"><font color="#000000"> 2 Select Utilities > Noise in the MIPAV window. The program displays the Additive Noise dialog box ( | + | <div style="font-style: normal; font-weight: normal; margin-bottom: 6pt; margin-left: 0pt; margin-right: 0pt; margin-top: 0pt; text-align: left; text-decoration: none; text-indent: 0pt; text-transform: none; vertical-align: baseline"><font color="#000000"> Adding noise to images allows you to test the robustness and performance of an algorithm in the presence of known amounts of noise. When you select Utilities > Noise, the program clamps either Gaussian or Uniform noise to the lowest or highest value in the source image type.<br /></font></div><div style="font-style: normal; font-weight: normal; margin-bottom: 4pt; margin-left: 0pt; margin-right: 0pt; margin-top: 0pt; text-align: left; text-decoration: none; text-indent: 0pt; text-transform: none; vertical-align: baseline"><font color="#0000ff"> For example, for a byte image, if the intensity of the source pixel is 120 and noise is 15, then intensity noise = 135. This value (135) would be clamped to the maximum pixel value for a byte image (127).<br /></font></div><div style="font-style: normal; font-weight: normal; margin-bottom: 6pt; margin-left: 0pt; margin-right: 0pt; margin-top: 0pt; text-align: left; text-decoration: none; text-indent: 0pt; text-transform: none; vertical-align: baseline"><font color="#000000"> This class relies heavily on the Java Random class and is used to generate a stream of pseudorandom numbers. The class uses a 48-bit seed, which is modified using a linear congruency formula (refer to Donald Knuth, <span style="font-weight: normal; text-decoration: none; text-transform: none; vertical-align: baseline">''<font color="#000000">The Art of Computer Programming</font>''</span>, Volume 2, Section 3.2.1.).<br /></font></div><div style="font-style: normal; margin-bottom: 6pt; margin-left: 0pt; margin-right: 0pt; margin-top: 14pt; text-align: left; text-decoration: none; text-indent: 0pt; text-transform: none; vertical-align: baseline">'''<font color="#000000"> To add noise to images<br /></font>'''</div><div style="font-style: normal; font-weight: normal; margin-bottom: 0pt; margin-left: 18pt; margin-right: 0pt; margin-top: 6pt; text-align: left; text-decoration: none; text-indent: -18pt; text-transform: none; vertical-align: baseline"><font color="#000000"> 1 Open an image on which you want to test the effectiveness of an algorithm.<br /></font></div><div style="font-style: normal; font-weight: normal; margin-bottom: 0pt; margin-left: 18pt; margin-right: 0pt; margin-top: 6pt; text-align: left; text-decoration: none; text-indent: -18pt; text-transform: none; vertical-align: baseline"><font color="#000000"> 2 Select Utilities > Noise in the MIPAV window. The program displays the Additive Noise dialog box (Figure 45).<br /></font></div><div style="font-style: normal; font-weight: normal; margin-bottom: 0pt; margin-left: 18pt; margin-right: 0pt; margin-top: 6pt; text-align: left; text-decoration: none; text-indent: -18pt; text-transform: none; vertical-align: baseline"><font color="#000000"> 3 Type the level of noise that you want to add to the image in the Noise level box. You can specify a value from 10 to 32,768.<br /></font></div><div style="font-style: normal; font-weight: normal; margin-bottom: 0pt; margin-left: 0pt; margin-right: 0pt; margin-top: 0pt; text-align: left; text-decoration: none; text-indent: 0pt; text-transform: none; vertical-align: baseline"><font color="#000000"> <br /></font></div><div style="font-style: normal; font-weight: normal; margin-bottom: 0pt; margin-left: 0pt; margin-right: 0pt; margin-top: 0pt; text-align: left; text-decoration: none; text-indent: 0pt; text-transform: none; vertical-align: baseline"><font color="#000000"> <br /></font></div><div style="font-style: normal; font-weight: normal; margin-bottom: 0pt; margin-left: 0pt; margin-right: 0pt; margin-top: 0pt; text-align: left; text-decoration: none; text-indent: 0pt; text-transform: none; vertical-align: baseline"><font color="#000000"> |
{| border="1" cellpadding="5" | {| border="1" cellpadding="5" | ||
| − | |+ <div style="font-style: normal; margin-bottom: 3pt; margin-left: 0pt; margin-right: 0pt; margin-top: 9pt; text-align: left; text-decoration: none; text-indent: 0pt; text-transform: none; vertical-align: baseline">'''<font color="#000000"> Figure | + | |+ <div style="font-style: normal; margin-bottom: 3pt; margin-left: 0pt; margin-right: 0pt; margin-top: 9pt; text-align: left; text-decoration: none; text-indent: 0pt; text-transform: none; vertical-align: baseline">'''<font color="#000000"> Figure 45. Additive Noise dialog box <br /></font>'''</div> |
|- | |- | ||
| | | | ||
| Line 11: | Line 11: | ||
<div class="CellBody">Specifies the level of noise to add to the image. </div> <div class="CellBody">The default value is 10.</div> | <div class="CellBody">Specifies the level of noise to add to the image. </div> <div class="CellBody">The default value is 10.</div> | ||
| rowspan="4" colspan="1" | | | rowspan="4" colspan="1" | | ||
| − | |||
| − | |||
[[Image:AdditiveNoise.jpg]] | [[Image:AdditiveNoise.jpg]] | ||
| − | |||
|- | |- | ||
| rowspan="1" colspan="2" | | | rowspan="1" colspan="2" | | ||
| Line 62: | Line 59: | ||
===== Example ===== | ===== Example ===== | ||
| − | In the following example ( | + | In the following example (Figure 46), the original image appears at the top of the figure. The next row shows the image on the left that results from adding Uniform noise of 1000. To its right is the image after running the Median algorithm. The image on the left on the last row results from adding Gaussian noise of 1000 to the original image. Running the Median algorithm on that image produces the image on its right. In this example, the Median algorithm performs better on an image containing Gaussian noise. |
| − | |||
{| border="1" cellpadding="5" | {| border="1" cellpadding="5" | ||
| − | |+ <div style="font-style: normal; margin-bottom: 3pt; margin-left: 0pt; margin-right: 0pt; margin-top: 9pt; text-align: left; text-decoration: none; text-indent: 0pt; text-transform: none; vertical-align: baseline">'''<font color="#000000"> Figure | + | |+ <div style="font-style: normal; margin-bottom: 3pt; margin-left: 0pt; margin-right: 0pt; margin-top: 9pt; text-align: left; text-decoration: none; text-indent: 0pt; text-transform: none; vertical-align: baseline">'''<font color="#000000"> Figure 46. Examples of adding a noise to an image, and then using it to test an algorithm's effectiveness in removing the noise <br /></font>'''</div> |
|- | |- | ||
| − | |||
| − | |||
| | | | ||
[[Image:AddingNoiseOriginal.jpg]] | [[Image:AddingNoiseOriginal.jpg]] | ||
| − | + | <br /> <div class="CellBody">A</div> | |
| | | | ||
<div class="CellBody"><span style="font-style: normal; text-decoration: none; text-transform: none; vertical-align: baseline">'''<font color="#000000">A</font>'''</span> is an original image</div> <div class="CellBody"><span style="font-style: normal; text-decoration: none; text-transform: none; vertical-align: baseline">'''<font color="#000000">B</font>'''</span> is the image after applying Uniform noise (1000)</div> <div class="CellBody"><span style="font-style: normal; text-decoration: none; text-transform: none; vertical-align: baseline">'''<font color="#000000">C</font>'''</span> is the image B after applying the Median filter</div> <div class="CellBody"><span style="font-style: normal; text-decoration: none; text-transform: none; vertical-align: baseline">'''<font color="#000000">D</font>'''</span> is the image after adding Gaussian noise (1000)</div> <div class="CellBody"><span style="font-style: normal; text-decoration: none; text-transform: none; vertical-align: baseline">'''<font color="#000000">F</font>'''</span> is the image D after running the Median filter on it</div> | <div class="CellBody"><span style="font-style: normal; text-decoration: none; text-transform: none; vertical-align: baseline">'''<font color="#000000">A</font>'''</span> is an original image</div> <div class="CellBody"><span style="font-style: normal; text-decoration: none; text-transform: none; vertical-align: baseline">'''<font color="#000000">B</font>'''</span> is the image after applying Uniform noise (1000)</div> <div class="CellBody"><span style="font-style: normal; text-decoration: none; text-transform: none; vertical-align: baseline">'''<font color="#000000">C</font>'''</span> is the image B after applying the Median filter</div> <div class="CellBody"><span style="font-style: normal; text-decoration: none; text-transform: none; vertical-align: baseline">'''<font color="#000000">D</font>'''</span> is the image after adding Gaussian noise (1000)</div> <div class="CellBody"><span style="font-style: normal; text-decoration: none; text-transform: none; vertical-align: baseline">'''<font color="#000000">F</font>'''</span> is the image D after running the Median filter on it</div> | ||
|- | |- | ||
| − | |||
| − | |||
| | | | ||
[[Image:Uniform1000.jpg]] | [[Image:Uniform1000.jpg]] | ||
| − | + | <br /><div class="CellBody">B</div> | |
| − | + | ||
| − | + | ||
| | | | ||
[[Image:MedianAfterUniform.jpg]] | [[Image:MedianAfterUniform.jpg]] | ||
| − | + | <br /><div class="CellBody">C</div> | |
|- | |- | ||
| + | | | ||
| + | [[Image:Gaussian1000.jpg]] | ||
| + | <br />''' <div class="CellBody">E</div> | ||
| | | | ||
| − | + | [[Image:MedianAfterGaussianjpg.jpg]] | |
| − | + | <br />'''<div class="CellBody">F</div> | |
| − | + | ||
|} | |} | ||
| − | |||
[[Pad]] | [[Pad]] | ||
Revision as of 18:47, 15 February 2012
Adding noise to images
Adding noise to images allows you to test the robustness and performance of an algorithm in the presence of known amounts of noise. When you select Utilities > Noise, the program clamps either Gaussian or Uniform noise to the lowest or highest value in the source image type.
For example, for a byte image, if the intensity of the source pixel is 120 and noise is 15, then intensity noise = 135. This value (135) would be clamped to the maximum pixel value for a byte image (127).
This class relies heavily on the Java Random class and is used to generate a stream of pseudorandom numbers. The class uses a 48-bit seed, which is modified using a linear congruency formula (refer to Donald Knuth, The Art of Computer Programming, Volume 2, Section 3.2.1.).
To add noise to images
1 Open an image on which you want to test the effectiveness of an algorithm.
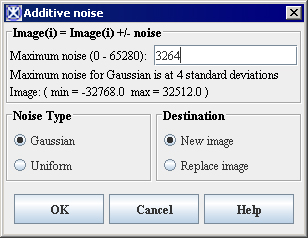
2 Select Utilities > Noise in the MIPAV window. The program displays the Additive Noise dialog box (Figure 45).
3 Type the level of noise that you want to add to the image in the Noise level box. You can specify a value from 10 to 32,768.
|
Noise level (0-32768)
|
Specifies the level of noise to add to the image. The default value is 10.
|
|
|
Noise Type
| ||
|
Gaussian
|
Adds Gaussian noise to the image.
| |
|
Uniform
|
Adds Uniform noise to the image.
| |
|
Destination
| ||
|
New image
|
Shows the cropped image in a new image window.
| |
|
Replace image
|
Replaces the current active image with the cropped image.
| |
|
OK
|
Applies the parameters that you specified for adding noise to this image.
| |
|
Cancel
|
Disregards any changes you made in this dialog box, closes the dialog box, and does not add noise to this image.
| |
|
Help
|
Displays online help for this dialog box.
| |
4 Type the level of noise that you want to add to the image in the Noise level box. You can specify a value from 10 to 32,768.
5 Select either of the following:
Gaussian-To add Gaussian noise to the image
Uniform-To add Uniform noise to the image
6 Select either of the following:
New image-To generate the resulting image in a new image window
Replace image-To replace the current image with the resulting image
7 Click OK. The program adds the Gaussian or Uniform noise to the image and displays either a new image or replaces the current image with the one to which noise was added.
8 Now, select the algorithm in the Algorithms menu to test its effectiveness on the image.
Example
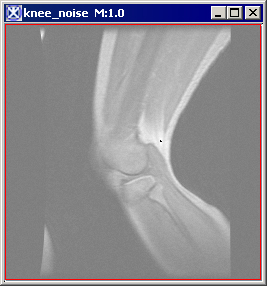
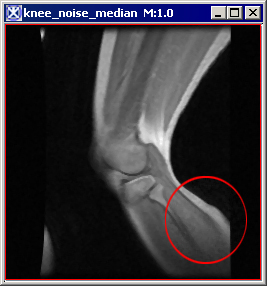
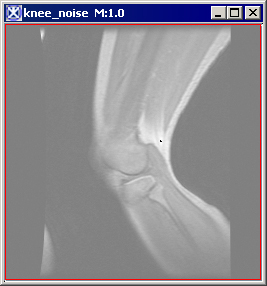
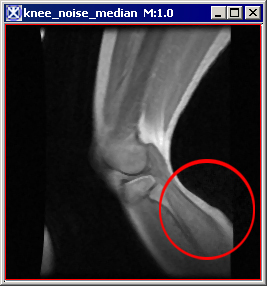
In the following example (Figure 46), the original image appears at the top of the figure. The next row shows the image on the left that results from adding Uniform noise of 1000. To its right is the image after running the Median algorithm. The image on the left on the last row results from adding Gaussian noise of 1000 to the original image. Running the Median algorithm on that image produces the image on its right. In this example, the Median algorithm performs better on an image containing Gaussian noise.
|
A
|
A is an original image B is the image after applying Uniform noise (1000) C is the image B after applying the Median filter D is the image after adding Gaussian noise (1000) F is the image D after running the Median filter on it
|
|
B
|
C
|
|
E
|
F
|
