|
|
| (One intermediate revision by the same user not shown) |
| Line 1: |
Line 1: |
| − | == Adding image margins ==
| + | The Add Image Margins command allows you to add a border of pixels or a specific intensity along the edges of an image dataset.<br /> |
| | | | |
| − | <div style="font-style: normal; font-weight: normal; margin-bottom: 6pt; margin-left: 0pt; margin-right: 0pt; margin-top: 0pt; text-align: left; text-decoration: none; text-indent: 0pt; text-transform: none; vertical-align: baseline"><font color="#000000"> The Add Image Margins command allows you to add a border of pixels or a specific intensity along the edges of an image dataset.<br /></font></div><div style="font-style: normal; margin-bottom: 6pt; margin-left: 0pt; margin-right: 0pt; margin-top: 14pt; text-align: left; text-decoration: none; text-indent: 0pt; text-transform: none; vertical-align: baseline">'''<font color="#000000"> <span style="font-style: normal; text-decoration: none; text-transform: none; vertical-align: baseline">'''<font color="#000000">To add image margins</font>'''</span><br /></font>'''</div><div style="font-style: normal; font-weight: normal; margin-bottom: 0pt; margin-left: 18pt; margin-right: 0pt; margin-top: 6pt; text-align: left; text-decoration: none; text-indent: -18pt; text-transform: none; vertical-align: baseline"><font color="#000000"> 1 Open an image.<br /></font></div><div style="font-style: normal; font-weight: normal; margin-bottom: 0pt; margin-left: 18pt; margin-right: 0pt; margin-top: 6pt; text-align: left; text-decoration: none; text-indent: -18pt; text-transform: none; vertical-align: baseline"><font color="#000000"> 2 Select Utilities > Add Image Margins. The Add Image Borders dialog box (Figure 7) opens.<br /></font></div><div style="font-style: normal; font-weight: normal; margin-bottom: 0pt; margin-left: 18pt; margin-right: 0pt; margin-top: 6pt; text-align: left; text-decoration: none; text-indent: -18pt; text-transform: none; vertical-align: baseline"><font color="#000000"> 3 Enter the number of pixels to add on the left and right sides of the image, the top and bottom, and to the front and back of the image.<br /></font></div><div style="font-style: normal; font-weight: normal; margin-bottom: 0pt; margin-left: 18pt; margin-right: 0pt; margin-top: 6pt; text-align: left; text-decoration: none; text-indent: -18pt; text-transform: none; vertical-align: baseline"><font color="#000000"> 4 Enter the intensity value for the margins.<br /></font></div><div style="font-style: normal; font-weight: normal; margin-bottom: 0pt; margin-left: 18pt; margin-right: 0pt; margin-top: 6pt; text-align: left; text-decoration: none; text-indent: -18pt; text-transform: none; vertical-align: baseline"><font color="#000000"> 5 Select one of the following destinations:<br /></font></div><div style="font-style: normal; font-weight: normal; margin-bottom: 0pt; margin-left: 36pt; margin-right: 0pt; margin-top: 6pt; text-align: left; text-decoration: none; text-indent: -12pt; text-transform: none; vertical-align: baseline"><font color="#000000"> <span style="font-weight: normal; text-decoration: none; text-transform: none; vertical-align: baseline">''<font color="#000000">New image</font>''</span>-The software applies the margins to another instance of the dataset in a new image window. <br /></font></div><div style="font-style: normal; font-weight: normal; margin-bottom: 0pt; margin-left: 36pt; margin-right: 0pt; margin-top: 6pt; text-align: left; text-decoration: none; text-indent: -12pt; text-transform: none; vertical-align: baseline"><font color="#000000"> <span style="font-weight: normal; text-decoration: none; text-transform: none; vertical-align: baseline">''<font color="#000000">Replace image</font>''</span>-The software adds the margins to the existing instance of the dataset.<br /></font></div><div style="font-style: normal; font-weight: normal; margin-bottom: 0pt; margin-left: 18pt; margin-right: 0pt; margin-top: 6pt; text-align: left; text-decoration: none; text-indent: -18pt; text-transform: none; vertical-align: baseline"><font color="#000000"> 6 Click OK. The image margins are applied to the dataset.<br /></font></div><div style="font-style: normal; font-weight: normal; margin-bottom: 0pt; margin-left: 0pt; margin-right: 0pt; margin-top: 0pt; text-align: left; text-decoration: none; text-indent: 0pt; text-transform: none; vertical-align: baseline"><font color="#000000"> <br /></font></div><div style="font-style: normal; font-weight: normal; margin-bottom: 0pt; margin-left: 0pt; margin-right: 0pt; margin-top: 0pt; text-align: left; text-decoration: none; text-indent: 0pt; text-transform: none; vertical-align: baseline"><font color="#000000">
| + | '''To add image margins'''<br /> |
| | + | 1 Open an image.<br /> |
| | + | 2 Select Utilities > Add Image Margins. The Add Image Borders dialog box (Figure 7) opens.<br /> |
| | + | 3 Enter the number of pixels to add on the left and right sides of the image, the top and bottom, and to the front and back of the image.<br /> |
| | + | 4 Enter the intensity value for the margins.<br /> |
| | + | 5 Select one of the following destinations:<br /> |
| | + | * ''New image'' -The software applies the margins to another instance of the dataset in a new image window. <br /> |
| | + | * ''Replace image'' -The software adds the margins to the existing instance of the dataset.<br /> |
| | + | 6 Click OK. The image margins are applied to the dataset.<br /> |
| | | | |
| | {| border="1" cellpadding="5" | | {| border="1" cellpadding="5" |
| − | |+ <div style="font-style: normal; margin-bottom: 3pt; margin-left: 0pt; margin-right: 0pt; margin-top: 9pt; text-align: left; text-decoration: none; text-indent: 0pt; text-transform: none; vertical-align: baseline">'''<font color="#000000"> Figure 7. Add Image Border dialog box <br /></font>'''</div> | + | |+ '''Figure 7. Add Image Border dialog box ''' |
| | |- | | |- |
| | | | | | |
Latest revision as of 18:06, 22 February 2012
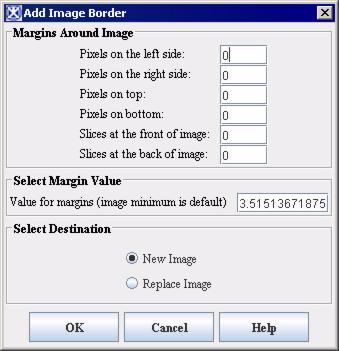
The Add Image Margins command allows you to add a border of pixels or a specific intensity along the edges of an image dataset.
To add image margins
1 Open an image.
2 Select Utilities > Add Image Margins. The Add Image Borders dialog box (Figure 7) opens.
3 Enter the number of pixels to add on the left and right sides of the image, the top and bottom, and to the front and back of the image.
4 Enter the intensity value for the margins.
5 Select one of the following destinations:
- New image -The software applies the margins to another instance of the dataset in a new image window.
- Replace image -The software adds the margins to the existing instance of the dataset.
6 Click OK. The image margins are applied to the dataset.
Figure 7. Add Image Border dialog box
|
Margins Around Image
|
Pixels on the left side: Specifies the number of pixels that should appear on the left side of the image. Pixels on the right side: Specifies the number of pixels that should appear on the right side of the image. Pixels on top: Specifies the number of pixels that should appear on the top of the image. Pixels on bottom: Specifies the number of pixels that should appear at the bottom of the image. Slices at the front of image: Specifies the number of slices that should appear at the front of the image.
|
|
|
|
|
Slices at the back of image: Specifies the number of slices that should appear at the back of the image.
|
|
Value for margins
|
Specifies the intensity of the border around the image. As a default, the intensity of the border is the same intensity as that for the image.
|
|
New image
|
Shows the image with the additional or adjusted margins in a new image window.
|
|
Replace image
|
Replaces the current active image with the results of the image to which margins were added or adjusted.
|
|
OK
|
Applies the parameters that you specified to add margins to this image.
|
|
Cancel
|
Disregards any changes you made in this dialog box, closes the dialog box, and does not add image margins.
|
|
Help
|
Displays online help for this dialog box.
|
Copying images using the Clone command
