4 D tools
From MIPAV
Revision as of 17:07, 15 February 2012 by Angelfish100 (Talk)
Contents
Converting 3D to 4D images and vise versa
To convert 3D images to 4D images
1 Open a 3D image or image dataset.
2 Select Utilities > Convert 3D to 4D. The Convert 3D to 4D dialog box opens.
3 Do either of the following in the Number of slices in the 3rd dimension, Resolutions: 3rd dimension, and Resolutions: 4th dimension boxes:
Accept the default numbers.
Enter different numbers.
4 Select in each of the Resolution units: 3rd dimension and Resolutions units: 4th dimension lists one of the following: millimeters (the default value), unknown, inches, centimeters, angstroms, nanometers, micrometers, milliliters, meters, kilometers, miles, nanoseconds, microseconds, milliseconds, seconds, minutes, hours, or Hz.
5 Click OK. The program applies all of the specification in this dialog box to the image or image dataset. See Figure 1.
|
Number of slices in the 3rd dimension
|
Specifies how many slices are in the 3rd dimension. The default number is 2.
|
|
|
Resolutions:
3rd dimension |
Indicates the resolution for the third dimension. The default number is 5.0.
| |
|
Resolutions:
4th dimension |
Indicates the resolution for the fourth dimension. The default number is 1.0.
| |
|
Resolution units:
3rd dimension |
Indicates the voxel resolution in the 3rd dimension.
| |
|
Resolution units:
4th dimension |
Indicates the voxel resolution of the 4th dimension.
| |
|
OK
|
Applies the specified parameters to convert a 3D image to a 4D image.
| |
|
Cancel
|
Disregards any changes you made in this dialog box, closes the dialog box, and does not convert the image.
| |
|
Help
|
Displays online help for this dialog box.
| |

To convert 4D to 3D images
1 Open a 4D image or image dataset.
2 Select Utilities > Convert 4D to 3D.
The program immediately begins processing the image.
Extracting 3D subset from 4D
This utility allows you to remove one of the x, y, z, or t dimensions from 4D images to produce a 3D image. Refer to Figure 2.
To remove an X dimension slice
1 Open a 4D image.
2 Select Utilities >4D Tools> Extract 3D Subset from 4D. The Extract 3D Subset dialog box ([MIPAV_Utilities.html#1200557 Figure 222]) opens.
3 Select X.
4 Type the index number of the slice you want to extract in the Select index from. <N> to <N> box.
5 Click Remove. The program removes the slice you specified from the dataset.
To remove a Y dimension slice
1 Open a 4D image.
2 Select Utilities > Extract 3D Subset from 4D. The Extract 3D Subset dialog box (Figure 2) opens.
3 Select Y.
4 Type the index number of the slice you want to extract in the Select index from <N> to <N> box.
5 Type the index number of the slice you want to extract in the Select index from. <N> to <N> box.
6 Click Remove. The program removes the slice you specified from the dataset.
To remove a Z dimension slice
1 Open a 4D image.
2 Select Utilities > Extract 3D Subset from 4D. The Extract 3D Subset dialog box (Figure 2) opens.
3 Select Z.
4 Type the index number of the slice you want to extract in the Select index from. <N> to <N> box.
5 Click Remove. The program removes the slice you specified from the dataset.
To remove the T dimension
1 Open a 4D image.
2 Select Utilities > Extract 3D Subset from 4D. The Extract 3D Subset dialog box (Figure 2) opens.
3 Select T.
4 Type the index number of the slice you want to extract in the Select index from. <N> to <N> box.
5 Click Remove. The program removes the slice you specified from the dataset.
.
|
X
|
Specifies that the algorithm should remove the X (width) dimension.
|
|
|
Y
|
Specifies that the algorithm should remove the Y (height, or length) dimension.
| |
|
Z
|
Specifies that the algorithm should remove the Z (depth) dimension.
| |
|
T
|
Specifies that the T (time) dimension should be removed.
| |
|
Index from <N> to <N>
|
Specifies the index number of the volume or slice that you want to extract from the dataset.
| |
|
Extract
|
Removes the specified dimension.
| |
|
Cancel
|
Disregards any changes you made in this dialog box, closes the dialog box, and does not remove any dimensions.
| |
|
Help
|
Displays online help for this dialog box.
| |

Removing time volumes
If an image dataset contains blank images or unusable images, which might be caused by patients blinking their eyes during tests, the Remove Time Volumes command on the Utility menu in the MIPAV window allows you to remove unusable images from the dataset.
To remove time volumes
1 Open an image dataset that contains time volumes.
Note: The Remove Time Volumes command only becomes active for 4D image datasets.
2 Use the image slider to look through the dataset one time volume, or image, at a time ([MIPAV_Utilities.html#1213864 Figure 223]). If you find an unusable volume-one that is blank, or totally black, or that contains unusable information-stop moving the slider on that volume.
Note: The volume number appears in the title bar of the MIPAV window and correlates to the slice indicated by the image slider.
3 Select Utilities > Remove time volumes. The Remove Time Volumes dialog box ([MIPAV_Utilities.html#1188371 Figure 282 on page 486]) opens.
4 Select the time volume or volumes (slices) that you want to remove in the list at the top of the dialog box, or type the number of the slice or range of volumes in the Check the time slices to remove box.
5 Do either of the following:
Click Select all to remove all of the slices.
Click Remove to remove the slices you selected.
A status message appears. Then the MIPAV window refreshes.
6 Use the image slider again, if you'd like, to look through the slices in the dataset to verify that the appropriate slices were removed. See [MIPAV_Utilities.html#1213864 Figure 223] and [MIPAV_Utilities.html#1189797 Figure 224].
Swapping the third and fourth dimensions
Swapping the third and fourth dimensions refers to how image datasets are stored. Datasets may be stored using the following two methods:
xytz (horizontal, vertical, time, third dimension)
xyzt (horizontal, vertical, third dimension, time)
Because MIPAV requires that datasets be stored using the xyzt method, it provides the Swap Dims 3 <-> 4 command for those users whose datasets may be stored using the xytz method.
To swap the third and fourth dimensions
1 Open an image that is stored using the xytz method.
2 Select Utilities>4D Tools>Swap Dims 3 <-> 4. A progress message appears briefly while the program changes the storage method of the image and replaces the image with one that is stored using the xyzt method.
|
   {| align="center" |
|

|}
|
Select all
|
Selects all time volumes.
|
{| align="center" |
|

|- |
Clear
|
Clears selection.
|- |
Remove
|
Removes selected slices.
|- |
Cancel
|
Disregards any changes you made in this dialog box, closes the dialog box, and does not remove the time volumes.
|- |
Help
|
Displays online help for this dialog box.
|- | rowspan="1" colspan="3" |
Figure 224. The Remove Time Volumes dialog box
|}
Convert 4D to RGB
This utility converts 4D datasets that have three or less slices (volumes) into RGB 3D images, where each slice is represented by one channel - red, green or blue.
To convert 4D to 3D images
1 Open a 4D image or image dataset.
2 Select Utilities >4D Tools>Convert 4D to RGB.
3 The Convert 4D to RGB dialog box appears. Complete the dialog box, use the list boxes to assign a chosen volume to the corresponding color channel. Refer to [MIPAV_Utilities.html#1203749 Figure 225].
4 Press OK. The new 3D RGB image appears in a new image frame. See [MIPAV_Utilities.html#1203977 Figure 226].
.
|
Volume/color channel
|
{| align="center" |
| |

|- | rowspan="1" colspan="2" |
Specify the image volume and the corresponding color channel. Use the list boxes to select Red, Green, and Blue channel; or use blank.
|- |
Remap data
| rowspan="1" colspan="2" |
Check this box, if you would like to remap RGB data to 0-255 range.
|- |
OK
| rowspan="1" colspan="2" |
Applies the specified parameters to convert a $D image to a RGB image.
|- |
Cancel
| rowspan="1" colspan="2" |
Disregards any changes you made in this dialog box and closes the dialog box.
|- |
Help
| rowspan="1" colspan="2" |
Displays online help for this dialog box.
|}
{| border="1" cellpadding="5" |+
{| align="center" |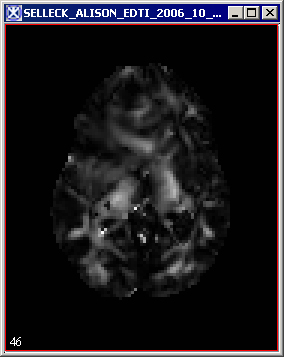 |}
|}
|
{| align="center" |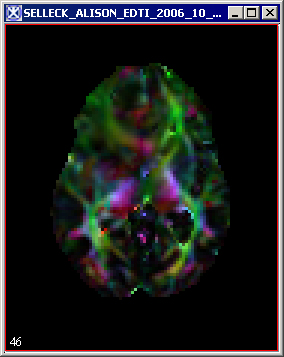 |}
|}
|}
Figure 226. The original 4D image and the same image converted to 3D RGB
|- | {| align="center" |
 |}
|}{| align="center" |
 |}
|}