From MIPAV
Converting 3D to 4D images and vise versa
To convert 3D images to 4D images
1 Open a 3D image or image dataset.
2 Select Utilities > Convert 3D to 4D. The Convert 3D to 4D dialog box opens.
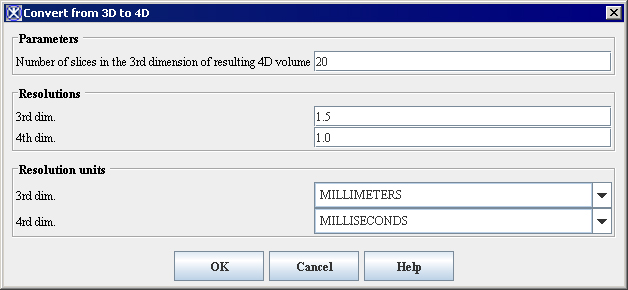
3 Do either of the following in the Number of slices in the 3rd dimension, Resolutions: 3rd dimension, and Resolutions: 4th dimension boxes:
Accept the default numbers.
Enter different numbers.
4 Select in each of the Resolution units: 3rd dimension and Resolutions units: 4th dimension lists one of the following: millimeters (the default value), unknown, inches, centimeters, angstroms, nanometers, micrometers, milliliters, meters, kilometers, miles, nanoseconds, microseconds, milliseconds, seconds, minutes, hours, or Hz.
5 Click OK. The program applies all of the specification in this dialog box to the image or image dataset. See [MIPAV_Utilities.html#1189567 Figure 221 on page 405].
Figure 221. Convert from 3D to 4D dialog boxÂ
|
Number of slices in the 3rd dimension
|
Specifies how many slices are in the 3rd dimension. The default number is 2.
|
{| align="center"
|
|
|-
|
Resolutions:
3rd dimension
|
Indicates the resolution for the third dimension. The default number is 5.0.
|-
|
Resolutions:
4th dimension
|
Indicates the resolution for the fourth dimension. The default number is 1.0.
|-
|
Resolution units:
3rd dimension
|
Indicates the voxel resolution in the 3rd dimension.
|-
|
Resolution units:
4th dimension
| rowspan="1" colspan="2" |
Indicates the voxel resolution of the 4th dimension.
|-
|
OK
| rowspan="1" colspan="2" |
Applies the specified parameters to convert a 3D image to a 4D image.
|-
|
Cancel
| rowspan="1" colspan="2" |
Disregards any changes you made in this dialog box, closes the dialog box, and does not convert the image.
|-
|
Help
| rowspan="1" colspan="2" |
Displays online help for this dialog box.
|}
To convert 4D to 3D images
1 Open a 4D image or image dataset.
2 Select Utilities > Convert 4D to 3D.
The program immediately begins processing the image.
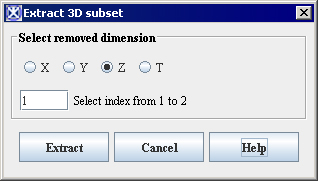
This utility allows you to remove one of the x, y, z, or t dimensions from 4D images to produce a 3D image. Refer to [MIPAV_Utilities.html#1200557 Figure 222 on page 408].
To remove an X dimension slice
1 Open a 4D image.
2 Select Utilities >4D Tools> Extract 3D Subset from 4D. The Extract 3D Subset dialog box ([MIPAV_Utilities.html#1200557 Figure 222]) opens.
3 Select X.
4 Type the index number of the slice you want to extract in the Select index from. <N> to <N> box.
5 Click Remove. The program removes the slice you specified from the dataset.
To remove a Y dimension slice
1 Open a 4D image.
2 Select Utilities > Extract 3D Subset from 4D. The Extract 3D Subset dialog box ([MIPAV_Utilities.html#1200557 Figure 222]) opens.
3 Select Y.
4 Type the index number of the slice you want to extract in the Select index from <N> to <N> box.
5 Type the index number of the slice you want to extract in the Select index from. <N> to <N> box.
6 Click Remove. The program removes the slice you specified from the dataset.
To remove a Z dimension slice
1 Open a 4D image.
2 Select Utilities > Extract 3D Subset from 4D. The Extract 3D Subset dialog box ([MIPAV_Utilities.html#1200557 Figure 222]) opens.
3 Select Z.
4 Type the index number of the slice you want to extract in the Select index from. <N> to <N> box.
5 Click Remove. The program removes the slice you specified from the dataset.
To remove the T dimension
1 Open a 4D image.
2 Select Utilities > Extract 3D Subset from 4D. The Extract 3D Subset dialog box ([MIPAV_Utilities.html#1200557 Figure 222]) opens.
3 Select T.
4 Type the index number of the slice you want to extract in the Select index from. <N> to <N> box.
5 Click Remove. The program removes the slice you specified from the dataset.
.
Figure 222. Extract 3D Subset dialog boxÂ
|
X
|
Specifies that the algorithm should remove the X (width) dimension.
|
{| align="center"
|
|
|-
|
Y
|
Specifies that the algorithm should remove the Y (height, or length) dimension.
|-
|
Z
| rowspan="1" colspan="2" |
Specifies that the algorithm should remove the Z (depth) dimension.
|-
|
T
| rowspan="1" colspan="2" |
Specifies that the T (time) dimension should be removed.
|-
|
Index from <N> to <N>
| rowspan="1" colspan="2" |
Specifies the index number of the volume or slice that you want to extract from the dataset.
|-
|
Extract
| rowspan="1" colspan="2" |
Removes the specified dimension.
|-
|
Cancel
| rowspan="1" colspan="2" |
Disregards any changes you made in this dialog box, closes the dialog box, and does not remove any dimensions.
|-
|
Help
| rowspan="1" colspan="2" |
Displays online help for this dialog box.
|}


