Getting Started with Eclipse and Histogram Matching: Difference between pages
MIPAV>Senseneyj (→Code Conventions: these bugs are no longer present in Eclipse) |
m (1 revision imported) |
||
| Line 1: | Line 1: | ||
The Histogram Matching (also called Histogram Specification) algorithm generates an output image based upon a specified histogram. | |||
== | === Background === | ||
The process of Histogram Matching takes in an input image and produces an output image that is based upon a specified histogram. The required parameters for this algorithm are the input image and the specified image, from which the specified histogram can be obtained. | |||
The algorithm works as follows: | |||
The histograms for the input image p(f) and the specified image pd(g) are generated. Here, the desired histogram of the specified image is denoted as pd(g). Cumulative histograms - P(f) and Pd(g) are then generated using the following equations: | |||
Equation 1 <br /> | |||
<math> | |||
P(f) = \sum_{k=0}^fp(k) | |||
</math> | |||
== | Equation 2 <br /> | ||
{| border="1 | <math> | ||
|+ '' | P_d(g) = \sum_{k=0}^gP_d(k) | ||
</math> | |||
where ''f'' and ''g'' are the pixel intensity levels. | |||
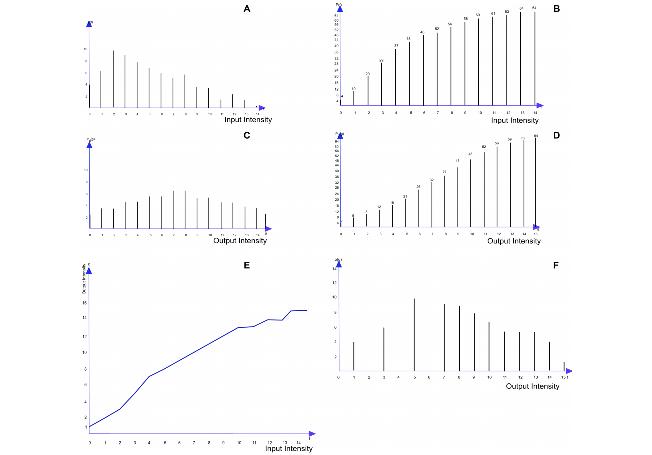
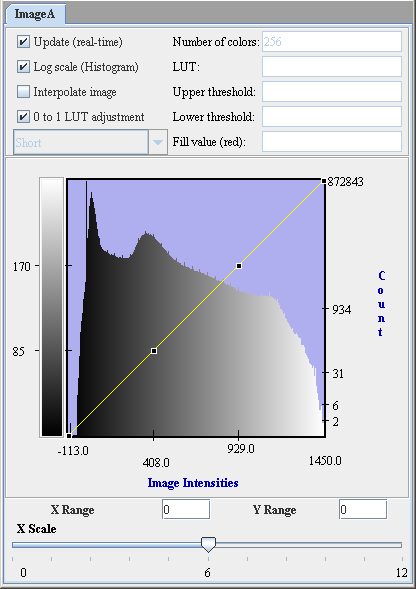
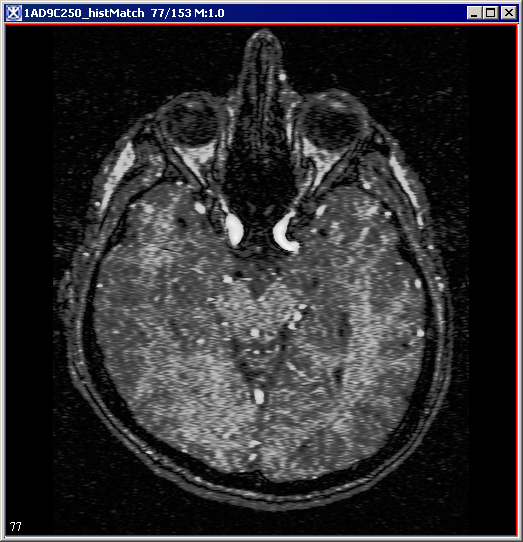
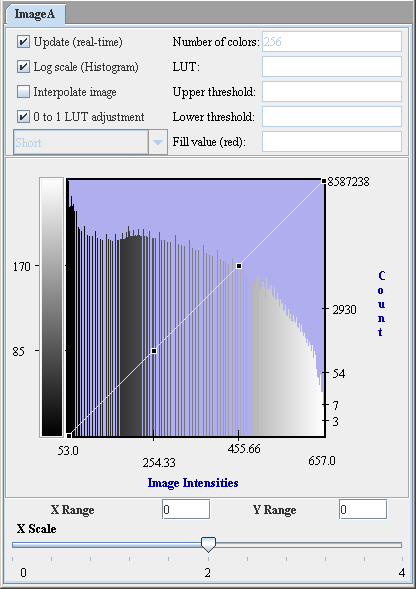
The transformation function is obtained by choosing g for each f, such that if g > f, then Pd(g) > P(f). The transformation function is then applied to the input image to produce an output image by remapping the pixel intensities. The objective is to find a transformed digital picture of a given picture, such that the sum of absolute errors between the intensity level histogram of the transformed picture and that of a reference picture is minimized. Refer to Figure 1. | |||
<div> | |||
{| border="1" cellpadding="5" | |||
|+ <div>'''Figure 1. Histograms and cumulative histograms: (A) histogram of 8x8 pixel image; (B) cumulative histogram derived from (A); (C) desired histogram of the same 8x8 pixel image; (D) cumulative histogram derived from (C); (E) gray scale transformation function that approximately transforms the histogram (A) to desired histogram (C); (F) histogram of gray-scale-transformed image obtained by applying the transformation function in (E) to the image with the histogram shown in (A).''' </div> | |||
|- | |- | ||
| | | | ||
<div style="font-style: normal; font-weight: normal; margin-bottom: 0pt; margin-left: 0pt; margin-right: 0pt; margin-top: 1pt; text-align: left; text-decoration: none; text-indent: 0pt; text-transform: none; vertical-align: baseline"><font size="2pt"><font color="#000000"><div align="left">[[Image:All_Graphs8_3_8_4.jpg]]</div><br /> </font></font></div> | |||
| | |} | ||
</div><div> | |||
{| border="1" cellpadding="5" | |||
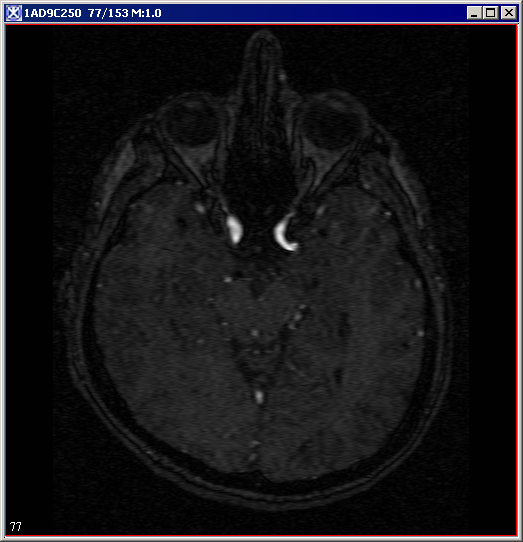
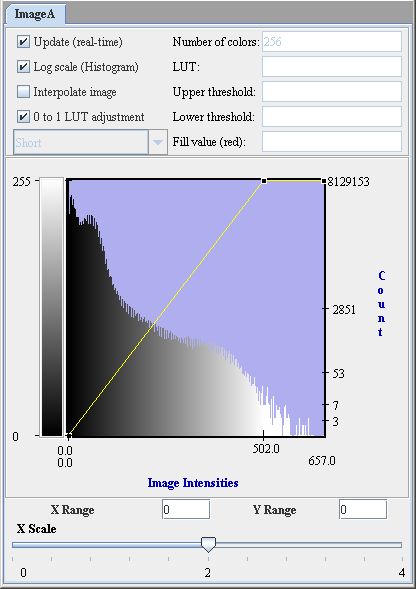
|+ <div>'''Figure 2. The input image and its histogram p(f)''' </div> | |||
|- | |- | ||
| | | | ||
<div style="font-style: normal; font-weight: normal; margin-bottom: 0pt; margin-left: 0pt; margin-right: 0pt; margin-top: 1pt; text-align: left; text-decoration: none; text-indent: 0pt; text-transform: none; vertical-align: baseline"><font size="2pt"><font color="#000000"><div><center>[[Image:Image1fj.png]]</center></div><br /> </font></font></div> | |||
| [[Image: | | | ||
<div style="font-style: normal; font-weight: normal; margin-bottom: 0pt; margin-left: 0pt; margin-right: 0pt; margin-top: 1pt; text-align: left; text-decoration: none; text-indent: 0pt; text-transform: none; vertical-align: baseline"><font size="2pt"><font color="#000000"><div><center>[[Image:Image1Histogramm.png]]</center></div><br /> </font></font></div> | |||
|} | |||
</div><div> | |||
{| border="1" cellpadding="5" | |||
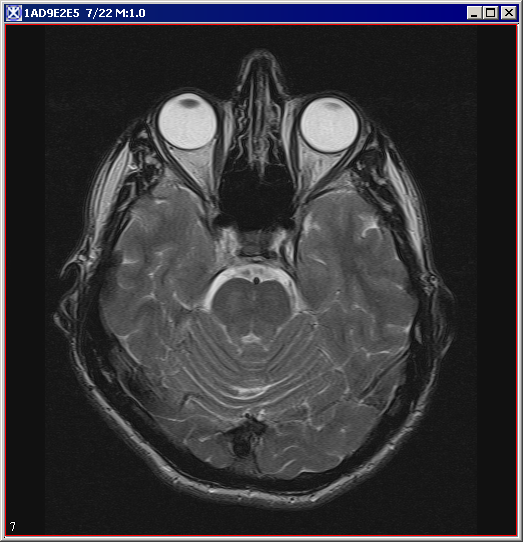
|+ <div>'''Figure 3. The specified image and its histogram pd(g)''' </div> | |||
|- | |- | ||
| | | | ||
<div style="font-style: normal; font-weight: normal; margin-bottom: 0pt; margin-left: 0pt; margin-right: 0pt; margin-top: 1pt; text-align: left; text-decoration: none; text-indent: 0pt; text-transform: none; vertical-align: baseline"><font size="2pt"><font color="#000000"><div><center>[[Image:Image2png.png]]</center></div><br /> </font></font></div> | |||
| [[Image: | | | ||
<div style="font-style: normal; font-weight: normal; margin-bottom: 0pt; margin-left: 0pt; margin-right: 0pt; margin-top: 1pt; text-align: left; text-decoration: none; text-indent: 0pt; text-transform: none; vertical-align: baseline"><font size="2pt"><font color="#000000"><div><center>[[Image:Image2Histogramm.png]]</center></div><br /> </font></font></div> | |||
|} | |||
</div><div> | |||
{| border="1" cellpadding="5" | |||
|+ <div>'''Figure 4. The result image and its histogram ''' </div> | |||
|- | |- | ||
| | | | ||
<div style="font-style: normal; font-weight: normal; margin-bottom: 0pt; margin-left: 0pt; margin-right: 0pt; margin-top: 1pt; text-align: left; text-decoration: none; text-indent: 0pt; text-transform: none; vertical-align: baseline"><font size="2pt"><font color="#000000"><div><center>[[Image:Image3fk.png]]</center></div><br /> </font></font></div> | |||
| | |||
|- | <div style="font-style: normal; font-weight: normal; margin-bottom: 0pt; margin-left: 0pt; margin-right: 0pt; margin-top: 1pt; text-align: left; text-decoration: none; text-indent: 0pt; text-transform: none; vertical-align: baseline"><font size="2pt"><font color="#000000"><div><center>[[Image:Image3Histogramm.png]]</center></div><br /> </font></font></div> | ||
|} | |} | ||
</div> | |||
==== References ==== | |||
Rafael C. Gonzalez and Richard E. Woods. Digital Image Processing. Addison-Wesley Publishing Company, 1992, pp. 173-182 | |||
Jae S. Lim. Two-Dimensional Signal and Image Processing. Prentice-Hall, Inc., 1990, pp. 453-459 | |||
==== Image types ==== | |||
You can apply this algorithm to both color and black-and-white images, as well as 2D and 3D images. | |||
=== Applying the Histogram Matching algorithm === | |||
To use this algorithm, do the following: | |||
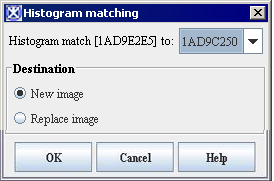
# Select Algorithms > Histogram Tools > Histogram Matching in the main MIPAV window. The Histogram Matching dialog box (Figure 5) appears. | |||
# Complete the information in the dialog box. | |||
# Click OK. The algorithm begins to run, and a progress bar appears momentarily with the status. When the algorithm finishes running, the progress bar disappears, and the results appear in a separate image window. | |||
<div> | |||
</div><div>'''Figure 5. Histogram Matching dialog box''' </div> | |||
{| border="1" cellpadding="5" | |||
|+ | |||
|- | |||
| | |||
<div>'''Histogram match <File name> to ''' </div> | |||
| | |||
<div>Select the specified image p''d''(g) from the list box </div> | |||
| | |||
<div><div><center>[[Image:HistogtramMatchingDB.png]]</center></div> </div> | |||
|- | |||
| | |||
<div>'''New image''' </div> | |||
| rowspan="1" colspan="2" | | |||
<div>Shows the results of the algorithm in a new image window </div> | |||
|- | |||
| | |||
<div>'''Replace image''' </div> | |||
| rowspan="1" colspan="2" | | |||
<div>Shows the results of the algorithm in the same image window </div> | |||
|- | |||
| | |||
<div>'''OK''' </div> | |||
| rowspan="1" colspan="2" | | |||
<div>Applies the algorithm according to the specifications in this dialog box. </div> | |||
|- | |||
| | |||
<div>'''Cancel''' </div> | |||
| rowspan="1" colspan="2" | | |||
<div>Disregards any changes that you made in the dialog box and closes this dialog box. </div> | |||
|- | |||
| | |||
<div>'''Help''' </div> | |||
| rowspan="1" colspan="2" | | |||
<div>Displays online help for this dialog box. </div> | |||
|} | |||
[[Category:Help]] | |||
[[Category:Help:Algorithms]] | |||
Latest revision as of 16:28, 9 February 2024
The Histogram Matching (also called Histogram Specification) algorithm generates an output image based upon a specified histogram.
Background
The process of Histogram Matching takes in an input image and produces an output image that is based upon a specified histogram. The required parameters for this algorithm are the input image and the specified image, from which the specified histogram can be obtained.
The algorithm works as follows:
The histograms for the input image p(f) and the specified image pd(g) are generated. Here, the desired histogram of the specified image is denoted as pd(g). Cumulative histograms - P(f) and Pd(g) are then generated using the following equations:
Equation 1
Equation 2
where f and g are the pixel intensity levels.
The transformation function is obtained by choosing g for each f, such that if g > f, then Pd(g) > P(f). The transformation function is then applied to the input image to produce an output image by remapping the pixel intensities. The objective is to find a transformed digital picture of a given picture, such that the sum of absolute errors between the intensity level histogram of the transformed picture and that of a reference picture is minimized. Refer to Figure 1.
References
Rafael C. Gonzalez and Richard E. Woods. Digital Image Processing. Addison-Wesley Publishing Company, 1992, pp. 173-182
Jae S. Lim. Two-Dimensional Signal and Image Processing. Prentice-Hall, Inc., 1990, pp. 453-459
Image types
You can apply this algorithm to both color and black-and-white images, as well as 2D and 3D images.
Applying the Histogram Matching algorithm
To use this algorithm, do the following:
- Select Algorithms > Histogram Tools > Histogram Matching in the main MIPAV window. The Histogram Matching dialog box (Figure 5) appears.
- Complete the information in the dialog box.
- Click OK. The algorithm begins to run, and a progress bar appears momentarily with the status. When the algorithm finishes running, the progress bar disappears, and the results appear in a separate image window.
|
Histogram match <File name> to
|
Select the specified image pd(g) from the list box
|
|
|
New image
|
Shows the results of the algorithm in a new image window
| |
|
Replace image
|
Shows the results of the algorithm in the same image window
| |
|
OK
|
Applies the algorithm according to the specifications in this dialog box.
| |
|
Cancel
|
Disregards any changes that you made in the dialog box and closes this dialog box.
| |
|
Help
|
Displays online help for this dialog box.
| |


