Flipping images and Getting Started with Eclipse: Difference between pages
(Difference between pages)
Jump to navigation
Jump to search
m (1 revision imported) |
m (1 revision imported) |
||
| Line 1: | Line 1: | ||
Eclipse is one of many good IDEs for developing MIPAV plugins and helping with the MIPAV project. Here you can find out how to get started using Eclipse. | |||
== Requirements == | |||
{| border="1" cellpadding="5" | Here are locations for downloading both Java and Eclipse. Note that Java may already be installed on your system. Find out what version of Java you have [http://www.java.com/en/download/installed.jsp?detect=jre&try=1 here]. | ||
|+ '' | |||
* Java SE Runtime Environment ('''JRE''') or Java Development Kit ('''JDK'''). Version 1.6 or higher is needed. You can either [http://java.sun.com/javase/downloads/?intcmp=1281 download it here] or use the JRE bundled with an installed version of MIPAV. | |||
* Eclipse IDE for Java Developers. The current version is recommended. [http://www.eclipse.org/downloads/ Download here] | |||
=== Installing Java === | |||
If you downloaded Java, simply follow the installation prompts provided. | |||
=== Installing Eclipse === | |||
{| border="1" rules="all" cellpadding="5" | |||
|+ ''Steps for building MIPAV.'' | |||
! Step | |||
! Text | |||
! Picture | |||
|- | |- | ||
| | | 1 | ||
| Download "Eclipse IDE for Java Developers" from [http://www.eclipse.org/downloads/ http://www.eclipse.org/downloads/]. | |||
| | |||
| | |||
|- | |- | ||
| | | 2 | ||
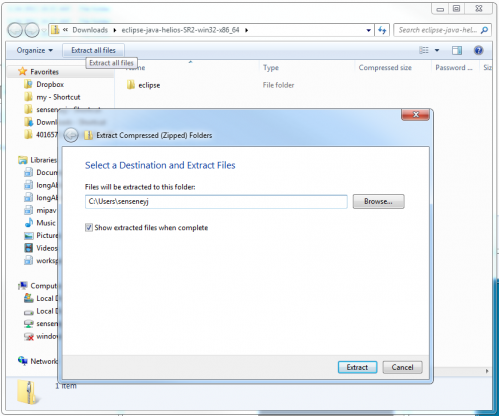
| Unzip Eclipse to an area where you have permission to change/install files, such as your user folder. | |||
| | | [[Image: unzipEclipse.png|thumb|499px]] | ||
|- | |- | ||
| | | 3 | ||
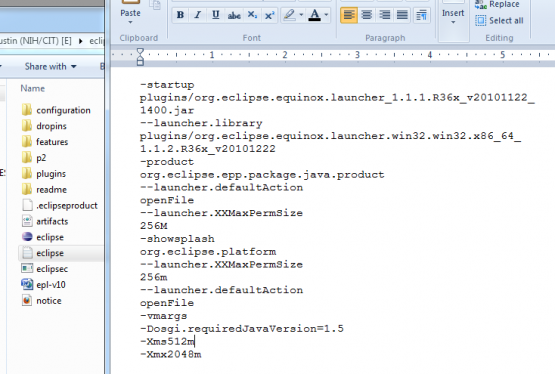
| Open "eclipse.ini" in the Eclipse folder you've just unzipped. Increase the two memory values at the bottom of the file. In the picture, I changed the minimum (-Xms) to 512m and the maximum to (2048m) in an 8MB machine. | |||
| | | [[Image:FixEclipse.png|thumb|555px]] | ||
|- | |- | ||
| | | 4 | ||
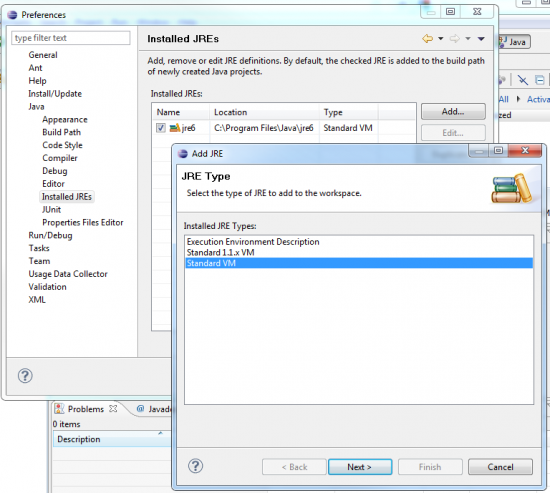
| Start Eclipse, press Go to Workbench, and then press Window->Preferences. It's time to link to the MIPAV JRE. Navigate to the Installed JREs section you see in this picture, and add a Standard VM. | |||
| [[Image:AddJRE.png|thumb|550px]] | |||
|- | |- | ||
| | | 5 | ||
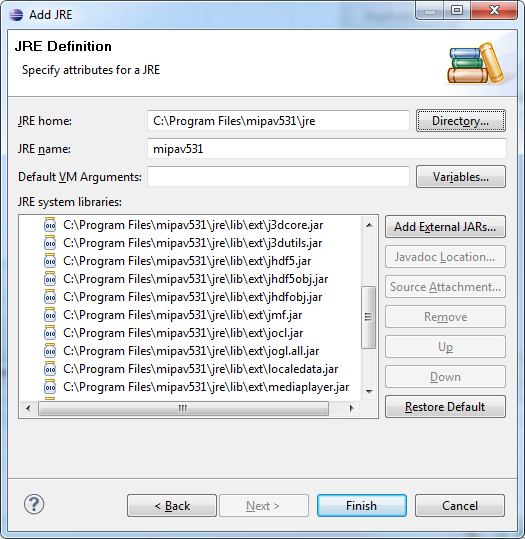
| Use the Directory... button to locate the MIPAV JRE. This is located inside of the folder where you installed MIPAV. | |||
| | | [[Image:newJRE.png|thumb|550px]] | ||
|} | |} | ||
Click Finish, the project will now be initialized. A new project called mipav-plugin should appear. You're now ready to run MIPAV. | |||
== Code Conventions == | |||
MIPAV code is written in Java and conforms to many of the standard Java code conventions. In addition, here are some things you can set Eclipse to do: | |||
*Insert spaces when the Tab key is pressed. | |||
== Now What? == | |||
[[ | With Java and Eclipse installed, you're all set to [[Writing MIPAV plugins without MIPAV source code|write MIPAV plugins]]. | ||
Latest revision as of 16:28, 9 February 2024
Eclipse is one of many good IDEs for developing MIPAV plugins and helping with the MIPAV project. Here you can find out how to get started using Eclipse.
Requirements
Here are locations for downloading both Java and Eclipse. Note that Java may already be installed on your system. Find out what version of Java you have here.
- Java SE Runtime Environment (JRE) or Java Development Kit (JDK). Version 1.6 or higher is needed. You can either download it here or use the JRE bundled with an installed version of MIPAV.
- Eclipse IDE for Java Developers. The current version is recommended. Download here
Installing Java
If you downloaded Java, simply follow the installation prompts provided.
Installing Eclipse
| Step | Text | Picture |
|---|---|---|
| 1 | Download "Eclipse IDE for Java Developers" from http://www.eclipse.org/downloads/. | |
| 2 | Unzip Eclipse to an area where you have permission to change/install files, such as your user folder. | |
| 3 | Open "eclipse.ini" in the Eclipse folder you've just unzipped. Increase the two memory values at the bottom of the file. In the picture, I changed the minimum (-Xms) to 512m and the maximum to (2048m) in an 8MB machine. | |
| 4 | Start Eclipse, press Go to Workbench, and then press Window->Preferences. It's time to link to the MIPAV JRE. Navigate to the Installed JREs section you see in this picture, and add a Standard VM. | |
| 5 | Use the Directory... button to locate the MIPAV JRE. This is located inside of the folder where you installed MIPAV. |
Click Finish, the project will now be initialized. A new project called mipav-plugin should appear. You're now ready to run MIPAV.
Code Conventions
MIPAV code is written in Java and conforms to many of the standard Java code conventions. In addition, here are some things you can set Eclipse to do:
- Insert spaces when the Tab key is pressed.
Now What?
With Java and Eclipse installed, you're all set to write MIPAV plugins.


