Filters (Wavelet): Thresholding and Flipping images: Difference between pages
(Difference between pages)
Jump to navigation
Jump to search
m (1 revision imported) |
MIPAV>Olga Vovk mNo edit summary |
||
| Line 1: | Line 1: | ||
MIPAV allows you to flip images either horizontally, or vertically, or invert the order of slices in the image dataset. The last option is available via the Utilities>Flip Image> In Depth menu.<br /> | |||
'''To flip an image, '''<br /> | |||
# Call Utilities > Flip > Horizontal, Vertical of In Depth. | |||
# Then, complete the dialog box that appears, and press OK. | |||
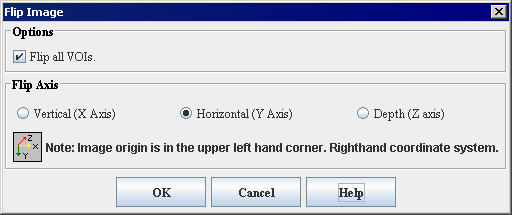
# After a few moments, the flopped image replaces the original image in the same image window. For dialog box options, refer to Figure 21. <br /> | |||
{| border="1" cellpadding="5" | {| border="1" cellpadding="5" | ||
|+ | |+ ''' Figure 21. The Flip Image dialog box options ''' | ||
|- | |- | ||
| | | | ||
<div>''' | <div class="CellBody"><span style="font-style: normal; text-decoration: none; text-transform: none; vertical-align: baseline">'''<font color="#000000">Options</font>'''</span></div> | ||
| | | | ||
<div | <div class="CellBody"><span style="font-style: normal; text-decoration: none; text-transform: none; vertical-align: baseline">'''<font color="#000000">Flip all VOIs </font>'''</span>- flips an image along with all VOIs.</div> | ||
| rowspan="2" colspan="1" | | |||
[[Image:FillImage.jpg]] | |||
| rowspan=" | |||
|- | |- | ||
| | | | ||
<div>''' | <div class="CellBody"><span style="font-style: normal; text-decoration: none; text-transform: none; vertical-align: baseline">'''<font color="#000000">Flip Axis</font>'''</span></div> | ||
| | | | ||
<div>- | <div class="CellBody">Vertical (X Axis) - flips the image vertically;</div> <div class="CellBody">Horizontal (Y Axis) - flips the image horizontally;</div> <div class="CellBody">Depth (Z Axis) - flips the image about the Z axis.</div> | ||
|- | |- | ||
| | | | ||
<div>''' | <div class="CellBody"><span style="font-style: normal; text-decoration: none; text-transform: none; vertical-align: baseline">'''<font color="#000000">OK</font>'''</span></div> | ||
| | | rowspan="1" colspan="2" | | ||
<div> | <div class="CellBody">Applies the parameters that you specified to flip the image.</div> | ||
|- | |- | ||
| | | | ||
<div>''' | <div class="CellBody"><span style="font-style: normal; text-decoration: none; text-transform: none; vertical-align: baseline">'''<font color="#000000">Cancel</font>'''</span></div> | ||
| rowspan="1" colspan="2" | | | rowspan="1" colspan="2" | | ||
<div> | <div class="CellBody">Disregards any changes you made in this dialog box, closes the dialog box, and does not flip the image.</div> | ||
|- | |- | ||
| | | | ||
<div>''' | <div class="CellBody"><span style="font-style: normal; text-decoration: none; text-transform: none; vertical-align: baseline">'''<font color="#000000">Help</font>'''</span></div> | ||
| rowspan="1" colspan="2" | | | rowspan="1" colspan="2" | | ||
<div> | <div class="CellBody">Displays online help for this dialog box.</div> | ||
|} | |||
{| border="1" cellpadding="5" | |||
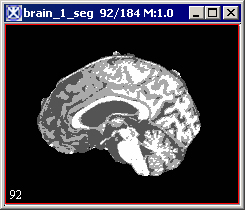
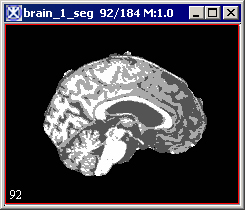
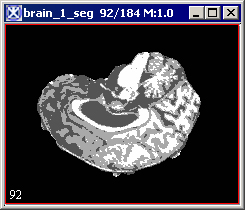
|+ '''Figure 22. An original image (A), image flipped horizontally (B), and then vertically (C)''' | |||
|- | |- | ||
| | | | ||
[[Image:Originala.jpg]] | |||
A | |||
| | |||
[[Image:Horizontal.jpg]] | |||
B | |||
| | | | ||
[[Image:Vertically.jpg]] | |||
C | |||
|} | |} | ||
'''To invert the order of images in datasets'''<br /> | |||
1 Open an image that contains slices.<br /> | |||
2 Select Utilities > Flip> Flip in Depth.<br /> | |||
A status message appears and indicates that the software is reordering the slices in the dataset. In a moment or two the MIPAV window refreshes, and the image window in which the original dataset appeared displays the reordered slices.<br /> | |||
==See also: == | |||
[[Changing Image Datasets Using MIPAV Utilities]] | |||
[[Image Calculator]] | |||
[[Category:Help]] | [[Category:Help]] | ||
Revision as of 20:06, 21 September 2012
MIPAV allows you to flip images either horizontally, or vertically, or invert the order of slices in the image dataset. The last option is available via the Utilities>Flip Image> In Depth menu.
To flip an image,
- Call Utilities > Flip > Horizontal, Vertical of In Depth.
- Then, complete the dialog box that appears, and press OK.
- After a few moments, the flopped image replaces the original image in the same image window. For dialog box options, refer to Figure 21.
|
Options
|
Flip all VOIs - flips an image along with all VOIs.
|
|
|
Flip Axis
|
Vertical (X Axis) - flips the image vertically; Horizontal (Y Axis) - flips the image horizontally; Depth (Z Axis) - flips the image about the Z axis.
| |
|
OK
|
Applies the parameters that you specified to flip the image.
| |
|
Cancel
|
Disregards any changes you made in this dialog box, closes the dialog box, and does not flip the image.
| |
|
Help
|
Displays online help for this dialog box.
| |
To invert the order of images in datasets
1 Open an image that contains slices.
2 Select Utilities > Flip> Flip in Depth.
A status message appears and indicates that the software is reordering the slices in the dataset. In a moment or two the MIPAV window refreshes, and the image window in which the original dataset appeared displays the reordered slices.


