|
MIPAV>Angelfish100 |
| Line 1: |
Line 1: |
| ''This method produces an edge map of the zero-crossings of the non-maximum suppression for 2D and 2.5D images. Edges are defined as the union of points for which the gradient magnitude assumes a maximum in the gradient direction. ''
| | You can either edit a script while you are creating it, or you can edit any previously saved script. MIPAV saves the script in text format so that any text editor, such as Microsoft Wordpad or Notepad, can modify the file. |
|
| |
|
| === Background ===
| | '''Caution''': Editing scripts may cause serious problems if the script commands are not entered correctly. This task is recommended for more advanced users.<br /> |
|
| |
|
| For a 2D image, let's introduce a local coordinate system (u, v) such that at any point in the image P''0''(x''0'',y''0'') v-axis is parallel to the gradient direction at (x''0'',y''0'') and the u-axis is perpendicular to it, i.e.,
| | '''To edit scripts during creation'''<br /> |
|
| |
|
| Equation 1 <div align "left> </div>
| | Suppose you make an error while you are recording a script, or perhaps you've changed your mind about performing a specific action. It can be more practical to correct the problem right away. |
|
| |
|
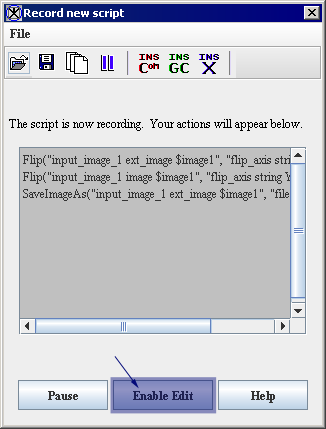
| | To correct errors or make changes to scripts while you're creating and running them, simply click the Enable Edit button, in the Record New Script dialog box (Figure 18). Three things occur: |
| | 1 It pauses the script execution.<br /> |
| | 2 The scripting box in the dialog box turns from gray to white to indicate that you can now type, copy, or paste information into it and delete information from it.<br /> |
| | 3 The Enable Edit button changes to the Disable Edit button. If the scripting box contains actions that you want to erase, select the actions and delete them. To add new actions, you can type them into the scripting box directly. You can also rearrange actions by copying and pasting them.<br /> |
|
| |
|
| {| border="1" cellpadding="5" | | {| border="1" cellpadding="5" |
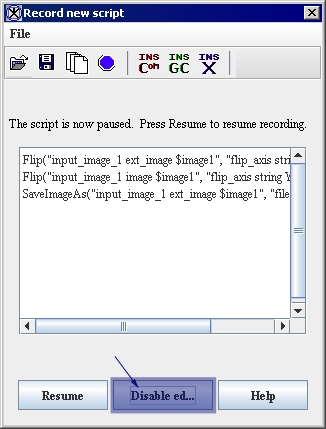
| |+ | | |+ '''Figure 18. Record New Script dialog box (A) before and (B) after clicking Enable Edit''' |
| |- | | |- |
| | | | | |
| <math>
| | [[Image:Script_EnableEdit.png]] |
| \binom {cos \alpha} {sin \alpha} = \frac {1} {\sqrt{L^2_x + L^2_y}} \binom {L_x} {L_y}_{(x_0;y_0)}
| |
| </math>
| |
| |}
| |
| | |
| | |
| Where L is a convolution of an image (represented as a function ''f(x,y'') with the Gaussian kernel defined as:
| |
| Equation 2 <div align "left> </div>
| |
| | |
| | |
| {| border="1" cellpadding="5"
| |
| |+
| |
| |-
| |
| |
| |
| <math>
| |
| g(x,y) = \frac {1} {2\pi t}exp \left \{-\frac {x^2 +y^2} {2t} \right \}
| |
| </math>
| |
| |}
| |
| | |
| <br />
| |
| | |
| so that
| |
| | |
| Equation 3 <div align "left> </div>
| |
| | |
| | |
| {| border="1" cellpadding="5"
| |
| |+
| |
| |-
| |
| |
| |
| <math>
| |
| L{(x,y;t)} = g{(x,y;t)}of{(x,y)}
| |
| </math>
| |
| |}
| |
| | |
| <br />
| |
| | |
| where the circle represents convolution of g(x,y;t) and'' f''(x,y) and semicolon in the argument of g implies that the convolution is performed only over the variables x and y, while the scale parameter ''t'' after the semicolon just indicates which scale-space level is being defined. Directional derivatives in this local (u,v) system are related to partial derivatives in the Cartesian coordinate system by the following system of equations,
| |
| | |
| Equation 4 <div align "left> </div>
| |
| | |
| | |
| {| border="1" cellpadding="5"
| |
| |+
| |
| |-
| |
| |
| |
| <math>
| |
| L_u = sin\alpha L_x - cos \alpha L_y
| |
| </math>
| |
| | |
| <math>
| |
| L_v= cos\alpha L_x + sin\alpha L_y
| |
| </math>
| |
| | |
| |}
| |
| | |
| <br />
| |
| | |
| where, at a given point P''0''
| |
| | |
| Equation 5 <div align "left> </div>
| |
| | |
| | |
| {| border="1" cellpadding="5"
| |
| |+
| |
| |-
| |
| |
| |
| <math>
| |
| cos\alpha = \frac {L_x}{\sqrt{(L^2_x + L^2_y)}}
| |
| </math>
| |
| |-
| |
| |
| |
| <math>
| |
| sin\alpha = \frac {L_y}{\sqrt{L^2_x + L^2_y}}
| |
| </math>
| |
| |}
| |
| | |
| <br />
| |
| And this (u,v) coordinate system is characterized by the fact that one of the two first-order derivatives -L''u'', is zero, e.g.
| |
| | |
| Equation 6 <div align "left> </div>
| |
| | |
| | |
| {| border="1" cellpadding="5"
| |
| |+
| |
| |-
| |
| | | | | |
| <math>
| | [[Image:Script_DisableEdit.png]] |
| L_v = \frac {L^2_x + L^2_y}{\sqrt{L^2_x + L^2_y}} = {\sqrt{L^2_x + L^2_y}}
| |
| </math>
| |
| |}
| |
| | |
| <br />
| |
| Equation 7 <div align "left> </div>
| |
| | |
| | |
| {| border="1" cellpadding="5"
| |
| |+
| |
| |-
| |
| |
| |
| <math>
| |
| L_u= \frac {(L_xL_y - L_xL_y)}{\sqrt{(L^2_x + L^2_y)}} = 0
| |
| </math>
| |
| |}
| |
| | |
| <br />
| |
| Equation 8 <div align "left> </div>
| |
| | |
| | |
| {| border="1" cellpadding="5"
| |
| |+
| |
| |-
| |
| |
| |
| <math>
| |
| L^2_v = L^2_x + L^2_y
| |
| </math>
| |
| |}
| |
| | |
| <br />
| |
| | |
| Below, are equations used in the method for calculating the second and third derivative - L''vv'' and L''vvv''.
| |
| | |
| Equation 9 <div align "left> </div>
| |
| | |
| | |
| {| border="1" cellpadding="5"
| |
| |+
| |
| |- | | |- |
| | | | | |
| <math> | | <div class="CellBody">A</div> |
| L_{vv}=( cos\alpha L_x + sin\alpha L_y )^2
| |
| </math>
| |
| |}
| |
| | |
| <br />
| |
| Equation 10 <div align "left> </div>
| |
| | |
| | |
| {| border="1" cellpadding="5"
| |
| |+
| |
| |-
| |
| | | | | |
| <math> | | <div class="CellBody">B</div> |
| L_{vv} = cos^2\alpha L_{xx} + 2cos\alpha sin\alpha L_{xy} + sin^2\alpha L_{yy} = \frac {L^2x L_{xx} + 2L_xL_yL_{xy} + L^2_yL_{yy}} {L^2_x + L^2_y}
| |
| </math> | |
| |} | | |} |
|
| |
|
| <br />
| |
| Equation 11 <div align "left> </div>
| |
|
| |
|
| | When you've finished editing the script, click Disable Edit. The record of script actions resumes. The scripting box turns gray and the Disable Edit button becomes the Enable Edit button. |
|
| |
|
| {| border="1" cellpadding="5"
| | '''To edit previously created scripts'''<br /> |
| |+
| | 1 Click the Start Recording Script icon on the scripting toolbar. The icon turns red, and the Record New Script dialog box opens.<br /> |
| |-
| | 2 Select File > Open on the Record New Script dialog box. The Open dialog box opens.<br /> |
| |
| | 3 Select the script that you want to edit. The script appears in the scripting box on the Record New Script dialog box.<br /> |
| <math> | | 4 Click Enable Edit. The actions box turns from gray to white.<br /> |
| | | 5 Select any of the actions and copy, rearrange, or delete them, or type new actions directly into the scripting box.<br /> |
| L_{vvv} = \left ( cos^2 \alpha L_{xx} + \left ( 2 cos \alpha sin \alpha L_{xy} + sin \alpha^2 L_{yy} \right ) cos \alpha L_x + sin \alpha L_y \right ) = cos^3 \alpha L_{xxx} + 3cos^2 \alpha sin \alpha L_{xxy} +3cos \alpha sin^2 \alpha L_{xyy} + sin^3 \alpha L_{yyy}
| | 6 Click Disable Edit when you are satisfied with the script. The scripting box returns to gray.<br /> |
| </math> | | 7 Continue recording actions if needed until you are satisfied the script.<br /> |
| |}
| | 8 Save the script by clicking File > Save. The Save dialog box opens.<br /> |
| | | 9 Type the name of the script followed by the ''.sct'' extension in the File Name box.<br /> |
| <br /> | | 10 Click Save. MIPAV saves the script under the specified name.<br /> |
| Equation 12 <div align "left> </div>
| |
|
| |
|
| {| border="1" cellpadding="5"
| | '''To delete scripts (Windows specific)''' |
| |+
| |
| |-
| |
| |
| |
| <math>
| |
| L_{vvv} = \frac {L^3_x L_{xxx} + 3 L^2_x L_y L_{xxy} +3 L_x L^2_y L_{xyy} + L^3_y L_{yyy}} {(L^2_x +L^2_y)^{\frac {3} {2}}}
| |
| </math>
| |
| |}
| |
|
| |
|
|
| | If you decide at some point that you want to delete a script, go to Windows Explorer and navigate to the scripts home directory. |
| Equation 13 <div align "left> </div>
| |
|
| |
|
| | 1 Open Windows explorer.<br /> |
| | 2 Navigate to the scripts home directory.<br /> |
| | 3 Select the script or scripts that you want to delete.<br /> |
| | 4 Right-click on the selected script(s).<br /> |
| | 5 Click Delete. Windows deletes the selected scripts and places them in the Recycle Bin where they stay until you empty the bin.<br /> |
|
| |
|
| {| border="1" cellpadding="5"
| |
| |+
| |
| |-
| |
| |
| |
| <math>
| |
| L^3_v L_{vvv} = L^3_x L_{xxx} + 3 L^2_x L_y L_{xxy} + 3 L_x L^2_y L_{xyy} +L^3 L_{yyy}
| |
| </math>
| |
| |}
| |
|
| |
| <br />
| |
|
| |
| According to the notion of non-maximum suppression, an edge point is defined as a point at which the gradient magnitude assumes a maximum in the gradient direction. In terms of directional derivatives, such definition can be also expressed as a combination of two conditions:
| |
|
| |
| ** The second-order directional derivative in the v-direction L''vv ''being zero;
| |
| ** And the third-order directional derivative in the same direction L''vvv'' being'' ''negative, e.g.:
| |
|
| |
| Equation 14 <div align "left> </div>
| |
|
| |
|
| |
| {| border="1" cellpadding="5"
| |
| |+
| |
| |-
| |
| |
| |
| <math>
| |
| \begin{cases}
| |
| L_{vv} = 0,\\
| |
| L_{vvv} < 0
| |
| \end{cases}
| |
| </math>
| |
| |}
| |
|
| |
| <br />
| |
|
| |
| Since only the sign information is important, these conditions can be restated as:
| |
|
| |
| Equation 15 <div align "left> </div>
| |
|
| |
|
| |
| {| border="1" cellpadding="5"
| |
| |+
| |
| |-
| |
| |
| |
| <math>
| |
| \begin{cases}
| |
| L^2_v L_{vv} = 0\\
| |
| L^3 * L_{vvv} < 0
| |
| \end{cases}
| |
| </math>
| |
| |}
| |
|
| |
| <br />
| |
|
| |
| Here, L is the scale-space representation of an image ''f''(x,y;t) at a certain scale t, and the last equation defines the edges of ''f'' at that scale.
| |
|
| |
| This condition can also be formulated in terms of zero-crossings of the partial derivative of ''L'' with respect to the scale parameter (i.e., as a directional derivative in the vertical scale direction). For more information about the zero-crossings method for detecting edges used in MIPAV, refer to MIPAV User Manual, Volume 2, Algorithms, Edge Detection: Zero X Laplacian.
| |
|
| |
| The method evaluates detected zero-crossings using the Marching Squares algorithm to determine only those zero-crossings that corresponds to edges. To learn more about the Marching Squares algorithm, refer to MIPAV User Manual, Volume 2, Algorithms, Extract Surface (Marching Cubes).
| |
|
| |
| The resulting image is an unsigned byte image with values of 255 at the edges and 0 elsewhere.
| |
|
| |
| <div><br /> </div><div>
| |
|
| |
| {| border="1" cellpadding="5"
| |
| |+ <div>'''Figure 1. The original image and its unsigned byte mask with detected edges.''' </div>
| |
| |-
| |
| |
| |
| <div style="font-style: normal; font-weight: normal; margin-bottom: 0pt; margin-left: 0pt; margin-right: 0pt; margin-top: 1pt; text-align: left; text-decoration: none; text-indent: 0pt; text-transform: none; vertical-align: baseline"><font size="2pt"><font color="#000000"><div><center>[[Image:EdgeDetNonMAxSupprOriginal.jpg]]</center></div><br />
| |
| |
| |
| <div style="font-style: normal; font-weight: normal; margin-bottom: 0pt; margin-left: 0pt; margin-right: 0pt; margin-top: 1pt; text-align: left; text-decoration: none; text-indent: 0pt; text-transform: none; vertical-align: baseline"><font size="2pt"><font color="#000000"><div><center>[[Image:EdgeDetNonMAxSupprResultl.jpg]]</center></div><br />
| |
| |}
| |
|
| |
|
| |
|
| |
| ==== Image types ====
| |
|
| |
| You can apply this algorithm to 2D and 3D grayscale images.
| |
|
| |
| ==== References ====
| |
|
| |
| Bart M. ter Haar Romeny(Ed.), "Geometry-Driven Diffusion in Computer Vision", Chapter2: ''Linear Scale''''-''''Space II: Early Visual Operations'' by Tony Lindeberg and Bart M. ter Haar Romeny, Kluwer Academic Publishers, 1994, pp. 39-46.
| |
|
| |
| MIPAV User Manual, Volume 2, Algorithms, Edge Detection: Zero X Laplacian.
| |
|
| |
| Tony Lindeberg [1996]. "Edge detection and ridge detection with automatic scale selection" ''Technical report ''ISRN KTH/NA/P-96/06-SE, May 1996, Revised August 1998. ''Int. J. of Computer Vision'', vol 30, number 2, 1998. (In press). Shortened version in Proc. CVPR'96, San Francisco, June 1996. http://www.nada.kth.se/~tony
| |
|
| |
| === Applying the Zero X Non-Maximum Suppression algorithm ===
| |
|
| |
| To run this algorithm, complete the following steps:
| |
|
| |
| # Open an image of interest;
| |
| # Select Algorithms > Edge detection > Zero x non-maximum suppression. The EdgeNMSuppression dialog box opens. For the dialog box options, refer to Figure 2.
| |
| # Complete the fields in the dialog box. Click OK.
| |
|
| |
| ; The algorithm begins to run, and a status window appears. When the algorithm finishes, the resulting image appears as an unsigned byte mask in a new image window as shown in Figure 3.
| |
|
| |
| <div><br /> </div><div>
| |
|
| |
| '''Figure 2. The EdgeNMSuppression dialog box options''' <div align "left"> </div>
| |
| {| border="1" cellpadding="5"
| |
| |+
| |
| |-
| |
| |
| |
| <div>'''Scale of the Gaussian''' </div>
| |
| |
| |
| <div>Specifies the standard deviation (from 1.0 to 10.0) of the Gaussian filter in X, Y, and Z directions which were used to determine edges in the image. </div><div>Note that larger standard deviation produces an image with smaller number of edges. Smoothing the image before applying the algorithm also reduce the number of detected edges. Refer to Figure 3 for more information. </div>
| |
| | rowspan="2" colspan="1" |
| |
| <div><div><center>[[Image:EdgeNMSuppression.jpg]]</center></div> </div>
| |
| |-
| |
| |
| |
| <div>'''Use image resolutions to normalize Z scale''' </div>
| |
| |
| |
| <div>If checked, the following equation - ''Z scale*(X resolution/Z resolution)'' will be used to generate the edge map. </div><div>If unchecked, only Z scale will be used in generation of the edge map. </div>
| |
| |-
| |
| |
| |
| <div>Process each slice independently (2.5D) </div>
| |
| | rowspan="1" colspan="2" |
| |
| <div>Applies the algorithm to each image slice individually. </div>
| |
| |-
| |
| |
| |
| <div>Destination </div>
| |
| | rowspan="1" colspan="2" |
| |
| <div>''New image'' - this is the default option; ''Replace image'' - this option cannot be selected. </div>
| |
| |-
| |
| |
| |
| <div>Process </div>
| |
| | rowspan="1" colspan="2" |
| |
| <div>''Whole Image'' - if checked the edge detection will be calculated for the whole image; ''VOI region'' - if checked the edge detection will be calculated for the selected VOI. </div>
| |
| |-
| |
| |
| |
| <div>'''OK''' </div>
| |
| | rowspan="1" colspan="2" |
| |
| <div>Applies the algorithm according to the specifications in this dialog box. </div>
| |
| |-
| |
| |
| |
| <div>'''Cancel''' </div>
| |
| | rowspan="1" colspan="2" |
| |
| <div>Closes the dialog box. </div>
| |
| |-
| |
| |
| |
| <div>'''Help''' </div>
| |
| | rowspan="1" colspan="2" |
| |
| <div>Displays online help for this dialog box. </div>
| |
| |-
| |
| | rowspan="1" colspan="3" |
| |
|
| |
| |}
| |
|
| |
| </div><div><br /> </div><div>
| |
|
| |
| {| border="1" cellpadding="5"
| |
| |+ <div>'''Figure 3. The original image (a) and its unsigned byte mask with detected edges depending on the standard deviation: (b) - standard deviation is set to 1; (c) - standard deviation is set to 4; (d) - standard deviation is set to 6; (e) - standard deviation is set to 8; (f) - standard deviation is set to 6, but the original image has been smoothed before applying the algorithm.''' </div>
| |
| |-
| |
| |
| |
| <div style="font-style: normal; font-weight: normal; margin-bottom: 0pt; margin-left: 0pt; margin-right: 0pt; margin-top: 1pt; text-align: left; text-decoration: none; text-indent: 0pt; text-transform: none; vertical-align: baseline"><font size="2pt"><font color="#000000"><div><center>[[Image:EdgrNMSuppOriginal.jpg]]</center></div><br /> </font></font></div><div>a </div>
| |
| |
| |
| <div style="font-style: normal; font-weight: normal; margin-bottom: 0pt; margin-left: 0pt; margin-right: 0pt; margin-top: 1pt; text-align: left; text-decoration: none; text-indent: 0pt; text-transform: none; vertical-align: baseline"><font size="2pt"><font color="#000000"><div><center>[[Image:EdgrNMSuppEdges.jpg]]</center></div><br /> </font></font></div><div>b </div>
| |
| |-
| |
| |
| |
| <div style="font-style: normal; font-weight: normal; margin-bottom: 0pt; margin-left: 0pt; margin-right: 0pt; margin-top: 1pt; text-align: left; text-decoration: none; text-indent: 0pt; text-transform: none; vertical-align: baseline"><font size="2pt"><font color="#000000"><div><center>[[Image:EdgeDetNonMAxSupprResultDev4.jpg]]</center></div><br /> </font></font></div><div>c </div>
| |
| |
| |
| <div style="font-style: normal; font-weight: normal; margin-bottom: 0pt; margin-left: 0pt; margin-right: 0pt; margin-top: 1pt; text-align: left; text-decoration: none; text-indent: 0pt; text-transform: none; vertical-align: baseline"><font size="2pt"><font color="#000000"><div><center>[[Image:EdgeDetNonMAxSupprResultDev6.jpg]]</center></div><br /> </font></font></div><div>d </div>
| |
| |-
| |
| |
| |
| <div style="font-style: normal; font-weight: normal; margin-bottom: 0pt; margin-left: 0pt; margin-right: 0pt; margin-top: 1pt; text-align: left; text-decoration: none; text-indent: 0pt; text-transform: none; vertical-align: baseline"><font size="2pt"><font color="#000000"><div><center>[[Image:EdgeDetNonMAxSupprResultDev8.jpg]]</center></div><br /> </font></font></div><div>e </div>
| |
| |
| |
| <div style="font-style: normal; font-weight: normal; margin-bottom: 0pt; margin-left: 0pt; margin-right: 0pt; margin-top: 1pt; text-align: left; text-decoration: none; text-indent: 0pt; text-transform: none; vertical-align: baseline"><font size="2pt"><font color="#000000"><div><center>[[Image:EdgeDetNonMAxSupprResultDev6AfterBlur.jpg]]</center></div><br /> </font></font></div><div>f </div>
| |
| |}
| |
|
| |
| </div>
| |
|
| |
|
| [[Category:Help:Algorithms]] | | [[Examples]] |
| [[Category:Help]]
| |
You can either edit a script while you are creating it, or you can edit any previously saved script. MIPAV saves the script in text format so that any text editor, such as Microsoft Wordpad or Notepad, can modify the file.
Caution: Editing scripts may cause serious problems if the script commands are not entered correctly. This task is recommended for more advanced users.
To edit scripts during creation
Suppose you make an error while you are recording a script, or perhaps you've changed your mind about performing a specific action. It can be more practical to correct the problem right away.
To correct errors or make changes to scripts while you're creating and running them, simply click the Enable Edit button, in the Record New Script dialog box (Figure 18). Three things occur:
1 It pauses the script execution.
2 The scripting box in the dialog box turns from gray to white to indicate that you can now type, copy, or paste information into it and delete information from it.
3 The Enable Edit button changes to the Disable Edit button. If the scripting box contains actions that you want to erase, select the actions and delete them. To add new actions, you can type them into the scripting box directly. You can also rearrange actions by copying and pasting them.
Figure 18. Record New Script dialog box (A) before and (B) after clicking Enable Edit
|
|
|
|
A
|
B
|
When you've finished editing the script, click Disable Edit. The record of script actions resumes. The scripting box turns gray and the Disable Edit button becomes the Enable Edit button.
To edit previously created scripts
1 Click the Start Recording Script icon on the scripting toolbar. The icon turns red, and the Record New Script dialog box opens.
2 Select File > Open on the Record New Script dialog box. The Open dialog box opens.
3 Select the script that you want to edit. The script appears in the scripting box on the Record New Script dialog box.
4 Click Enable Edit. The actions box turns from gray to white.
5 Select any of the actions and copy, rearrange, or delete them, or type new actions directly into the scripting box.
6 Click Disable Edit when you are satisfied with the script. The scripting box returns to gray.
7 Continue recording actions if needed until you are satisfied the script.
8 Save the script by clicking File > Save. The Save dialog box opens.
9 Type the name of the script followed by the .sct extension in the File Name box.
10 Click Save. MIPAV saves the script under the specified name.
To delete scripts (Windows specific)
If you decide at some point that you want to delete a script, go to Windows Explorer and navigate to the scripts home directory.
1 Open Windows explorer.
2 Navigate to the scripts home directory.
3 Select the script or scripts that you want to delete.
4 Right-click on the selected script(s).
5 Click Delete. Windows deletes the selected scripts and places them in the Recycle Bin where they stay until you empty the bin.
Examples

