Saving and printing images
This section explains how to save images to the same format (as when opened) or to a different format. It also shows how to print images. In addition, it explains how to save an image as a TIFF file.
Saving images to the same format
To save an image file in the same format (as when opened)
- In the MIPAV window, do one of the following:
- Click the Save Image icon or use the Ctrl+S combination of keys.
- Select File > Save Image.
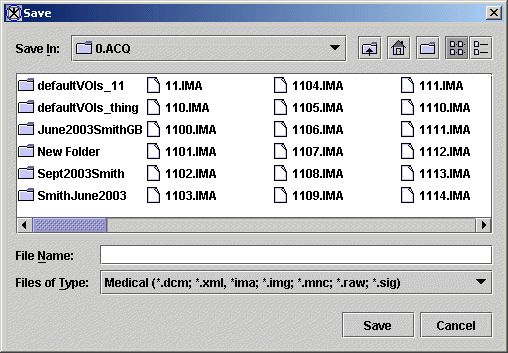
- The Save dialog box appears.
- In the dialog box, type the name of the file in File name and click Save.
Note: If you prefer for MIPAV to use the style of Open and Save dialog boxes that are used by the operating system (e.g., Microsoft Windows, Unix, or Apple) on your computer, read the section on "Using platform-specific Open and Save dialog boxes".
Capturing images as TIFF(RGB) files
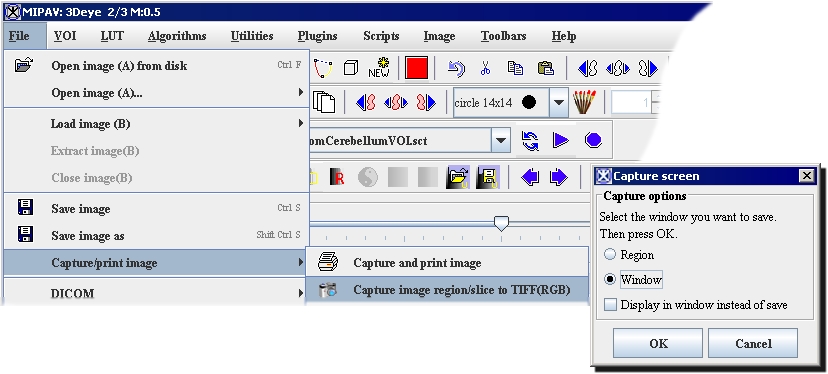
MIPAV allows you to capture entire images or portions of images as RGB TIFF files.
To capture an image: Select File > Capture image to TIFF(RGB) in the MIPAV window. The Capture Screen dialog box opens.
To capture only a portion of an image: Select Region, then draw a rectangle with the mouse around the region in the image you want to save. Click OK. The Save dialog box opens. Type the name of the file in File Name, and select the TIFF type of file. Click Save. The region is saved under the specified file name.
To capture the entire image: Select Window, then click OK. The Save dialog box opens. Follow the instructions provided by the dialog box to save the image in TIFF format.
To display the region in a separate window rather than save it, select Display in Window Instead of Save. The selected region appears in a separate window.
To display the image in a separate window rather than save it, select Display in Window Instead of Save. The entire image appears in a separate window.
Saving images as
MIPAV uses the file extension to save images into various formats. Thus, saving an image with the extension of TIFF causes the image to be saved as a TIFF image. Saving an image with the extension of IMG causes the image to be saved as an Analyze image. See Supported Formats for file extensions supported by MIPAV.
To save images as RGB TIFF files
- Select File > Save as in the MIPAV window. The Save Image as dialog box appears.
- Type the name of the image in File name. Make sure you add .tiff as the extension.
- Click Save. MIPAV saves the file as a TIFF file under the name you specified.
To save images to MINC format
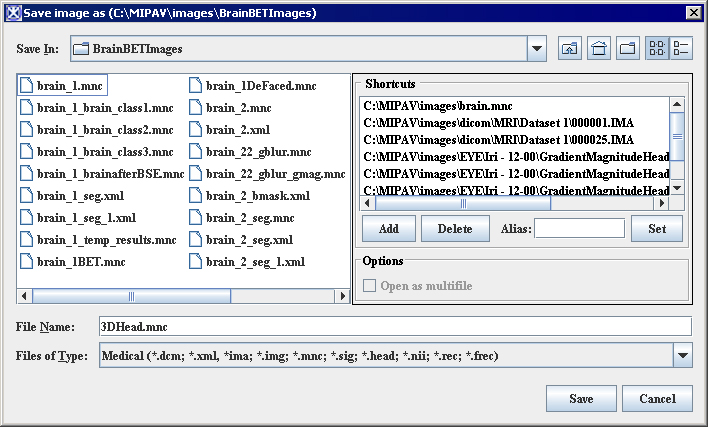
- Select File > Save As.The Save Image as dialog box appears.
- Type the name of the file in File name. Make sure you add .mnc as the extension.
- The Attributes to Save dialog box appears.
- Complete the text boxes with the appropriate information. Note that the x, y, and z values differ from DICOM.
- Click Save. MIPAV saves the image to MINC format.
MINC Attributes of the Save dialog box
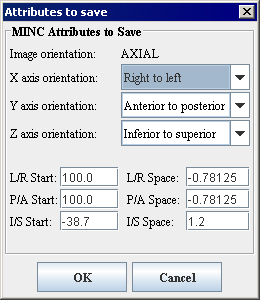

Image orientation: Specify the image orientation here if need. Note that, often the proper value is already entered in the dialog box. Then use the appropriate list boxes to specify the X, Y and Z axis orientation.
OK - Saves the selected image based on your choices in this dialog box.
Cancel - Disregards changes you made in this dialog box and closes the dialog box.
Saving images to XML format
To record a history of actions that were performed on images, you should save the images to MIPAV XML format. When you save images to XML format, MIPAV creates two files for each image: a RAW file, which contains image data, and an XML file. The XML file includes image attributes, such as action history. You can view the attributes of an image by selecting Image > Attributes > Edit Attributes or by viewing the .xml file using a text editor or an internet browser.
To save images to XML format
- Select File > Save as. The Save Image as dialog box opens.
- Accept the name currently in File name or type a new name. Make sure you add .xml as the extension.
- Click Save. MIPAV saves the file under the name and extension you specified and begins, from this point on, recording a history of actions performed on the image.
Saving images to another format or renaming images
To save images to format different from the original file:
- Select File > Save as.The Save Image as dialog box appears. 2 Type the new name in File name. To save the file in a different format, change the file extension.
- Click Save. MIPAV saves the file under the name and extension you specified.
To rename images:
- Select File > Save as. The Save Image as dialog appears.
- Type the new name in File name. Either keep the extension already specified or change it to another file type.
- Click Save. MIPAV saves the file under the name and extension you specified.
Printing Images
MIPAV offers the following printing command File > Capture and Print Image. This command calls the Print dialog box. Using this dialog you can set up a printer (to do it press the Properties button) or a file for printing (using the Print to File option), select the print copies and print range (all pages, current page, or selected pages).
To print an image with its current options: choose File > Capture and Print Image, and click OK.
To set printer and page setup options:
- Choose File > Capture and Print Image.
- Select an installed printer from the pop-up list at the top of the dialog box.
- Set additional options, such as paper size and layout, as desired. The available options depend on your printer, print drivers, and operating system.