|
MIPAV>Angelfish100 |
| Line 1: |
Line 1: |
| You can create a self-contained plug-in that does not rely on the default MIPAV user interface. When running, this type of plug-in hides MIPAV and displays its own image(s) with the action and algorithm handling specific to its frame.<br /> | | MIPAV allows you to generate intensity profiles, or contour VOI graphs, for VOI contours. For delineated VOIs, you can generate 2D, 3D, or 4D intensity graphs. You can also generate a 3D intensity graph at a specific point across all slices in a dataset. For information on how to contour a VOI, refer to Chapter 1, "Segmenting Images Using Contours and Masks,"<br /> |
| == To create a self-contained plug-in: ==
| |
|
| |
|
| <div style="font-style: normal; font-weight: normal; margin-bottom: 0pt; margin-left: 18pt; margin-right: 0pt; margin-top: 6pt; text-align: left; text-decoration: none; text-indent: -18pt; text-transform: none; vertical-align: baseline"><font color="#000000"> 1 Extend <span style="font-style: normal; font-weight: normal; text-decoration: none; text-transform: none; vertical-align: baseline"><font color="#000000">ViewJFrameImage</font></span>, as this will allow the plug-in to use a wide-range of <span style="font-style: normal; font-weight: normal; text-decoration: none; text-transform: none; vertical-align: baseline"><font color="#000000">ViewJFrameImage</font></span> and <span style="font-style: normal; font-weight: normal; text-decoration: none; text-transform: none; vertical-align: baseline"><font color="#000000">ViewJFrameBase</font></span> specific functions for storing and displaying <span style="font-style: normal; font-weight: normal; text-decoration: none; text-transform: none; vertical-align: baseline"><font color="#000000">ModelImages</font></span>. These functions include, for example, the image and on-screen buffers, menu and toolbar builders, etc.<br /></font></div><div style="font-style: normal; font-weight: normal; margin-bottom: 0pt; margin-left: 18pt; margin-right: 0pt; margin-top: 6pt; text-align: left; text-decoration: none; text-indent: -18pt; text-transform: none; vertical-align: baseline"><font color="#000000"> 2 Override the <span style="font-style: normal; font-weight: normal; text-decoration: none; text-transform: none; vertical-align: baseline"><font color="#000000">ViewOpenFrameInterface</font></span> <span style="font-style: normal; font-weight: normal; text-decoration: none; text-transform: none; vertical-align: baseline"><font color="#000000">openFrame(ModelImage) </font></span>function. This handles the creation of a new <span style="font-style: normal; font-weight: normal; text-decoration: none; text-transform: none; vertical-align: baseline"><font color="#000000">PlugIn</font></span> frame based on whether a result image is created within the dialog of an algorithm. For example, when the user runs an algorithm and selects the destination New Image rather than Replace Image, a new frame will be created with the result of the algorithm. To set all algorithms to work in place and disallow creating of new frames, call <span style="font-style: normal; font-weight: normal; text-decoration: none; text-transform: none; vertical-align: baseline"><font color="#000000">ViewUserInterface setForceInPlace(true)</font></span> function, which tells the dialogs that all algorithms must work in place.<br /></font></div><div style="font-style: normal; font-weight: normal; margin-bottom: 0pt; margin-left: 18pt; margin-right: 0pt; margin-top: 6pt; text-align: left; text-decoration: none; text-indent: -18pt; text-transform: none; vertical-align: baseline"><font color="#000000"> 3 Create an <span style="font-style: normal; font-weight: normal; text-decoration: none; text-transform: none; vertical-align: baseline"><font color="#000000">init()</font></span> function, where the <span style="font-style: normal; font-weight: normal; text-decoration: none; text-transform: none; vertical-align: baseline"><font color="#000000">PlugIn</font></span> frame is layout and components will be initialized. <br /></font></div><div style="font-style: normal; font-weight: normal; margin-bottom: 0pt; margin-left: 18pt; margin-right: 0pt; margin-top: 6pt; text-align: left; text-decoration: none; text-indent: -18pt; text-transform: none; vertical-align: baseline"><font color="#000000"> 4 In the <span style="font-style: normal; font-weight: normal; text-decoration: none; text-transform: none; vertical-align: baseline"><font color="#000000">init()</font></span> function, several methods should be called:<br /></font></div><div style="font-style: normal; font-weight: normal; margin-bottom: 0pt; margin-left: 36pt; margin-right: 0pt; margin-top: 6pt; text-align: left; text-decoration: none; text-indent: -12pt; text-transform: none; vertical-align: baseline"><font color="#000000"> Call <span style="font-style: normal; font-weight: normal; text-decoration: none; text-transform: none; vertical-align: baseline"><font color="#000000">initLUT()</font></span> for the <span style="font-style: normal; font-weight: normal; text-decoration: none; text-transform: none; vertical-align: baseline"><font color="#000000">ModelImage</font></span> look-up table,<br /></font></div><div style="font-style: normal; font-weight: normal; margin-bottom: 0pt; margin-left: 36pt; margin-right: 0pt; margin-top: 6pt; text-align: left; text-decoration: none; text-indent: -12pt; text-transform: none; vertical-align: baseline"><font color="#000000"> Call <span style="font-style: normal; font-weight: normal; text-decoration: none; text-transform: none; vertical-align: baseline"><font color="#000000">initResolutions()</font></span> for the <span style="font-style: normal; font-weight: normal; text-decoration: none; text-transform: none; vertical-align: baseline"><font color="#000000">ModelImage</font></span> resolutions,<br /></font></div><div style="font-style: normal; font-weight: normal; margin-bottom: 0pt; margin-left: 36pt; margin-right: 0pt; margin-top: 6pt; text-align: left; text-decoration: none; text-indent: -12pt; text-transform: none; vertical-align: baseline"><font color="#000000"> Call <span style="font-style: normal; font-weight: normal; text-decoration: none; text-transform: none; vertical-align: baseline"><font color="#000000">initZoom()</font></span> for the frame's zoom factor,<br /></font></div><div style="font-style: normal; font-weight: normal; margin-bottom: 0pt; margin-left: 36pt; margin-right: 0pt; margin-top: 6pt; text-align: left; text-decoration: none; text-indent: -12pt; text-transform: none; vertical-align: baseline"><font color="#000000"> <span style="font-style: normal; font-weight: normal; text-decoration: none; text-transform: none; vertical-align: baseline"><font color="#000000">initComponentImage()</font></span> creates a displayable <span style="font-style: normal; font-weight: normal; text-decoration: none; text-transform: none; vertical-align: baseline"><font color="#000000">ComponentImage</font></span>,<br /></font></div><div style="font-style: normal; font-weight: normal; margin-bottom: 0pt; margin-left: 36pt; margin-right: 0pt; margin-top: 6pt; text-align: left; text-decoration: none; text-indent: -12pt; text-transform: none; vertical-align: baseline"><font color="#000000"> <span style="font-style: normal; font-weight: normal; text-decoration: none; text-transform: none; vertical-align: baseline"><font color="#000000">initExtentsVariables()</font></span> initializes z-slice and time-slice positions.<br /></font></div><div style="font-style: normal; font-weight: normal; margin-bottom: 0pt; margin-left: 18pt; margin-right: 0pt; margin-top: 6pt; text-align: left; text-decoration: none; text-indent: -18pt; text-transform: none; vertical-align: baseline"><font color="#000000"> 5 To add toolbars and menus to your plug-in, within <span style="font-style: normal; font-weight: normal; text-decoration: none; text-transform: none; vertical-align: baseline"><font color="#000000">init()</font></span>,<span style="font-style: normal; font-weight: normal; text-decoration: none; text-transform: none; vertical-align: baseline"><font color="#000000"> </font></span>create a <span style="font-style: normal; font-weight: normal; text-decoration: none; text-transform: none; vertical-align: baseline"><font color="#000000">ViewControlsImage</font></span> object, and then<br /></font></div><div style="font-style: normal; font-weight: normal; margin-bottom: 0pt; margin-left: 36pt; margin-right: 0pt; margin-top: 6pt; text-align: left; text-decoration: none; text-indent: -12pt; text-transform: none; vertical-align: baseline"><font color="#000000"> Call <span style="font-style: normal; font-weight: normal; text-decoration: none; text-transform: none; vertical-align: baseline"><font color="#000000">buildToolBar() </font></span>to create pre-defined toolbars for image, VOI, paint, and scripting controls; <br /></font></div><div style="font-style: normal; font-weight: normal; margin-bottom: 0pt; margin-left: 36pt; margin-right: 0pt; margin-top: 6pt; text-align: left; text-decoration: none; text-indent: -12pt; text-transform: none; vertical-align: baseline"><font color="#000000"> Or call <span style="font-style: normal; font-weight: normal; text-decoration: none; text-transform: none; vertical-align: baseline"><font color="#000000">buildSimpleToolBar</font></span> and pass <span style="font-style: normal; font-weight: normal; text-decoration: none; text-transform: none; vertical-align: baseline"><font color="#000000">Vector<CustomUIBuilder.UIParams></font></span> using <span style="font-style: normal; font-weight: normal; text-decoration: none; text-transform: none; vertical-align: baseline"><font color="#000000">addCustomToolBar()</font></span> for each of the Vectors.<br /></font></div>
| | === Generating contour VOI graphs === |
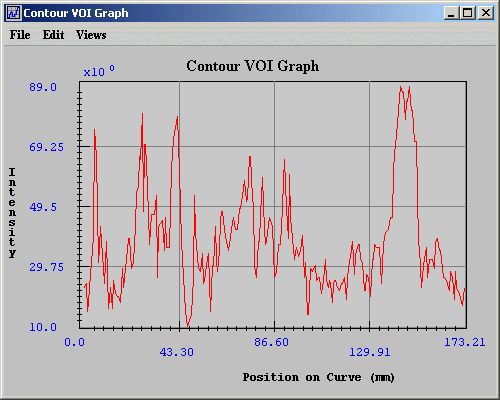
| | Contour VOI graphs display the intensity values of the selected contour's boundary in the Contour VOI Graph window (Figure 10). You can generate either 2D or 3D contour VOI graphs. <br /> |
|
| |
|
| Pre-defined button and menu parameters are located in <span style="font-style: normal; font-weight: normal; text-decoration: none; text-transform: none; vertical-align: baseline"><font color="#000000">CustomUIBuilder</font></span>. Pre-defined as well as the user-defined <span style="font-style: normal; font-weight: normal; text-decoration: none; text-transform: none; vertical-align: baseline"><font color="#000000">UIParams</font></span> can be added and used in both toolbars and menus.
| | '''To generate 2D contour VOI graphs'''<br /> |
| | 1 Open an image.<br /> |
| | 2 Delineate a 2D VOI on the image using one of the 2D icons in the MIPAV window.<br /> |
|
| |
|
| <div style="font-style: normal; font-weight: normal; margin-bottom: 0pt; margin-left: 18pt; margin-right: 0pt; margin-top: 6pt; text-align: left; text-decoration: none; text-indent: -18pt; text-transform: none; vertical-align: baseline"><font color="#000000"> 6 Create <span style="font-style: normal; font-weight: normal; text-decoration: none; text-transform: none; vertical-align: baseline"><font color="#000000">ViewMenuBar</font></span>. This allows you to add either pre-defined or <span style="font-style: normal; font-weight: normal; text-decoration: none; text-transform: none; vertical-align: baseline"><font color="#000000">UIParam</font></span> menus. The Vector from above (used on the custom toolbar) can be passed into the <span style="font-style: normal; font-weight: normal; text-decoration: none; text-transform: none; vertical-align: baseline"><font color="#000000">ViewMenuBar</font></span> <span style="font-style: normal; font-weight: normal; text-decoration: none; text-transform: none; vertical-align: baseline"><font color="#000000">makeCustomMenu() </font></span>function. <span style="font-style: normal; font-weight: normal; text-decoration: none; text-transform: none; vertical-align: baseline"><font color="#000000">ViewMenuBar</font></span> also has pre-defined menus for a file, help, image, look-up tables, etc.<br /></font></div><div style="font-style: normal; font-weight: normal; margin-bottom: 0pt; margin-left: 18pt; margin-right: 0pt; margin-top: 6pt; text-align: left; text-decoration: none; text-indent: -18pt; text-transform: none; vertical-align: baseline"><font color="#000000"> 7 Finally, the <span style="font-style: normal; font-weight: normal; text-decoration: none; text-transform: none; vertical-align: baseline"><font color="#000000">init()</font></span> function should handle the container for the <span style="font-style: normal; font-weight: normal; text-decoration: none; text-transform: none; vertical-align: baseline"><font color="#000000">ViewJComponentEditImage</font></span> created from <span style="font-style: normal; font-weight: normal; text-decoration: none; text-transform: none; vertical-align: baseline"><font color="#000000">initComponentImage()</font></span>. The component image should be added to a <span style="font-style: normal; font-weight: normal; text-decoration: none; text-transform: none; vertical-align: baseline"><font color="#000000">JScrollPane</font></span> to accommodate the variable size of the display.<br /></font></div><div style="font-style: normal; font-weight: normal; margin-bottom: 0pt; margin-left: 18pt; margin-right: 0pt; margin-top: 6pt; text-align: left; text-decoration: none; text-indent: -18pt; text-transform: none; vertical-align: baseline"><font color="#000000"> 8 Override the <span style="font-style: normal; font-weight: normal; text-decoration: none; text-transform: none; vertical-align: baseline"><font color="#000000">actionPerformed() </font></span>method to catch (handle) <span style="font-style: normal; font-weight: normal; text-decoration: none; text-transform: none; vertical-align: baseline"><font color="#000000">ActionEvents</font></span>. If a custom toolbar and (or) menu bar was created using a Vector of <span style="font-style: normal; font-weight: normal; text-decoration: none; text-transform: none; vertical-align: baseline"><font color="#000000">UIParams</font></span>, the <span style="font-style: normal; font-weight: normal; text-decoration: none; text-transform: none; vertical-align: baseline"><font color="#000000">UIParam</font></span> contains the action event for each button and (or) menu item.<br /></font></div><div style="font-style: normal; font-weight: normal; margin-bottom: 0pt; margin-left: 18pt; margin-right: 0pt; margin-top: 6pt; text-align: left; text-decoration: none; text-indent: -18pt; text-transform: none; vertical-align: baseline"><font color="#000000"> 9 Override the <span style="font-style: normal; font-weight: normal; text-decoration: none; text-transform: none; vertical-align: baseline"><font color="#000000">componentResized()</font></span> method to properly handle (or ignore) the resizing of the plug-in frame. Using the <span style="font-style: normal; font-weight: normal; text-decoration: none; text-transform: none; vertical-align: baseline"><font color="#000000">ViewJFrameImage</font></span> <span style="font-style: normal; font-weight: normal; text-decoration: none; text-transform: none; vertical-align: baseline"><font color="#000000">componentResized</font></span> function would likely create unwanted behavior as the layout of the plug-in is different from MIPAV's standard <span style="font-style: normal; font-weight: normal; text-decoration: none; text-transform: none; vertical-align: baseline"><font color="#000000">ViewJFrameImage</font></span>.<br /></font></div><div style="font-style: normal; font-weight: normal; margin-bottom: 0pt; margin-left: 18pt; margin-right: 0pt; margin-top: 6pt; text-align: left; text-decoration: none; text-indent: -18pt; text-transform: none; vertical-align: baseline"><font color="#000000"> 10 Create a basic <span style="font-style: normal; font-weight: normal; text-decoration: none; text-transform: none; vertical-align: baseline"><font color="#000000">PlugInGeneric</font></span> class that will be called as a command-line argument. This class should have the ability to choose/open a <span style="font-style: normal; font-weight: normal; text-decoration: none; text-transform: none; vertical-align: baseline"><font color="#000000">ModelImage</font></span> using the <span style="font-style: normal; font-weight: normal; text-decoration: none; text-transform: none; vertical-align: baseline"><font color="#000000">FileIO.readImage()</font></span> method. The self-contained plug-in frame should be instantiated within this class by passing in the <span style="font-style: normal; font-weight: normal; text-decoration: none; text-transform: none; vertical-align: baseline"><font color="#000000">ModelImage</font></span>. <br /></font></div><div style="font-style: normal; font-weight: normal; margin-bottom: 0pt; margin-left: 18pt; margin-right: 0pt; margin-top: 6pt; text-align: left; text-decoration: none; text-indent: -18pt; text-transform: none; vertical-align: baseline"><font color="#000000"> 11 When running MIPAV, pass in the arguments <br /></font></div><div style="font-style: normal; font-weight: normal; margin-bottom: 0pt; margin-left: 0pt; margin-right: 0pt; margin-top: 0pt; text-align: left; text-decoration: none; text-indent: 0pt; text-transform: none; vertical-align: baseline"><font color="#000000"> <span style="font-style: normal; font-weight: normal; text-decoration: none; text-transform: none; vertical-align: baseline"><font color="#000000">-hide</font></span> <span style="font-style: normal; font-weight: normal; text-decoration: none; text-transform: none; vertical-align: baseline"><font color="#000000">-p [YourGenericPlugin]</font></span>. The <span style="font-style: normal; font-weight: normal; text-decoration: none; text-transform: none; vertical-align: baseline"><font color="#000000">-hide</font></span> flag tells MIPAV not to bring up the User Interface and <span style="font-style: normal; font-weight: normal; text-decoration: none; text-transform: none; vertical-align: baseline"><font color="#000000">MessageFrame</font></span>, while the <span style="font-style: normal; font-weight: normal; text-decoration: none; text-transform: none; vertical-align: baseline"><font color="#000000">-p</font></span> flag tells which plug-in to run. See Figure 17.<br /></font></div><div style="font-style: normal; font-weight: normal; margin-bottom: 0pt; margin-left: 0pt; margin-right: 0pt; margin-top: 0pt; text-align: left; text-decoration: none; text-indent: 0pt; text-transform: none; vertical-align: baseline"><font color="#000000">
| |
|
| |
|
| {| border="1" cellpadding="5" | | {| border="1" cellpadding="5" |
| |+ <div style="font-style: normal; margin-bottom: 3pt; margin-left: 0pt; margin-right: 0pt; margin-top: 9pt; text-align: left; text-decoration: none; text-indent: 0pt; text-transform: none; vertical-align: baseline">'''<font color="#000000"> Figure 17. The arguments for running the self-contained plug-in frame.<br /></font>'''</div> | | |+ '''Figure 10. Contour VOI Graph window ''' |
| | |- |
| | | rowspan="1" colspan="3" | |
| | [[Image:windowContourVOIGraph.jpg]] |
| | |- |
| | | rowspan="4" colspan="1" | |
| | <div class="CellBody"><span style="font-style: normal; text-decoration: none; text-transform: none; vertical-align: baseline">'''<font color="#000000">File</font>'''</span></div> |
| | | rowspan="1" colspan="2" | |
| | <div class="CellBody"><span style="font-style: normal; text-decoration: none; text-transform: none; vertical-align: baseline">'''<font color="#000000">Open Graph</font>'''</span>-Opens a PLT file that contains graph data. When you select this command or press Ctrl O on the keyboard, the Open Graph Data dialog box appears. </div> |
| | |- |
| | | rowspan="1" colspan="2" | |
| | <div class="CellBody"><span style="font-style: normal; text-decoration: none; text-transform: none; vertical-align: baseline">'''<font color="#000000">Save Graph</font>'''</span>-Saves the graph data in a PLT file. When you select this command or when you press Ctrl S on the keyboard, the Save dialog box opens.</div> |
| | |- |
| | | rowspan="1" colspan="2" | |
| | <div class="CellBody"><span style="font-style: normal; text-decoration: none; text-transform: none; vertical-align: baseline">'''<font color="#000000">Print Graph</font>'''</span>-Allows you to print the graph. When you select this command or press <br />Ctrl P, the Print dialog box opens.</div> |
| | |- |
| | | rowspan="1" colspan="2" | |
| | <div class="CellBody"><span style="font-style: normal; text-decoration: none; text-transform: none; vertical-align: baseline">'''<font color="#000000">Close Graph</font>'''</span>-Closes the Intensity Graph window. To close the window, you can also press Ctrl X on the keyboard.</div> |
| | |- |
| | | rowspan="3" colspan="1" | |
| | <div class="CellBody"><span style="font-style: normal; text-decoration: none; text-transform: none; vertical-align: baseline">'''<font color="#000000">Edit</font>'''</span></div> |
| | | rowspan="1" colspan="2" | |
| | <div class="CellBody"><span style="font-style: normal; text-decoration: none; text-transform: none; vertical-align: baseline">'''<font color="#000000">Delete Function</font>'''</span>-Allows you to delete a specific function. However, you cannot delete a function if it is the only function displayed in the window.</div> |
| | |- |
| | | rowspan="1" colspan="2" | |
| | <div class="CellBody"><span style="font-style: normal; text-decoration: none; text-transform: none; vertical-align: baseline">'''<font color="#000000">Copy Function</font>'''</span>-Copies a function that is currently displayed in the window.</div> |
| | |- |
| | | rowspan="1" colspan="2" | |
| | <div class="CellBody"><span style="font-style: normal; text-decoration: none; text-transform: none; vertical-align: baseline">'''<font color="#000000">Paste Function</font>'''</span>-Pastes a previously copied function into the window. The pasted function has a different color than the first function displayed in the window.</div> |
| | |- |
| | | rowspan="3" colspan="1" | |
| | <div class="CellBody"><span style="font-style: normal; text-decoration: none; text-transform: none; vertical-align: baseline">'''<font color="#000000">Views</font>'''</span></div> |
| | | rowspan="1" colspan="2" | |
| | <div class="CellBody"><span style="font-style: normal; text-decoration: none; text-transform: none; vertical-align: baseline">'''<font color="#000000">Modify Graph Features</font>'''</span>-Allows you to customize the appearance of the graph.</div> |
| | |- |
| | | rowspan="1" colspan="2" | |
| | <div class="CellBody"><span style="font-style: normal; text-decoration: none; text-transform: none; vertical-align: baseline">'''<font color="#000000">Reset Range to Default</font>'''</span>-<span style="font-style: normal; text-decoration: none; text-transform: none; vertical-align: baseline">'''<font color="#000000">[TBD]</font>'''</span></div> |
| | |- |
| | | rowspan="1" colspan="2" | |
| | <div class="CellBody"><span style="font-style: normal; text-decoration: none; text-transform: none; vertical-align: baseline">'''<font color="#000000">Reset Graph to Original</font>'''</span>-<span style="font-style: normal; text-decoration: none; text-transform: none; vertical-align: baseline">'''<font color="#000000">[TBD]</font>'''</span>. </div> |
| |- | | |- |
| | | | | |
| [[Image:MIPAV_SimpleImageFramePlugInRun.jpg]]
| | <div class="CellBody"><span style="font-style: normal; text-decoration: none; text-transform: none; vertical-align: baseline">'''<font color="#000000">Help</font>'''</span></div> |
| | | rowspan="1" colspan="2" | |
| | <div class="CellBody"><span style="font-style: normal; text-decoration: none; text-transform: none; vertical-align: baseline">'''<font color="#000000">Help Topics</font>'''</span>-Displays online help topics.</div> |
| |} | | |} |
|
| |
|
| | <br /> |
| | 3 Select the VOI. <br /> |
| | As an option, copy the VOI to other slices in the dataset by selecting VOI > Propagate and one of the following commands:<br /> |
| | *To Next Slice<br /> |
| | *To Previous Slice<br /> |
| | *To All Slices<br /> |
| | 4 Do one of the following:<br /> |
| | *Select VOI > Graph > Boundary Intensity in the MIPAV window. <br /> |
| | *Right click on the VOI and then select Graph > Boundary Intensity.<br /> |
| | *The Contour VOI Graph window (Figure 10) opens.<br /> |
|
| |
|
| ===== Optional: =====
| | '''To generate 3D contour VOI graphs'''<br /> |
| | 1 Open an image.<br /> |
| | 2 Delineate a VOI on the image using the 3D rectangular VOI icon, in the MIPAV window. <br /> |
| | 3 Select the VOI. <br /> |
| | As an option, copy the VOI to other slices in the dataset by selecting VOI > Propagate and one of the following commands:<br /> |
| | *To Next Slice<br /> |
| | *To Previous Slice<br /> |
| | *To All Slices<br /> |
| | 4 Do one of the following:<br /> |
| | *Select VOI > Graph > Boundary Intensity in the MIPAV window.<br /> |
| | *Right-click on the VOI and then select Graph > Boundary Intensity. <br /> |
| | The Contour VOI Graph window (Figure 10) opens. This window displays a graph of the intensity values of the selected contour's boundary. <br /> |
|
| |
|
| The<span style="font-style: normal; font-weight: normal; text-decoration: none; text-transform: none; vertical-align: baseline"><font color="#000000"> ViewJFrameMessage</font></span> Data and Debug tabs (as well as others) can be added to the plug-in frame by retrieving the <span style="font-style: normal; font-weight: normal; text-decoration: none; text-transform: none; vertical-align: baseline"><font color="#000000">JTabbedPane</font></span> through <span style="font-style: normal; font-weight: normal; text-decoration: none; text-transform: none; vertical-align: baseline"><font color="#000000">ViewUserInterface.getReference().getMessageFrame().getTabbedPane()</font></span>. This enables the Data and Debug message output to be displayed outside of the separate message frame that accompanies MIPAV.
| | === Generating intensity graphs === |
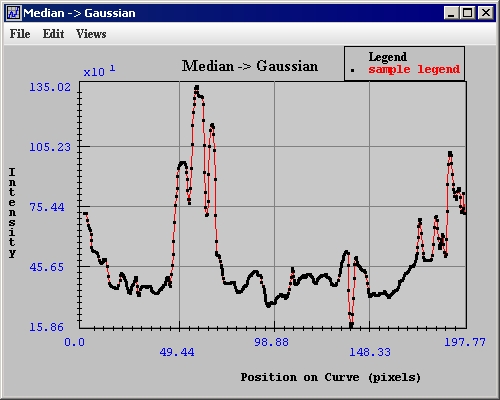
| | Intensity profiles, or graphs, present information on the intensity values of the VOI region in an image. The intensity graph appears in the Intensity Graph window (Figure 11).<br /> |
|
| |
|
| See also: Figure 18 and Figure 19.
| | '''To generate 2D intensity graphs'''<br /> |
| | | 1 Open an image.<br /> |
| <div style="font-style: normal; font-weight: normal; margin-bottom: 0pt; margin-left: 0pt; margin-right: 0pt; margin-top: 0pt; text-align: left; text-decoration: none; text-indent: 0pt; text-transform: none; vertical-align: baseline"><font color="#000000"> | | 2 Delineate a 2D VOI on the image using one of the 2D icons in the MIPAV window.<br />< |
| | 3 Select the VOI. <br /> |
| | As an option, copy the VOI to other slices in the dataset by selecting VOI > Propagate and one of the following commands:<br /> |
| | *To Next Slice<br /> |
| | *To Previous Slice<br /> |
| | *To All Slices<br /> |
| | 4 Do one of the following:<br /> |
| | Select VOI > Graph in the MIPAV window and either of the following:<br /> |
| | * ''2.5D Total Intensity'' -To generate a graph of the sum of the intensity values of the VOI region. <br /> |
| | * ''2.5D Average Intensity'' -To generate a graph of the average of the intensity values of the VOI region.<br /> |
| | Right-click on the VOI and then select Graph and one of the following commands:<br /> |
| | * ''2.5D Total Intensity'' -To generate a graph of the sum of the intensity values of the area delineated by the VOI per slice.<br /> |
| | * ''2.5D Average Intensity'' -To generate a graph of the average of the intensity values of the VOI region.<br /> |
| | * ''2.5D Total Intensity with Threshold'' -TBD. <br /> |
| | * ''2.5D Average Intensity with Threshold'' -TBD.<br /> |
| | The Intensity Graph window (Figure 11) opens. |
|
| |
|
| {| border="1" cellpadding="5" | | {| border="1" cellpadding="5" |
| |+ <div style="font-style: normal; margin-bottom: 3pt; margin-left: 0pt; margin-right: 0pt; margin-top: 9pt; text-align: left; text-decoration: none; text-indent: 0pt; text-transform: none; vertical-align: baseline">'''<font color="#000000"> Figure 18. A part of the code for PlugInDialogImageVOIDisplay.java. The full code can be found in "Examples of MIPAV plug-ins", Figure 28.<br /></font>'''</div> | | |+ '''Figure 11. Intensity Graph window ''' |
| | |- |
| | | |
| | <div class="CellBody"><span style="font-style: normal; text-decoration: none; text-transform: none; vertical-align: baseline">'''<font color="#000000">File</font>'''</span></div> |
| | | |
| | <div class="CellBody"><span style="font-style: normal; text-decoration: none; text-transform: none; vertical-align: baseline">'''<font color="#000000">Open Graph</font>'''</span>-Opens a PLT file that contains graph data.</div> <div class="CellBody">When you select this command or press Ctrl O on the keyboard, the Open Graph Data dialog box appears. </div> |
| | | rowspan="2" colspan="1" | |
| | [[Image:VOIGRaphMOdifyPointsVis.jpg]] |
| |- | | |- |
| | | | | |
| PlugInDialogImageVOIDisplay.java
| | <div class="CellBody"> </div> |
| | | | |
| <div style="font-style: normal; font-weight: normal; margin-bottom: 0pt; margin-left: 30pt; margin-right: 0pt; margin-top: 0pt; text-align: left; text-decoration: none; text-indent: -30pt; text-transform: none; vertical-align: baseline"><font color="#000000"> 1 <span style="font-style: normal; font-weight: normal; text-decoration: none; text-transform: none; vertical-align: baseline"><font color="#000000">import java.awt.*;</font></span><br /></font></div><div style="font-style: normal; font-weight: normal; margin-bottom: 0pt; margin-left: 30pt; margin-right: 0pt; margin-top: 0pt; text-align: left; text-decoration: none; text-indent: -30pt; text-transform: none; vertical-align: baseline"><font color="#000000"> 2 <span style="font-style: normal; font-weight: normal; text-decoration: none; text-transform: none; vertical-align: baseline"><font color="#000000">import java.awt.event.*;</font></span><br /></font></div><div style="font-style: normal; font-weight: normal; margin-bottom: 0pt; margin-left: 30pt; margin-right: 0pt; margin-top: 0pt; text-align: left; text-decoration: none; text-indent: -30pt; text-transform: none; vertical-align: baseline"><font color="#000000"> 3 <span style="font-style: normal; font-weight: normal; text-decoration: none; text-transform: none; vertical-align: baseline"><font color="#000000">import java.util.Vector;</font></span><br /></font></div><div style="font-style: normal; font-weight: normal; margin-bottom: 0pt; margin-left: 30pt; margin-right: 0pt; margin-top: 0pt; text-align: left; text-decoration: none; text-indent: -30pt; text-transform: none; vertical-align: baseline"><font color="#000000"> 4 <br /></font></div><div style="font-style: normal; font-weight: normal; margin-bottom: 0pt; margin-left: 30pt; margin-right: 0pt; margin-top: 0pt; text-align: left; text-decoration: none; text-indent: -30pt; text-transform: none; vertical-align: baseline"><font color="#000000"> 5 <span style="font-style: normal; font-weight: normal; text-decoration: none; text-transform: none; vertical-align: baseline"><font color="#000000">import javax.swing.*;</font></span><br /></font></div><div style="font-style: normal; font-weight: normal; margin-bottom: 0pt; margin-left: 30pt; margin-right: 0pt; margin-top: 0pt; text-align: left; text-decoration: none; text-indent: -30pt; text-transform: none; vertical-align: baseline"><font color="#000000"> 6 <span style="font-style: normal; font-weight: normal; text-decoration: none; text-transform: none; vertical-align: baseline"><font color="#000000">import gov.nih.mipav.model.file.FileInfoBase;</font></span><br /></font></div><div style="font-style: normal; font-weight: normal; margin-bottom: 0pt; margin-left: 30pt; margin-right: 0pt; margin-top: 0pt; text-align: left; text-decoration: none; text-indent: -30pt; text-transform: none; vertical-align: baseline"><font color="#000000"> 7 <span style="font-style: normal; font-weight: normal; text-decoration: none; text-transform: none; vertical-align: baseline"><font color="#000000">import gov.nih.mipav.model.structures.ModelImage;</font></span><br /></font></div><div style="font-style: normal; font-weight: normal; margin-bottom: 0pt; margin-left: 30pt; margin-right: 0pt; margin-top: 0pt; text-align: left; text-decoration: none; text-indent: -30pt; text-transform: none; vertical-align: baseline"><font color="#000000"> 8 <span style="font-style: normal; font-weight: normal; text-decoration: none; text-transform: none; vertical-align: baseline"><font color="#000000">import gov.nih.mipav.model.structures.ModelLUT;</font></span><br /></font></div><div style="font-style: normal; font-weight: normal; margin-bottom: 0pt; margin-left: 30pt; margin-right: 0pt; margin-top: 0pt; text-align: left; text-decoration: none; text-indent: -30pt; text-transform: none; vertical-align: baseline"><font color="#000000"> 9 <span style="font-style: normal; font-weight: normal; text-decoration: none; text-transform: none; vertical-align: baseline"><font color="#000000">import gov.nih.mipav.model.structures.ModelRGB;</font></span><br /></font></div><div style="font-style: normal; font-weight: normal; margin-bottom: 0pt; margin-left: 30pt; margin-right: 0pt; margin-top: 0pt; text-align: left; text-decoration: none; text-indent: -30pt; text-transform: none; vertical-align: baseline"><font color="#000000"> 10 <span style="font-style: normal; font-weight: normal; text-decoration: none; text-transform: none; vertical-align: baseline"><font color="#000000">import gov.nih.mipav.model.structures.VOI;</font></span><br /></font></div><div style="font-style: normal; font-weight: normal; margin-bottom: 0pt; margin-left: 30pt; margin-right: 0pt; margin-top: 0pt; text-align: left; text-decoration: none; text-indent: -30pt; text-transform: none; vertical-align: baseline"><font color="#000000"> 11 <span style="font-style: normal; font-weight: normal; text-decoration: none; text-transform: none; vertical-align: baseline"><font color="#000000">import gov.nih.mipav.view.*;</font></span><br /></font></div><div style="font-style: normal; font-weight: normal; margin-bottom: 0pt; margin-left: 30pt; margin-right: 0pt; margin-top: 0pt; text-align: left; text-decoration: none; text-indent: -30pt; text-transform: none; vertical-align: baseline"><font color="#000000"> 12 <span style="font-style: normal; font-weight: normal; text-decoration: none; text-transform: none; vertical-align: baseline"><font color="#000000">import gov.nih.mipav.view.dialogs.*;</font></span><br /></font></div><div style="font-style: normal; font-weight: normal; margin-bottom: 0pt; margin-left: 30pt; margin-right: 0pt; margin-top: 0pt; text-align: left; text-decoration: none; text-indent: -30pt; text-transform: none; vertical-align: baseline"><font color="#000000"> 13 <br /></font></div><div style="font-style: normal; font-weight: normal; margin-bottom: 0pt; margin-left: 30pt; margin-right: 0pt; margin-top: 0pt; text-align: left; text-decoration: none; text-indent: -30pt; text-transform: none; vertical-align: baseline"><font color="#000000"> 14 <br /></font></div><div style="font-style: normal; font-weight: normal; margin-bottom: 0pt; margin-left: 30pt; margin-right: 0pt; margin-top: 0pt; text-align: left; text-decoration: none; text-indent: -30pt; text-transform: none; vertical-align: baseline"><font color="#000000"> 15 <span style="font-style: normal; font-weight: normal; text-decoration: none; text-transform: none; vertical-align: baseline"><font color="#000000">/**</font></span><br /></font></div><div style="font-style: normal; font-weight: normal; margin-bottom: 0pt; margin-left: 30pt; margin-right: 0pt; margin-top: 0pt; text-align: left; text-decoration: none; text-indent: -30pt; text-transform: none; vertical-align: baseline"><font color="#000000"> 16 <span style="font-style: normal; font-weight: normal; text-decoration: none; text-transform: none; vertical-align: baseline"><font color="#000000"> * Plugin example class for creating a simple, self-contained frame that extends ViewJFrame Image</font></span><br /></font></div><div style="font-style: normal; font-weight: normal; margin-bottom: 0pt; margin-left: 30pt; margin-right: 0pt; margin-top: 0pt; text-align: left; text-decoration: none; text-indent: -30pt; text-transform: none; vertical-align: baseline"><font color="#000000"> 17 <span style="font-style: normal; font-weight: normal; text-decoration: none; text-transform: none; vertical-align: baseline"><font color="#000000"> * Contains a subset of the VOI functions, as well as the message frame contained within the frame itself</font></span><br /></font></div><div style="font-style: normal; font-weight: normal; margin-bottom: 0pt; margin-left: 30pt; margin-right: 0pt; margin-top: 0pt; text-align: left; text-decoration: none; text-indent: -30pt; text-transform: none; vertical-align: baseline"><font color="#000000"> 18 <span style="font-style: normal; font-weight: normal; text-decoration: none; text-transform: none; vertical-align: baseline"><font color="#000000"> * @author linkb</font></span><br /></font></div><div style="font-style: normal; font-weight: normal; margin-bottom: 0pt; margin-left: 30pt; margin-right: 0pt; margin-top: 0pt; text-align: left; text-decoration: none; text-indent: -30pt; text-transform: none; vertical-align: baseline"><font color="#000000"> 19 <span style="font-style: normal; font-weight: normal; text-decoration: none; text-transform: none; vertical-align: baseline"><font color="#000000"> *</font></span><br /></font></div><div style="font-style: normal; font-weight: normal; margin-bottom: 0pt; margin-left: 30pt; margin-right: 0pt; margin-top: 0pt; text-align: left; text-decoration: none; text-indent: -30pt; text-transform: none; vertical-align: baseline"><font color="#000000"> 20 <span style="font-style: normal; font-weight: normal; text-decoration: none; text-transform: none; vertical-align: baseline"><font color="#000000"> */</font></span><br /></font></div><div style="font-style: normal; font-weight: normal; margin-bottom: 0pt; margin-left: 30pt; margin-right: 0pt; margin-top: 0pt; text-align: left; text-decoration: none; text-indent: -30pt; text-transform: none; vertical-align: baseline"><font color="#000000"> 21 <span style="font-style: normal; font-weight: normal; text-decoration: none; text-transform: none; vertical-align: baseline"><font color="#000000">public class PlugInDialogImageVOIDisplay extends ViewJFrameImage implements MouseListener, AdjustmentListener {</font></span><br /></font></div><div style="font-style: normal; font-weight: normal; margin-bottom: 0pt; margin-left: 30pt; margin-right: 0pt; margin-top: 0pt; text-align: left; text-decoration: none; text-indent: -30pt; text-transform: none; vertical-align: baseline"><font color="#000000"> 22 <br /></font></div><div style="font-style: normal; font-weight: normal; margin-bottom: 0pt; margin-left: 30pt; margin-right: 0pt; margin-top: 0pt; text-align: left; text-decoration: none; text-indent: -30pt; text-transform: none; vertical-align: baseline"><font color="#000000"> 23 <span style="font-style: normal; font-weight: normal; text-decoration: none; text-transform: none; vertical-align: baseline"><font color="#000000"> </font></span><br /></font></div><div style="font-style: normal; font-weight: normal; margin-bottom: 0pt; margin-left: 30pt; margin-right: 0pt; margin-top: 0pt; text-align: left; text-decoration: none; text-indent: -30pt; text-transform: none; vertical-align: baseline"><font color="#000000"> 24 <span style="font-style: normal; font-weight: normal; text-decoration: none; text-transform: none; vertical-align: baseline"><font color="#000000"> </font></span><br /></font></div><div style="font-style: normal; font-weight: normal; margin-bottom: 0pt; margin-left: 30pt; margin-right: 0pt; margin-top: 0pt; text-align: left; text-decoration: none; text-indent: -30pt; text-transform: none; vertical-align: baseline"><font color="#000000"> 25 <span style="font-style: normal; font-weight: normal; text-decoration: none; text-transform: none; vertical-align: baseline"><font color="#000000"> </font></span> //~ Constructors ---------------------------------------------------------------------------------------------------<br /></font></div><div style="font-style: normal; font-weight: normal; margin-bottom: 0pt; margin-left: 30pt; margin-right: 0pt; margin-top: 0pt; text-align: left; text-decoration: none; text-indent: -30pt; text-transform: none; vertical-align: baseline"><font color="#000000"> 26 <br /></font></div><div style="font-style: normal; font-weight: normal; margin-bottom: 0pt; margin-left: 30pt; margin-right: 0pt; margin-top: 0pt; text-align: left; text-decoration: none; text-indent: -30pt; text-transform: none; vertical-align: baseline"><font color="#000000"> 27 <span style="font-style: normal; font-weight: normal; text-decoration: none; text-transform: none; vertical-align: baseline"><font color="#00007c">/**</font></span><br /></font></div><div style="font-style: normal; font-weight: normal; margin-bottom: 0pt; margin-left: 30pt; margin-right: 0pt; margin-top: 0pt; text-align: left; text-decoration: none; text-indent: -30pt; text-transform: none; vertical-align: baseline"><font color="#000000"> 28 <span style="font-style: normal; font-weight: normal; text-decoration: none; text-transform: none; vertical-align: baseline"><font color="#00007c"><nowiki>*</nowiki></font></span> <span style="font-style: normal; font-weight: normal; text-decoration: none; text-transform: none; vertical-align: baseline"><font color="#00007c">Default</font></span> <span style="font-style: normal; font-weight: normal; text-decoration: none; text-transform: none; vertical-align: baseline"><font color="#00007c">constructor</font></span><br /></font></div><div style="font-style: normal; font-weight: normal; margin-bottom: 0pt; margin-left: 30pt; margin-right: 0pt; margin-top: 0pt; text-align: left; text-decoration: none; text-indent: -30pt; text-transform: none; vertical-align: baseline"><font color="#000000"> 29 <span style="font-style: normal; font-weight: normal; text-decoration: none; text-transform: none; vertical-align: baseline"><font color="#00007c"><nowiki>*/</nowiki></font></span><br /></font></div><div style="font-style: normal; font-weight: normal; margin-bottom: 0pt; margin-left: 30pt; margin-right: 0pt; margin-top: 0pt; text-align: left; text-decoration: none; text-indent: -30pt; text-transform: none; vertical-align: baseline"><font color="#000000"> 30 <span style="font-style: normal; text-decoration: none; text-transform: none; vertical-align: baseline">'''<font color="#7c9ebc">public</font>'''</span> PlugInDialogImageVOIDisplay(ModelImage image) {<br /></font></div><div style="font-style: normal; font-weight: normal; margin-bottom: 0pt; margin-left: 30pt; margin-right: 0pt; margin-top: 0pt; text-align: left; text-decoration: none; text-indent: -30pt; text-transform: none; vertical-align: baseline"><font color="#000000"> 31 <span style="font-style: normal; text-decoration: none; text-transform: none; vertical-align: baseline">'''<font color="#7c9ebc">super</font>'''</span>(image, <span style="font-style: normal; text-decoration: none; text-transform: none; vertical-align: baseline">'''<font color="#7c9ebc">null</font>'''</span>, <span style="font-style: normal; text-decoration: none; text-transform: none; vertical-align: baseline">'''<font color="#7c9ebc">null</font>'''</span>, <span style="font-style: normal; text-decoration: none; text-transform: none; vertical-align: baseline">'''<font color="#7c9ebc">false</font>'''</span>, <span style="font-style: normal; text-decoration: none; text-transform: none; vertical-align: baseline">'''<font color="#7c9ebc">false</font>'''</span>);<br /></font></div><div style="font-style: normal; font-weight: normal; margin-bottom: 0pt; margin-left: 30pt; margin-right: 0pt; margin-top: 0pt; text-align: left; text-decoration: none; text-indent: -30pt; text-transform: none; vertical-align: baseline"><font color="#000000"> 32 init();<br /></font></div><div style="font-style: normal; font-weight: normal; margin-bottom: 0pt; margin-left: 30pt; margin-right: 0pt; margin-top: 0pt; text-align: left; text-decoration: none; text-indent: -30pt; text-transform: none; vertical-align: baseline"><font color="#000000"> 33 }<br /></font></div><div style="font-style: normal; font-weight: normal; margin-bottom: 0pt; margin-left: 30pt; margin-right: 0pt; margin-top: 0pt; text-align: left; text-decoration: none; text-indent: -30pt; text-transform: none; vertical-align: baseline"><font color="#000000"> 34 <br /></font></div><div style="font-style: normal; font-weight: normal; margin-bottom: 0pt; margin-left: 30pt; margin-right: 0pt; margin-top: 0pt; text-align: left; text-decoration: none; text-indent: -30pt; text-transform: none; vertical-align: baseline"><font color="#000000"> 35 <br /></font></div><div style="font-style: normal; font-weight: normal; margin-bottom: 0pt; margin-left: 30pt; margin-right: 0pt; margin-top: 0pt; text-align: left; text-decoration: none; text-indent: -30pt; text-transform: none; vertical-align: baseline"><font color="#000000"> 36 <span style="font-style: normal; font-weight: normal; text-decoration: none; text-transform: none; vertical-align: baseline"><font color="#00007c">/**</font></span><br /></font></div><div style="font-style: normal; font-weight: normal; margin-bottom: 0pt; margin-left: 30pt; margin-right: 0pt; margin-top: 0pt; text-align: left; text-decoration: none; text-indent: -30pt; text-transform: none; vertical-align: baseline"><font color="#000000"> 37 <span style="font-style: normal; font-weight: normal; text-decoration: none; text-transform: none; vertical-align: baseline"><font color="#00007c"><nowiki>*</nowiki></font></span> <span style="font-style: normal; font-weight: normal; text-decoration: none; text-transform: none; vertical-align: baseline"><font color="#00007c">ViewOpenFrameInterface</font></span> <span style="font-style: normal; font-weight: normal; text-decoration: none; text-transform: none; vertical-align: baseline"><font color="#00007c">function</font></span> <span style="font-style: normal; font-weight: normal; text-decoration: none; text-transform: none; vertical-align: baseline"><font color="#00007c">for</font></span> <span style="font-style: normal; font-weight: normal; text-decoration: none; text-transform: none; vertical-align: baseline"><font color="#00007c">opening</font></span> <span style="font-style: normal; font-weight: normal; text-decoration: none; text-transform: none; vertical-align: baseline"><font color="#00007c">a</font></span> <span style="font-style: normal; font-weight: normal; text-decoration: none; text-transform: none; vertical-align: baseline"><font color="#00007c">model</font></span> <span style="font-style: normal; font-weight: normal; text-decoration: none; text-transform: none; vertical-align: baseline"><font color="#00007c">image</font></span> <span style="font-style: normal; font-weight: normal; text-decoration: none; text-transform: none; vertical-align: baseline"><font color="#00007c">(result)</font></span> <span style="font-style: normal; font-weight: normal; text-decoration: none; text-transform: none; vertical-align: baseline"><font color="#00007c">into</font></span> <span style="font-style: normal; font-weight: normal; text-decoration: none; text-transform: none; vertical-align: baseline"><font color="#00007c">a</font></span> <span style="font-style: normal; font-weight: normal; text-decoration: none; text-transform: none; vertical-align: baseline"><font color="#00007c">new</font></span> <span style="font-style: normal; font-weight: normal; text-decoration: none; text-transform: none; vertical-align: baseline"><font color="#00007c">frame</font></span><br /></font></div><div style="font-style: normal; font-weight: normal; margin-bottom: 0pt; margin-left: 30pt; margin-right: 0pt; margin-top: 0pt; text-align: left; text-decoration: none; text-indent: -30pt; text-transform: none; vertical-align: baseline"><font color="#000000"> 38 <span style="font-style: normal; font-weight: normal; text-decoration: none; text-transform: none; vertical-align: baseline"><font color="#00007c"><nowiki>*/</nowiki></font></span><br /></font></div><div style="font-style: normal; font-weight: normal; margin-bottom: 0pt; margin-left: 30pt; margin-right: 0pt; margin-top: 0pt; text-align: left; text-decoration: none; text-indent: -30pt; text-transform: none; vertical-align: baseline"><font color="#000000"> 39 <span style="font-style: normal; text-decoration: none; text-transform: none; vertical-align: baseline">'''<font color="#7c9ebc">public</font>'''</span> PlugInDialogImageVOIDisplay openFrame(ModelImage image) {<br /></font></div><div style="font-style: normal; font-weight: normal; margin-bottom: 0pt; margin-left: 30pt; margin-right: 0pt; margin-top: 0pt; text-align: left; text-decoration: none; text-indent: -30pt; text-transform: none; vertical-align: baseline"><font color="#000000"> 40 <span style="font-style: normal; text-decoration: none; text-transform: none; vertical-align: baseline">'''<font color="#7c9ebc">return</font>'''</span> <span style="font-style: normal; text-decoration: none; text-transform: none; vertical-align: baseline">'''<font color="#7c9ebc">new</font>'''</span> PlugInDialogImageVOIDisplay(image);<br /></font></div><div style="font-style: normal; font-weight: normal; margin-bottom: 0pt; margin-left: 30pt; margin-right: 0pt; margin-top: 0pt; text-align: left; text-decoration: none; text-indent: -30pt; text-transform: none; vertical-align: baseline"><font color="#000000"> 41 }<br /></font></div> | | <div class="CellBody"><span style="font-style: normal; text-decoration: none; text-transform: none; vertical-align: baseline">'''<font color="#000000">Save Graph</font>'''</span>-Saves the graph data in a PLT file. </div> <div class="CellBody">When you select this command or when you press Ctrl S on the keyboard, the Save dialog box opens.</div> |
| | |- |
| | | |
| | <div class="CellBody"> </div> |
| | | rowspan="1" colspan="2" | |
| | <div class="CellBody"><span style="font-style: normal; text-decoration: none; text-transform: none; vertical-align: baseline">'''<font color="#000000">Print Graph</font>'''</span>-Allows you to print the graph. When you select this command or press <br />Ctrl P, the Print dialog box opens.</div> |
| | |- |
| | | |
| | <div class="CellBody"> </div> |
| | | rowspan="1" colspan="2" | |
| | <div class="CellBody"><span style="font-style: normal; text-decoration: none; text-transform: none; vertical-align: baseline">'''<font color="#000000">Close Graph</font>'''</span>-Closes the Intensity Graph window. To close the window, you can also press Ctrl X on the keyboard.</div> |
| | |- |
| | | |
| | <div class="CellBody"><span style="font-style: normal; text-decoration: none; text-transform: none; vertical-align: baseline">'''<font color="#000000">Edit</font>'''</span></div> |
| | | rowspan="1" colspan="2" | |
| | <div class="CellBody"><span style="font-style: normal; text-decoration: none; text-transform: none; vertical-align: baseline">'''<font color="#000000">Delete Function</font>'''</span>-Allows you to delete the function that you select. However, you cannot delete a function if it is the only function displayed in the window.</div> |
| | |- |
| | | |
| | <div class="CellBody"> </div> |
| | | rowspan="1" colspan="2" | |
| | <div class="CellBody"><span style="font-style: normal; text-decoration: none; text-transform: none; vertical-align: baseline">'''<font color="#000000">Paste Function</font>'''</span>-Pastes a previously copied function into the window. The pasted function has a different color than the first function displayed in the window.</div> |
| | |- |
| | | |
| | <div class="CellBody"><span style="font-style: normal; text-decoration: none; text-transform: none; vertical-align: baseline">'''<font color="#000000">Views</font>'''</span></div> |
| | | rowspan="1" colspan="2" | |
| | <div class="CellBody"><span style="font-style: normal; text-decoration: none; text-transform: none; vertical-align: baseline">'''<font color="#000000">Modify Graph Features</font>'''</span>-Allows you to customize the appearance of the graph.</div> |
| | |- |
| | | |
| | <div class="CellBody"> </div> |
| | | rowspan="1" colspan="2" | |
| | <div class="CellBody"><span style="font-style: normal; text-decoration: none; text-transform: none; vertical-align: baseline">'''<font color="#000000">Reset Range to Default</font>'''</span>-TBD.</div> |
| | |- |
| | | |
| | <div class="CellBody"> </div> |
| | | rowspan="1" colspan="2" | |
| | <div class="CellBody"><span style="font-style: normal; text-decoration: none; text-transform: none; vertical-align: baseline">'''<font color="#000000">Reset Graph to Original</font>'''</span>-TBD.</div> |
| | |- |
| | | |
| | <div class="CellBody"><span style="font-style: normal; text-decoration: none; text-transform: none; vertical-align: baseline">'''<font color="#000000">Help</font>'''</span></div> |
| | | rowspan="1" colspan="2" | |
| | <div class="CellBody"><span style="font-style: normal; text-decoration: none; text-transform: none; vertical-align: baseline">'''<font color="#000000">Help Topics</font>'''</span>-Displays online help topics.</div> |
| |} | | |} |
|
| |
|
| <br /></font></div> | | '''To generate 3D intensity graphs of all slices in a dataset at a specific point'''<br /> |
| | | 1 Open an image.<br /> |
| <div style="font-style: normal; font-weight: normal; margin-bottom: 0pt; margin-left: 0pt; margin-right: 0pt; margin-top: 0pt; text-align: left; text-decoration: none; text-indent: 0pt; text-transform: none; vertical-align: baseline"><font color="#000000"> | | 2 Draw a point VOI on the image (Figure 12).<br /> |
| | 3 Select the VOI.<br /> |
| | 4 Do one of the following:<br /> |
| | *Select the Propagate VOI to all slices icon.<br /> |
| | *Select VOI > Propagate > To All Slices. <br /> |
| | *Right-click on the VOI, then select Propagate > To All Slices (Figure 12).<br /> |
| | 5 Right-click on the VOI and select Show VOI Graph (Figure 12).<br /> |
|
| |
|
| {| border="1" cellpadding="5" | | {| border="1" cellpadding="5" |
| |+ <div style="font-style: normal; margin-bottom: 3pt; margin-left: 0pt; margin-right: 0pt; margin-top: 9pt; text-align: left; text-decoration: none; text-indent: 0pt; text-transform: none; vertical-align: baseline">'''<font color="#000000"> Figure 19. The Simple Image Frame plug-in opens the MIPAV independent image frame for a selected image. (a) The image frame contains the following elements of the interface - the VOI toolbar, image slice slider and menu bar. The Gradient Magnitude algorithm was called from the menu and applied to the image. (b) The result image opened in a new image frame.<br /></font>'''</div> | | |+ '''Figure 12. Point VOI''' |
| |- | | |- |
| | | | | |
| [[Image:MIPAV_SimpleImageFramePlugIn.jpg]] | | <div style="font-style: normal; font-weight: normal; margin-bottom: 0pt; margin-left: 0pt; margin-right: 0pt; margin-top: 0pt; text-align: left; text-decoration: none; text-indent: 0pt; text-transform: none; vertical-align: baseline"><font color="#000000"> <br /></font></div> |
| | |
| | <br clear="all" /> |
| | |
| | {| |
| | | |
| | [[Image:PointVOIPropagate.jpg]] |
| |} | | |} |
|
| |
|
| '''Next:''' [[Examples of MIPAV plug-ins]] | | '''To generate 3D intensity graphs of specific areas'''<br /> |
| == See also: ==
| | 1 Open an image.<br /> |
| *[[Understanding plug-in programs]] | | 2 Delineate a VOI on the image using the 3D rectangular VOI icon.<br /> |
| *[[Using the API documentation]] | | 3 Select the VOI. Then, do one of the following:<br /> |
| *[[Developing plug-in programs]] | | *a Select VOI > Graph and either of the following in the MIPAV window:<br /> |
| *[[Creating a self-contained plug-in frame]] | | ** ''2.5D Total Intensity'' -To generate a graph of the sum of the intensity values of the area delineated by the VOI per slice.<br /> |
| *[[Installing a plug-in]] | | ** ''2.5D Average Intensity'' -To generate a graph of the average of the intensity values of the VOI region.<br /> |
| *[[Examples of MIPAV plug-ins]]
| | *b Right-click the VOI, and then select Graph and one of the following commands in the MIPAV window:<br /> |
| **[[Plug-in CT_MD, a typical plug-in program]] | | ** ''2.5D Total Intensity'' -To generate a graph of the sum of the intensity values of the area delineated by the VOI per slice.<br /> |
| ***[[PlugInAlgorithmCT_MD.java]] | | ** ''2.5D Average Intensity'' -To generate a graph of the average of the intensity values of the VOI region.<br /> |
| ***[[Plug-in CT_MD.java]] | | ** ''2.5D Total Intensity with Threshold'' -TBD.<br /> |
| | ** ''2.5D Average Intensity with Threshold'' -TBD.<br /> |
| | The Intensity Graph window (Figure 11) opens.<br /> |
| | |
| | |
| | [[Customizing the appearance of graphs - Modify graph dialog box]] |
MIPAV allows you to generate intensity profiles, or contour VOI graphs, for VOI contours. For delineated VOIs, you can generate 2D, 3D, or 4D intensity graphs. You can also generate a 3D intensity graph at a specific point across all slices in a dataset. For information on how to contour a VOI, refer to Chapter 1, "Segmenting Images Using Contours and Masks,"
Generating contour VOI graphs
Contour VOI graphs display the intensity values of the selected contour's boundary in the Contour VOI Graph window (Figure 10). You can generate either 2D or 3D contour VOI graphs.
To generate 2D contour VOI graphs
1 Open an image.
2 Delineate a 2D VOI on the image using one of the 2D icons in the MIPAV window.
Figure 10. Contour VOI Graph window
|
|
|
File
|
Open Graph-Opens a PLT file that contains graph data. When you select this command or press Ctrl O on the keyboard, the Open Graph Data dialog box appears.
|
|
Save Graph-Saves the graph data in a PLT file. When you select this command or when you press Ctrl S on the keyboard, the Save dialog box opens.
|
|
Print Graph-Allows you to print the graph. When you select this command or press
Ctrl P, the Print dialog box opens.
|
|
Close Graph-Closes the Intensity Graph window. To close the window, you can also press Ctrl X on the keyboard.
|
|
Edit
|
Delete Function-Allows you to delete a specific function. However, you cannot delete a function if it is the only function displayed in the window.
|
|
Copy Function-Copies a function that is currently displayed in the window.
|
|
Paste Function-Pastes a previously copied function into the window. The pasted function has a different color than the first function displayed in the window.
|
|
Views
|
Modify Graph Features-Allows you to customize the appearance of the graph.
|
|
Reset Range to Default-[TBD]
|
|
Reset Graph to Original-[TBD].
|
|
Help
|
Help Topics-Displays online help topics.
|
3 Select the VOI.
As an option, copy the VOI to other slices in the dataset by selecting VOI > Propagate and one of the following commands:
- To Next Slice
- To Previous Slice
- To All Slices
4 Do one of the following:
- Select VOI > Graph > Boundary Intensity in the MIPAV window.
- Right click on the VOI and then select Graph > Boundary Intensity.
- The Contour VOI Graph window (Figure 10) opens.
To generate 3D contour VOI graphs
1 Open an image.
2 Delineate a VOI on the image using the 3D rectangular VOI icon, in the MIPAV window.
3 Select the VOI.
As an option, copy the VOI to other slices in the dataset by selecting VOI > Propagate and one of the following commands:
- To Next Slice
- To Previous Slice
- To All Slices
4 Do one of the following:
- Select VOI > Graph > Boundary Intensity in the MIPAV window.
- Right-click on the VOI and then select Graph > Boundary Intensity.
The Contour VOI Graph window (Figure 10) opens. This window displays a graph of the intensity values of the selected contour's boundary.
Generating intensity graphs
Intensity profiles, or graphs, present information on the intensity values of the VOI region in an image. The intensity graph appears in the Intensity Graph window (Figure 11).
To generate 2D intensity graphs
1 Open an image.
2 Delineate a 2D VOI on the image using one of the 2D icons in the MIPAV window.
<
3 Select the VOI.
As an option, copy the VOI to other slices in the dataset by selecting VOI > Propagate and one of the following commands:
- To Next Slice
- To Previous Slice
- To All Slices
4 Do one of the following:
Select VOI > Graph in the MIPAV window and either of the following:
- 2.5D Total Intensity -To generate a graph of the sum of the intensity values of the VOI region.
- 2.5D Average Intensity -To generate a graph of the average of the intensity values of the VOI region.
Right-click on the VOI and then select Graph and one of the following commands:
- 2.5D Total Intensity -To generate a graph of the sum of the intensity values of the area delineated by the VOI per slice.
- 2.5D Average Intensity -To generate a graph of the average of the intensity values of the VOI region.
- 2.5D Total Intensity with Threshold -TBD.
- 2.5D Average Intensity with Threshold -TBD.
The Intensity Graph window (Figure 11) opens.
Figure 11. Intensity Graph window
|
File
|
Open Graph-Opens a PLT file that contains graph data. When you select this command or press Ctrl O on the keyboard, the Open Graph Data dialog box appears.
|
|
|
|
Save Graph-Saves the graph data in a PLT file. When you select this command or when you press Ctrl S on the keyboard, the Save dialog box opens.
|
|
|
Print Graph-Allows you to print the graph. When you select this command or press
Ctrl P, the Print dialog box opens.
|
|
|
Close Graph-Closes the Intensity Graph window. To close the window, you can also press Ctrl X on the keyboard.
|
|
Edit
|
Delete Function-Allows you to delete the function that you select. However, you cannot delete a function if it is the only function displayed in the window.
|
|
|
Paste Function-Pastes a previously copied function into the window. The pasted function has a different color than the first function displayed in the window.
|
|
Views
|
Modify Graph Features-Allows you to customize the appearance of the graph.
|
|
|
Reset Range to Default-TBD.
|
|
|
Reset Graph to Original-TBD.
|
|
Help
|
Help Topics-Displays online help topics.
|
To generate 3D intensity graphs of all slices in a dataset at a specific point
1 Open an image.
2 Draw a point VOI on the image (Figure 12).
3 Select the VOI.
4 Do one of the following:
- Select the Propagate VOI to all slices icon.
- Select VOI > Propagate > To All Slices.
- Right-click on the VOI, then select Propagate > To All Slices (Figure 12).
5 Right-click on the VOI and select Show VOI Graph (Figure 12).
Figure 12. Point VOI
|
To generate 3D intensity graphs of specific areas
1 Open an image.
2 Delineate a VOI on the image using the 3D rectangular VOI icon.
3 Select the VOI. Then, do one of the following:
- a Select VOI > Graph and either of the following in the MIPAV window:
- 2.5D Total Intensity -To generate a graph of the sum of the intensity values of the area delineated by the VOI per slice.
- 2.5D Average Intensity -To generate a graph of the average of the intensity values of the VOI region.
- b Right-click the VOI, and then select Graph and one of the following commands in the MIPAV window:
- 2.5D Total Intensity -To generate a graph of the sum of the intensity values of the area delineated by the VOI per slice.
- 2.5D Average Intensity -To generate a graph of the average of the intensity values of the VOI region.
- 2.5D Total Intensity with Threshold -TBD.
- 2.5D Average Intensity with Threshold -TBD.
The Intensity Graph window (Figure 11) opens.
Customizing the appearance of graphs - Modify graph dialog box
|


